GSM?
GSM, or Global System for Mobile communications, is a cellular standard used for mobile communication worldwide. It's a digital network technology designed to enable calls, texts, and basic data services like SMS and MMS. GSM operates on different frequency bands globally, facilitating international roaming for mobile users.
Powering Sim800L:
To power the SIM800L GSM Module effectively, start with ensuring a stable power supply. The module operates best with an input voltage between 3.7V and 4.2V, which may differ from typical electronic requirements.
You have a couple of options: either employ a buck converter capable of delivering at least 2A, set to output 4V, or use a 3.7V li-ion battery. The buck converter's 2A capacity or more is crucial because the GSM module can be quite power-hungry, especially during calls or messaging.
Connecting Sim800L with Arduino:
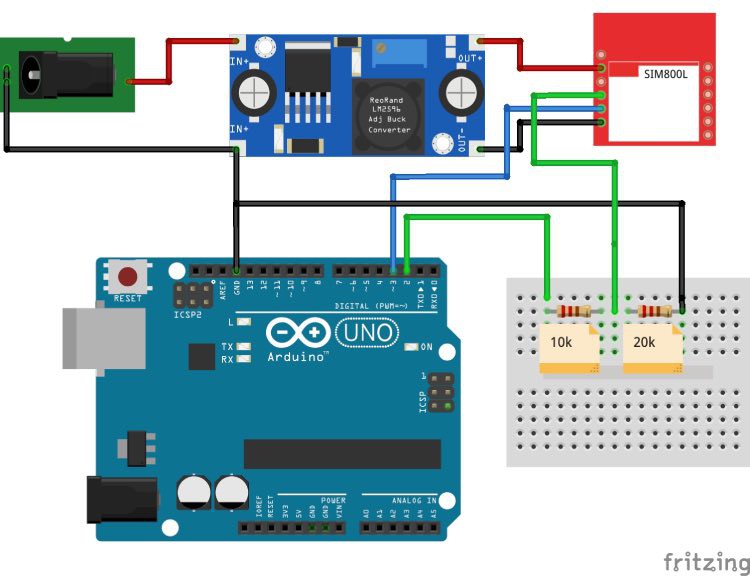
When connecting the SIM800L with an Arduino UNO, it's crucial to ensure voltage compatibility to avoid damaging the module. Here's a simplified guide:
1. Voltage Compatibility: The SIM800L operates at 3.3V, whereas Arduino UNO uses 5V internally. Use level-shifting techniques like a voltage divider to safely interface the two.
2. Voltage Divider: Create a voltage divider using resistors to step down the Arduino's 5V logic to 3.3V suitable for the SIM800L. For instance, a 10kΩ and 20kΩ resistor in series can be used. The values can vary based on your specific setup.
3. Implementation: Refer to wiring diagrams for proper placement of the voltage divider between Arduino and SIM800L. Use a voltage divider calculator to determine suitable resistor values based on your needs.
Remember, the goal is to safely adapt the Arduino's 5V logic to the 3.3V level required by the SIM800L module. Feel free to experiment with different resistor values to optimize performance!
Some possible Solutions for Sim800L Not Connecting with the Network:
If the network status LED on the SIM800L isn't blinking as expected, indicating a failure to connect to the network, follow these troubleshooting steps:
1. Check SIM Card: Ensure a 2G-supported SIM card (with call and SMS capabilities) is properly inserted and undamaged.
2. Adjust Voltage: Increase the voltage supplied by the buck converter within the safe range (up to 4.2V maximum) to optimize module performance.
3. Verify Coverage: Confirm if other SIM cards from the same network have good coverage in your area. If not, consider changing the SIM card and retrying.
4. Module Replacement: If the issue persists despite these checks, the SIM800L module may be faulty and should be replaced.
As for whether the SIM800L supports 4G, the answer is no. The SIM800L module exclusively supports 2G and does not offer 3G or 4G capabilities. In India, this means your options are limited to networks like Airtel and Vodafone for 2G connectivity.
Important Note: If the network status LED doesn't blink every 3 seconds even after trying these steps, there may be a fundamental issue with the SIM800L module itself, and replacing it is advisable.
AT Command Test:
To test the SIM800L GSM module using AT commands:
1. Upload Arduino Sketch: Use the following code to set up communication with SIM800L via Arduino:
// Create a SoftwareSerial object to communicate with the SIM800L module
SoftwareSerial mySerial(3, 2); // SIM800L Tx & Rx connected to Arduino pins #3 & #2
void setup()
{
  // Initialize serial communication with Arduino and the Arduino IDE (Serial Monitor)
  Serial.begin(9600);
  // Initialize serial communication with Arduino and the SIM800L module
  mySerial.begin(9600);
  Serial.println("Initializing...");
  delay(1000);
  mySerial.println("AT"); // Handshake test, should return "OK" on success
  updateSerial();
  mySerial.println("AT+CSQ"); // Signal quality test, value range is 0-31, 31 is the best
  updateSerial();
  mySerial.println("AT+CCID"); // Read SIM information to confirm whether the SIM is inserted
 updateSerial();
...
Read more »
 kutluhan_aktar
 shashikanth
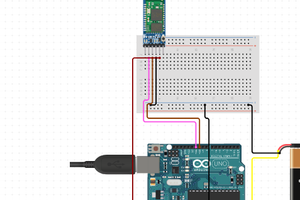
 hIOTron