 Tavis
TavisInstructions :
Step 1. Unscrew 4 small screws to open the solar compartment.
Step 2. Solder your battery JST-PHR-2 connector or power wires to the + and - terminals of the battery. If you don't have the proper connector you can solder directly to the pins on the back of the JST connector, just make sure you get the polarity correct. You can utilize the power button to turn on and off the Rak unit by connecting the negative Rak wire to the location indicated in the extra photo added in attachments instead of directly to the battery negative terminal. Cutting the wires and sealing the hold with glue is recommended as the LED will drain the battery over night.
Step 3. Drill the hole for your sma pigtail. A perfectly vertical antenna via 90 degree bend will not allow for a very flat solar panel so choose wisely or use an externally mounted antenna. You can skip this step if you want to use an internal antenna that fits.
Step 4. Install the sma pigtail. Seal with silicone or marine sealant.
Step 5. Install the RAK module in the free space. You can lightly tack glue this in place if you want to.
Step 6. Connect the antenna and battery and close up the back.
The light housing can be removed if not needed.
The light housing is not as waterproof as the solar enclosure so be careful if putting electronics inside of it.
Attach to a stick and put it high up.
The light will still turn on at night for a very stealthy node. To turn off the light there is a button on the back.
Here is a Lowes.com link to the solar light : https://www.lowes.com/pd/60LM-Solar-Spot-Light/1002689960
Here is a link to a European dealer : https://www.hornbach.nl/p/led-solar-buitenlamp-op-spies-35-cm-zwart/10327077
Here is a link to the Meshtastic Starter kit : https://store.rakwireless.com/products/wisblock-meshtastic-starter-kit
Here is an amazon link to the sma and antennas https://www.amazon.com/915MHz-LoRa-Antenna-Indoor-Cable/dp/B0CTXL61LY/

 serdef
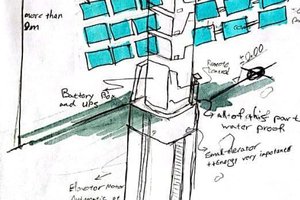
 Shahram Samadpourbonab
 Open Green Energy
 Tauno Erik
Awesome stuff. I am interested in the connection that would allow use of the button to turn off or power-cycle the Rak unit but the extra photo seems to be showing MQTT configuration options instead of where to solder the negative wire.