-
Phase 3 - Alarm Clock
08/16/2014 at 05:03 • 0 commentsThe next step along the path was to include the alarm clock functionality in addition to standard music controls making this a bedside gadget.
Making an alarm clock in python is fairly straightforward so I wanted to focus instead on the controls. The alarm goes off daily according to the time you set in the python script.
When that timestamp is hit the current song will play, the LCD will turn on displaying the current date/time, and the LED will go to full brightness.
To turn off the alarm you have two choices; snooze or off
Sticking with the idea of a 100% touch-less interface and wanting to leverage the controls that are already built in for music control I settled on the following for now:
Snooze = Waving your hand over 10cm above the device pauses the playback for 7 minutes and leaves the LCD with date/time on. The motion is similar to quickly swiping the air above the clock
Alarm Off = Bringing your hand down to 0cm on the device turns off the playback, turns off the LCD backlight and LED, and resets the alarm for the next day. The motion is similar to bringing your hand down onto the device (like hitting off button on your alarm clock)
I'm merging this capability in the existing code but I'm leaving the lightouch.py code untouched so you have the option of music player or music player+alarm clock.
import serial import mpd import subprocess import alsaaudio import os import datetime import time ser = serial.Serial('/dev/ttyS0', 9600) # Change /dev/* value to match your arduino serial interface device ser.timeout=.05 # Timeout reduces CPU usage mixer = alsaaudio.Mixer('PCM', 0) # Which audio mixer to control changecheck=" " # variable that 'watches' to see if the song has changed counter=0 # variable used to delay the time to redisplay the Artist/Song after changing volume #alarmhour=int(input("Enter Alarm Hour: ")) #alarmminute=int(input("Enter Alarm Minute: ")) alarmhour=0 # #Enter alarm hour alarmminute=36 #Enter alarm minute snooze=0 flag=0 masteralarmhour=alarmhour #Keep track of a universal alarm hour masteralarmminute=alarmminute #Keep track of a universal alarm minute client = mpd.MPDClient() client.connect("localhost", "6600") def translate(value, leftMin, leftMax, rightMin, rightMax): # Used to translate the value of volume to a 0-100 range for accurate display # Figure out how 'wide' each range is leftSpan = leftMax - leftMin rightSpan = rightMax - rightMin # Convert the left range into a 0-1 range (float) valueScaled = float(value - leftMin) / float(leftSpan) # Convert the 0-1 range into a value in the right range. return rightMin + (valueScaled * rightSpan) while True: now=datetime.datetime.now() #get current time dt = list(time.localtime()) #break down into list hour = dt[3] #set hour minute = dt[4] #set minute second = dt[5] #set second if hour == alarmhour and minute == alarmminute and second == 0 and flag==0: client.play() #Play music mixer.setvolume(100) #At max volume ser.write(now.strftime("%a, %b %d %Y")) #Display date to LCD ser.write('@') #Trigger to skip to next LCD row ser.write(now.strftime(" %H:%M ")) #Display time to LCD ser.write('@') #Trigger to skip to next LCD row ser.write('%') #Trigger to pause ultrasonic inputs print now.strftime("%Y-%m-%d %H:%M") flag=1; #Alarm is playing snooze=1; #Snooze is available snafu=ser.readline().decode('utf-8','ignore')[:-2] #Read serial input SongInfo=client.currentsong() #Pulls information from MPD artist=SongInfo['artist'] #Artist info song=SongInfo['title'] #Song info if len(song) > 16: #Chops artist length to LCD width (16 characters) choppedsong = song[0:15] else: choppedsong = song[0:(len(song))] if len(artist) > 16: #Chops artist length to LCD width (16 characters) choppedartist = artist[0:15] else: choppedartist = artist[0:(len(artist))] if counter==20: #Amount of time to redisplay the Artist/Song after volume change changecheck='' counter=counter+1 if counter>=21: counter=21 if changecheck != choppedsong: #If counter met or song changed write to LCD ser.write(choppedsong) ser.write('@') ser.write(choppedartist) ser.write('@') print choppedsong print choppedartist changecheck=choppedsong if snafu == 'Pause': #Read serial input for Pause, Next, or Volume client.pause(1) print(snafu) ser.write(' Paused') #Print to LCD ser.write('@') #'@' symbol tells the arduino to move to the next row on the LCD counter=21; flag=0; #Alarm already triggered snooze=0; #Turn off snooze alarmhour=masteralarmhour #Reset alarm hour alarmminute=masteralarmminute #Reset alarm minute elif snafu == 'Next': client.next() print(snafu) elif snafu.isdigit() and snooze==1: #If in volume spectrum and alarm is playing client.pause(1) alarmminute=minute+9 #Reset alarm for 9 minutes from now if alarmminute>=60: #Make sure it doesn't go outside of time format alarmminute=0 alarmhour=alarmhour+1 print "Snooze" ser.write(' Snooze ') #Write Snooze to the LCD #ser.write('~') #Trigger code to pause all input from arduino for a short time flag=0; #Flag alarm to go off again #snooze=0; #Flag snooze to go off again elif snafu.isdigit() and snooze==0: #If in volume and alarm is not playing client.play() #Standard music controls mixer.setvolume(int(snafu)) #Set raspi volume according to ultrasonic distance counter=0 ser.write('Vol: ') #Print volume level to LCD print(int(translate(int(snafu),70,100,0,100))) ser.write(snafu) ser.write('@') flag=1; #Tell alarm not to go off when playing normally <br> -
Phase 2 - Prototype (software)
08/10/2014 at 18:19 • 0 commentsI'm by no means a developer. I find a great deal of enjoyment in 'tinkering' with different programming languages and I prefer to learn as a go. To me it's like visiting a new country and trying to learn the language on the fly rather than in a book. While there's a certain appeal to that approach it can have some downfalls such as inefficient code.
My first python scripts were functional, but UGLY so I've taken the time to rewrite them but realize there's still a ways to go. The goal is overall stability and performance.
There are two pieces of code that do all of the heavy lifting; the python script on the raspi's side and the arduino sketch.
- This is script is responsible for the following:
- Receive commands from the ultrasonic sensor via the arduino's serial interface
- Control the MPD interface
- Set system volume
- Retrieve/Send MPD information to the LCD via the arduino's serial interface
- Monitor time and act as an alarm clock
- Send Alarm Clock notification to the LCD/LED via the arduino's serial interface
import serial import mpd import subprocess import alsaaudio import os ser = serial.Serial('/dev/ttyS0', 9600) # Change /dev/* value to match your arduino serial interface device ser.timeout=.05 # Timeout reduces CPU usage mixer = alsaaudio.Mixer('PCM', 0) # Which audio mixer to control changecheck=" " # variable that 'watches' to see if the song has changed counter=0 # variable used to delay the time to redisplay the Artist/Song after changing volume client = mpd.MPDClient() client.connect("localhost", "6600") def translate(value, leftMin, leftMax, rightMin, rightMax): # Used to translate the value of volume to a 0-100 range for accurate display # Figure out how 'wide' each range is leftSpan = leftMax - leftMin rightSpan = rightMax - rightMin # Convert the left range into a 0-1 range (float) valueScaled = float(value - leftMin) / float(leftSpan) # Convert the 0-1 range into a value in the right range. return rightMin + (valueScaled * rightSpan) while True: snafu=ser.readline().decode('utf-8','ignore')[:-2] #Read serial input SongInfo=client.currentsong() #Pulls information from MPD artist=SongInfo['artist'] #Artist info song=SongInfo['title'] #Song info if len(song) > 16: #Chops artist length to LCD width (16 characters) choppedsong = song[0:15] else: choppedsong = song[0:(len(song))] if len(artist) > 16: #Chops artist length to LCD width (16 characters) choppedartist = artist[0:15] else: choppedartist = artist[0:(len(artist))] if counter==20: #Amount of time to redisplay the Artist/Song after volume change changecheck='' counter=counter+1 if counter>=21: counter=21 if changecheck != choppedsong: #If counter met or song changed write to LCD ser.write(choppedsong) ser.write('@') ser.write(choppedartist) ser.write('@') print choppedsong print choppedartist changecheck=choppedsong if snafu == 'Pause': #Read serial input for Pause, Next, or Volume client.pause(1) print(snafu) ser.write(' Paused') #Print to LCD ser.write('@') #'@' symbol tells the arduino to move to the next row on the LCD counter=21; elif snafu == 'Next': client.next() print(snafu) elif snafu.isdigit(): client.play() mixer.setvolume(int(snafu)) #Read serial input and set volume counter=0 ser.write('Vol: ') vol=str(int(translate(int(snafu),70,100,0,100))) print(vol) ser.write(vol) ser.write('@') #print(snafu)This is the code to be uploaded to the arduino or arduino clone and is responsible for the following:
- Convert ultrasonic sensor distance reading into cm
- Adjust the brightness of the LED
- Transmit sensor data to raspi via serial interface
- Turn LCD backlight on/off
- Receive 'now playing' information from raspi to be displayed on the LCD
#include <SoftwareSerial.h> #include <LiquidCrystal.h> LiquidCrystal lcd(8, 9, 4, 5, 6, 7); //pins for lcd int lcd_key = 0; //work in progress int adc_key_in = 0; //work in progress #define btnRIGHT 0 //work in progress #define btnUP 1 //work in progress #define btnDOWN 2 //work in progress #define btnLEFT 3 //work in progress #define btnSELECT 4 //work in progress #define btnNONE 5 //work in progress const int pingPinT = A4; //Ultrasonic Trigger Pin //const int pingPinR = A3; //Ultrasonic Echo Pin const int pingPinR = A4; //Ultrasonic Echo Pin const int ledPin = 3; //Fading LED pin const int ceiling = 80; //Highest point of detection (cm) const int volumemin = 10; //Lowest volume distance (cm) before pause const int volumemax = 45; //Highest volume distance (cm) before 'dead zone' const int nexttrack = 70; //Height until next track triggered (cm) int cm; // Distance variable int new_cm=54; //Second distance variable to determine if there's been a change since last loop int fadevalue; // LED brightness based on ultrasonic distance char buffer; //Serial buffer int old_cm; // WORK IN PROGRESS int read_LCD_buttons() { adc_key_in = analogRead(0); // read the value from the sensor // my buttons when read are centered at these valies: 0, 144, 329, 504, 741 // we add approx 50 to those values and check to see if we are close if (adc_key_in > 1000) return btnNONE; // We make this the 1st option for speed reasons since it will be the most likely result if (adc_key_in < 50) return btnRIGHT; if (adc_key_in < 195) return btnUP; if (adc_key_in < 380) return btnDOWN; if (adc_key_in < 555) return btnLEFT; if (adc_key_in < 790) return btnSELECT; return btnNONE; // when all others fail, return this... } void setup() { delay(5000); lcd.begin(16,2); lcd.setCursor(0,0); lcd.print("All Your Base"); lcd.setCursor(0,1); lcd.print("are belong to us"); lcd.setCursor(0,0); // initialize serial communication: Serial.begin(9600); Serial.flush(); digitalWrite(10, LOW); } void loop() { // --------------PRINT TO LCD FROM SERIAL INPUT------------------- int count = Serial.available(); if (Serial.available()) { // wait a bit for the entire message to arrive lcd.clear(); delay(100); lcd.setCursor(0,0); while (Serial.available() > 0) { // display each character to the LCD buffer=Serial.read(); if(buffer=='@'){ //TRIGGER VALUE TO BREAK TO NEXT LCD ROW lcd.setCursor(0,1); } else if(buffer=='%'){ //ALARM CLOCK TRIGGER (WORK IN PROGRESS) new_cm=volumemax; //SET EVERYTHING TO HIGHEST (WORK IN PROGRESS) } else { lcd.print(buffer); //DISPLAY SERIAL DATA TO LCD } } } // --------------READ BUTTON------------------- // WORK IN PROGRESS lcd_key = read_LCD_buttons(); // read the buttons switch (lcd_key) // depending on which button was pushed, we perform an action { case btnRIGHT: { break; } case btnLEFT: { Serial.println("Love"); delay(500); break; } case btnUP: { break; } case btnDOWN: { break; } case btnSELECT: { Serial.println("Change"); delay(500); break; } case btnNONE: { break; } } // --------------GET DISTANCE FROM ULTRASONIC SENSOR------------------- long duration; pinMode(pingPinT, OUTPUT); digitalWrite(pingPinT, LOW); delayMicroseconds(2); digitalWrite(pingPinT, HIGH); delayMicroseconds(5); digitalWrite(pingPinT, LOW); pinMode(pingPinR, INPUT); duration = pulseIn(pingPinR, HIGH); // convert the time into a distance cm = microsecondsToCentimeters(duration); // --------------SET CEILING------------------- if (cm>ceiling){ cm=new_cm; } // --------------SET/FADE LED------------------- if (cm<nexttrack) { if ((cm<volumemin) &&(cm>0)){ analogWrite(ledPin, 0); //TURN LED OFF WHEN PAUSED cm=volumemin-1; } if ((cm>=volumemax)&&(cm<nexttrack)){ analogWrite(ledPin, 255); //TURN LCD TO BRIGHTEST AT MAX VOLUME pinMode(10, INPUT); digitalWrite(10, LOW); cm=volumemax; } if ((cm<volumemax)&&(cm>volumemin)){ fadevalue = map(cm , volumemin, volumemax, 0, 125); //TRANSLATES MIN/MAX VOLUME INTO LED BRIGHTNESS VALUES analogWrite(ledPin, fadevalue); //FADE LED ACCORDING TO VOLUME LEVEL } } else { analogWrite(ledPin, 0); cm=nexttrack; } // --------------SEND COMMANDS TO PI------------------- if (new_cm!=cm) { if ((cm < volumemin) && (cm>0)) { Serial.println("Pause"); //SEND PAUSE TO RASPI pinMode(10, OUTPUT); //TURN OFF LCD BACKLIGHT } if ((cm < volumemax) && (cm>=volumemin)) { Serial.println(map(cm, volumemin, volumemax, 70, 100)); //TRANSLATE MIN/MAX VOLUME TO ALSA VOLUME LEVELS AND SEND TO RASPI old_cm=cm; pinMode(10, INPUT); //TURN ON LCD BACKLIGHT digitalWrite(10, LOW); //TURN ON LCD BACKLIGHT } if ((cm >=volumemax) && (cm<nexttrack)) { //mySerial.write(17); // Turn backlight on Serial.println(100); //SEND MAX VOLUME TO RASPI pinMode(10, INPUT); //TURN ON LCD BACKLIGHT digitalWrite(10, LOW); //TURN ON LCD BACKLIGHT } if (cm >=nexttrack) { Serial.println("Next"); //SEND NEXT COMMAND TO RASPI delay(250); //BLINK LED AT MAX BRIGHTNESS analogWrite(ledPin, 255); delay(250); analogWrite(ledPin, 0); delay(250); analogWrite(ledPin, 255); delay(250); analogWrite(ledPin, 0); cm=old_cm; } } new_cm=cm; delay(50); // Short Delay allows for smoother fading } //End Loop //-------------Functions-------------------------------// long microsecondsToCentimeters(long microseconds) { // The speed of sound is 340 m/s or 29 microseconds per centimeter. // The ping travels out and back, so to find the distance of the // object we take half of the distance travelled. return microseconds / 29 / 2; } //------------End-Functions-------------------------------// - This is script is responsible for the following:
-
Phase 2 - Prototype (hardware)
08/09/2014 at 01:41 • 0 commentsAfter I got my concept code down on the arduino platform, I let the project sit for a while. As it was the only music you could play was if it was already stored on the sdcard in the mp3 shield. What is this? The Dark Ages? All music should be streamed over a WiFi connection in infinite quantity and diversity! However making all that happen in an arduino platform is a little bit more work that I was willing to do.
Enter the raspberry pi. This $35 board solves all of those problems in one nice, neat little package. One raspbian install, a couple python package installs, and an ultrasonic on the GPIO later and everything appeared to be working.
I had read other posts about using an ultrasonic sensor with a raspberry pi and how the accuracy is somewhat lacking because of the fact that the GPIO has to go through the processor of the raspberry pi which can be affected by load. So you don't get a standard, consistent measurement. That was absolutely confirmed by my tests.
So my idea was to offload those cycles into a 'middle-ware' arduino. That way the only communication to the raspberry pi would only for actionable events and not 50 pings a second going through the GPIO.
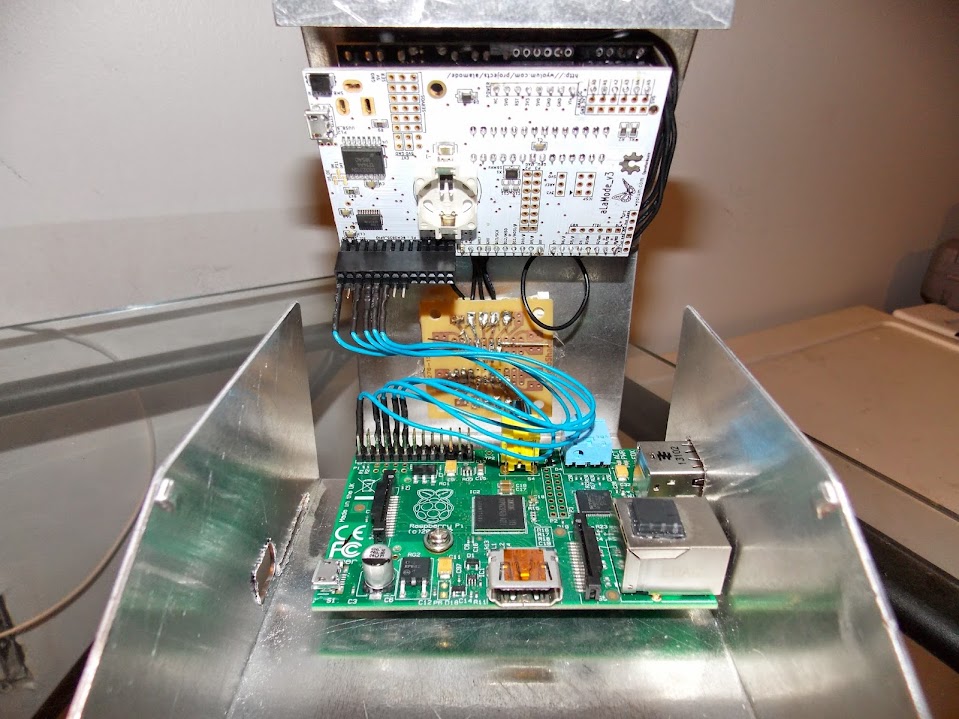
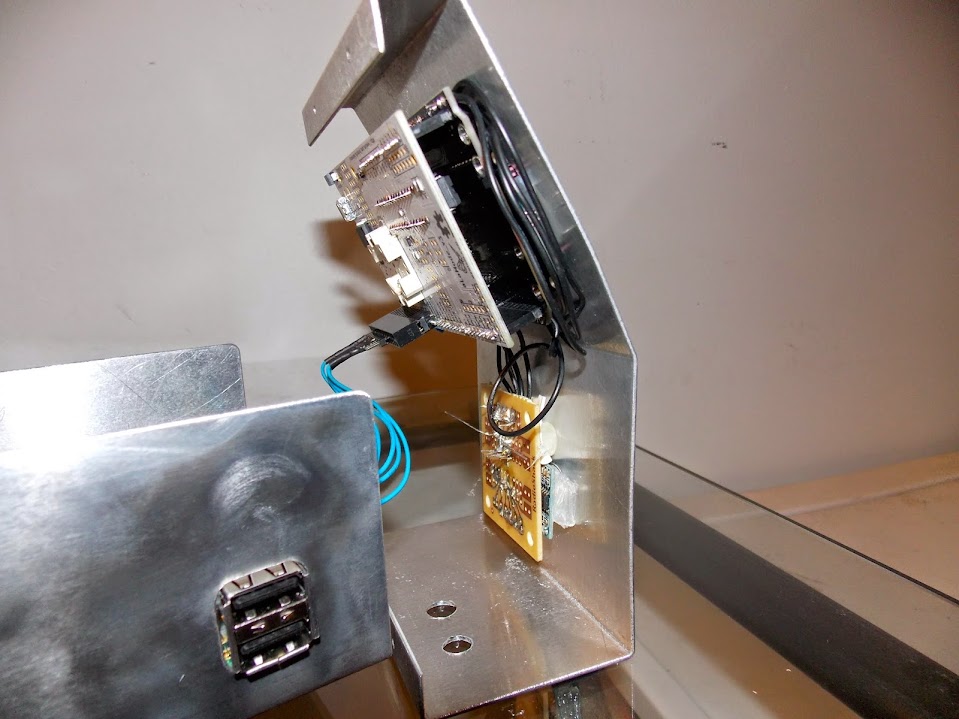
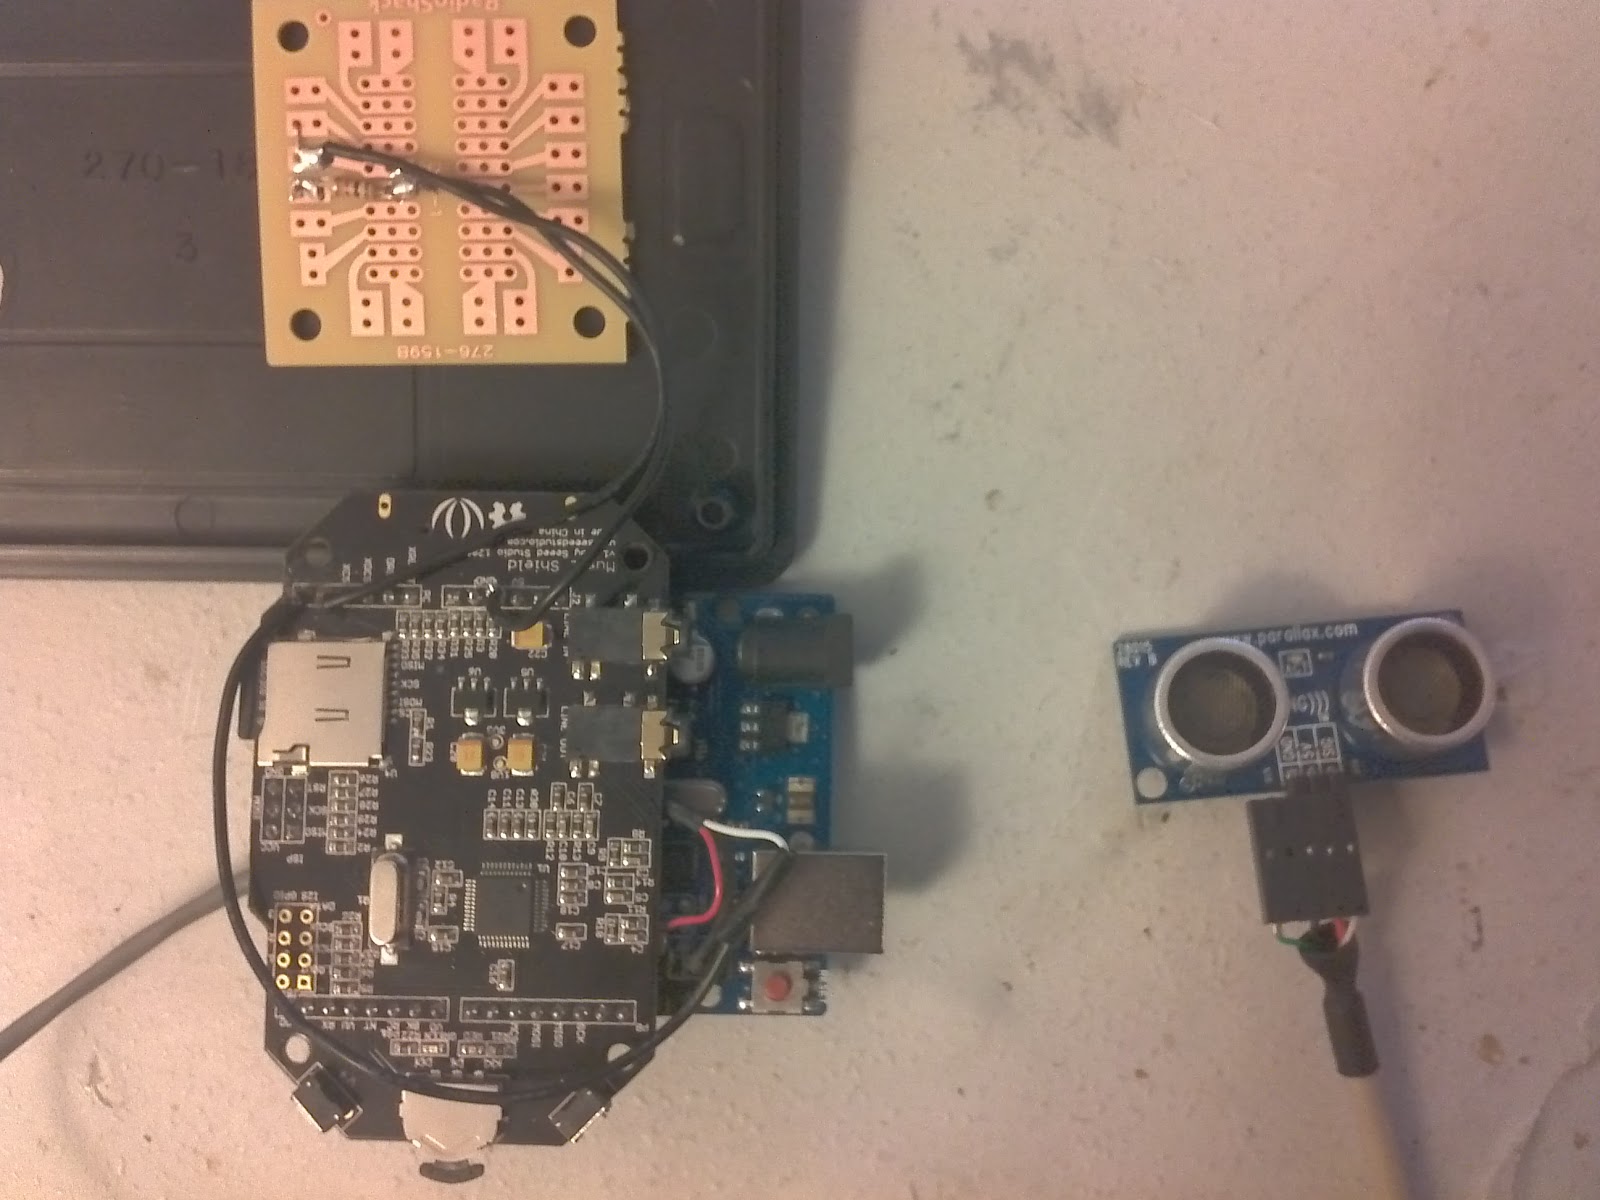
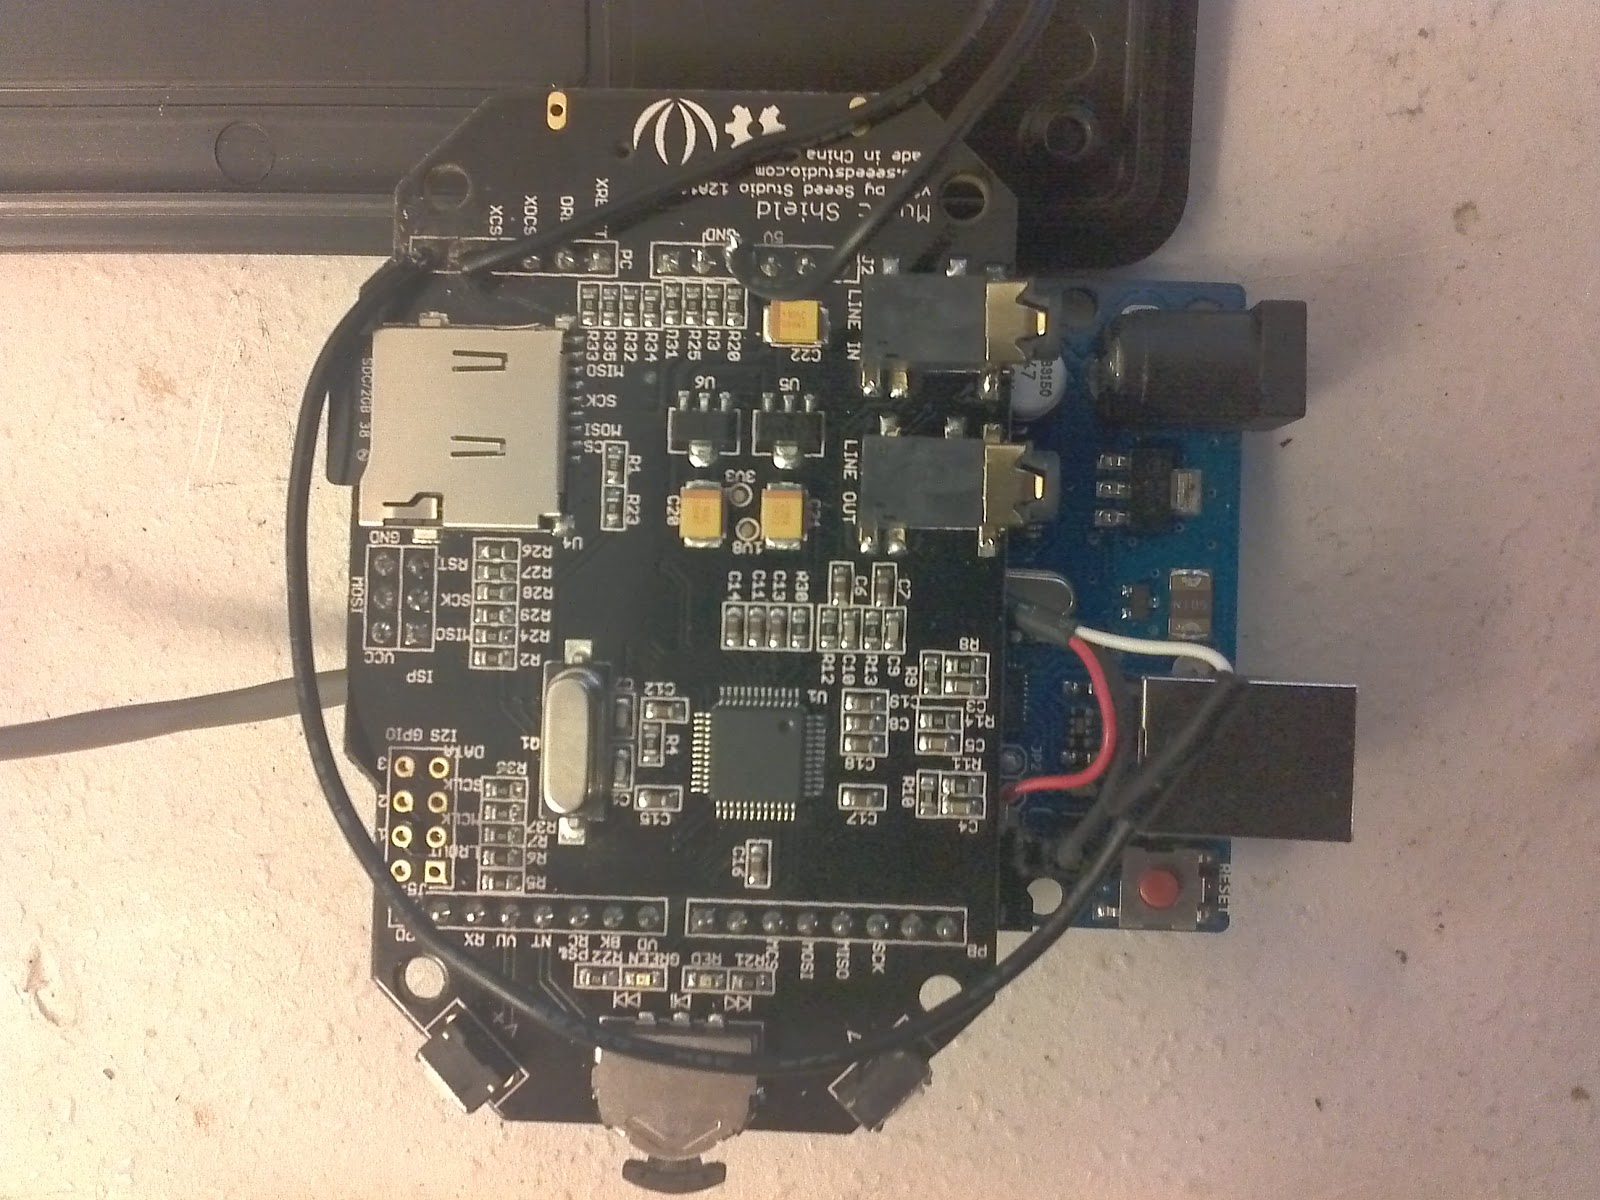
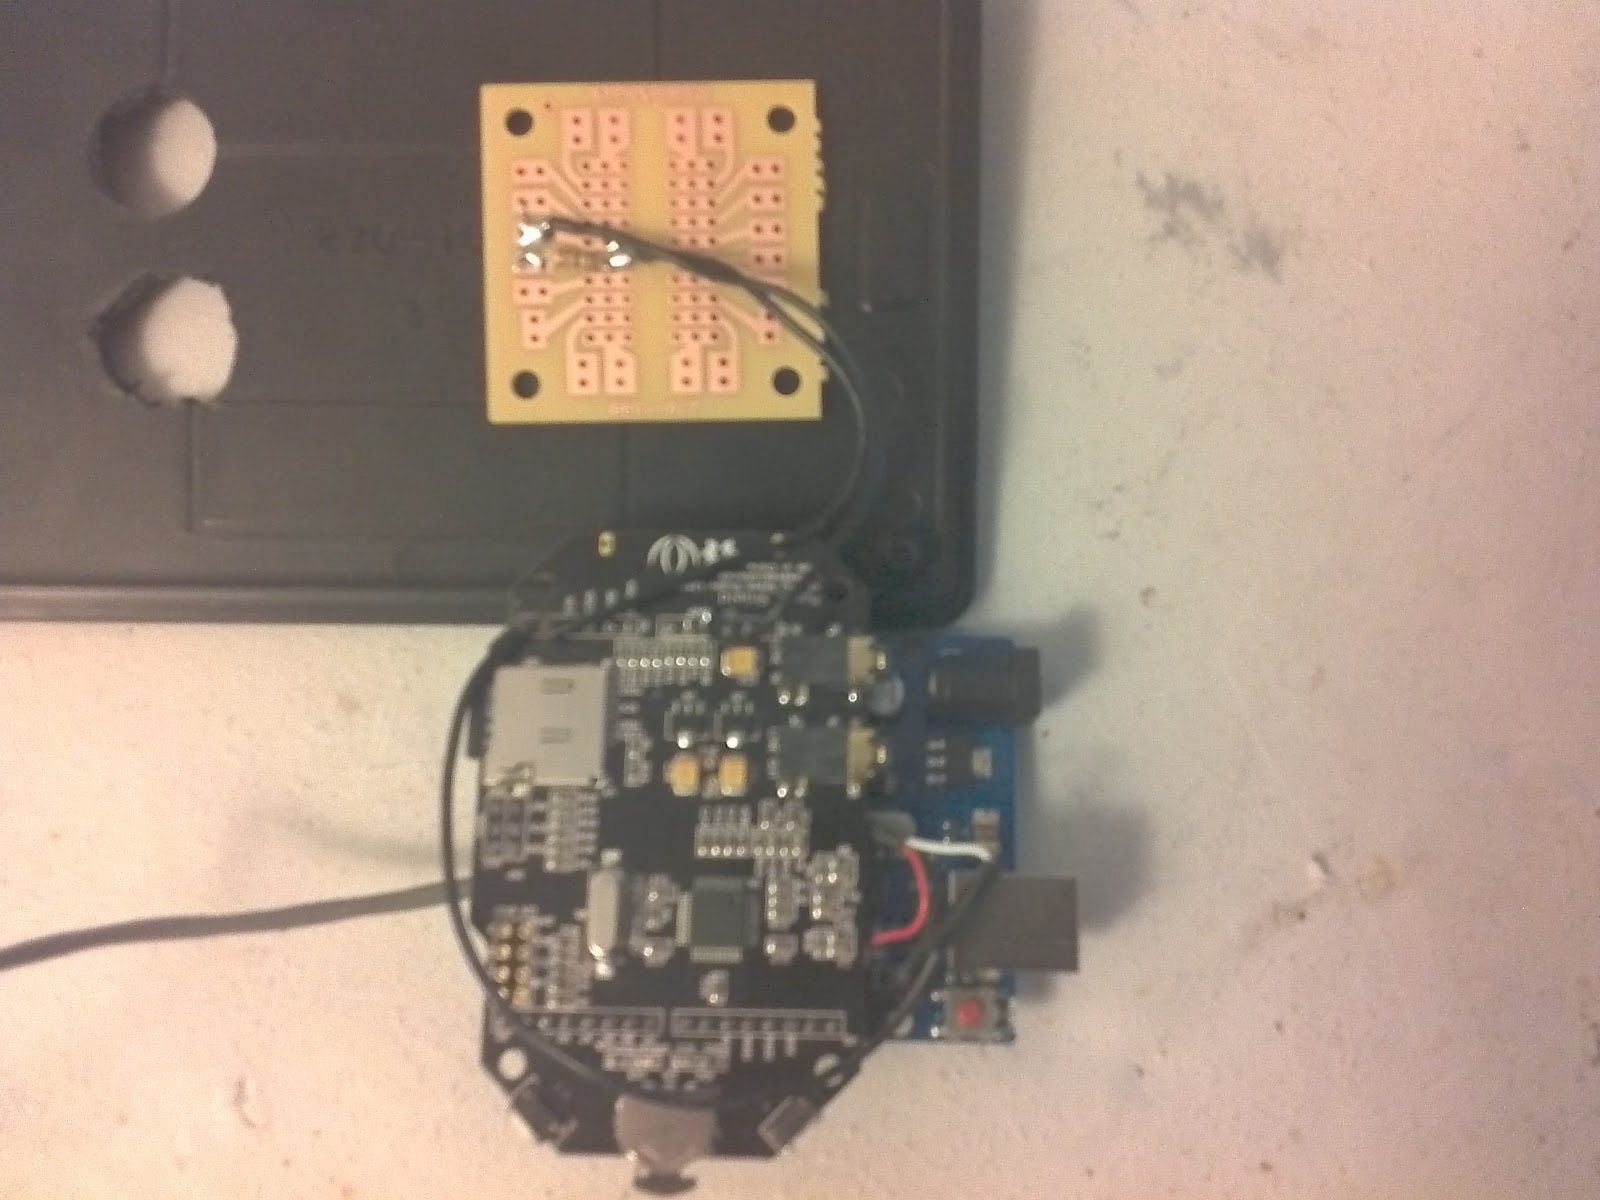
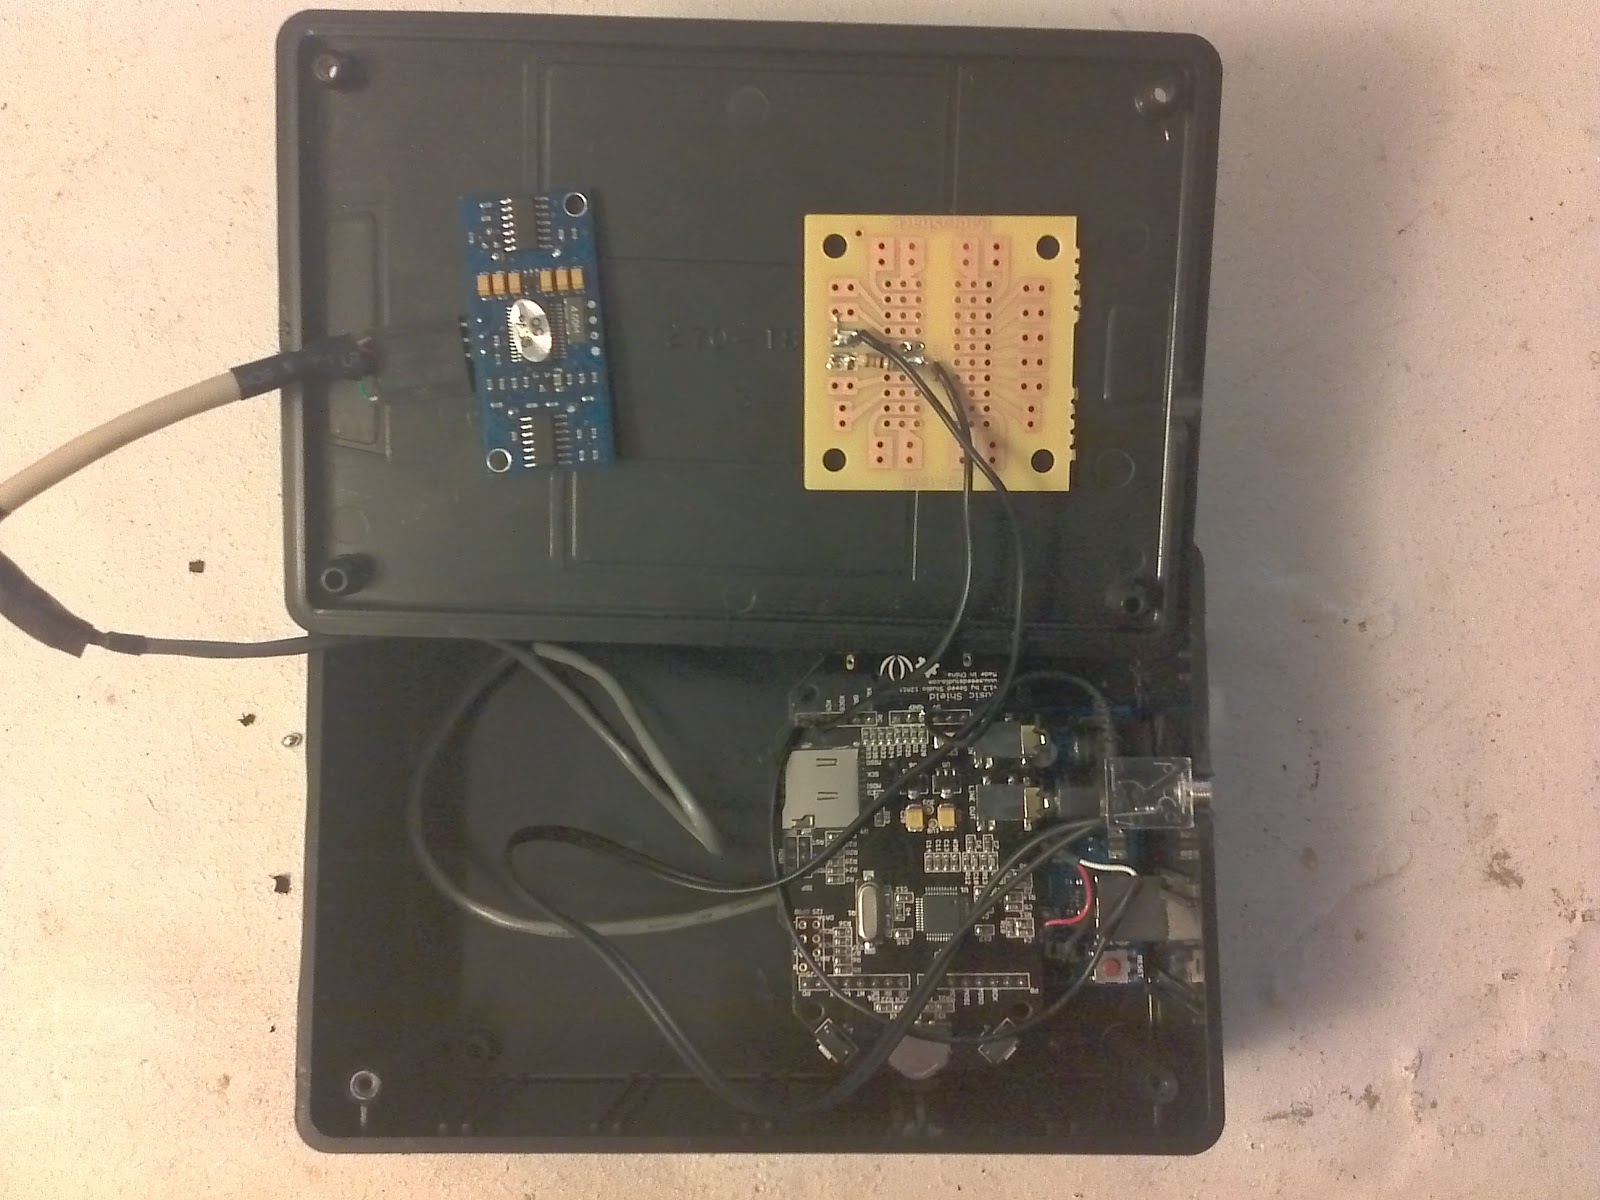
I chose a pi alamode to keep the footprint small. Initially I was just going to use it as a stacked shield, but poor planning on the case I purchased didn't allow for that space wise, so I compromised on just extending the leads.
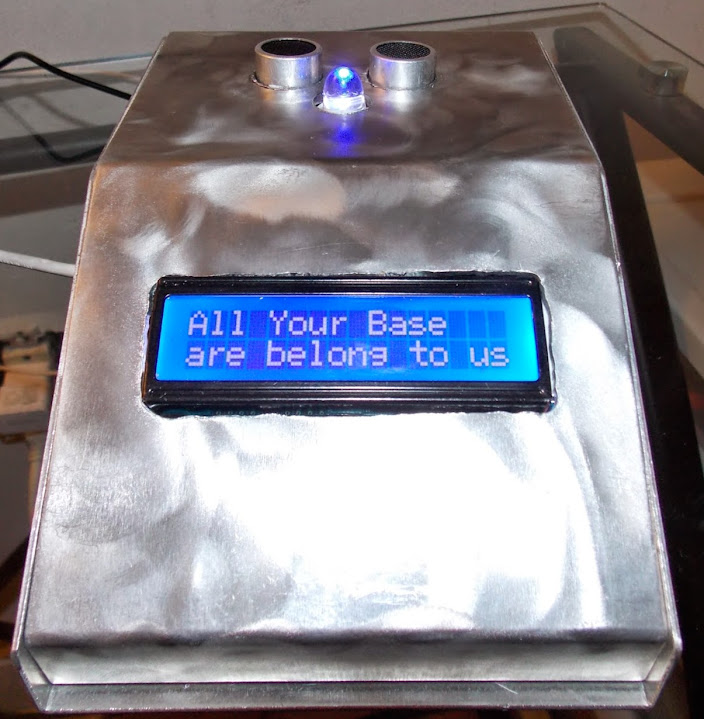
At that point I wanted to add some kind of display to this (other than the LED). I chose to keep the load on the arduino as much as possible and bought a blue 16x2 LCD shield to sit on top of the pi alamode. Now the arduino is both reading and writing via the raspberry pi's GPIO.
So just to recap, the ultrasonic sensor, the ultrabright blue LED, and the 16x2 LCD shield are all connected to the pi alamode. The pi alamode interprets all the ultrasonic signals and writes that information (when appropriate) over the raspberry pi's GPIO. The raspberry pi then sends data (like Artist/Song info) over GPIO to the pi alamode to display information on the LCD.
![]()
![]()
-
Phase 1 - Concept
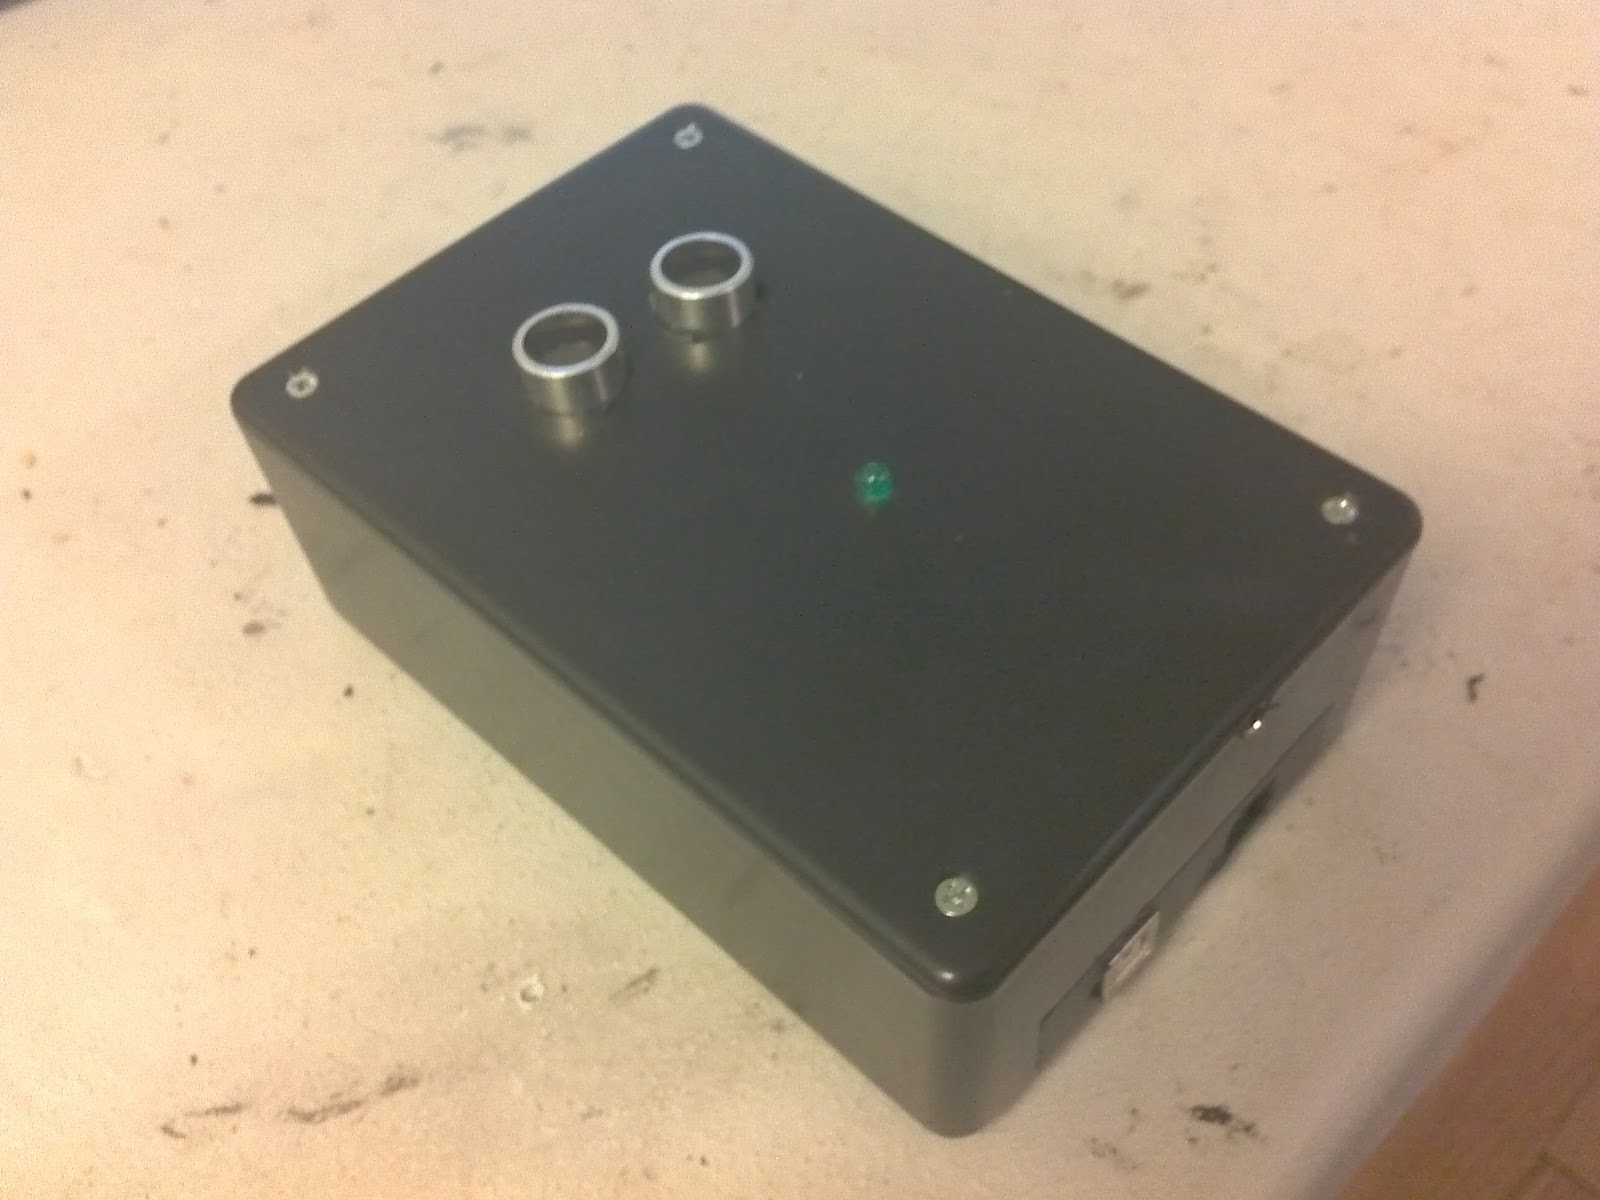
08/07/2014 at 00:32 • 0 commentsLighTouch was an idea I had as I was just diving into Arduino. Like anyone getting started, I bought an Uno and three random shields just to play with (music shield, bluetooth, and ultrasonic range finder). To that end, I got each of them up and running in record time and got bored. So what was the next logical step? Right... figure out how many of these shields can I use at the same time. In this case, a music shield and ultrasonic range finder made the cut.
The idea is pretty simple; an mp3 player that you never have to touch. Simply hold your hand over the device to adjust volume, pause, and move to the next track. All the commands basically key on the distance of your hand from the sensor.
A little modification of the demo code for both, some enclosure work, and before i knew it I had a pretty functional little prototype.
Here's the current control scheme:
0-7cm = Pause (LED OFF)
7-30cm = Lowest Volume->Highest Volume (LED DIM)
30-50cm = Highest Volume (LED ON)
50-55cm = Next Track (LED OFF then ON)
So basically the setup works based on your hand's distance from the sensor with feedback given by the LED so you know where you are in the control scheme. There's 'dead zones' setup to avoid accidentally moving from volume mode to next track. For instance, once you're at the max volume (30cm) , there's a +20cm dead zone until you hit the next track and the LED turns bright so that you know you're at the max volume.
Whenever you move your hand away, and the distance becomes 'infinite' (ie, the ceiling) it locks in the last distance it recorded for your hand. So basically you move your hand to the volume you want, then slide your hand off to the side to lock it in.
To pause, move your hand close to the sensor until the LED turns off, then slide your hand away.
To change volume you raise your hand up or down while the LED is dimly lit, until it's brightest (then you're at max volume)
Once you're at max volume, you can pop your hand up, watch for the LED to turn off, then back down to move to the next track (then you're back in volume mode, or just move your hand off to the side).
I plan on expanding on this idea. Ultrasonic proves to be a very simplistic, but very precise user interface for just about everything I've tried it on.
What's next? An alarm clock that I can just wave my hand over to shut it off.
I'll do a detailed tutorial when I get to the next phase (better package, more functionality, lcd display(?), etc)
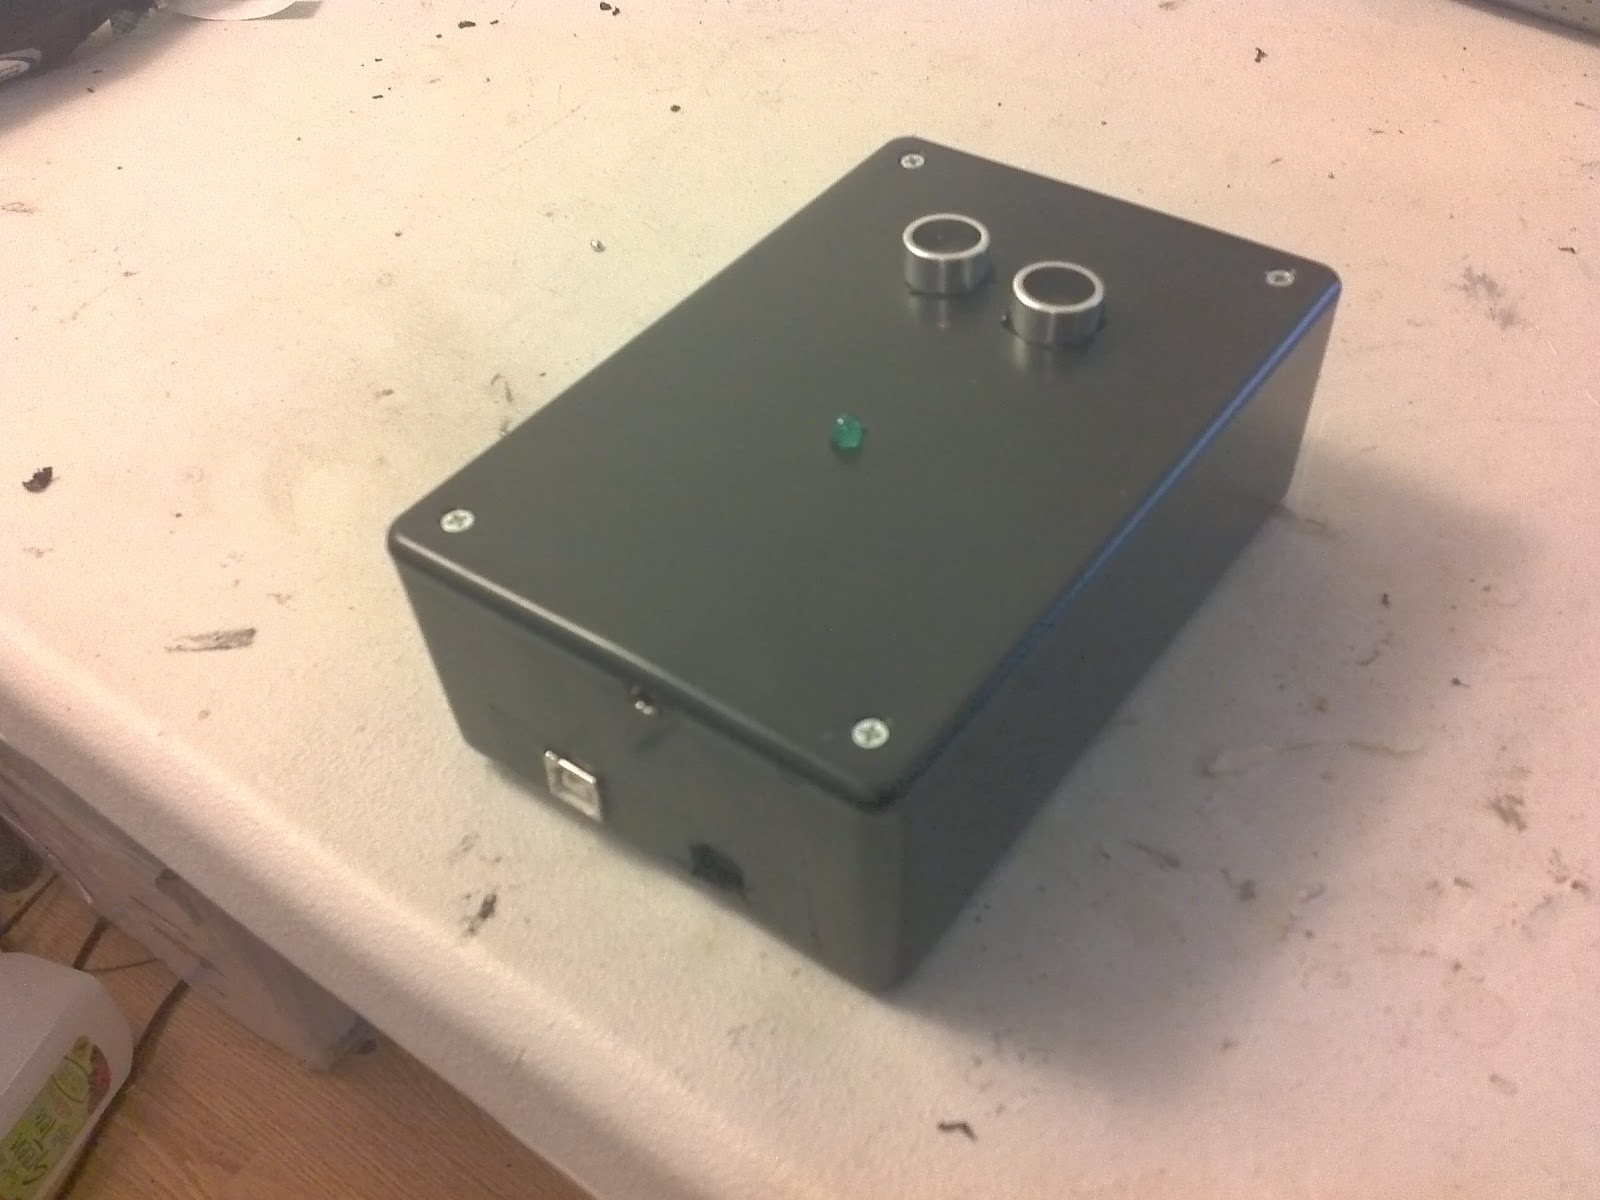
Assembled:
![]()
![]()
![]()
![]()
Parts Used ![]()
The music shield only leaves two analog pins available (A4 & A5). I used one for the LED and one for the ultrasonic
![]()
Also had to hijack some pins on the ICSP for USB header (for 5v and ground)
![]()
A resistor and an LED indicate when the music is paused (OFF), at maximum volume (ON), or in vol+/- (DIM)
![]()
Interior
LighTouch - Control music with the wave of a hand
A touch-less, streaming radio/alarm clock