 andyhull
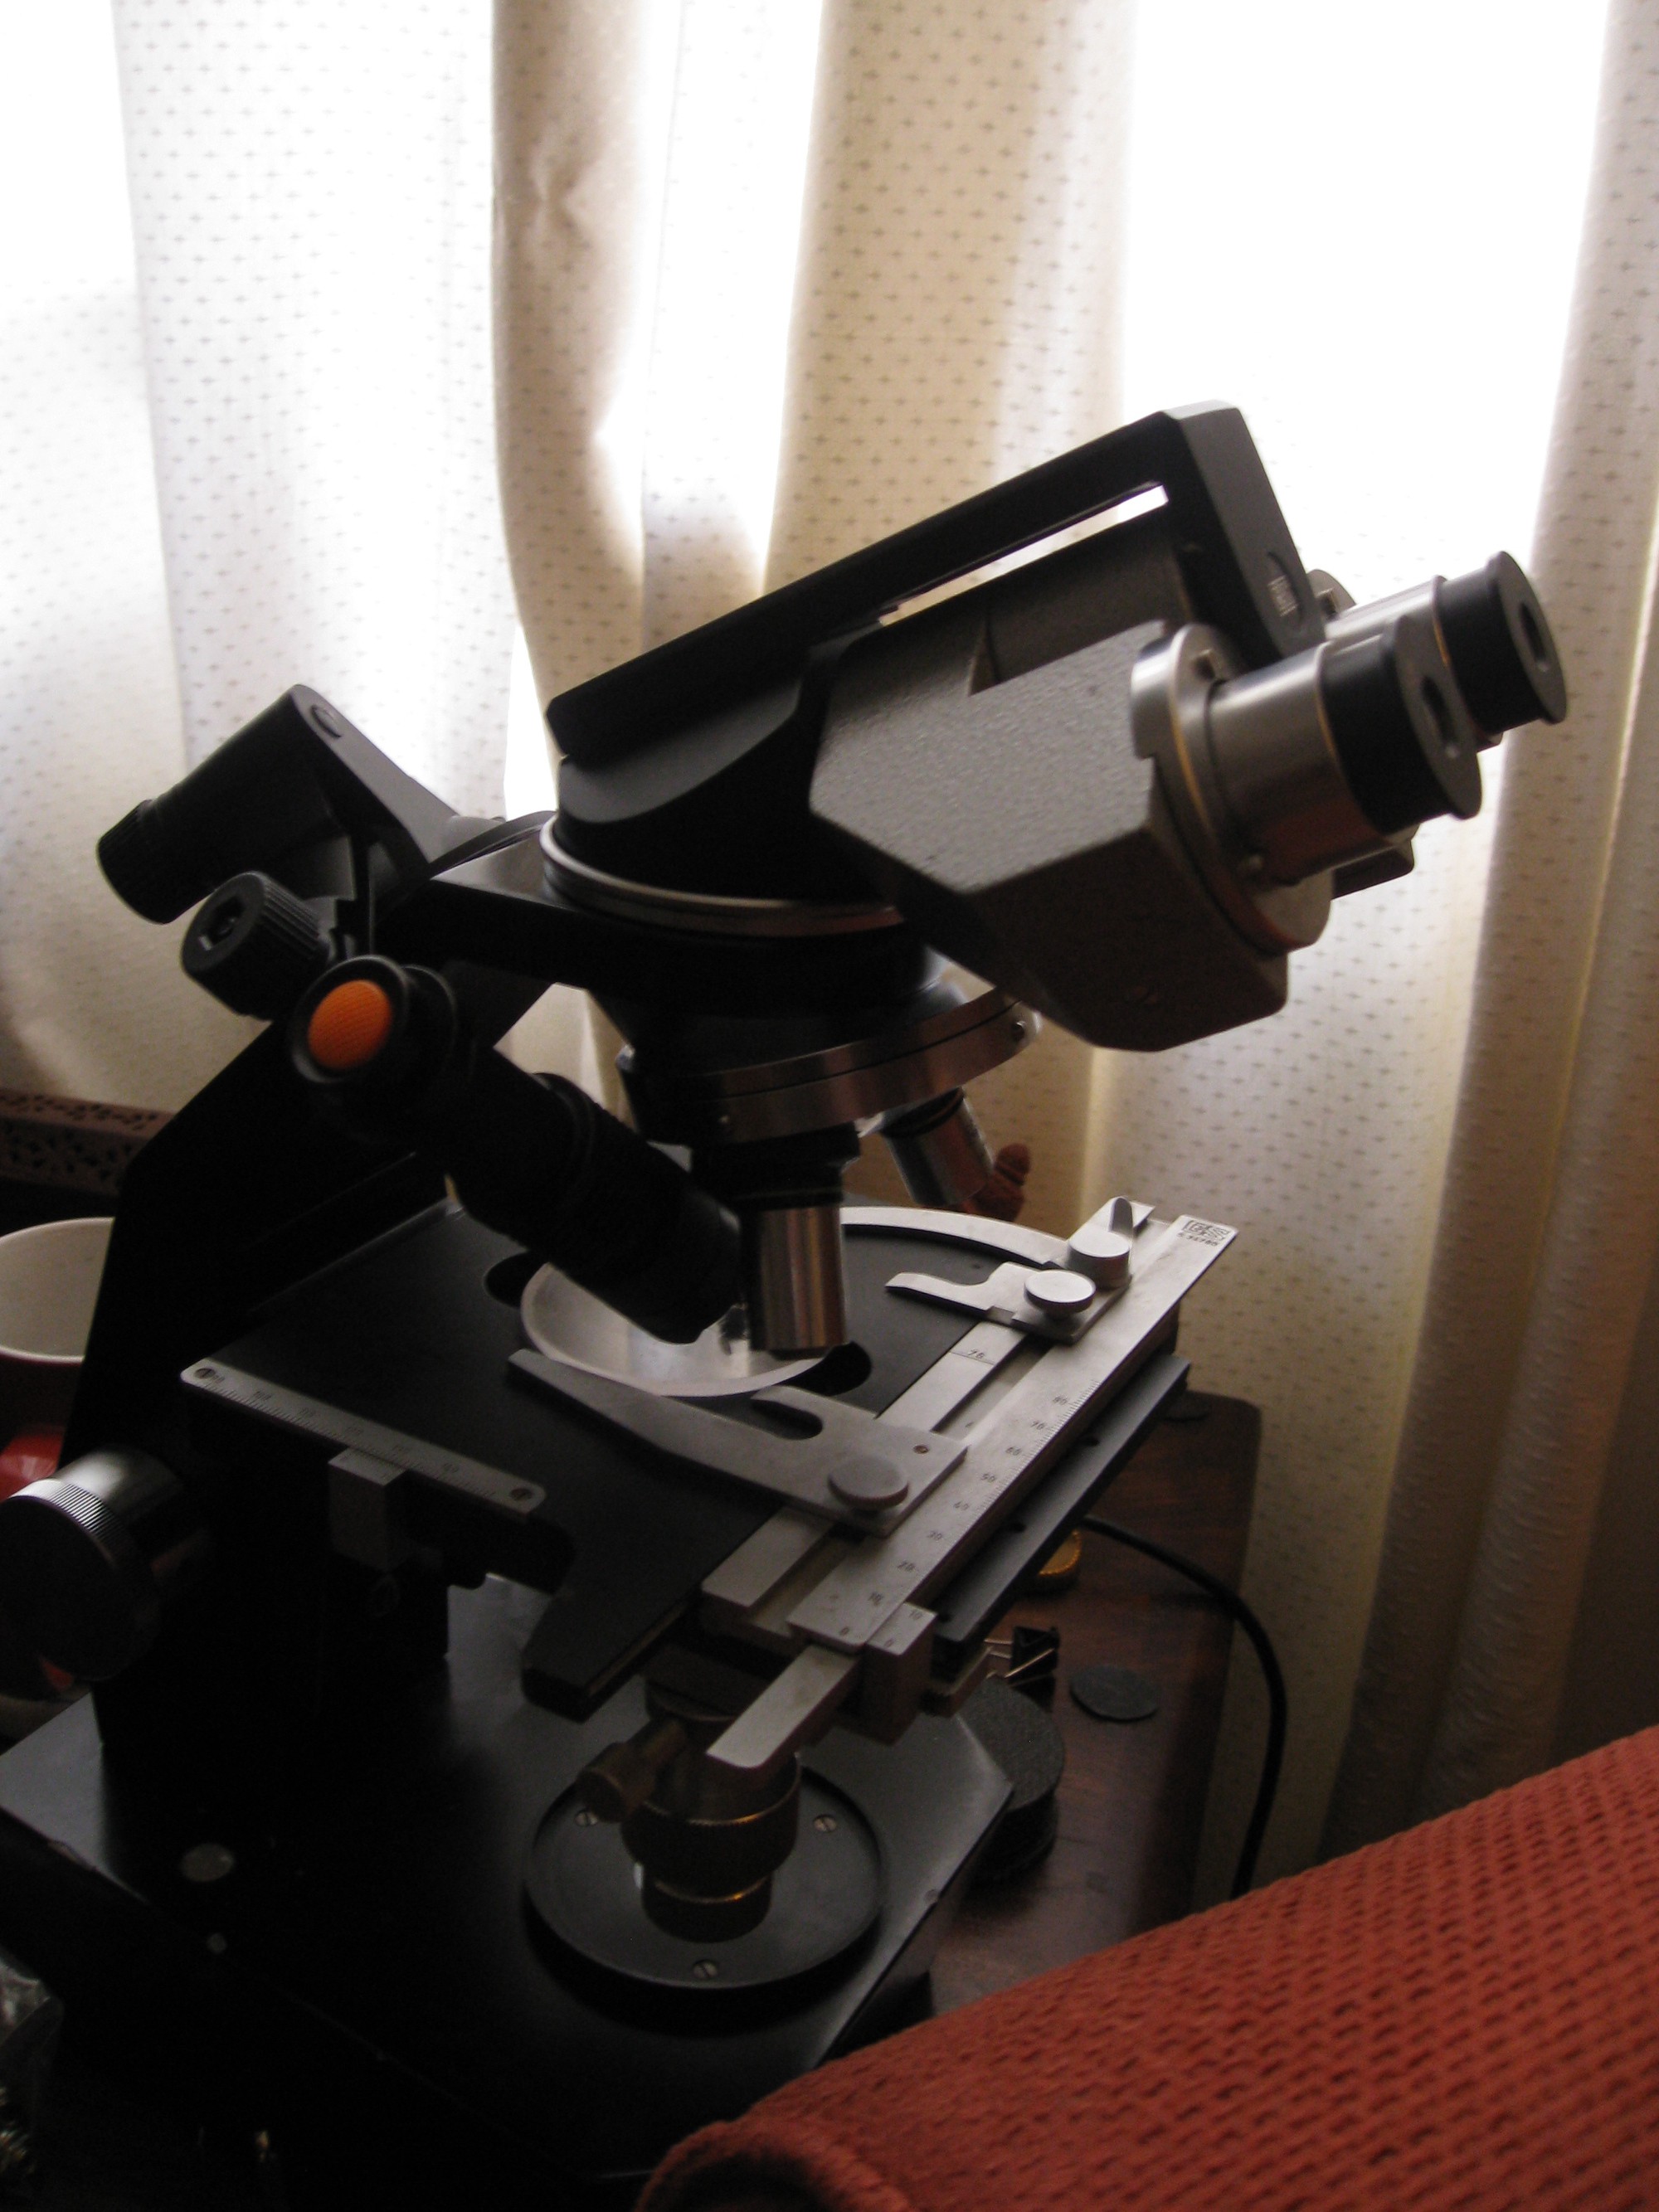
Since the microscope in question was actually a pile of broken microscopes (dumpster find), with just about enough parts to make two working 'scopes, the majority of the work in this project was spent cleaning repairing and re-assembling the optics and the stages. Cleaning microscope optics is an art in itself, and involves a lot of patience, lint free cloths, suitable glass safe solvents, bamboo skewers and a steady hand. The least little speck of dust can ruin the whole operation. Cleaning the prisms alone, must have taken at least an hour. The transformation was pretty startling. When I started the repair process, I could barely see through the right hand eyepiece due to decades of neglect, and rough handling. By the time I had finished, things were almost as clear as the day it left the factory. Be prepared to spend a little extra effort here, as it makes all the difference to the final results. Given the financial value of a second hand microscope, you might argue it isn't worth the time, but I wasn't doing this for monetary reward.
Once this was done, the original transformer, wire-wound pot/resistor and mains cable was removed, and the wires from the bulb holder stripped, tinned and soldered to the PWM board. One point worth mentioning is that the socket for the tungsten bulb is a classic bayonet fit, but a headlight bulb actually has the pins on the shaft (as opposed to the pins on the base) offset, one higher than the other, so you can only fit the bulb in a similar socket, and only if it is the correct way round.
The reason for the difference is that car bulbs are dual filament, but the original microscope bulb was not. It also means that the original bulb holder required a little "Dremmelwerk" to allow me to fit the new LED bulb. Furthermore the negative (0V) needs to be attached to the can of the holder, and the positive (+12V) is attached to both pins of the socket base. It is also worth remembering that low voltage LED bulbs generally have a polarity, but filament bulbs don't. If you swap the wires round, the bulb wont light
One safety tip, if you have any doubts about the quality of your wall wart, it would also be a good idea to insulate the bulb holder from the metalwork, since the body of the microscope will no longer be earthed. This shouldn't matter for a well behaved triple insulated wall wart, but some of the devices at the lower price points have some pretty dodgy mains isolation. This has been discussed here on HAD in the past. I opted for some strategically placed electrical tape, just in case.. I don't want my hair standing on end for all the wrong reasons when I look through the eyepieces.
Once the bulb holder was dealt with, the 2.5mm (or is it 2.1mm 'cant remember.. whatever)... input socket was un-soldered, the wires passed through the old rubber strain relief grommet (a tricky operation, involving brute force and cunning, a little swearing, and a near miss with the pointy end of my pliers and my knee), and re-soldered.
The original bakelite knob was a perfect fit for the new nylon potentiometer shaft on the LED dimmer, so everything went back together without any trouble, and the microscope looks pretty much as it originally did, with the exception of the wall wart attached to the 2.5mm power socket pigtail.
The new bulb is not exactly a perfect point source, but with some imagination and an improvised foil reflector, I have a very brightly illuminated stage. More than good enough for seeing very small things (much smaller than the usual SMD components often gracing these pages, we are talking really small.. down to the limits of light microscopes in fact). One other minor grouch is that the light spectrum of "white" LEDs is somewhat non linear, so digital pictures tend to have a blue cast to them (fixable in post processing) . Tungsten bulbs also have a non linear light curve, but it tends to be a warmer, redder bias.
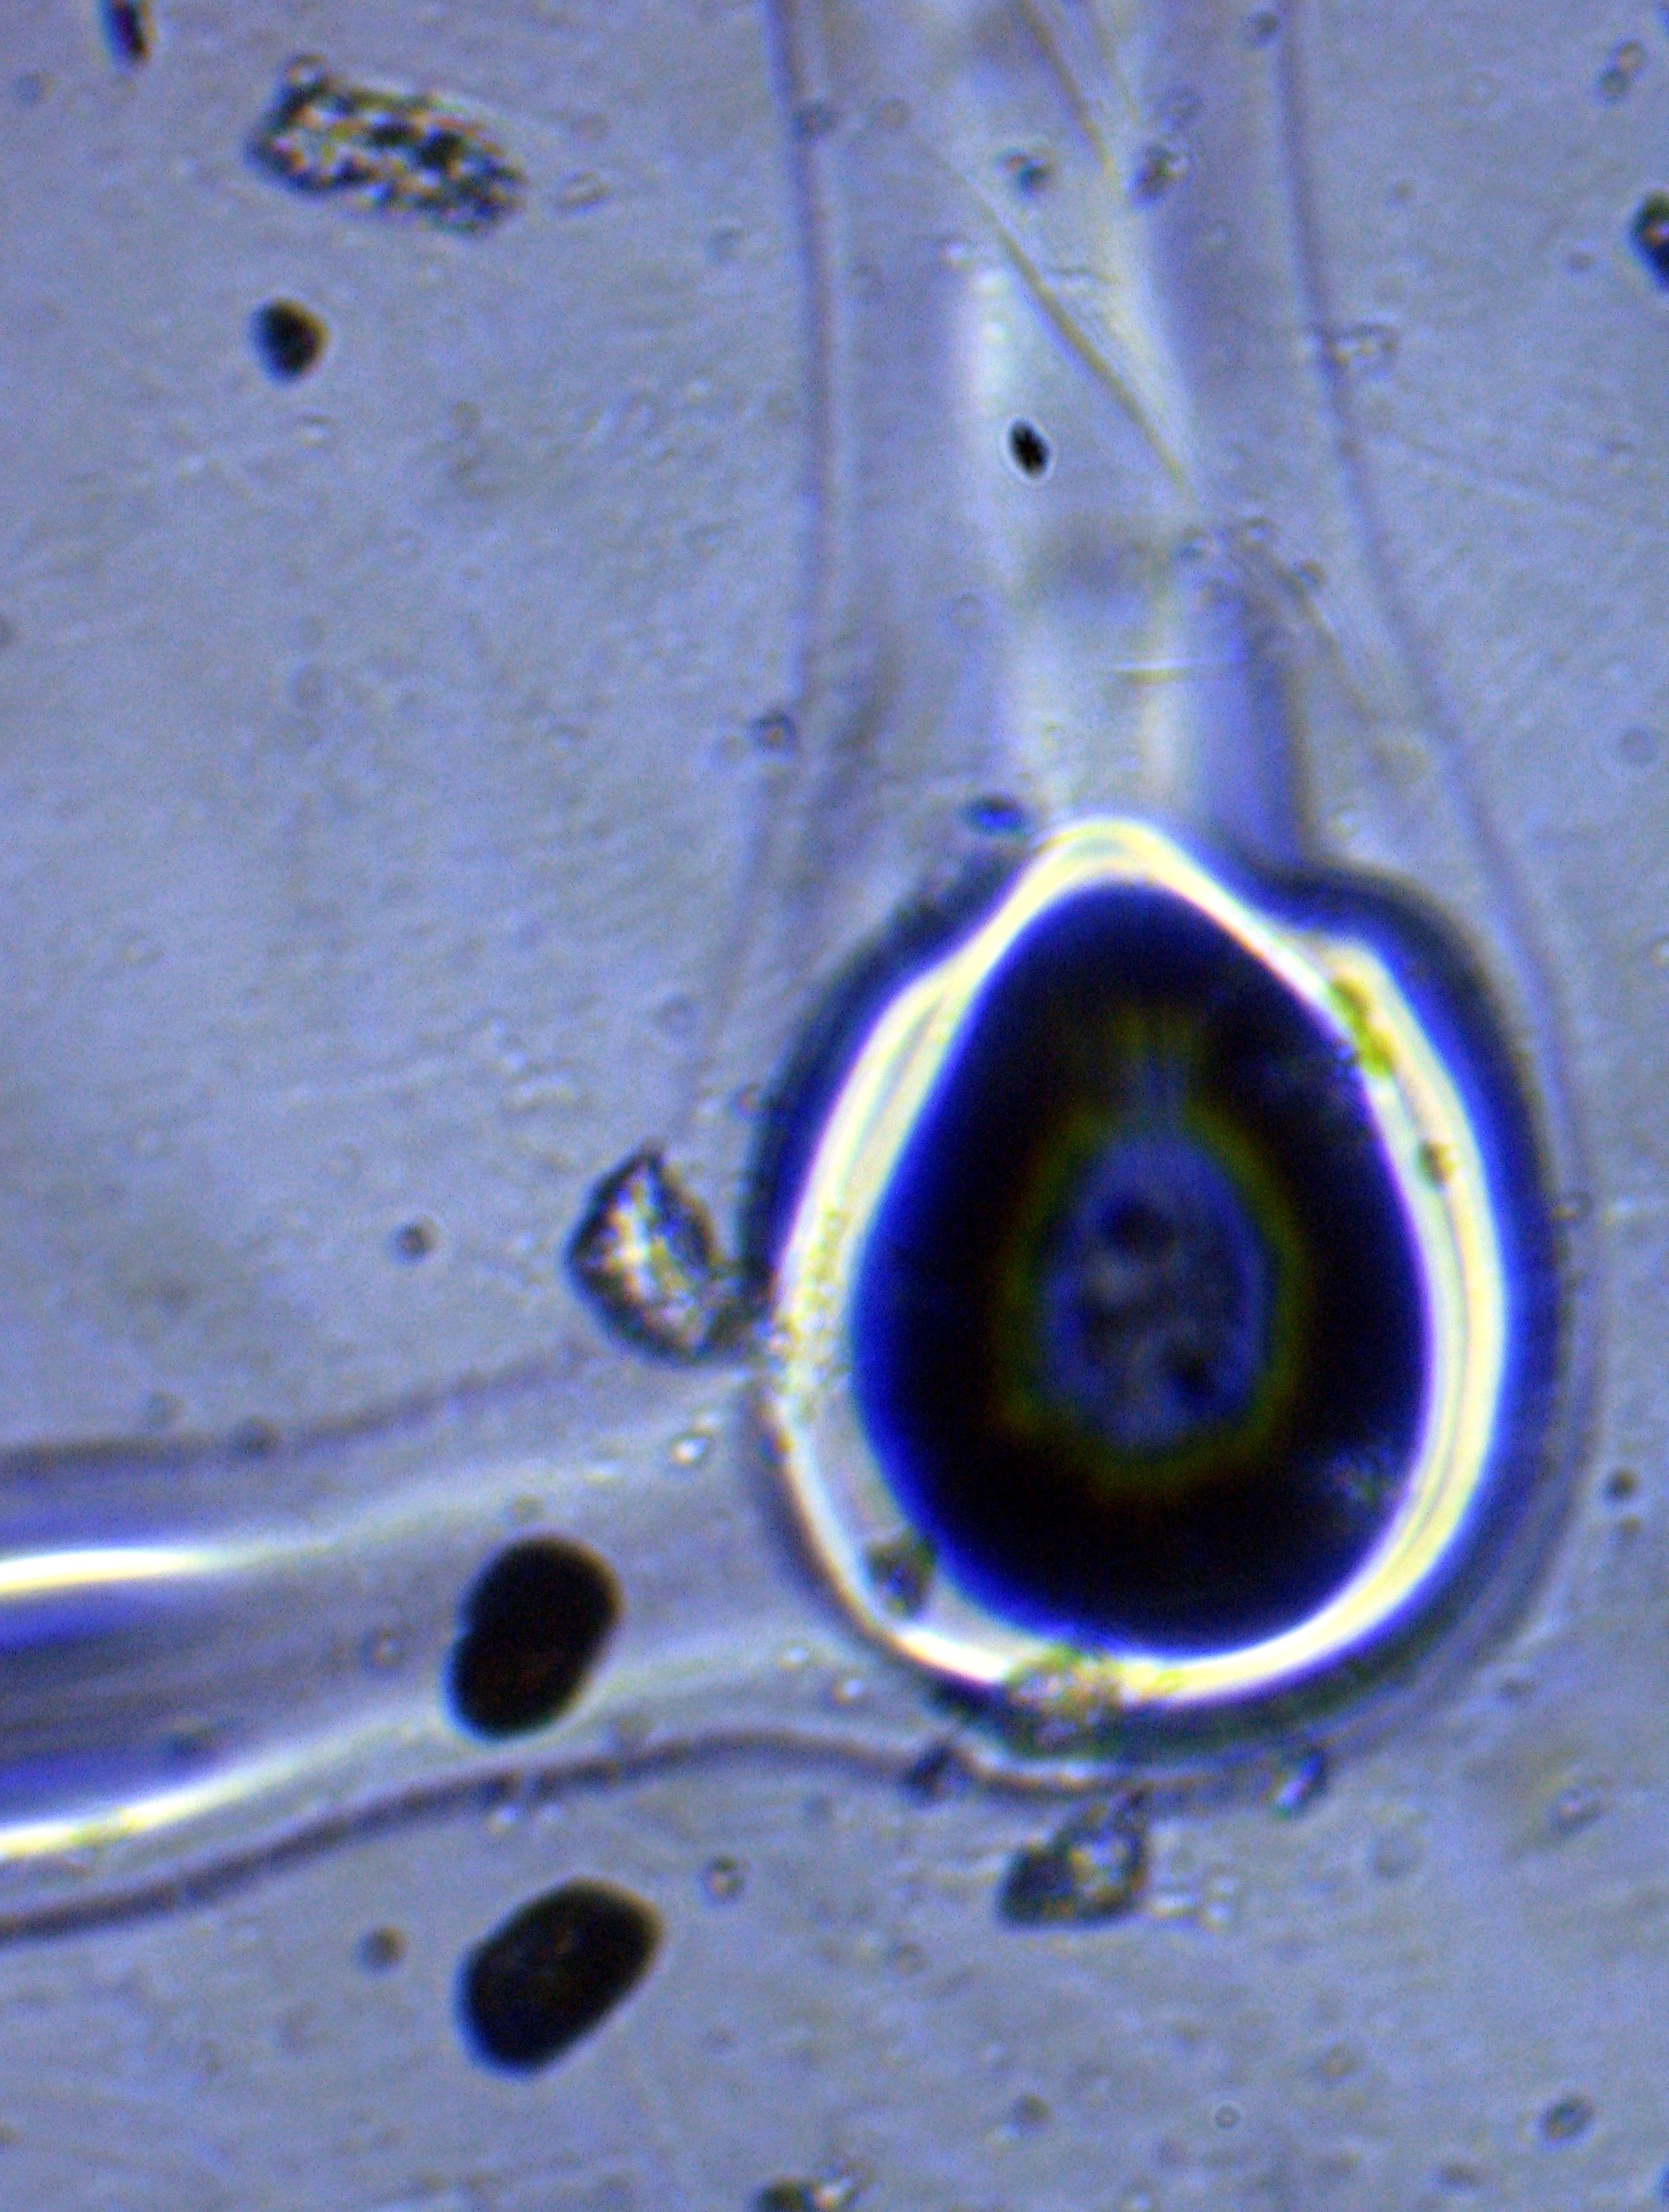
Finally, what can we see with our new super power vision... Human hairs, blood cells, the blue strangeness that magically invades unattended coffee mugs.. these and many other wonders are easily revealed in all their microscopic glory...
Next on the list... a proper camera mount for some digital imaging fun, and after that.. I'll see if I can motorize one of the newly repaired stages... there's a project here on hackaday.io for that...
http://hackaday.io/project/1866-Stagmo%3A-Microscope-Stage-Automator-
I'll need to take a closer look at it now.
Not bad for a dumpster find.. If you want to see more of the actual surgery ... follow the link...
https://plus.google.com/u/0/photos/111082960064282217370/albums/6035313757993412881
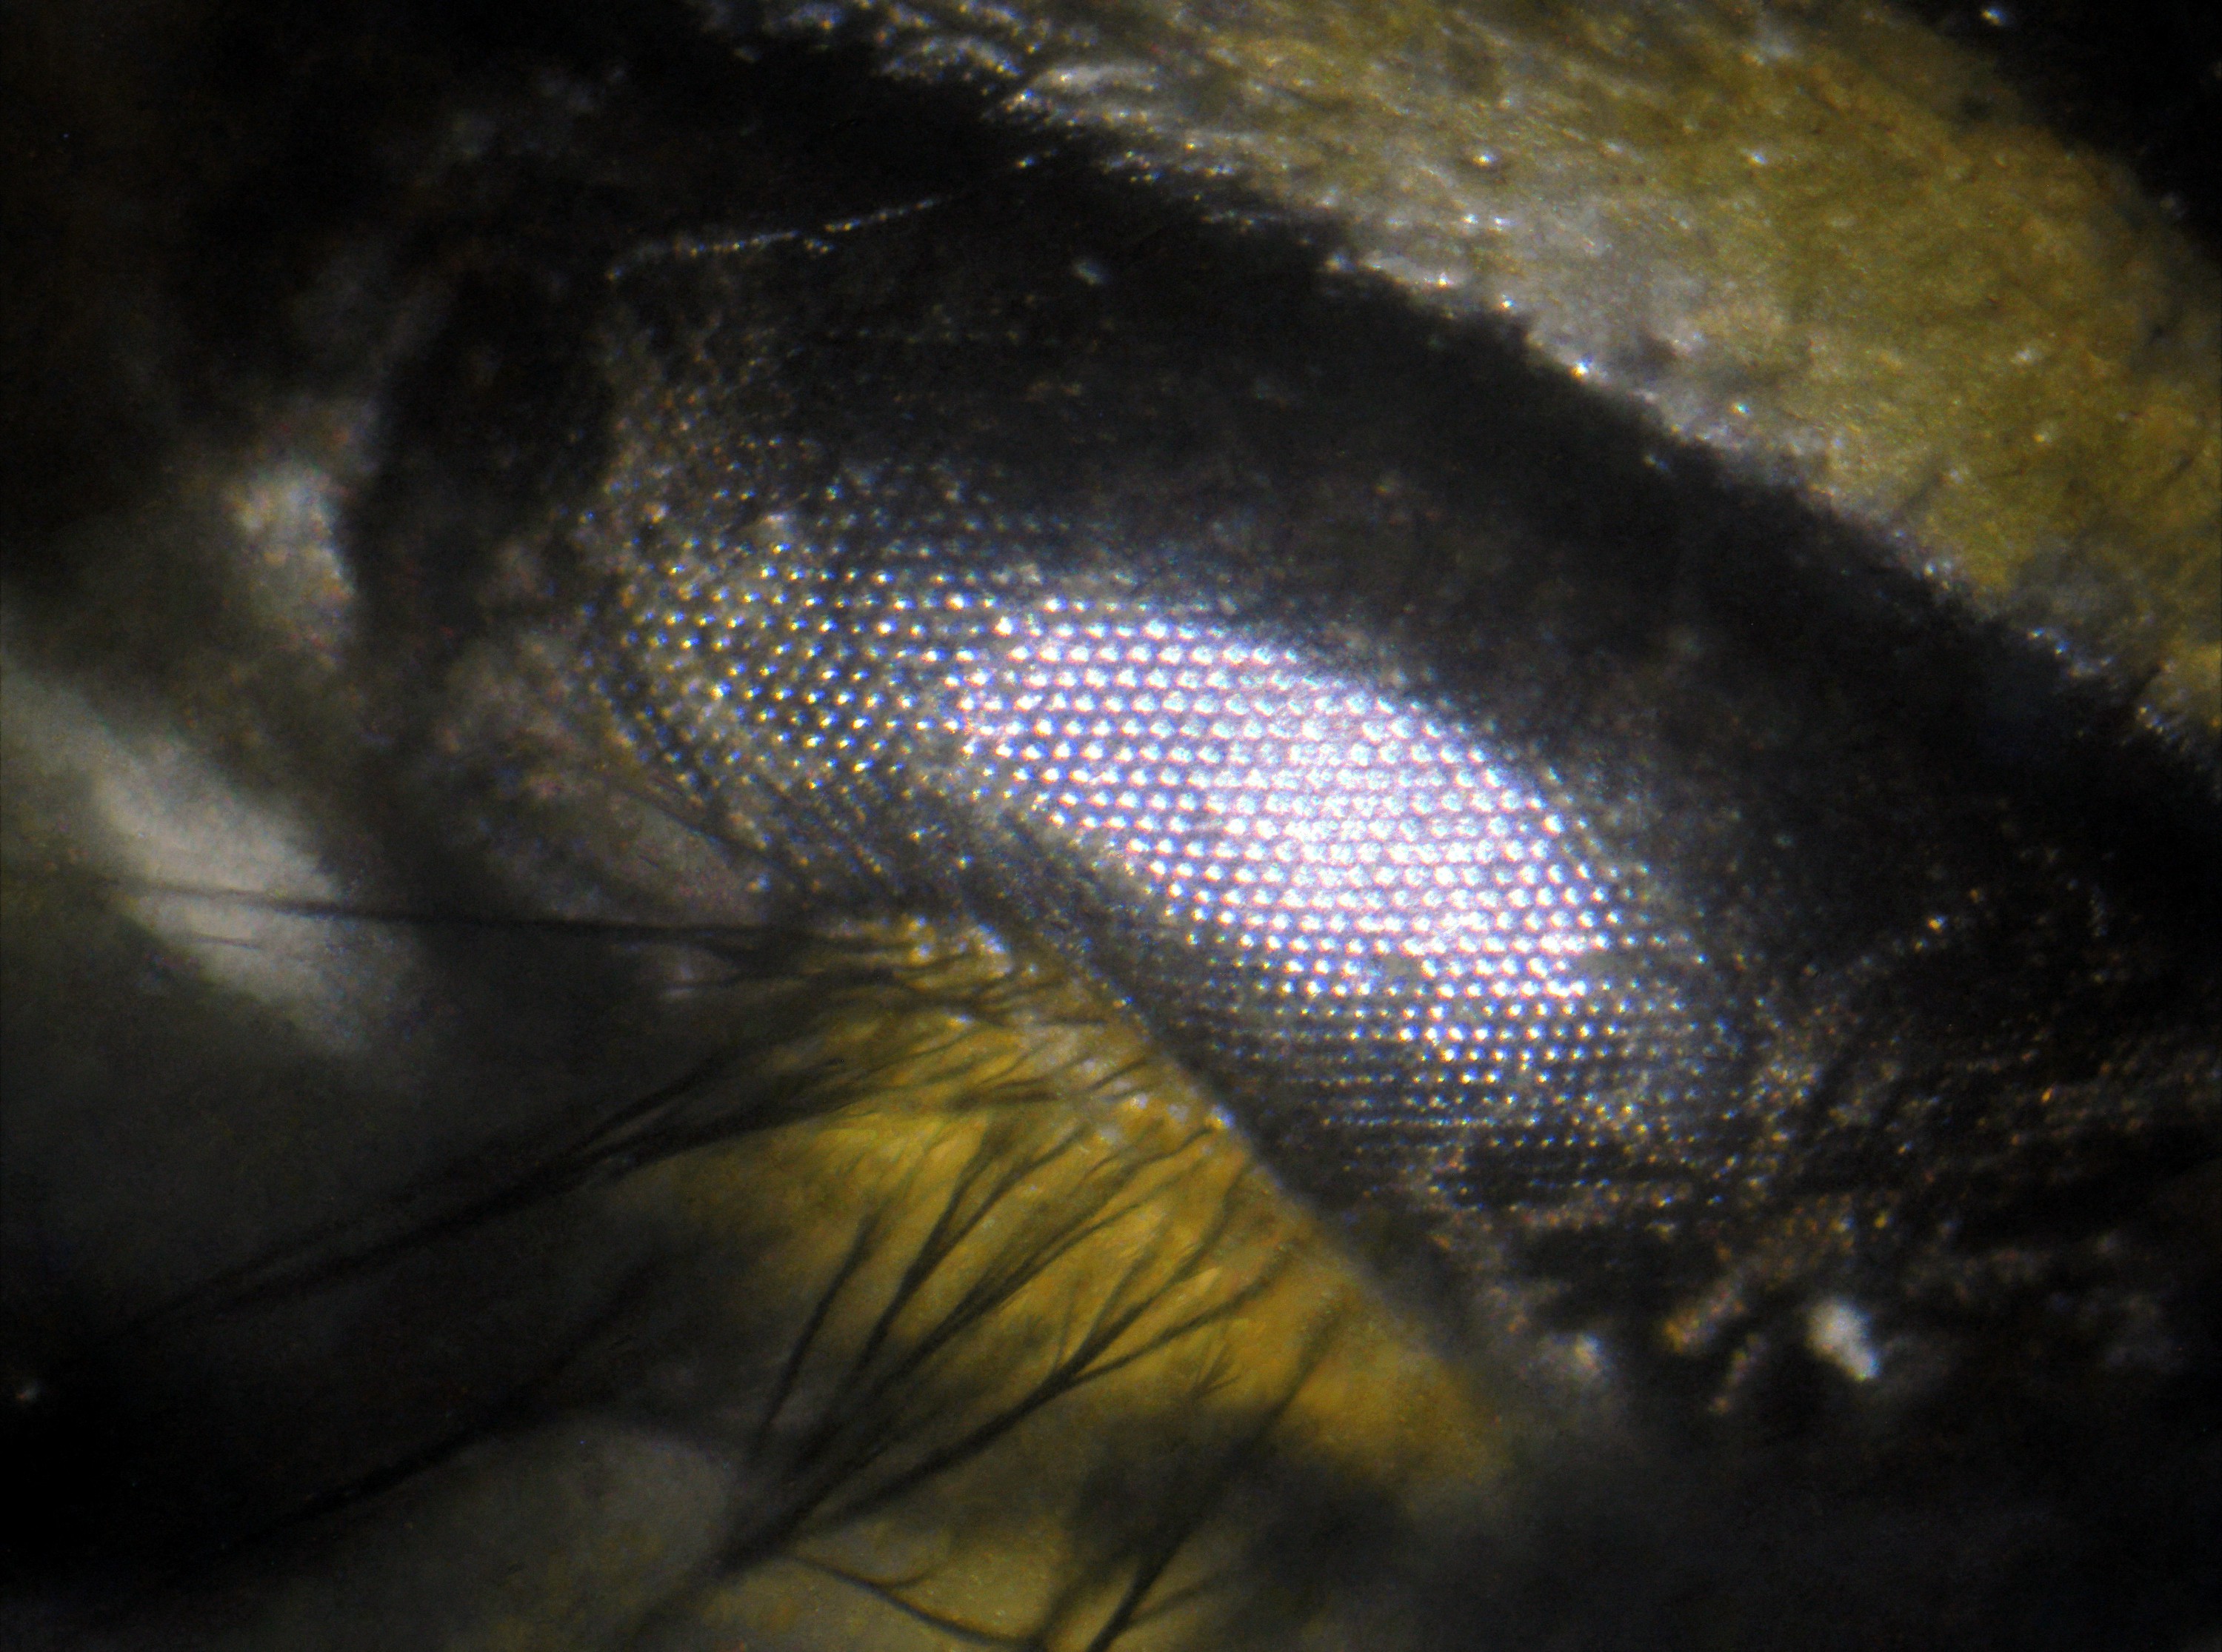
.. and finally if you have ever wondered what the individual laser etched dots in the lettering round the inside rim of a DVD look like (and who hasn't spent a sleepless night wondering such things)... here is your answer..
This is the dot in the top left corner of the top branch of the number "5" in case you were wondering, complete with lots of unidentified crud... now if I automated the stage and the focus, and fitted a proper mount for the camera,I could eliminate the shaky results, and scan the whole letter (or indeed any far more interesting item) with a far better depth of focus.
With a little effort, we can "focus stack" images using Hugin's alignment, enblend and enfuse functions.. ( http://hugin.sourceforge.net/ ).
There is a good tutorial about the process here...
http://blog.patdavid.net/2013/01/focus-stacking-macro-photos-enfuse.html
Here is a rough example using a dead wasp as the target, and a bunch of eight megapixel images. These were shot with the camera hand held, so they are nowhere near as sharp as the microscope is capable of.
The entire subject image area is probably of the order of around 1 mm square.
Magnification is roughly 40 to 80 times (x4 objective and x10 eyepiece). The exact magnification is imprecise, since I also zoomed the camera to avoid vignetting from the microscope eyepiece. The stack consists of 10 pictues. I could also have used HDR techniques to stretch the dynamic range, but that would have required a lot more images. In this example I top lit the subject with a Cree 5W white LED torch, rather than lighting from below with the light described in this project.
Better results can be obtained by fixing the camera securely to the microscope and triggering it remotely to avoid camera shake, and by stacking a much larger number of pictures. One other point of note, preserving the subject could be an issue. The eye of this particular wasp dessicated and collapsed within a few hours of its untimely demise. I should perhaps have pickled it in formaldehyde or alcohol.
I also added a 5W CRE Led torch on a sucker mount of the type used to fix GPS devices to windscreens for top lighting samples.
Discussions
Become a Hackaday.io Member
Create an account to leave a comment. Already have an account? Log In.