 Stryker295
Project FISIKA
The Name:
FISIKA, a Fully-Integrated Speedy Inverse-Kinematics Arm developed from scratch to teach myself the ins and outs of, you guessed it, inverse kinematics. The name is derived from the Indonesian word, "fisikas", which translates into English as "physics". Considering my experience with physics engines in the past, and the nature of inverse kinematics systems, it was a logical name, partially inspired by my Indonesian friend who gave me a push in this direction.
—
The Hardware:
For now I'll be using entirely LEGO parts, primarily the LEGO MindStorms NXT robotics kit. I may add in a WiiMote's IR tracking camera with the IR-pass filter removed, but for now I'm not including that into my designs for simplicity's sake. The NXT kit is composed primarily of a "brick" that houses the dual processors, memory, 4 buttons, a monochrome 100x64 LCD, the power supply (6 AAs), and all the necessary ports to attach the motors and sensors. Unfortunately I'm using Ni-MH rechargeables, so instead of a full 9V I can only draw up to 7.2V. The processors are a 32-bit Atmel AT91SAM7S256 (256 KB flash memory, 64 KB RAM) and an 8-bit Atmel ATmega48 @ 4 MHz (4 KB flash memory, 512 Bytes RAM).
There are 4 dedicated "Sensor Ports" on one end of the brick, and 3 dedicated ports for the motors. Each port is essentially the same, combining analog input/output, I2C, and RS-485 into a 6-pin connection. The motors are continuous-rotation servos, with a top speed at full power of ~170 RPM at 9V, and ~135 RPM at 7.2V. The internal rotary encoders are accessible with +/-1° of accuracy, providing realtime feedback on speed and direction, as well as current position. While there are a wide variety of sensors available to use with this modular kit, I'm focusing on just two: a "Light Sensor" and "Touch Sensor". The light sensor is, as would be expected, an ambient LED-based photosensor, and also includes a red LED, which can be used as both an indicator light or just to provide extra light to the sensor, primarily for reading reflected light levels. The touch sensor is effectively a pressure-sensitive button, with an ~8mm travel distance.
—
The Software:
I use third-party software to program the main processors (bundled together with the batteries in a single unit known as the 'intelligent brick' or just 'brick'). Primarily I work in an IDE known as BricxCC, which allows the use of a C-based language (known as "NXC"/"Not eXactly C") in place of the standard graphical, block-based programing language that comes with the LEGO MindStorms set. Using this linear, text-based programming language is more comfortable to work with and allows more complex operations and deeper access to hardware; the most notable improvement is a vast increase in performance due to stripped-down code and heavy optimization.
—
The Idea:
I've always been an outside-the-box thinker, particularly when it comes to limited resources on electronics platforms. For example, by making use of the ghosting effect on slow, cheap monochrome pixel displays, I was able to achieve 6-shade greyscale on a typically black-and-white screen; I've utilized the light source in the LED-based photosensor as an output/indicator for different programs, and even gone so far as to PWM the LED via realtime code, similar to my previously-mentioned work on the display. I've always enjoyed pushing boundaries and seeing what things can be done that nobody else would do, so when I got the idea to point the light sensor at the ground and measure the amount of light being reflected back, I realized I'd created a primitive short-range distance sensor. Adding this to a segway-style robot was a logical next-step, building a balancing system based solely on a photosensor. Many others have done this as well, it turns out, so I moved on, building more advanced balancing systems, including an autonomous self-balancing tightrope-traversing unicycle. I even wrote several physics engines from scratch that ran locally, writing a small...
Read more »
 Rudolph
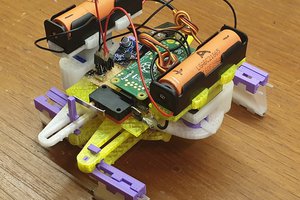

 Crypto [Neo]
 Dan Royer