-
Cricut Design Space Setup: A Step-by-Step Tutorial
14 hours ago • 0 commentsIf you are looking to buy a Cricut machine, then you must learn about the Cricut Design Space setup. Setting up the Cricut software on your device is an easy task and can be done in a few steps. In this blog, I am going to write all the information you need to setup the Design Space app.
Cricut Design Space is an application that works on all Cricut machines. It is an amazing app that is compatible with any operating device you are using. It is available for free on your phone or computer (iOS, Android, Mac, or Windows). You can download it from the Cricut official website and connect it to your device. The Design Space is a free app, so you can use it to start cutting and crafting at home. However, if you want to use all the features that Cricut offers, you can get its subscription, Cricut Access.
Easy Cricut Design Space Setup Guide
Before you download the Cricut Design app, you have to setup your machine. After the setup process is done, download the app and log into your Cricut ID so that you can connect your machine to the app and work on your DIY projects. Follow the steps in the section below:
- To setup the Cricut machine, you first have to open the machine and device you are using.
- Then, connect the machine to your device via Bluetooth or a USB cable.
- After that, connect your device to the Internet.
- Now, go to cricut.com/setup and download the Cricut app.
- Next, open the Design Space app and log into a Cricut account.
- If you don't have a Cricut ID, then you will need to create one.
- Once you log in with your username and password, the Design Space setup is complete.
Connect Cricut Machine to Your Operating System
It's important to connect your Cricut to a device so you can easily download and log into the Cricut software. Follow the steps below to connect:
- Before you start the connection process, you should first plug in the machine and give it a power supply.
- Once the machine is on, connect it using Bluetooth or a USB cable.
- To connect the machine with USB, you have to connect one end of the cable to the machine and the other end to the device. Make sure the USB cable is not strained.
- To connect the machine via Bluetooth, go to your computer or mobile device and open Settings. You have to remember that the distance of the device from the machine should not be more than 10-15 ft.
- In the Settings, you will find Bluetooth settings. Open it.
- In the Bluetooth settings, you will see the option to search for nearby Bluetooth devices. Click on it.
- Now, you will see all the devices that are available to connect to your computer. Click on the one that you want to connect. The device will be connected.
Download Cricut Design Space on Your Device
For the Cricut Design Space setup, the most important thing you have to do is download the Cricut app. The software is available to download for free on any device you are using. Do as written below, and you will learn how to download it on your device.
- To download the app, connect your device to the Internet.
- Now, go to cricut.com/setup on your computer's browser.
![]()
- On your phone, go to the Play Store and search for Cricut Design Space.
![]()
- After that, click on Download and wait.
- Open the downloaded folder and click on the file to start the process of installation.
- You may be asked to agree on the terms & conditions of your device. In such a case, click on Agree.
- When the process of installation is done, open the app and log in with the Cricut ID and password.
![]()
Create a New Cricut Account ID
To use all the features of Cricut Design Space, you must log into your account. But if you do not have a Cricut ID, you don’t have to worry about it. Follow these simple steps, and your Cricut account will be created.
- Open the Cricut software and go for the Sign Up option for a new account.
- Fill in the details, such as your name, email, and other details, as needed.
- Agree to the Terms and Conditions of the app to proceed. ...
-
How to Install Cricut Explore Air 2: A Complete Guide
3 days ago • 0 commentsCricut Explore Air 2 is a magnificent machine if you are looking to get into the world of crafting. It is a budget-friendly Cricut machine that you can use to cut different types of materials and work on various DIY projects. To install Cricut Explore Air 2, you will need to follow a few simple steps. In this blog, I am going to write about them, and after reading them, you will be ready to go.
![]()
In this guide, I will introduce you to the Explore Air 2 machine, explain the installation process, how to download Cricut Design Space, and so much more. Without any further delay, let’s get started.
Introduction to Cricut Explore Air 2
Cricut Explore Air 2 is an amazing cutting machine and the best addition to the Cricut family. The machine gives you a great opportunity to cut and craft your materials. With the help of the Explore Air 2 machine, you can cut more than 100+ materials, such as cardboard, leather, paper, cardstock, vinyl, fabric, and more. You can rely on this Cricut machine for your daily crafting.
![]()
It comes with an automatic function that allows you to cut a range of materials. This machine can do complex projects in a very simple way, so it’s a great choice for your DIY projects. Let’s move on to the installation procedure in the section below.
Install Cricut Explore Air 2: Quick and Easy Steps
To install the Cricut cutting machine, the first thing you have to do is unbox it and set everything up, like the power supply and internet connectivity. I will tell you all the basic steps you need to follow.
- To get started, you have to unbox the Cricut product and remove the protective covers.
- Next, check for the items in the box and make sure no item is missing.
- After that, plug in the Cricut machine and power it on.
- Then, connect your machine to your computer or phone using a USB cable or Bluetooth.
- Go to cricut.com/setup on your device and download the Cricut Design Space app.
- Open the Design Space app and sign in with a Cricut ID and password.
![]()
- If you are a first-time Cricut user, create a Cricut account.
Download Cricut Design Space on Your Operating System
Cricut Design Space is the software that you can use to choose designs, fonts, and projects for your crafting. Downloading the app is crucial to install Cricut Explore Air 2 on your device. To download the software, follow these steps:
- Initially, go to an internet browser and open cricut.com/setup.
- Then, press Download to start downloading the Design Space app.
![]()
- After that, you will see that the file is saved in the Downloads folder.
![]()
- Next, go to the Downloads folder and double-click the file to open it.
- Now, agree to the Terms and Conditions, and the installation process will start.
- When the installation is complete, sign in to your Cricut account.
Create a New Cricut Design Space Account
When downloading the Cricut app is done, then log into your Cricut ID. In case you are new to Cricut and do not have an account, you can create one. Simply follow these steps:
- Go to your mobile or computer and open a browser.
- After that, you should go to the cricut.com/setup website.
- Now, insert the Cricut ID and password to log in.
- If you are new to Cricut, create an account using the steps below.
- Next, click on the Sign Up to create a new account.
- Then, you will have to insert your name, email, and country.
- Also, input the strong password and remember it.
- Agree to the terms & conditions and follow the directions to proceed.
- Lastly, complete the sign-in with the newly made Cricut account.
Conclusion
In short, you read everything you need to know to install Cricut Explore Air 2. It is a great machine if you want to explore the world of crafting. This was an important procedure for you if you want to install the Cricut cutting machine. In this blog, you learn how to unbox the machine after buying it and then set it up. Once the Cricut machine is set up, you have to download the Cricut Design...
Read more » -
How to Connect My Cricut Maker 3 to Bluetooth: Easy Guide
05/21/2024 at 12:40 • 0 commentsHow to connect my Cricut Maker 3 to Bluetooth is the most frequently asked question I receive from my readers. The question is easy to answer, and I will make it easier for you.
I remember the day I got my first Cricut Maker 3 machine. I was a little bit, but somehow, I learned to connect Cricut to a device using Bluetooth. When I can do this, you can also do it in no time. For this, you will need a compatible computer or mobile device to which you want to connect. Let’s learn how to connect a Cricut machine with different devices, including Windows, macOS, iOS, and Android. Let’s delve into this blog and start establishing a connection.
How to Connect My Cricut Maker 3 to Bluetooth on Windows?
Connecting your Cricut cutting machine to a Windows computer using Bluetooth is not rocket science. By following the simple steps given below, anyone can easily connect their Cricut to their PC.
Here’s how to connect Cricut Maker 3 to Bluetooth on Windows 10:
- Before connecting, find a flat surface on which you can place your Cricut product.
- After that, confirm whether the distance between your PC and Cricut is within 10 - 15 feet (Make sure it doesn’t exceed 10 feet).
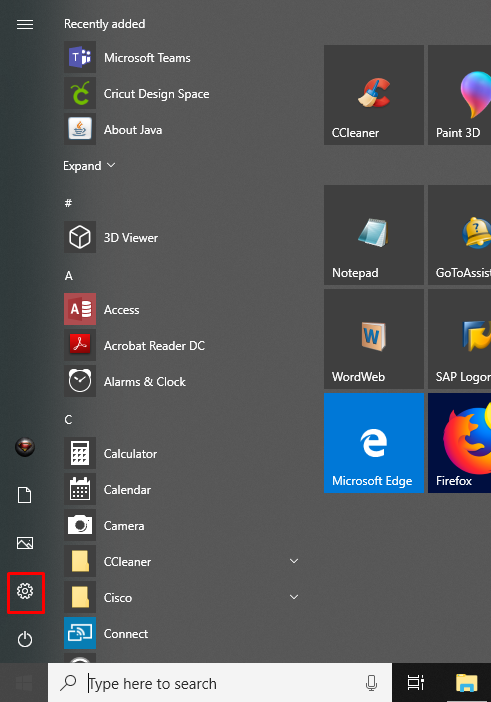
- Now, you should go to your Windows desktop and click on the Start menu located in the taskbar below.
- Next, you will see a small circular gear icon, which is your Settings. Click on it to open Settings.
![]()
- As you enter your PC’s Settings, you will see the Devices option. Click on it.
![]()
- Then, look for the Bluetooth option.
- In the following step, check if your Bluetooth is ON.
- If it is turned on, click on Add Bluetooth or other device.
![]()
- Afterward, you must select the Bluetooth option.
- Wait a while for your PC until it finds your Cricut machine.
- Once it is visible on your list, select the model to pair, and that’s it.
How to Connect My Cricut Maker 3 to Bluetooth on Mac?
Cricut is easily compatible with the MacBook. Besides, the first and second steps are the same for all devices as for the Windows computer. So, take out your Cricut machine outside or unbox it if you haven’t done it yet and start connecting it to your Mac.
Here’s how to connect Cricut Maker 3 to Bluetooth on Windows 10:
- Again, the first and second options will be the same as for the PC (See the above step for the PC).
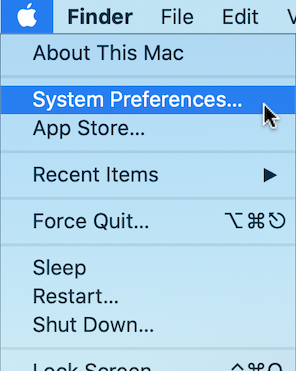
- Now, you have enabled Bluetooth. To do this, proceed to the Apple menu.
- Then, select the System Preferences option.
![]()
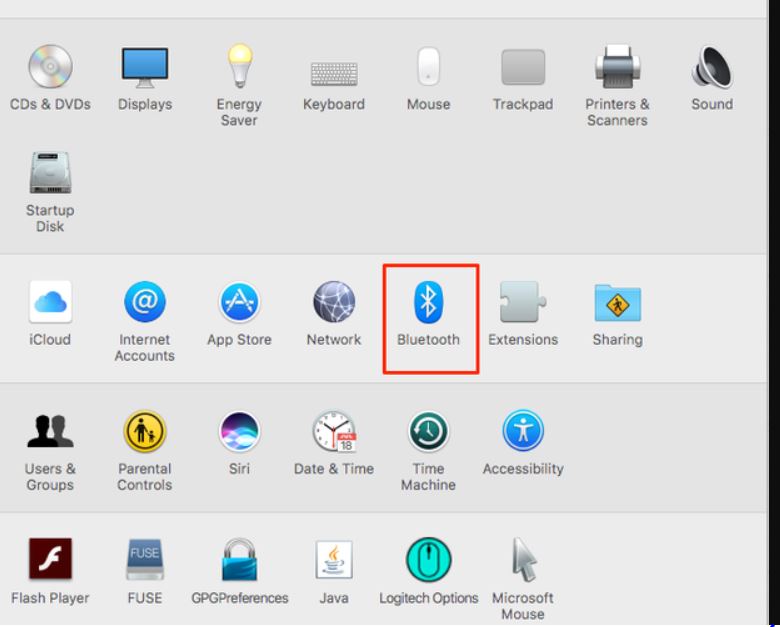
- Here, you need to search for the Bluetooth option.
![]()
- When the Bluetooth is ON, you have to select your Cricut machine from the available...


 Lutetium
 Arduino Enigma
 Ivan Lazarevic