 Mirko
Mirko Wassim
-
Home Assistant Addon to integrate the Thread Sensor Tag
01/22/2024 at 08:25 • 0 commentsWe created a new Addon for Home Assistant to more easily integrate the Thread Sensor Tag into your Home Assistent setup to receive and use its Temperatur, Humidiy, Pressure and Light data to build automations and other useful things around it.
You need an Open Thread Border Router setup to connect the Thread Sensor Tag. If you do not have that you can setup a Border Router using the Home Assistant SkyConnect Dongle or a nRF52840 USB Dongle
Setup Thread Border Router using nRF52840 USB Dongle
To setup a Open Thread Border Router with the nRF52840 USB Dongle you need the RCP Firmware. You can relatively easy flash the nRF52840 Firmware to the USB Dongle by following this steps:
- Make sure you have the nrfutils installed on your computer. If not you can follow this [guide](https://www.nordicsemi.com/Products/Development-tools/nrf-util)
- Plugin the nRF52840 USB Dongle and press the reset button. The red LED will fade in and out to show that the device is in the right state.
- Download the Firmware ZIP
- Run the following command to flash the nRF52840 USB Dongle
nrfutil dfu usb-serial -pkg ot-rcp.zip -p /dev/ttyACM0
Make sure the Path and USB port are corerct. On windows just replace '/dev/ttyACM0' with `COMx`.
If you want to build the latest version of the firmware yourself you can follow the official nordic guide
Setup Home Assistant
You can use the flashed nRF52840 USB Dongle or the SkyConnect from Home Assistant to open a OpenThread Border Router network.
Setup OpenThread Border Router
- Connect the flashed nRF52840 Dongle to the Home Assistant Device
- Open your Profile Settings on the bottom left sidemenu and scroll down to the setting to enable the Advanced Mode
- Go to Settings -> Add-ons and press the ADD-ON STORE button on the bottom right
- Search for and install OpenThread Border Router AddOn
- Open the OpenThread Border Router AddOn and configure it as follows.
- Select the Device in the Device section
- Set the Baudrate to 115200
- Uncheck/disable the OTBR Firwall option and press save.
- Enable Show disabled ports
- Enter 8080 as OpenThread Web Port
- Enter 8081 as OpenThread Rest Api Port
- Press save to save the setting and go to the info tab
- Press start to boot up the OpenThread Border Router
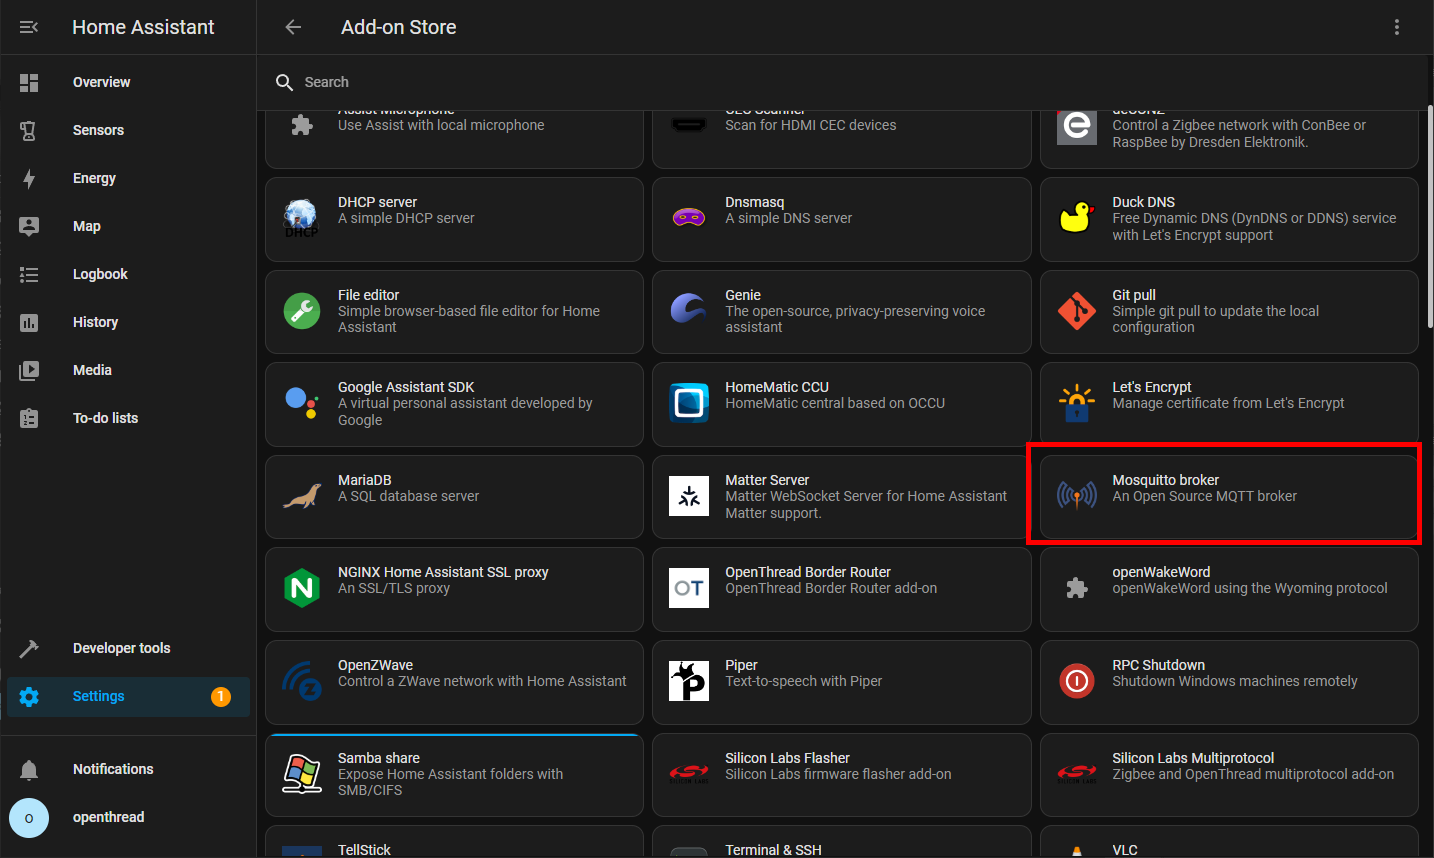
Install the MQTT AddOn
To see the Thread Sensor Tag as a device in Home Assistant we also need to enable the MQTT Broker functionality.
- Go to "Settings -> Add-Ons" and press "ADD-ON STORE"
- Search for Mosquitto MQTT Broker and install it
- In the Info Tab Start the AddOn
![]()
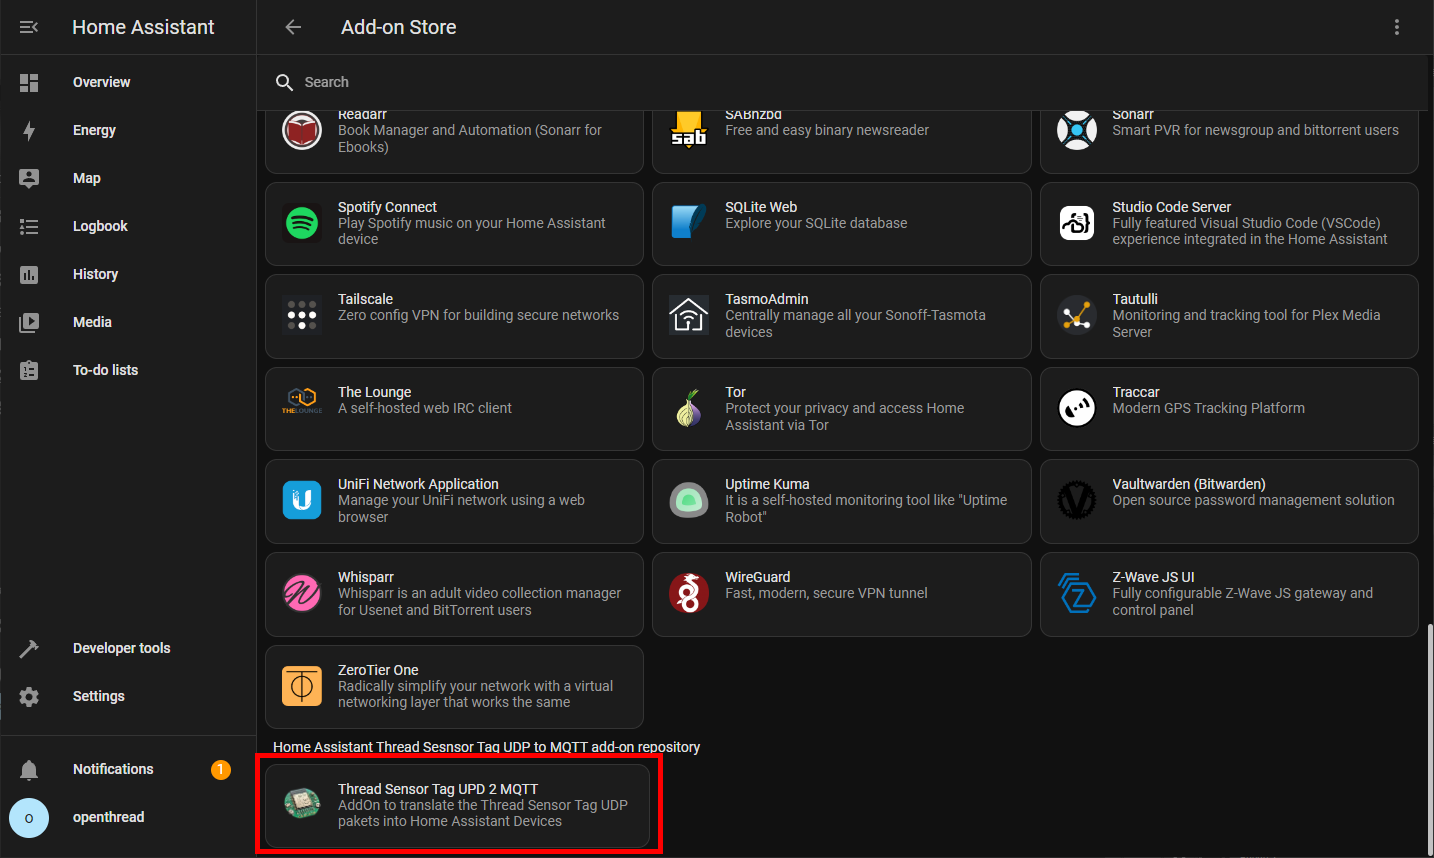
Install the Thread Sensor Tag UDP to MQTT AddOn
- Navigate to Settings -> Add-ons and press ADD-ON STORE
- Click on the three dots on the top right -> repositories
- Add https://github.com/open-thngs/home-assistant-sensor-tag-addon and press add
https://github.com/open-thngs/home-assistant-sensor-tag-addon - Scroll down until you see the "Thread Sensor Tag UPD 2 MQTT" and install it (you might have to refresh the page)
- Start the AddOn in the Info Tab
![]()
Connect the Thread Sensor Tag
- Put a battery into the Thread Sensor Tag
- Go to the WebGUI (http://homeassistant:8080/) of the OpenThread Border Router
- Go to Commission menu entry
- Type ABCDE4 into the PSKd and press commission
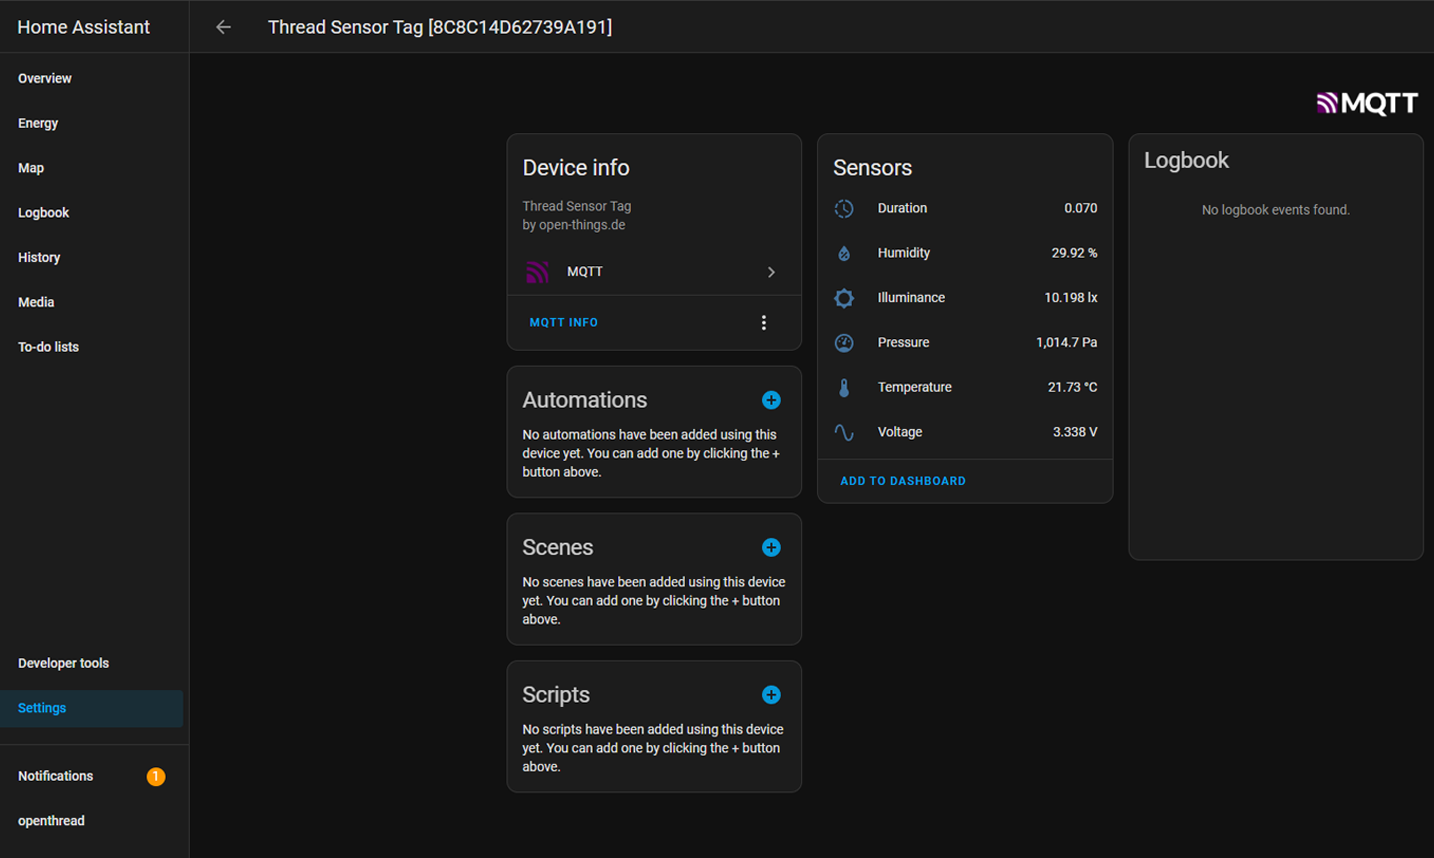
Once the Device is successfully commissioned into the Thread Network it will start sending out UDP pakets. The AddOn will read the UDP Pakets and translate them into Devices in Home Assistant. You can find the Thread Sensor Tag now as a Device in your Home Assistant.
Go to Settings -> Devices & Services and click on Devices in the Top Tab menu. In the List of devices you should see a Thread Sensor Tag. It might take a few minutes to first see it. You can always check in the Open Thread Border Router WebGUI under Topology if there is a client connected to the network.
![]()
-
How to setup a Open Thread Border Router with Raspberry Pi and connect the Thread Sensor Tag
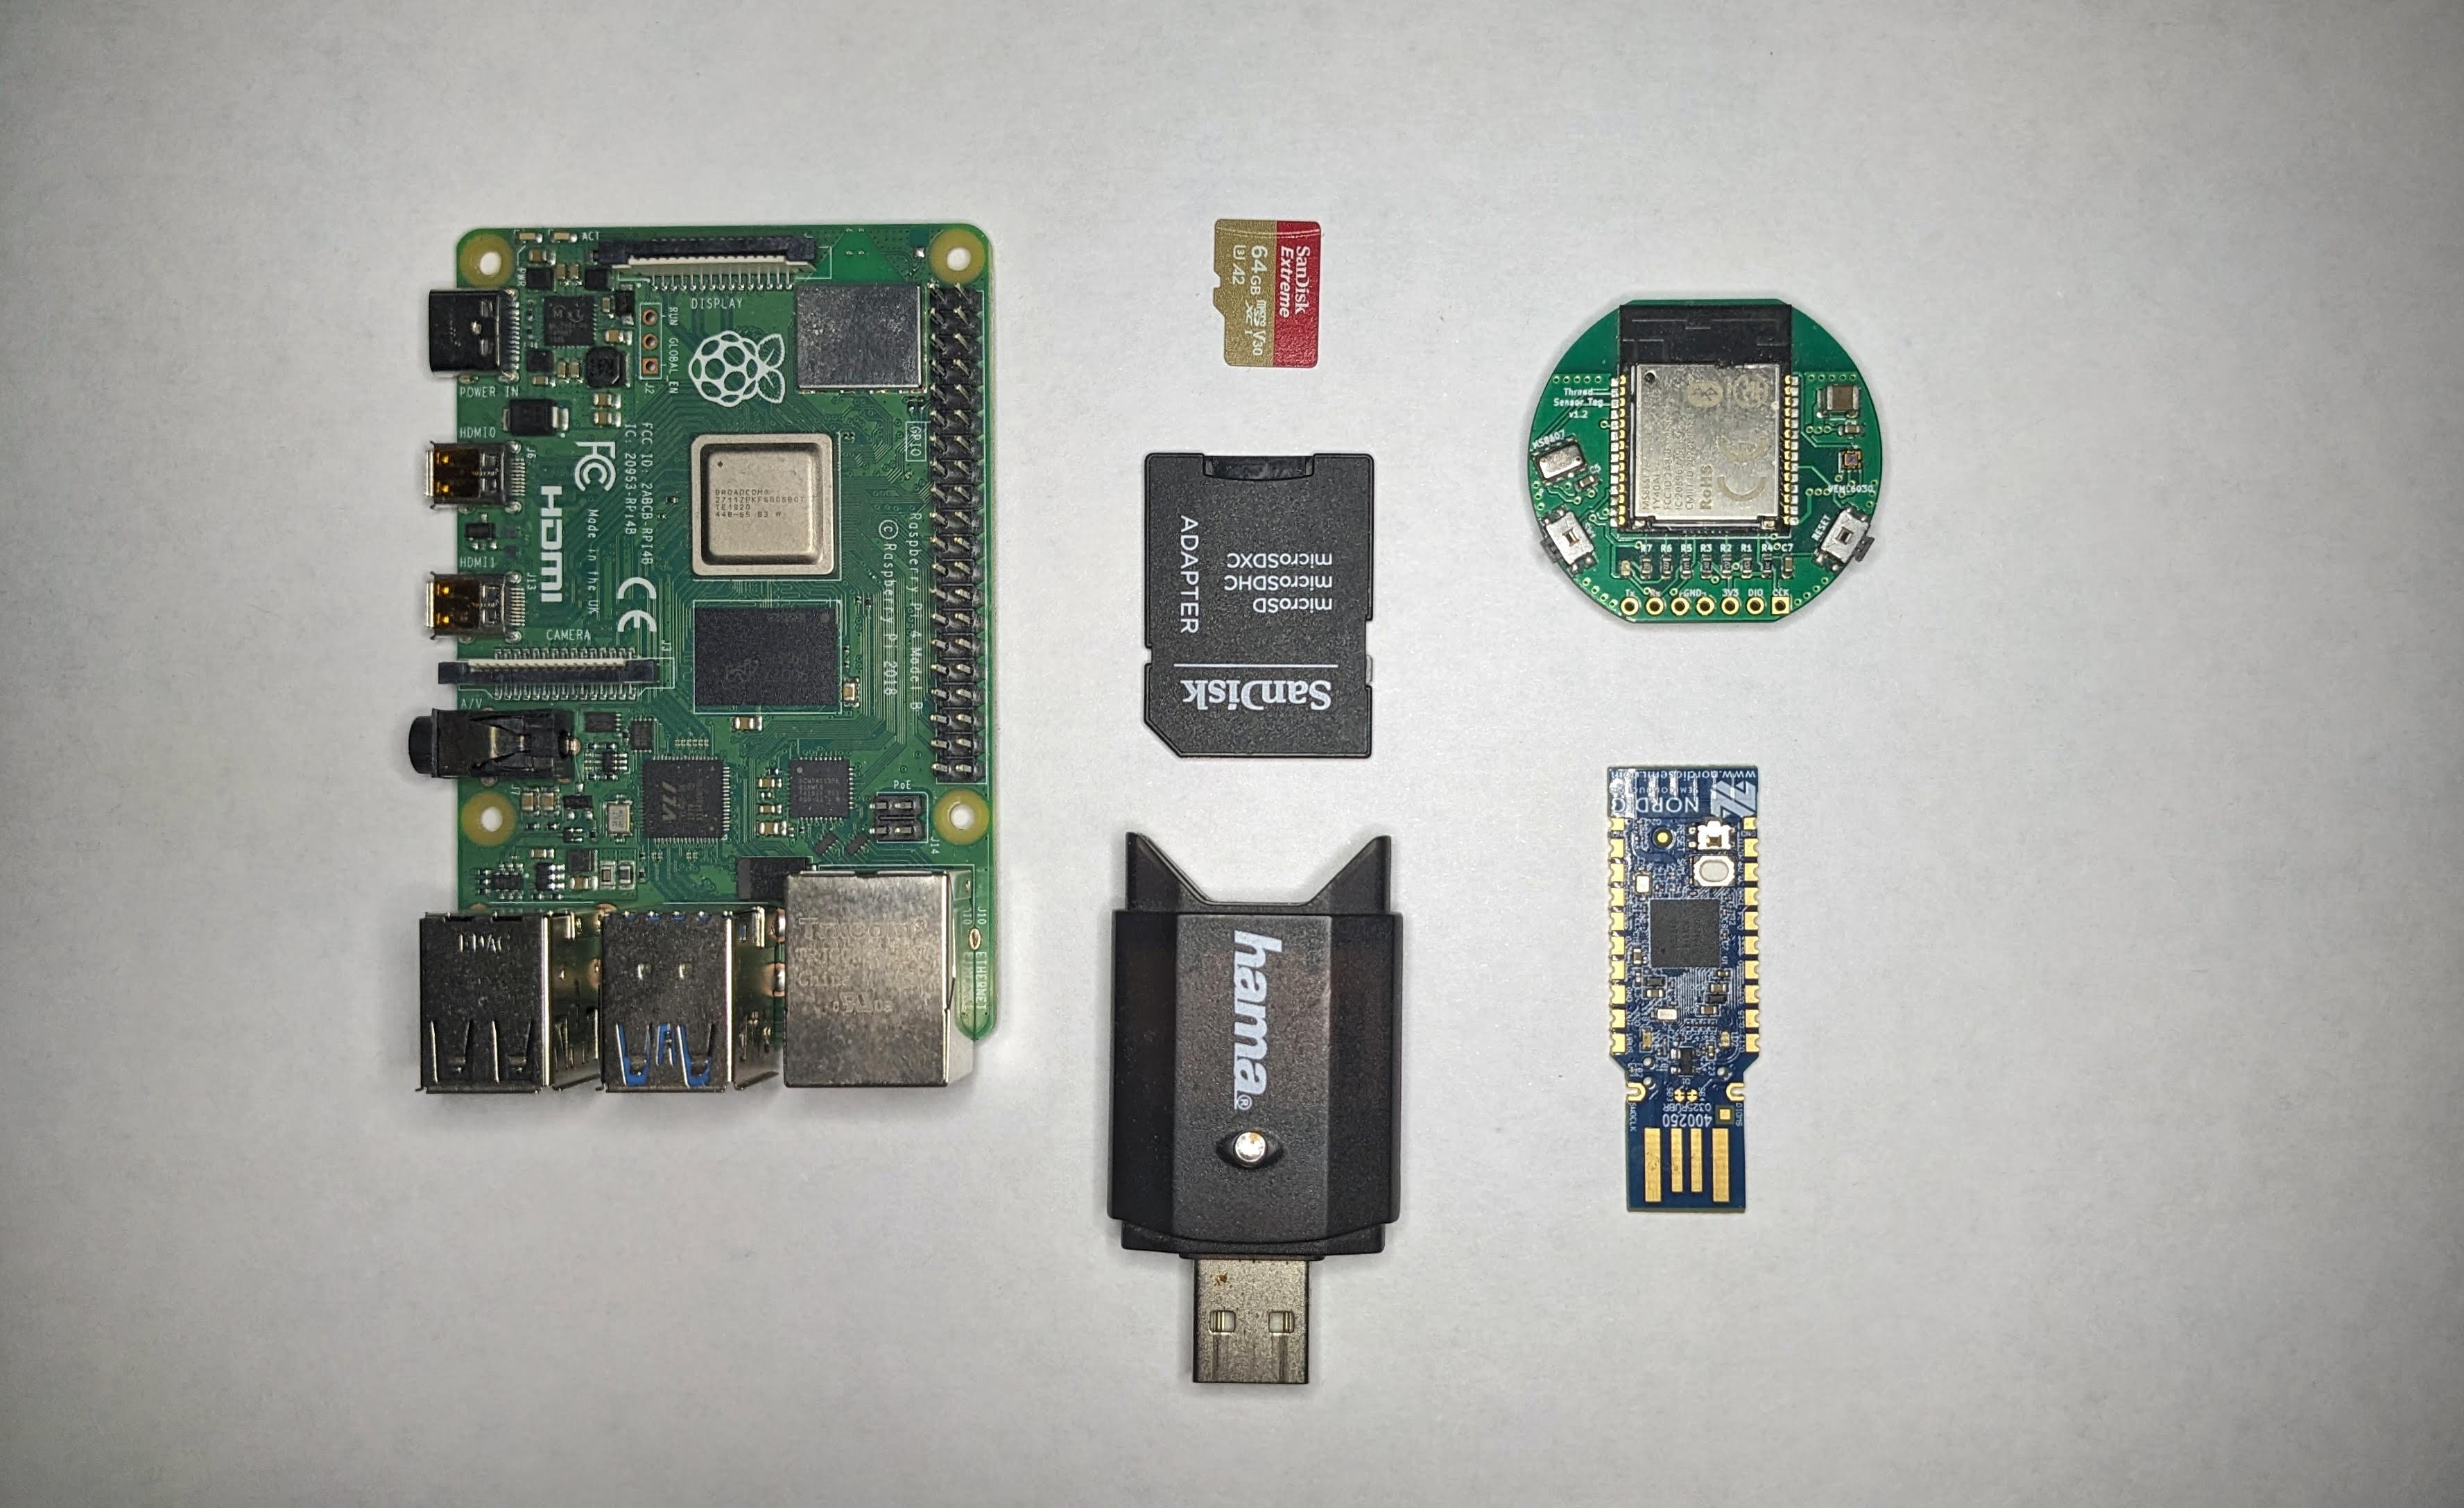
01/17/2024 at 14:31 • 5 commentsWith this tutorial I want to show you how easy it is to setup your own Open Thread Border Router at Home using a Raspberry Pi an nRF52840 USB Dongle and connecting the open source Thread Sensor Tag to measure Light, Temperature, Pressure and Humidity with ultra low power
![]()
Components you need are
- a Raspberry Pi 4
- an SD-Card
- the nRF52840 USB Dongle from nordic
- and the Thread Sensor Tag
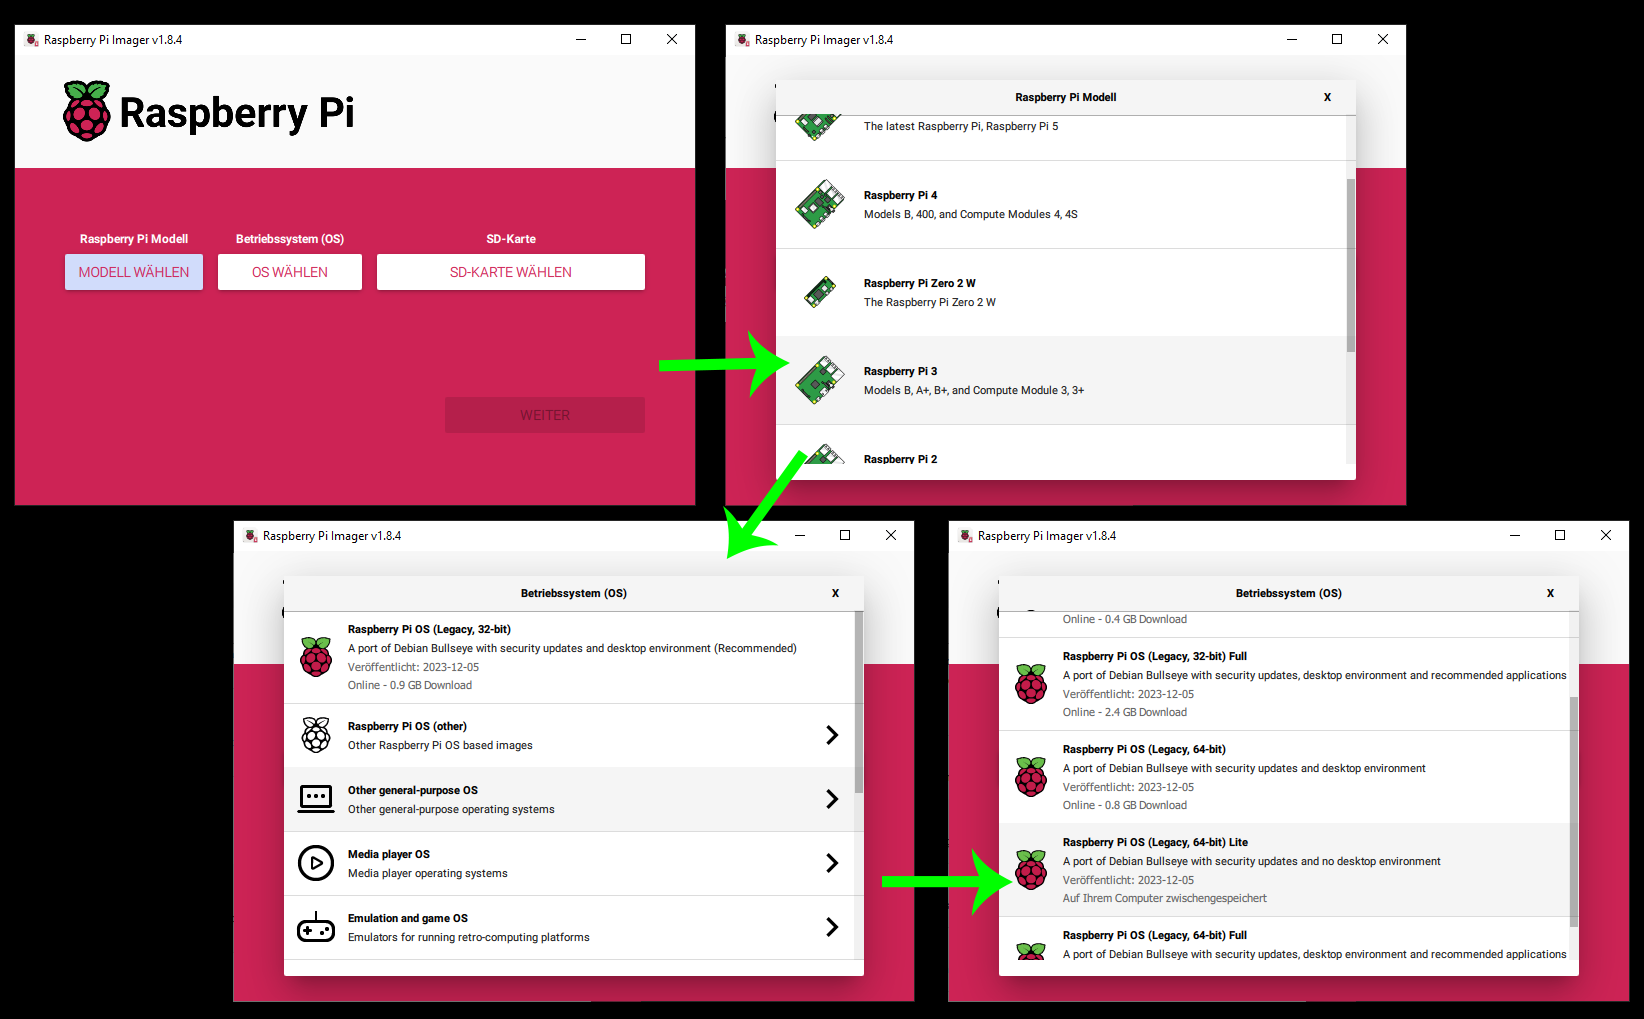
Step 1: Flash the Raspberry Pi OS to the SD-Card![]()
Use the Raspberry Pi Imager to flash the Raspberry Pi OS onto the SD-Card.
- Attach your SD-Card to your computer
- open the Raspberry Pi Imager and select the Rasperry Pi device you want to flash the SD-Card for (Recommended is a Raspberry Pi 3B+ or later. I am using a Raspberry Pi 4)
- Then you select the OS: "select OS" -> "Raspberry Pi OS (other)" -> Raspberry Pi OS (Legacy, 64-Bit) Lite
- choose the SD-Card and press next.
I recommend to add pre-defined settings like your WiFi and SSH etc.
Step 2: Flash NRF52840 RCP FirmwareMake sure you have the nrfurils installed.
- Attach the nRF52840 USB Dongle to your computer and press the reset button to bring it into the DFU Boot mode.
- Download the Firmware ZIP file and run the following command to flash the nRF52840 USB Dongle
nrfutil dfu usb-serial -pkg build/bin/ot-rcp.zip -p /dev/ttyACM0
If you want to build the latest version of the firmware yourself you can follow the official nordic guide
Step 3: Install and Setup the Open Thread Border Router SoftwareIn order to run the Open Thread Border Router on the Raspberry Pi we need to download and install the Open Thread Border Router repository. Run:
git clone https://github.com/openthread/ot-br-posixcd ot-br-posixWEB_GUI=1 ./script/bootstrapINFRA_IF_NAME=wlan0 WEB_GUI=1 ./script/setupto clone the repo, go into the folder, executing the bootstrap script with WEB_GUI enabled and then setup the otbr.
I tried to use Docker as well but with Docker I was unable to receive the UDP Pakets from the Thread Sensor Tag.
After this is done I recommend rebooting the Pi. After rebooting you should be able to reach the Border Router Web GUI by typing its IP Address into the web browser like http://192.168.178.xx
For troubleshooting and more information you can find the official instructions here
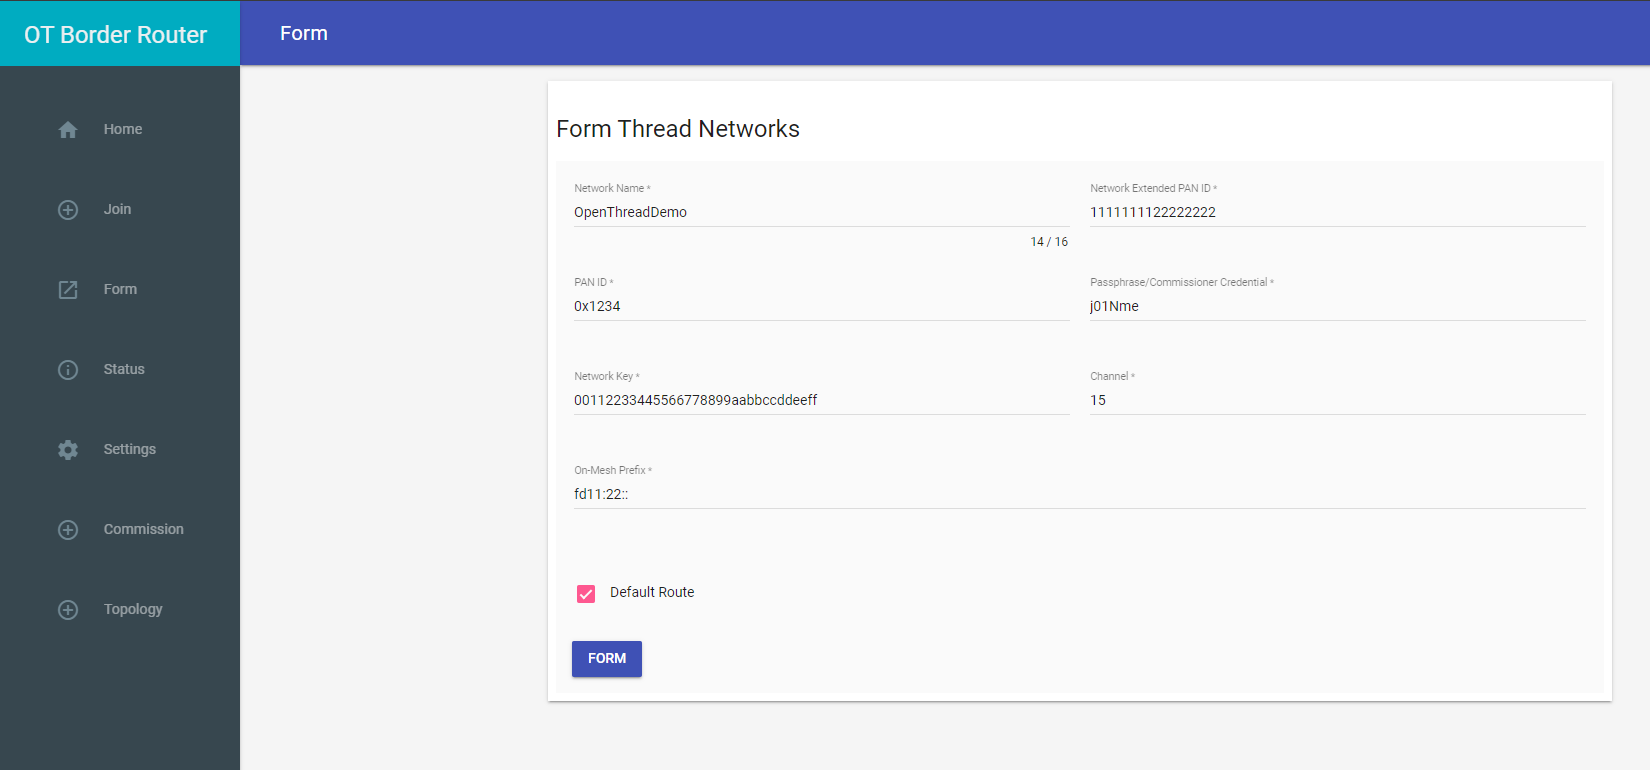
Step 4: Setup the OpenThread Network![]()
Open your browser and enter the IP address of your Raspberry Pi like http://192.168.178.XX make sure you use the correct IP Address. If you set a host you can also type the host name.
In the OTBR GUI go to the Menu "Form" to form a new Thread Network. You can leave the fields as they are for now but Google recommends to change them and leaving the default Channel and On-Mesh Prefix values. Then press Form
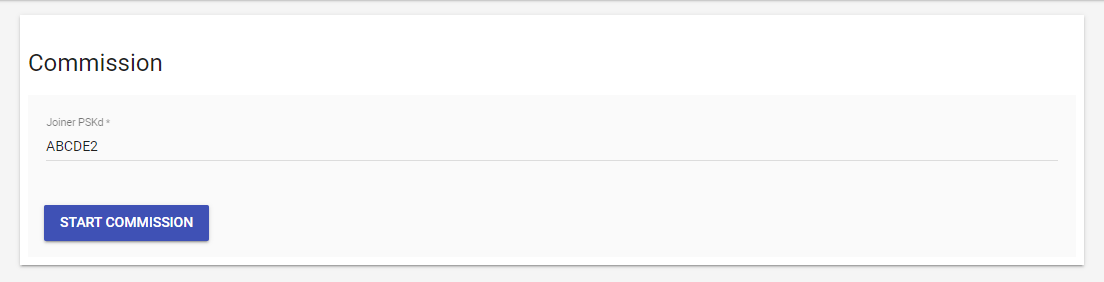
Step 5: Connect the Thread Sensor Tag to the Thread Network
![]()
Place a Battery into the Thread Sensor Tag and check the LED, it will blink red -> green -> blue and then just blue two times to show that it is there but has no network. (see the Troubleshoot section to know more about the blink patterns)
In the OTBR GUI go to the Commission Menu entry. You will see a text field which is asking for the Joiner PSKd. The Thread Sensor Tag comes with the default Joiner PSKd ABCDE4
Enter the PSKd and press Start Commission
Once this was done the GUI will promt you with a success Dialog and the Thread Sensor Tag will start blinking green once every 30 seconds which means it is happily connected and already sends its data into the Thread Network.
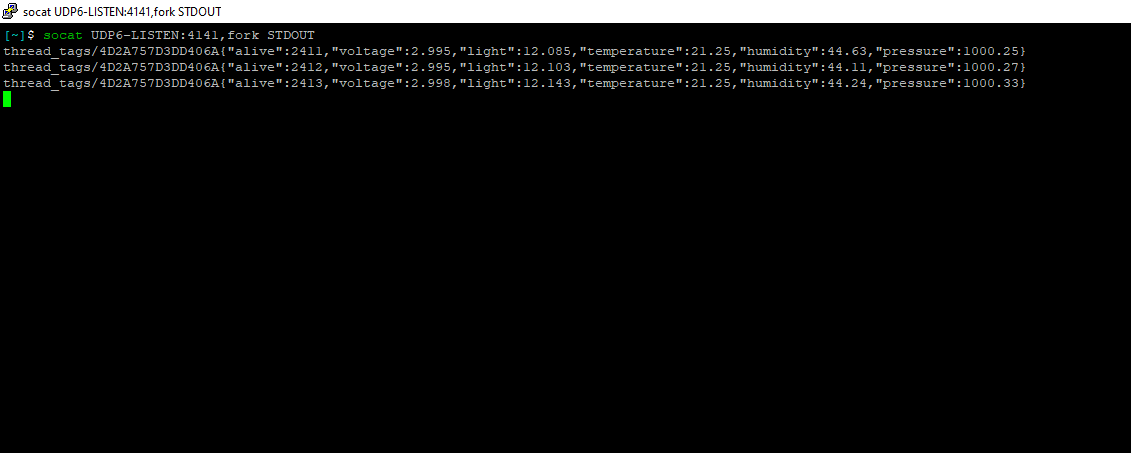
Step 6: Check the Data Incoming From the Thread Sensor Tag![]()
Once the setup worked you can use socat to subscribe to the UDP port to receive the packets that the Thread Sensor Tag is sending. To do so first install socat on the Raspberry Pi by running
sudo apt-get install socatand with the following command you can subscribe to the UDP Packet Stream of the...
Read more »
 Tijl Schepens
 Mukesh Sankhla
 Alex K
 Rodolfo
 hIOTron
 JanThar
 Michael Wessel
 Marcelo Valeria
 Amirreza Nasiri
 Daan Pape
 dev-lab
 Aidan Porteous
 torr45838
 sarah boo