 Dan Maloney
 Is the minimum layer height you can achieve dependent on the resin used (i assume different resins may be more sensitive to the UV light?) along with the stepper motor?
 Absolutely!
That's a great question, with a LOT of variables
I use car analogies a lot, so hopefully this makes sense!
![]() What entry level machine would recommend?
What entry level machine would recommend?
But it's sort of like asking "What's the fastest you can go?"
 One of my biggest hurdles and one that is not taken into consideration enough is how toxic resin is for not only humans but the environment @Andrew Sink But with proper precautions and making sure everything is cured, it can work out well and safely
It depends on the car, how many people are in it, what road you're driving on, etc!
 I think my obstacle to adopting MSLA is the mess, but we've already seen that can be managed. I guess the odor might be next -- I have a small shop, can't really ventilate it well.
But basically, with layer heights, a widely accepted standard is 50 microns (.05mm)
An interesting fact is you can print a thicker layer using a translucent resin, as the UV light is able to penetrate deeper through the resin itself!
Using a thick opaque resin, this would be more of a challenge!
![]() The Lambert-Beer law.
The Lambert-Beer law.
@SimonAllen, I'm VERY partial to the Elegoo Mars 2 Pro
It's inexpensive, and it provides reliable results
same^^
 @Dan Maloney I haven't found the odor to be too bad. In fact, I print in my office, which is a room in my apartment.
It's also heavy enough to not worry about tipping over, and it's a popular-enough model that there is a large user base online to bounce ideas off of!
 Since SLA printers have a smaller build volume than Filament printers, is there a way to fuse smaller SLA prints together into a larger piece?
@controlmypad, GREAT question!
 I have the Mars Pro and it's great with the seperate air purifier.
There are MANY options for fusing parts, the easiest is by creating models as an assembly (think dovetail joint) to assemble after printing
![]() @Dan Maloney a god carbon filter and HEPA filter goes a long ways.
@Dan Maloney a god carbon filter and HEPA filter goes a long ways.
![]() Assemble together with mating surfaces wetted with the printing resin, before the final curing.
Assemble together with mating surfaces wetted with the printing resin, before the final curing.
 The material used for 3D printing is not as important or critical to learning this, as the basic 3D design and compiler (to convert to instructions. Cost and time management, knowing the market or need, having a good application that helps people or groups. On Mars and the moon, they will use molten materials, electrochemical and plasma separation, and the tools will start with "3D". The chemistry, physics of materials will be critical to making things that last. Keep in mind the needs of the rest of the century for reliable tools and methods for other worlds.
You can also add a bit of UV-curable resin and cure it with a UV light to permanently bond two parts
Great question, @controlmypad!
I agree with @Nicolas Tremblay, the built-in air filter on the Mars 2 Pro is another great feature!
![]() When we do the gluing-together-with-resin step before the final curing, we have a lot of unreacted acrylate groups left on the surface and we can achieve higher bonding strength.
When we do the gluing-together-with-resin step before the final curing, we have a lot of unreacted acrylate groups left on the surface and we can achieve higher bonding strength.
 I made a UV laser holder for tacking parts together.
http://www.24hourengineer.com/2021/04/2021-04-05-m-uvlasermodule-completed.html
I used a tower fan put on its side, and open my window just enough to lay it sideways!
This blows air outside, while another window allows air inside the room
![]() hello, is there any real cleaning liquid alternative to IPA? :)
hello, is there any real cleaning liquid alternative to IPA? :)
It's basically a VERY low-tech air exchange system!
@borelli.g92, that's another great question!
Thank you, it sounds like it could fuse nearly seamlessly and also work for clear prints?
Negative pressure ventilation works well. Stick a fan in the window blowing out.
I haven't used it, but I've seen Simple Green used to clean parts
It's a solvent that should break down the resin, but it's something I haven't personally tried
![]() I disabled the chamber fan, and just leave it form saturated vapors. Limits the total amount of evaporated material, if the vapor pressure at the printing temperature is sufficiently low, which is easily the case with the big-molecule reactive diluents. (The oligomers don't contribute to the vapor pressure, nor the photoinitiators.)
I disabled the chamber fan, and just leave it form saturated vapors. Limits the total amount of evaporated material, if the vapor pressure at the printing temperature is sufficiently low, which is easily the case with the big-molecule reactive diluents. (The oligomers don't contribute to the vapor pressure, nor the photoinitiators.)
IPA is definitely not something you want to be careless with, but it works great for cleaning parts!
@David Geller, great point!
@controlmypad, yes, you can use the resin to fuse parts together! However, if there is any resin that is uncured, it will be visible through the clear surface
![]() @Andrew Sink yes. that's right. A friend of mine who is a chemist suggested me to find the right dilution of acetone. That should work as well. Any feedback on that? :)
@Andrew Sink yes. that's right. A friend of mine who is a chemist suggested me to find the right dilution of acetone. That should work as well. Any feedback on that? :)
Making *fully* clear parts that are made from multiple pieces is difficult, and at a certain point, it becomes more attractive to move to a casting process
@borelli.g92, I don't know that I would use Acetone
![]() Note on side. The curing reaction is fairly exothermic. I spilled a little bit of the resin on myself, wanted to peel the drop off instead of smearing it with a tissue, and lit it with UV LED. OUCH. Got a nice drop-shaped blister (and scar).
Note on side. The curing reaction is fairly exothermic. I spilled a little bit of the resin on myself, wanted to peel the drop off instead of smearing it with a tissue, and lit it with UV LED. OUCH. Got a nice drop-shaped blister (and scar).
@Thomas Shaddack is correct, you don't want to spill the resin on yourself!
NOPE!
I saw a picture of someone who spilled the resin on their leg before walking outside; once the sun cured the resin it led to a particularly nasty burn
eek, didn't realise it was that dangerous. are the fumes bad too then?
@anfractuosity: the short answer is: "It depends"
Some people are very sensitive to the smell of UV-curable resin, and some aren't
ahh
If you've ever been to a nail salon, a UV printer smells almost exactly the same
In fact, the same principles used to create a resin 3D printed part are used to make UV-curable acrylic nails!
They even use the same wavelength UV LEDs that we do!
![]() It's relatively harmless, the oligomers are big molecules that won't get through skin, the reactive diluents are the biggest concern (they can be nasty irritants and some people can get allergic to them, but there are some that are fairly good - I chose the one for my mix that didn't make my skin feel itchy after exposure, it has one of the lowest irritation indexes).
It's relatively harmless, the oligomers are big molecules that won't get through skin, the reactive diluents are the biggest concern (they can be nasty irritants and some people can get allergic to them, but there are some that are fairly good - I chose the one for my mix that didn't make my skin feel itchy after exposure, it has one of the lowest irritation indexes).
Thanks. I have been working since 2 am and have to get back to it. Best to everyone.
These are all really great questions!
Bye @RichardCollins, thanks for stopping in!
Ok, so, let's talk about washing / curing!
![]()

![]() for postcuring, one nasty thing to deal with is the oxygen inhibition. The presence of oxygen interferes with the radical polymerization. Major issue with printing inks.
for postcuring, one nasty thing to deal with is the oxygen inhibition. The presence of oxygen interferes with the radical polymerization. Major issue with printing inks.
![]() Another nice usage of UV-based 3d printers is to make PCBs.
Another nice usage of UV-based 3d printers is to make PCBs.
Have you ever tried?
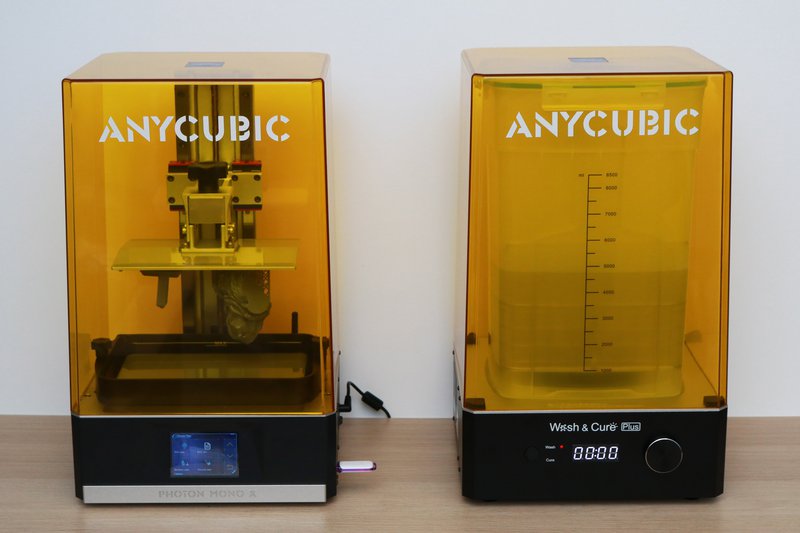
Here's an example of a resin 3D printer, next to a Wash / Cure station!
This station has two functions: 1) wash the part, 2) cure the part!

Looks like the washing step generates a far amount of waste. What's the best practice for disposing of that?
After printing, the part is washed in IPA to rinse any excess resin off. Printing models hollow is a great way to reduce material usage as well as minimize the wear and tear on the part!
*fair amount
Great question @Dan Maloney!
It actually generates *FAR* less than you may think
![]() You can use IPA multiple times
You can use IPA multiple times
The IPA is heavily reusable
So, for instance
I filled this wash station with 3 liters of IPA, several months ago
![]() What is your experience with dunk tanks, vs agitated tanks (with magnet string), vs ultrasonic cleaning?
What is your experience with dunk tanks, vs agitated tanks (with magnet string), vs ultrasonic cleaning?
and it is still potent enough to remove the material from parts!

![]() @Andrew Sink - That's the same cure station I have. It's been the difference between me using my mars elegoo, and not. The cleanup was just not fun. I've had the same experience with my IPA, and have not replaced it yet.
@Andrew Sink - That's the same cure station I have. It's been the difference between me using my mars elegoo, and not. The cleanup was just not fun. I've had the same experience with my IPA, and have not replaced it yet.
It does this by inducing cavitation (making little bubbles) and actively rinsing the parts!
![]() My favorite is ultrasound. Improvised setup with eyeglasses cleaner with water, and in it a beaker with alcohol.
My favorite is ultrasound. Improvised setup with eyeglasses cleaner with water, and in it a beaker with alcohol.
This way, instead of just soaking, the uncured resin is actively removed!
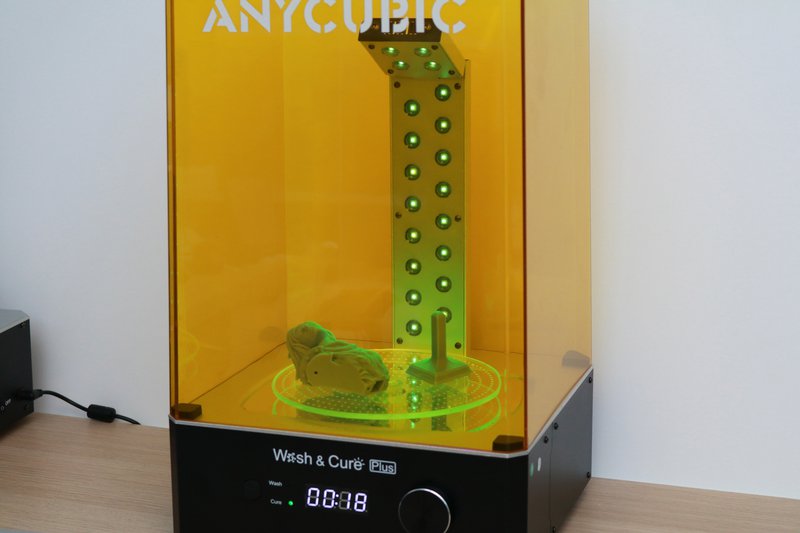
Once the part has been washed off, it can then be cured after the support has been removed!
The UV lights in the chamber will fully polymerize the part, turning it into a completed model!
From there, you can paint, sand, post-process to your hearts desire!
An interesting note, once the part has been fully cured, it will be significantly stiffer (and more brittle) than it's previous semi-cured state
If you take a part pre-curing and tap it on a desk, you will hear a "thunk"
a post-cured part will make a "click"
Are there any dimensional changes after curing? Shrinkage perhaps?
![]() Indeed. So some operations (thread-cutting, removing of supports...) can be better done on only briefly surface-cured part.
Indeed. So some operations (thread-cutting, removing of supports...) can be better done on only briefly surface-cured part.

 Any rules for determining how long to cure?
Great question, @Dan Maloney !
Dimensional change is a really hard subject to tackle, as the number of variables (including the geometry and features of the object) can influence the final part size
I rarely have parts that don't mate up, so I've never spent a lot of time chasing down the tolerance post-cure
@Involute, Not really, but it's worth noting that curing does generate heat in the part
So for practical purposes, not an issue.
So I'll typically cure for 1 minute
then let it sit for several minutes
then cure for one more minute
And to be fair, FDM prints have some dimensional issues too, after they cool.
That's true!
So, practically, again, the answer is "It depends"
It's such an unsatisfying answer!
Trust me, I know!
Discussions
Become a Hackaday.io Member
Create an account to leave a comment. Already have an account? Log In.