Need help with passive component selection as part of a relay project.
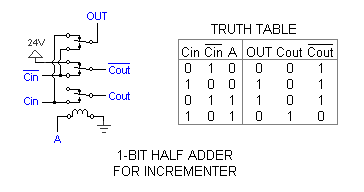
Starhawk wrote 01/28/2017 at 17:26 • 2 pointsI have built a circuit that doesn't work. (This is not unusual for me.) The circuit uses relays to count pulses from an old rotary phone dial... or is supposed to. I'm using a combination of the following circuits from http://www.electronixandmore.com/projects/relaycomputertwo/index.html (their images, not mine)...
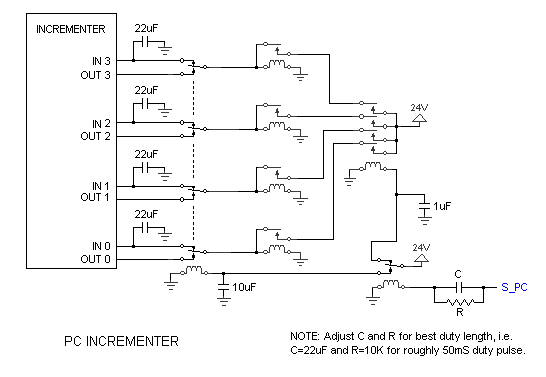
I'm using a 22uF electrolytic cap and 10k 1w resistor, per suggestion, for the "duty length" adjuster in the second image. However, where this guy is using 24vDC, I'm using 12vDC. Result: that cap/resistor network blocks the pulses from continuing on. Obviously the values there need adjusting.
I've got JD1914 "80A universal auto" SPDT relays for everything except the 3PDT and 4PDT relays, for which I've used Omron MY4N-J relays. Everything is 12v, known good, and from eBay. Outputs are to indicator lamps (*NOT* LEDs!), the 12v "Jumbo Red Lamps" that Radio Shack sold before it died and became part of Sprint. I have an additional JD1914 relay wired in as a momentary power-cut, so that when the user presses a button, it resets the entire circuit. (I've tested that functionality and it is not at fault here.) Power comes from a well-used Gateway brick rated 12vDC 3.5a. Back-of-the-envelope calculation says that that's plenty of power... JD1914 relays, as near as I can find, use ~125mA coil current each (I have seven in the circuit, including the reset relay), and the Omrons are rated 91mA at 12v each (I have six). I don't have specs for the lamps but they can't be too bad...
Can anyone do the math to tell me what cap and resistor I need, to replace the ones in that network? I don't have much money (I buy everything from eBay because it's cheap)... certainly I've not got enough for a multi-value box setup of any kind... I can upload the wiring diagram later (and plenty of construction photos, if anyone wants) -- right now it's a PDF; I just need to make it a JPEG before I can upload it.
Discussions
Become a Hackaday.io Member
Create an account to leave a comment. Already have an account? Log In.
Having what Mom and I call a "V8 Moment" -- I'm too young (~30) to call it a "senior moment", however tempted I might be. For reference...
http://www.dailymotion.com/video/x785ys_1970-v8-commercial_sport
Returning to our irregularly scheduled update here :P I re-found a PDF I'd had a copy of since basically forever. I'd found it early on in the research for this project, set it aside as not helpful, and forgotten about it.
*smacks forehead* I coulda had a V8! ...or at least a working counter...
The PDF is here --> http://www.ee.ryerson.ca/~phiscock/papers/relay-counter.pdf
I'm particularly looking at the schematic shown on page 12. There's one thing with it that I /really/ don't like, namely that the 0v line finds its way into the signal path, not just being used as a supply ground -- but since the circuit's already basically designed for me, I guess I don't have to worry so much about shorts after all ;)
I'll get a proper schematic (hand drawn, this time, sorry...) for the whole counter up in a little while. Chores first... I'm late.
Are you sure? yes | no
...and here's the schematic...
Are you sure? yes | no
Take your time, they said. We'll be here, they said.
[insert crickets here]
...anyone want to double-check that schematic?
Are you sure? yes | no
Hopefully I'll be back to this soon. Sorry everyone for dropping the ball... as my grandma used to say -- "life is what happens while you're making other plans" ;)
Are you sure? yes | no
That's o.k. we will be here when you get back on track :-)
Are you sure? yes | no
Bad news, everyone. The way this wound up being wired does not strictly follow the diagram. The wires going to the middle row of switch contacts on the 4PDT relay with the 10uF cap across it, those are taken off the lamps, not off the other 4PDT relays. Further, the ground leads daisy-chain across the lamps and then to the relays. Bypassing either side requires major surgery at this point, which I would rather strongly prefer to avoid...
@Jim Thompson, since you seem to know the math on this -- which I don't, which is fine, math and I have an extremely strained relationship -- can you tell me what size the caps on the 4PDT relays need to be, the ones that are currently 22uF, to take the lamps into account? I can order replacements on eBay if I know what size to order :) or possibly beg from the local tech shop next Thursday -- the owner is an amazing friend of mine.
@Peter Walsh -- don't worry about delays etc -- we all have our own lives :) I really really really don't want any semiconductors in this, though, and I'd be concerned about the effect of a driver on the circuit, given how the lamps are wired in.
@vdovydaitis -- TBH I thought about reed relays and the like. I didn't think they'd have the requisite contact strength -- and I really wanted relays where you could see what was going on inside. (...and, again, the RC circuit is very much long gone.)
Are you sure? yes | no
The math isn't that bad: when you discharge a capacitor through a resistive load, the time constant (the time it takes to discharge the capacitor to about 1/3 its full charge, which is roughly (very roughly) when a relay will drop out) is the capacitance in Farads times the resistance in ohms.
The rest is just from experience - I'm really just guessing that 10 ms differences between the drop-out times of the relays will be sufficient, and also this is about what the original designer used.
As for what capacitance to use with the lamps in circuit, I think this would be a bad idea, because there is such a difference between the cold and hot resistance in an incandescent lamp (like 1:5), the time constants and therefore delays in the circuit would be different depending on how long the lamp was on, which could cause the circuit to operate unreliably.
Finally, I wouldn't call this "bad news". Finding the error in a project is usually good news unless the error resulted in the destruction of one or more expensive components. Just fix it!
Are you sure? yes | no
"Just fix it!" Easier said than done. That's some nasty wire-work to rearrange, mostly because of tight space and 22awg wire. There's a reason I did it the way I did originally...
...plus my life is going to get in the way in some severe ways here. I have another batch of errands today (long story), and this weekend Mom (I'm 30, before you ask) wants me to help her pull apart and redo the closet/attic that has all the Christmas decorations in it, because gee why not. I ain't made to truck stuff up and down the stairs like that, Mom!
Maybe tonight if I'm not too dead from the errands, I can rework it. Ugh. This is going to suck.
Maybe I should just abandon the thing until I can afford to get the acrylic redone AGAIN and do the circuit right (i.e. not with dynamic capacitor BS). That's going to be quite a while, though... even Pololu's cutting service is *ahem* not cheap...
Are you sure? yes | no
PSA: do NOT buy the Sunbeam brand LED nightlights at Dollar Tree. The prongs are not well secured (hey, China -- solder doesn't stick to steel!) and can pop loose... causing all sorts of trouble. I'm glad I took mine apart before it could really do anything... oh, and they're dim as can be, anyways.
In related news, I now have a spare 16v 100uF capacitor... Chongx brand.
Are you sure? yes | no
Sorry for the delay in replying - I only check Hackaday.io a couple of times a week, sometimes less.
I think Jim Thompson and Vince are correct - lamps in parallel with the relays will suck all the power out of an incoming pulse, making the relays not trip.
Reworking the circuit to account for the lamps is possible, but as Jim pointed out, using lamp drivers is a better solution. A transistor will draw a negligible amount of current from your pulses, so you can focus your development on the relay behaviour.
Try it without the lamps, and if that works try using a single lamp driver and see if that affects one relay, and so on.
My hackerspace has a lot of donated transistors - I can send you some if you need any (PM me if interested).
Are you sure? yes | no
A couple of things:
(1) Looking at the photo's of the relay computer, he is using signal relays. The coils for these only draw a few milliamps (4-8mA) and have a large coil resistance (700+ ohms). You are using power relays which draw a large coil current and have a low coil resistance. The voltage drop across that 10K resistor is going to be huge with an 80ohm coil resistance, which is why the relay won't energize (voltage drop should be at most 4-5V).
(2) The RC circuit is in there for signal conditioning of the S_PC line in the relay computer. If you need signal conditioning of the pulses you need to know the characteristics of the rotary dial pulses. Rotary dials put out 10 pulses per second, and they may already be at 50% duty cycle (i.e. 50ms on and 50ms off). Your mileage may vary. What you may need is an Low Pass Filter to deal with the High Frequency noise generated by the pulse switching in the dial (or not as relays are fairly forgiving). I would go with @Peter Walsh and just take the RC circuit out.
(3) To energize your relay you are going to need a pulse that is at least 10ms long (preferably 20ms). If the positive pulse is too short you may want to consider inverting the relay and input (i.e. utilize long negative pulses.) One way to test this is to bypass the rotary dial with a push button and count button presses. If that works (with the RC circuit removed), then the pulse from the rotary dial is too short.
Hope this helps.
Are you sure? yes | no
just for the record : #Relay-based projects
Are you sure? yes | no
Oh nice... once I get it working, I'll do a project writeup. Probably.
Are you sure? yes | no
Just do it !
Are you sure? yes | no
LOL. Not tonight, Josephine... (as my grandma would say). I'm tired :( errands kicked my butt.
Are you sure? yes | no
Do you have a schematic? A Fritzing drawing is extremely difficult to troubleshoot with.
Are you sure? yes | no
Ha! That's not Fritzing. That was done in CorelDraw... I'm an artist amongst many other things. (Before anyone asks... that copy of CorelDraw was a Christmas gift from my father, who is also an artist. I did not pay for it, he did. He /has/ money. I don't!)
...but, yes, I can make a schematic from the diagram. Give me till late tonight, please -- I have errands to run in a half hour or so, that will take the remainder of the afternoon, and probably into the evening as well... I may need until tomorrow evening (I have engagements in the morning and early afternoon), but I really don't think so. We'll see.
Are you sure? yes | no
Gonna be tomorrow mid-to-late afternoon or evening. Sorry guys, I'm pooped.
Are you sure? yes | no
Oh - I didn't see your current specs for the relays. Peter is right - that's about about 96 ohms for the JD1914s and about 130 ohms for the Omrons. Can you find a current spec for the lamps, or measure either their cold resistance or current? Even a small lamp can easily draw 100 mA hot, and much much more when first turned on.
Are you sure? yes | no
11.5 ohms cold. The lamps are Radio Shack Cat #272-0336... I can't get squat out of them as far as specs go. Maybe you can? Good luck...
EDIT: that's measured with my Sparkfun Multimeter (one of the last yellow $15 ones sold) set to 200R.
Are you sure? yes | no
Okay. I didn't trace all of the wires, but see how the circuit is put together now. So back to the time constant calculations. This is likely the cause of your problems. First, I don't know if you ever tried this, but since you're feeding the circuit pulses anyway, you're better off without that RC circuit on the input.
So about the other capacitors: there's a reason they used three different sizes of capacitors: so that the relays will deactivate in the correct order. This also assumes, though, that all of your relays have the same coil resistance. The lamps are connected to the SPDT relays, which are just latches, BUT their coils are driven by the Incrementer which has the 22 uF capacitors. Having the lamps on that line are going to seriously shorten the time constant. Note that the lamps, at 12 ohms cold, dominate the load on the 22 uF capacitors, giving them a time constant of 264 us. That's not nearly long enough to make the circuit work - relays of this size need at least 50 ms to activate or deactivate, and anything less than 10 ms isn't really going to have an effect on their relative release times. The relay with the shortest delay is the 4PDT with 1 uF, which has a TC of 120 us, so I would bump that up to 10 uF to give you 1.2 ms of drop-out delay on that one. The next one that should drop out is the 4PDT with the 10 uF capacitor, and I think 10 ms should be good for that. 10 ms / 120 ohms is 83 uF, so round that to 100 uF. The 22 uF caps on the Incrementer output, even without the incandescent lamps are feeding 80 ohm relays, so to get a 20 ms delay on them takes 20e-3 sec / 80 ohms = 250 uF. And that's WITHOUT the lamps. My suggestion would be to add a lamp driver transistor to each of the lamps so they don't load down the capacitors. First, though, I would just disconnect the lamps and see if the relays start making the appropriate noises. You can use your multimeter to see which relays are on once the dial has returned to the rest position. If it works without the lamps, you need to find another way to drive the lamps, or switch to LEDs with current limiting resistors. Sorry to say. The first circuit on this page https://www.evl.uic.edu/drew/courses/AD405/PWMpowered.htm should do the trick. Doesn't have to be TIP120 transistors, but the turn-on current is going to be about 1.1 A so just use something that's good for at least 2 Amps.
I told you dynamic relay circuits are a bitch. The relays Harry Porter used are little DIP relays, which means they're faster to begin with AND have higher resistance - for 24V, they're probably at least 1 kohm coil resistance, which is about an order of magnitude higher than you're using, which explains why the capacitors need to be an order of magnitude bigger.
Are you sure? yes | no
I have a 10uF cap... I think I can salvage a 100uF... I'm severely allergic to semiconductors for this project (blame my artistic side) so can you calculate up for me what the output caps will need to be with the lamps involved? FWIW, I have some 1500uF caps, but they're only rated 6.3v -- much too low for this. A pity. (They were to replace some blown ones on a motherboard. I later decided to abandon that project... it honestly wasn't worth the trouble.) I only have small signal transistors anyways... 2N2222 and 2N2906 -- and they were "cheap on eBay" from HK/China, so the usual ratings for them may be a bit *ahem* liberal.
The RC circuit is very gone.
I will see what happens with the lamps out of the circuit, in a little bit (dinner first, sorry!) -- the relays have transparent cases, so I can see when they're operating. All but the four SPDT relays in the top section have LEDs in them, as well -- hence the polarization marks on the wiring diagram.
Are you sure? yes | no
I agree with Peter Walsh on your RC issue: try running the circuit without that, i.e., connect the pulsed input directly to the relay coil.
Are you sure? yes | no
Done. For results, see the comment below starting with the word "Partially" :)
Are you sure? yes | no
It's hard to help without seeing your full circuit. The circuits from electronixandmore are somewhat helpful, but not complete. For example, what is the 'A' input on the half-adders (which drives their relay coils) connected to? And also, what are you using to reset the circuit when the user activates the dial? There should be contacts on the dial that either close or open whenever the dial is off the resting position, but I don't know how you have these wired in.
Something to think about when using RC pulse shapers in relay drive circuits is that the coil resistance of the relay is significant (in effect it can be considered to be in parallel with the resistor), so it will be helpful to also know what coil resistances your SPDT and 4PDT relays have.
eloctronixandmore's counter circuit is a dynamic design, meaning that it relies on stored charge on the capacitors to hold the value of each relay output (on the half adder outputs). As is described on their website, this was to save on relays because otherwise they would need two relays for each counter bit. However, they DO note that the circuit as shown had some problems, and it looks like they ended up using the two-stage counter in the final design, most likely because they couldn't get the single-stage (with capacitors) design to work reliably. Trying to save relays by using tricks like this can be a false economy if you end up with an unreliable circuit.
In your case, you're using a slow enough input (assuming that's a 10 pulse/second telephone dial you're using) that you should be able to see how long each relay is being energized if you have lamps wired across them.
However, this brings up another point: or two, actually: first, assuming your light bulbs are across the relay coils, they ALSO need to be figured into the overall resistance of the relay coil circuits. And second, since you're using incandescent lamps, you should know that these have much lower resistance when cold (i.e., when you first turn them on) than once they are hot (hot enough to see). The good news is that having light bulbs across the relays will help them to turn off, since when each relay is turned off, the collapsing magnetic field has a load to discharge into, which should eliminate a problem with "lag" that the electronixandmore guys reported having trouble with.
Dynamic relay circuits can be a real bitch, because you can't just slow them down to note the state of each relay at each pulse - they'll only operate within a fairly narrow range of pulse rates. If you post the full schematic and the coil resistance of both relay types and the cold resistance of the lamps, I can try to help you.
Oh - one more thing: since your input is mostly-high and pulses low, this is the opposite of what electronixandmore's circuit expects. You can fix this by swapping the wires going to the normally-open and the normally-closed contacts on that relay connected to S_PC. What the first relay (the SPDT) is doing is enabling the inputs from the half-adder to drive the latch relays (the four SPDT relays) by energizing the left 4PDT relay when each pulse comes in, and enables the holding current from the upper-right 4PDT relay between pulses and when no pulses are coming in, so you need to invert the input for it to behave correctly. Swapping those contacts will do this.
Are you sure? yes | no
Thank you for a well-thought and detailed reply! I'll get that info up shortly. Give me an hour or two to reformat the wiring diagram and to shrink the pictures from my camera to something not-ginormous.
...I've already got a relay-NOT gate on the input from the phone dial. I've explained this twice now. Forgive me for being terse, but having that be missed multiple times is a little frustrating.
Are you sure? yes | no
Here's the wiring diagram :)
The red block at the bottom is the power switch. DPDT. The dark gray circle next to it is the reset switch. Tan squares with 'slot' terminals are the JD1914 relays, light grey rectangles with lots of round terminals are the Omrons. The red glowy circles are the lamps. Screw symbols represent screw terminals. Wire colors are -- black, 0v supply -- red, +12v supply -- green, +12v signal. The telephone dial uses blue wires for either side of the pulse/dial switch and white wires for either side of the hook switch.
96dpi photo of the counter in its more-or-less present state --
96dpi wiring photos --
...I'm no photographer (as you can tell) and my camera is a wimpy Kodak POS with only 7 MP -- but if you need better/detail photos, I can probably do that. Before you ask, everything is soldered, even to the quick-disconnect terminals on the SPDT relays (cringe!) -- I don't have the money for a proper crimper, and trying to do quick disconnect terminals with needlenose pliers absolutely kills my hands almost before I start. I have carpal tunnel or something like it...
Are you sure? yes | no
What more information do you need to help me further...?
Are you sure? yes | no
Still hoping for assistance with this...
Are you sure? yes | no
Hey, Mr Walsh, I'd love to have further assistance at some point, continuing to troubleshoot this... if you're willing...
I'll gladly post wiring diagram and photos if that would help.
Are you sure? yes | no
The purpose of the cap and resistor is to turn a long DC signal into a pulse. If the S_PC input is itself a pulse you may not need the resistor and capacitor at all.
So the first question you might ask is, what does the S_PC signal look like? Is it a fairly long ON/OFF signal that could be considered DC, or is it already a pulse?
Are you sure? yes | no
*I'd* call it a pulse, but I'm way more amateur than engineer. It's the signal off an old rotary phone dial (the pulse/dial switch, not the hook switch!), inverted because that particular switch is normally closed, not normally open the way it needs to be here. If it matters, for this circuit, +12v is a logic high, floating is a logic low -- aka the common "floating zero" method as quite commonly used in relay logic to avoid even the chance of a short.
Are you sure? yes | no
Try making a direct connection (ie - short out the RC circuit) and see if that works. You may need to invert the output of the rotary phone, you can do that with another relay.
Are you sure? yes | no
I'll try that and report back :) there's already a relay inverting the pulse-dial switch, BTW...
Are you sure? yes | no
Partially working now. The 4PDT relay with the 10uF cap fires, along with one of the SPDTs on in/out1 of the 2nd schematic, but the 4PDT relay with the 1uF cap won't fire at all, so the circuit still doesn't count.
Should I stick a 10uF in, in place of the 1uF, and see what happens...?
Are you sure? yes | no
You said "...but the 4PDT relay with the 1uF cap won't fire at all...."
Looking at the schematics this relay should be active/energized constantly when no pulses are arriving at the S_PC.
Check that you actually have 12 volts across this relay.
Are you sure? yes | no
When the S_PC line first comes on, the capacitor appears as a dead short and the full 12v is applied to the relay.
Later on, in the steady state condition the capacitor acts as an open circuit so the resistor and the resistance of the coil act in series as a voltage divider. Your relays have a coil resistance of 80 ohms, so see a voltage of 12 x 80/(10K+80) volts in the steady state condition and are turned off.
The time to go from instantaneous to steady state is the time for the capacitor to discharge through the resistor.
As a general rule, T = R x C for capacitors discharging through resistors. This formula calculates the "time constant" of the circuit, which is the time needed to rise to 63% of maximum or minimum, depending on if charging or discharging.
The actual voltage follows an exponential curve, so you would need to find the actual voltage where the relay turns off and plug it into the exponential formula to find the values for your relay, but chances are that just looking at the time constant is good enough. Most circuits are designed using the time constant.
So the original 10K x 22uF => 22mS, which is about half of the 50ms shown. The original circuit probably had light weight relays that flipped easily.
If your relays are stiffer, you want a longer time constant so you need to increase the resistance, so the capacitor takes a longer time to discharge. Try using 2 10K resistors in series instead of just one - that will double the pulse length. If that doesn't work, try using 3 in series.
All this does is increase the pulse length, so it probably doesn't matter to your circuit that much if you don't hit the value exactly right. A little extra won't hurt, and not enough will make the relay flipping intermittent.
As the page points out, you will need to "tune" the values to get the best response. There's no easy way to simply calculate the best value because it depends on the minimum voltage that will cause the relay to flip, and that isn't a published number and it varies with manufacturer and device and which way the relay is going. You would also need to add a comfortable extra amount of voltage to ensure reliable flipping, and this is an arbitrary "feels like it should be enough" value.
If you want to calculate the actual voltage over time, the link below explains the exponential decay of RC circuits:
http://www.electronics-tutorials.ws/rc/rc_1.html
Are you sure? yes | no
Thanks for the detailed explanation! I'll replace the existing resistor (wound around the leads of the cap and soldered in place) with two resistors and report back...
Are you sure? yes | no
Wow, even THREE isn't enough... maybe the cap is the wrong size? I have 10uF and 1uF caps that I can shove in as well...
Are you sure? yes | no
I'm not sure I agree fully on this explanation about the time constants.
As I see it the R is more or less irrelevant for determining the active/energizing pulse length. The R is simply used to discharge the capacitor when the S_PC goes inactive/floating/off.
The actual pulse length is solely set by the value of the capacitor. If the relay used needs more power, and a longer pulse, to energize compared to the original relays then the capacitance needs to be increased.
Are you sure? yes | no