 akanzler007
Ever dreamt of your own single board computer? Well, Raspberry Pi makes it easier for you to build your own single board computer. The Raspberry Pi is a low cost, credit-card sized computer that plugs into a computer monitor or TV, and uses a standard keyboard and mouse. It is a capable little device that enables people of all ages to explore computing, and to learn how to program in languages like Scratch and Python.
The developer’s basic idea was to provide computing to all the people making computers cheap and accessible to everyone so that everyone can learn programming without having to spend a lot of money on PC. It has a potential to do everything which you expect from a normal desktop computer like browsing, watching HD videos, making sheets, playing games, etc.
There have been many great boards from Raspberry Pi like Raspberry Pi 4, 3B+ and many more. The Raspberry Pi 4 4GB model is the best board by Raspberry Pi to date with the latest technology and interfaces available which easily makes it the most powerful board in the Raspberry Pi family. Every Techie would like to have this board but the hiccup that they face is the cost of the board is a tad too high. Thus, to solve this problem Raspberry Pi came up with Raspberry Pi Zero.
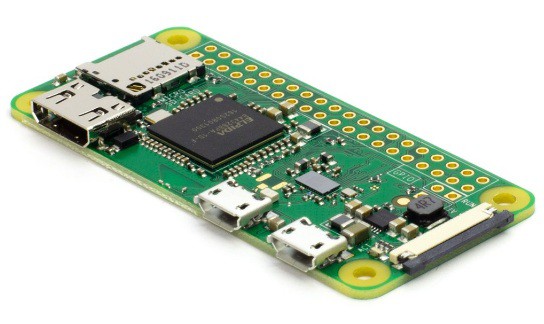
The Raspberry Pi Zero is a fantastic, miniature version of the Raspberry Pi that shrinks the board down to about the size of a stick of gum, but one problem with it is the lack of wireless features. The Raspberry Pi Zero W is a new version that packs in Bluetooth and Wi-Fi for a low price. The new Raspberry Pi Zero Woffers all the benefits of the Pi Zero v1.3, but with one big difference – built-in WiFi and Bluetooth for a low price!
The difference between the original and v1.3 was easy to see because the camera connector was added to one end of the board. The difference in the Zero W is more subtle. You can see pretty easily that a couple of new components have been added in the same area where the camera connector is located.
This is the slimmest, most pared down Raspberry Pi to date. It's kind of like the little cousin to the Pi 2 - with just a micro SD card slot, a mini HDMI port, two micro USB ports (one for power, one for USB), and 512MB of RAM. It has a single-core 1 GHz processor chip, similar to the Pi A+ and B+. The best part about all this is that the Pi Zero W keeps the same shape, connectors, and mounting holes as the Pi Zero v1.3. 99% of cases and accessories will still be fully compatible with both the Pi Zero W and v1.3.
Here’s a breakdown of the full specs on the Raspberry Pi Zero W:
- 1GHz, Single-core CPU
- 512MB RAM
- Mini HDMI and USB On-The-Go ports
- Micro USB power
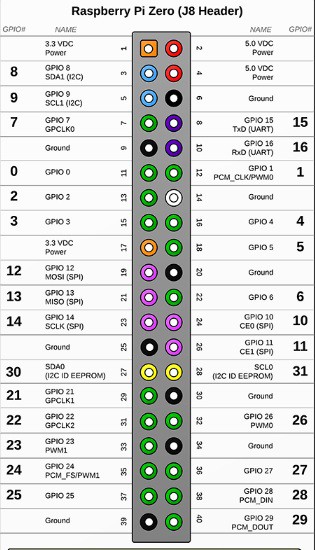
- HAT-compatible 40-pin header
- Composite video and reset headers
- CSI camera connector
- 802.11n wireless LAN
- Bluetooth 4.0
Connecting to WiFi
Next, let's connect the Pi Zero W to the internet. If you have a Pi Zero, you will need to add a Wifi dongle to your board's USB port (you may need a USB hub at this point). The Pi Zero W has built in WiFi, so you will not need any external WiFi dongles.
To enable WiFi on your Pi, look at the upper left corner of the Desktop, and left click the WiFi icon. You should see a list of available networks. Select the one you want. If it is a secured network, it will prompt you for a password. Enter the network password, and press OK. Give it a few seconds, and you should be connected. The WiFi symbol on the Desktop will change its appearance once connected. If you setup WiFi in Noobs, this information will already be saved. Adding WiFi isn't strictly necessary, but you will need internet access if you plan on doing updates.
Camera Interfacing
The key feature of the of the Raspberry Pi Zero W V1.3 was to support camera serial interface (CSI connector) which used to be equipped on high end Raspberry Pi. Thus, Pi Zero w began to be able to connect with cameras.
Indeed, numerous Raspberry Pi users choose to add Raspberry Pi cameras to have various applications. It was a shame that Pi Zero 1.2 cannot access cameras, but 1.3 supports the function again.
However, Pi Zero 1.3 still does not support DSI interface. Per the general usage, Raspberry Pi users use CSI interface more frequently than DSI interface. That might be the reason why Pi Zero 1.3 regained the CSI support first.
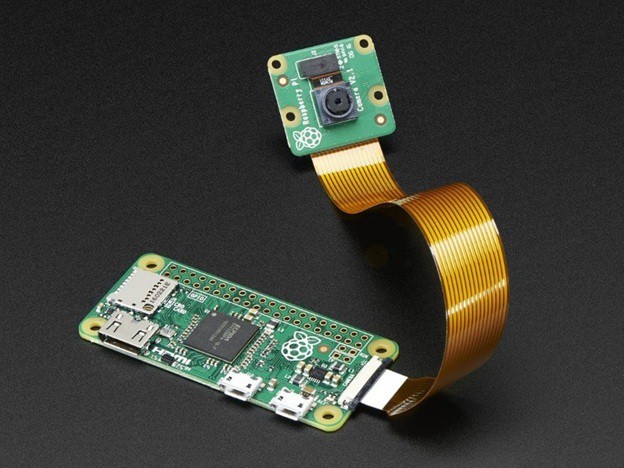
The steps to connect Raspberry Pi Zero and the camera module are given below
- Connect your camera module to the CSI port on your Raspberry Pi, this is the long thin port adjacent to the HDMI socket.
- Gently lift the collar on top of the CSI port.
- Insert the wider end of the adapter cable with the conductors facing in the same direction as the camera’s lens.
- Finally, attach the adapter to the Pi Zero by gently lifting the collar at the edge of the board and inserting the smaller end of the adapter with the conductors facing the back of the Pi Zero.
Your setup should look something like this:

Now, apply power to your Pi. Once booted, start the Raspberry Pi Configuration utility and enable the camera module: You will need to reboot after doing this (but this is one-time setup so you won’t need to do it again unless you re-install your operating system or switch SD cards).

If everything is working correctly, the camera should start, a preview from the camera should appear on the display and, after a 5 second delay it should capture an image before shutting down the camera.
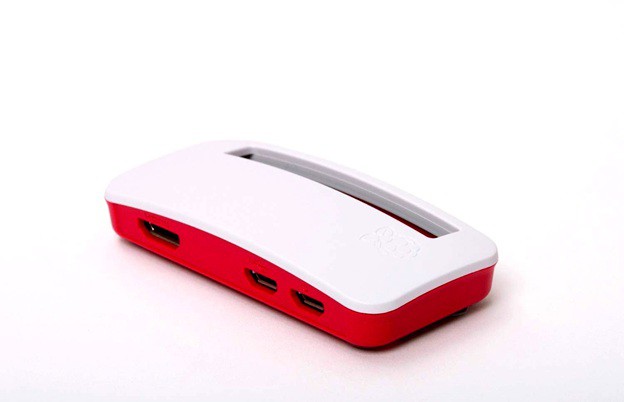
Raspberry Pi Case
This is not just a "Pi Zero W Case", it fits all three models of the Pi Zero. The bottom of the case has posts which fit the four mounting holes in the Pi Zero boards, and a tab on side which snaps over the board when it is pressed down into place, so it is held solidly in place.
There are three covers included with each case: one solid, one with a hole for the Pi Camera lens and a mounting adapter for the Pi Camera board, and one with a slot for the GPIO header.
To get Raspberry Pi Zero W board along with the case at the best Price click at the link below. Also do visit Robu.in for more Raspberry Pi boards along with their accessories at the best price possible. The link is given below.
Raspberry Pi Zero-W V1.3 Development Board With Official Case
Discussions
Become a Hackaday.io Member
Create an account to leave a comment. Already have an account? Log In.