-
HOW TO READ DELETED WHATSAPP MESSAGES ON ANDROID?
04/01/2021 at 05:50 • 0 comments![]()
WhatsApp, the messaging app used by every smartphone user which is owned by Facebook including lots of features in it. One of the basic features is Delete Messages that allows users to clear messages in order to free up space.
Have you ever deleted an important message accidentally, while clearing out the chat history? If yes then worry not I have mentioned some of the methods in this post that will help you to Read Deleted WhatsApp Messages On Android.
Method 1: Read Deleted WhatsApp Messages On Android Using Google Drive
Well, this method is only possible if you have done the backup process of your WhatsApp data to Google Drive before deleting messages.
So, before knowing the actual steps to Read Deleted WhatsApp Messages On Android, let’s look over the process of backing up messages to Google drive.
Backup WhatsApp Data To Google Drive:
If you have already backed up your messages then skip these backup steps.
Otherwise, follow these steps to back up your WhatsApp Messages On Android:- Firstly, open WhatsApp on your Android phone, and then click on three vertical lines present in the top right corner.
- Secondly, open Settings and click on the Chats option.
- On the Chats option, click on Chat Backup where you have to set the backup frequency that is Daily, Weekly, or Monthly as per your preference.
- Then on the backup option, you will be asked to choose if you want to backup data only on a Wi-Fi connection or not.
- Finally, click on Backup Over so that your data will be saved to Google Drive.
I know that no one wants to face such a problem. So, to avoid the dark side keep a backup of your data for further use.
Now come to the method of restoring backup messages from Google Drive:
- Firstly, uninstall WhatsApp.
- Secondly, reinstall WhatsApp using the same Google account and same phone number that was used for backup.
- After verifying your phone number, you will be asked to restore the data that has been backed up to your Google drive.
- Lastly, you will get all backed up WhatsApp messages from your drive.
The main problem arises when messages get removed from WhatsApp without any backup. In this case, you can move on to the second method.
Method 2: Read Deleted WhatsApp Messages On Android Using Local Backup
If your chat history has been deleted and you have not done any backup process then also using this method you can Read Deleted WhatsApp Messages On Android.
So, here the question arises how? Simply the answer is because WhatsApp creates its local backup in the phone’s internal or SD card storage once a day.
Now follow these steps to restore messages using local backup:
- First of all, open File Explorer.
- Secondly move to a folder named WhatsApp, there you will find a Database folder.
- After that rename msgstore.db.crypt12 to msgstore-latest.db.crypt12.
- Then rename msgstore-YYYY-MM-DD.1.db.crypt12 to msgstore.db.crypt12.
- Completion of renaming, uninstall WhatsApp
- Then click on the top left corner in the menu of Google drive.
- Click on the Backup option and delete the backed up file.
- After deleting reinstall the app.
- When asked for restoring data, click on Restore and get back the old deleted messages.
Conclusion
So, now if you have deleted messages accidentally then no need to worry. You can Read Deleted WhatsApp Messages On Android using these above-mentioned methods.
We hope it was helpful for you.
Thank you for reading. -
How to Disable Game DVR and Game Bar Windows 10?
03/17/2021 at 12:17 • 0 comments![]()
Dealing with the slow gaming performance on your Windows 10 PC? Is Game DVR and Game Bar is enabled on the system? If so, then this might be the reason for slow gaming. But don’t worry as in this article, I am going to explain to you three different ways to Disable Game DVR and Game Bar on Windows 10 PC.
There are so many users who reported the same issue and one thing that was common among all of them is the Game DVR and Game Bar were enabled on their systems.
No doubt that they are amazing features but they also have some disadvantages. Having these features enabled on PC affects the system’s performance and you may experience issues while playing games.
However, there are different ways to disable these features on Windows 10. If you want to do so, then go ahead and follow the mentioned steps.
What is the Game Bar and Game DVR?
Game Bar and Game DVR are some of the coolest features introduced by Microsoft. These features have specially designed for gamers in order to optimize the gaming experience. Microsoft has added the Xbox Game DVR and Game Bar features only to the updated version of Windows 10.
Game Bar is a wonderful feature that allows gamers to take control over their games too. It is the graphical interface that allows users to record gameplay, take screenshots, save clips while playing the games. One can easily access the “Game Bar” feature by pressing the Win + G buttons.
Whereas, Game DVR is part of the Game bar tool that automatically records all of your gaming moments in the background while playing games so that you can capture all the amazing moment happens while gaming.
Now, coming to the actual comparison, Game Bar doesn’t affect the system performance but it keeps popping up throughout the gaming session. Also, it is already enabled by default on Windows 10.
But the case is not the same with the Game DVR. Unlike Game Bar, it eats up a lot of system resources that may affect your device miserably especially if you are running the old PC or low configuration system.
Hence, keeping the affected system performance in mind, I suggest you disable the Game Bar and Game DVR. If you don’t know how to do this, below are several ways to do the same.
How to Disable Game DVR and Game Bar Via Windows Settings App
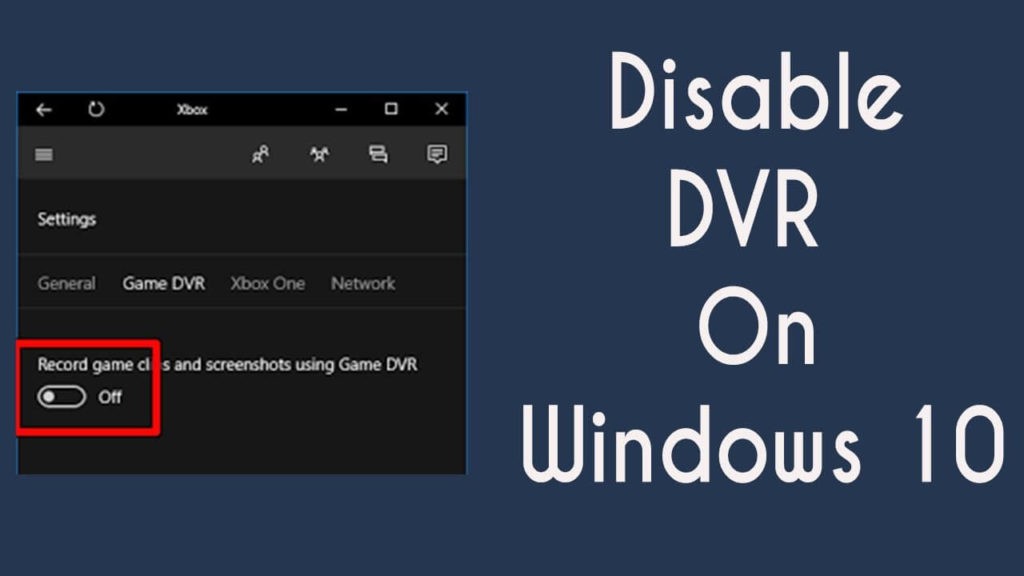
Steps to disable Game DVR on Windows 10
- Go to the Windows Start button.
- Click on the Settings icon.
- Select the Game option from the Windows Settings app.
- Click on the Game DVR.
- Now, tap on the switch given under the “Record in the background while I’m playing a game” section to turn it off.
Disable the Windows 10 Game Bar
- Right-click on the Windows Start button and select the Settings option.
- Click on the Gaming and go to the Game Bar.
- Now, click on the switch located under the Record game clips, screenshots, and broadcast using Game Bar section to turn it off.
Now, you won’t see the Game Bar feature again unless you return to the screen and turn it back on.
How to Disable Game DVR and Game Bar on Windows Using Registry Editor?
- Press the Windows + R keys simultaneously to open the Run window.
- Type regedit on the Run box and click on the OK button.
- On the Registry Editor window, go to this path:
- Right-click on the AppCaptureEnabled > select the Modify option from the context menu.
- Now, modify the Value Data from 1 to 0.
- Double click on the HistoricalCaptureEnabled > change the Value Data from 1 to 0 to disable the Game DVR.
HKEY_CURRENT_USER\Software\Microsoft\Windows\CurrentVersion\GameDVR
How to Disable Game DVR and Game Bar on via Group Policy Editor?
- Press the Windows + R keys to launch the Run dialog box.
- In the Run box, type gpedit.msc and click on the OK button to open the Local Group Policy Editor.
- In the Local Group Policy Editor window, navigate through the following path:
Computer Configuration > Administrative Templates > Windows Components > Windows Game Recording and Broadcasting
- Double click...