 Sarah Petkus
First of all, if you haven't seen The Fifth Element, all you need to know is that we're making replicas of these fancy things below which will operate with mechanical and electrical parts instead of spooky earth magic like in the movie =]

Mark and I decided that regardless of what the outer facade was made of, the inside of our stones needed to have a solid but light core which would give them structure and keep a consistent size throughout the four. Foam core will do the trick for this. As such, we modeled the shapes in their final dimensions in CAD and then worked our way inward to determine the measurements for the core.
The foam core bases were kept as one whole piece, scored in the areas where it needed to fold in on itself. Easy enough :


I must note that initially we were going to glue floral foam to the outside of these, carve the markings into them, plaster the surface, and then paint them to look like stone, but lets face it...... we have a 3D printer.
Mark modeled the facade of the stones in CAD. We decided for the sake of printing in safe bursts (in case of fail), it would be smart to break the model into many ring shaped pieces which would stack onto one another. The lower green section is actually six separate smaller pieces :

So far today we were able to complete the 'Earth' stone... because it has straight lines carved into it instead of wavy ones and is thus the easiest one to recreate. Mark and I printed six rings for the carved bottom half, and two slightly thicker rings for the solid upper half :

It took the whole day to print all these pieces... but once they were done, I jammed them rather violently onto the foam core centerpiece (tight fit) :

Each ring sits on a small groove/lip of the piece below it, so they lock together like puzzle pieces. The added pressure of the foam core forcing outward keeps them all firmly in place. The final structure is solid and extremely light weight :

Aside from the design on the outside of the stones, we needed to plan for the moving parts at the top. The upper portion has 15mm wide slots in the center of each face. These are the parts that “open" at the end of the movie when the stones activate. We modeled three triangular slices that swing out on some wire as hinges :

These metal wire bits slide into slots Mark made in the wall of the main piece :

The wedges fit in place like so :

These pieces will actuate via servo and wire pushrod. I plan to start on the servo and LED mount tomorrow while the pieces for the next stone are printing :

So yeah... this is our Earth stone so far. Like I said, technical part comes next... and I'll post an update as soon as I get this one activating and glowing all pretty-like. =]
[youtube ]
First I have to show off how nicely the prints turned out! Some of these larger pieces were printed over night for nine-hour periods and were completed without fail (which is surprising). In the morning there would be a loaf of stone sitting on the printer bed :

Mark is responsible for creating these seamless linear designs on the face of the stones :


We ran out of natural filament by the time we got to the 'wind' stone, so it's in a silver/gray color instead. This one was printed last because unlike the other three stones, its design is on the upper portion which overlaps the wedge pieces that pop out. It called for a little more fuss and planning when designed :


Over all, I'm extremely pleased with how they look so far. I can't wait to paint them though....!

I spent most of this past weekend getting the mechanical parts in working order. For this project, that's actuating those three wedge slices on each face of the stone to slide out when 'activated' :

I've had some tiny servo motors lying around from a couple of summers ago when I first started making delta robots... this is the perfect chance to finally use them. They fit nicely in the center of each column.
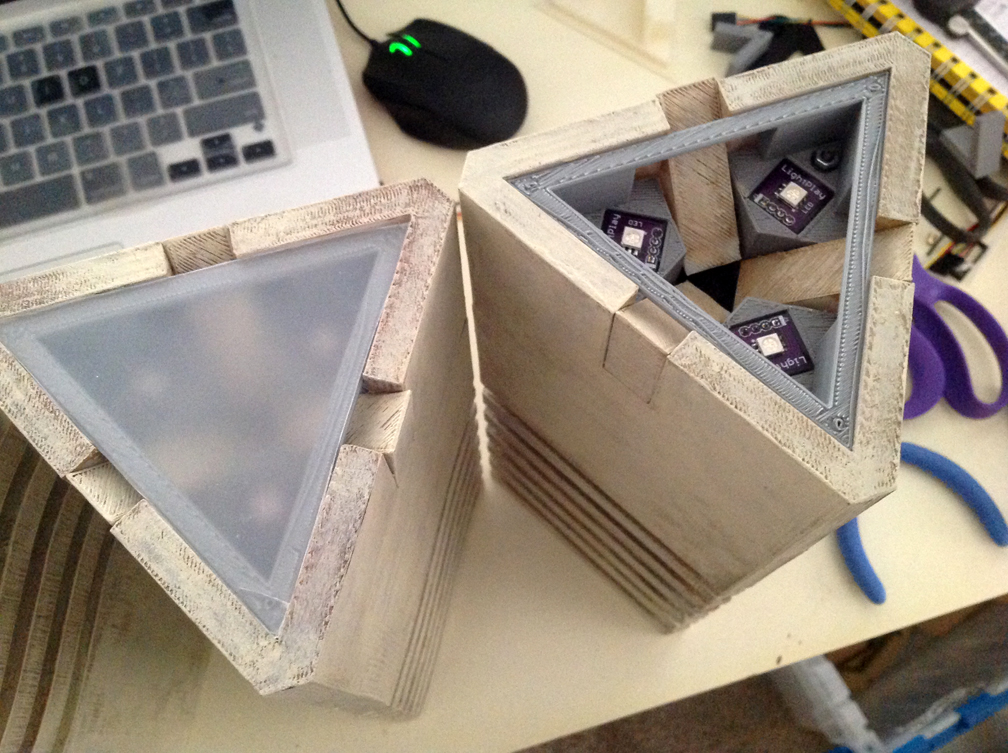
The LEDs also needed to be mounted somewhere on the top. The only realistic place to put them was in between the wedge pieces in the three corners. Luckily for Mark and I, we have a million little RGB LED boards for our Kickstarter kit (which we're also working on fulfilling right now), so we were able to repurpose a few of those conveniently size squares. The mounting plate I design ended up looking like a very odd throwing star once it was printed :

Alas, their design has two functions: to hold the LEDs, and to funnel the three push rods through the center to the motor, keeping them nicely aligned.
The servo bracket attaches to this LED throwing star piece like so :

And the whole 'core' drops down the center of the stone through the top, resting on the foam core inside :

This design is nice because all of the wires for the LEDs and motor fall straight down to the bottom plate of the stone, where one of our brain boards will be running the whole show (We also have a few prototypes of this board from our KS kit hanging around, and since they use the ATMegas 328 and already have designated servo and LED headers, they're perfect for this job) :


We have it rigged up so that when you hit a button, the stone opens and the LEDs slowly turn on. We also need to get all of the motors calibrated so that the wedges come out to the correct spot on cue and then suck back in all the way when deactivated.

We probably shouldn't have taken on this side project amidst all the pressure to prepare on time for our display at Maker Faire, however I'm glad we have this awesome life relic to show for it!
Since my last update, I took the four complete 3D printed stones and gave their surface a rather sharp makeover. All those years in art school came in handy again. It surprises me just how many techies have never heard of gesso … so I'm tapping this apparent art secret for the sake of painting on an otherwise stubborn surface. ABS will take acrylic paint, however instead of priming it with anything you might get from Home Depot in the paint section… you can go to Blick and grab a pint of clear gesso (canvas primer). It may be a little more expensive, but it's less volatile, doesn't have any fumes, and has the best tooth when it dries for painting on… you'll be thankful you spent the extra money.
So, I gessoed my rocks… and painted them over with a nice solid undercoat of dark muddy brown. The lighter color was dry brushed on top with a healthy amount of baby powder added to the paint to give it a matte, chunky appearance when it dried. The final texture is pretty sharp :


After they were polished up, it was time to get them ready to fulfill their purpose. We ended up using an old revision of the board we designed for our delta robot Kickstarter kit as the brain to drive the LEDs and servos. They have an ATMega 328 on board, so we used the Arduino platform to upload our code onto them (This is Rev A of our delta brain from last year) :

Since there is only one input for a single RGB LED we had to make some Y cables so that all three LEDs could be powered in parallel :

guts splayed out :

Also, the easiest and best way I've found to make excellent light diffusers is to go to the Container Store (or some place that has lots of plastic boxes for cheep) and buy something that has a frosted appearance. I found some boxes for under a dollar a piece with perfectly flat lids that I cut triangles into for the tops of these stones :

Here is what the LED tiles inside look like again :

Mark got some basic code on the brains to make them do :
[youtube ]
As soon as they were ready we rushed to the living room and set up an altar around the sofa! It was late, but we wanted to test out how they worked as 'mood lights'. Mark programmed the LEDs to pulse slowly… which was a cool effect because the overall color ambiance of the room would shift slightly as they all faded in and out at random intervals. I am pleased to report they definitely serve their purpose well! Right now each is powered with their own wall wart, but once we switch those out with battery packs they will become permanent fixtures in the living room!
Just add love...


So… I'd call the mood lighting project a success, however like all projects there are some things we learned along the way and would improve if we had to do it all over...
Here is what we'd do better :
Mark and I plan on making the STLs for these available on our website so that anyone can potentially use up an entire role of filament and make their own set of stones too! Before we do that, we want to optimize the design so that they can be printed in fewer pieces giving them a more seamless appearance in the end. The top portion needs to be removable so that the mechanical bits can be installed, so we'll explore a more aesthetically pleasing way to achieve both in the future.
The wedge pieces are a tad too snug in their slots now that they're painted. As such, the little servos we used don't have quite enough torque to push them out like they need to… so we'll tweak that as well.
The segments of our next revision should lock together somehow, eliminating the need for foam core inside as structural support.
I think other than some minor tweaks in proportion, that's it. If you do want to print your own, the natural color filament really did work out nicely when painted over. Do keep in mind that we used up an entire role for the first three stones (and we printed on the lowest setting with 10% infill!) >.<
In addition… we want to have the stones active with sensors (instead of an on and off switch) so that they can truly be as theatrical as in the movie. We were thinking of using a collection off different types to detect an approximation of their corresponding element (you know… it would be unwise to set the fire stone on fire and all). We're open to suggestions! Right now we're pondering on anything from moisture seniors, photo resistors, pressor sensors, and those nifty magnetic sensors… =D
I think tonight we'll watch the Fifth Element amidst our new life saving, light-giving stones of glowing awesomeness… I've seen the movie 409567209384760587217348 times, but it'll feel a bit cooler now because I have this sense of ownership that I didn't before. =]
Thanks for following our project! Show us yours if you decide to make them. We'd love to see improvements to our design!
-Sarah & Mark