Close
0%
0%

pi2meter

Use an analog micro-ammeter as an inexpensive output device for the Pi Zero.

Similar projects worth following
An analog microammeter makes a great output device for the Zero: it can display at least 20 distinct values and is simple and inexpensive. When paired with Sparkfun's free data service it becomes an internet-connected display.

As an added bonus we cover generating and using linearizing equations.

Of course we could use an ESP8266 instead of the Zero. However, the Pi with a WiFi dongle is only a couple of dollars more, and in return we have many more programming languages at our disposal. And of course you can do your development directly on the Zero.

Analog meters are a current measuring device. (If you have a meter that's designed to measure voltage you can still use it in this project: it's actually a current meter with an internal resistor. Simply open the meter up and short out the internal resistor by soldering a piece of wire across it.) For this project, we'll need to measure a varying voltage. How do we do that? Simple: insert a resistor in series with the meter! It's value determines the voltage that drives the meter to full scale. We'll use the PWM output to generate a varying voltage, and the gpio program (part of WiringPi) to set the PWM value.

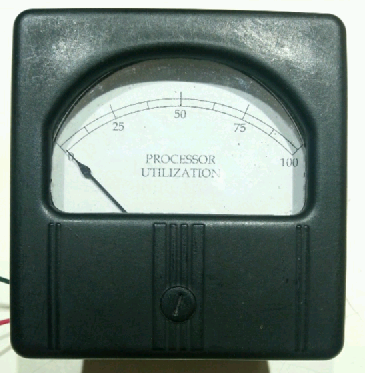
Here's the spiffy meter I used: it's from the 1950s. It's a 500uA meter with a resistance of 300 ohms. It was originally a Db meter, but with some modification (read: ripping out a bunch of parts) I turned it back into a plain old micro-ammeter. I made a custom scale since the original was logarithmic:

Here's our circuit diagram with the values for my particular meter:

Pretty simple, isn't it?

wolfram-output.txt

linearizing equation as output by Wolfram

plain - 427.00 bytes - 03/06/2016 at 05:47

Download

meter.bc

finished bc program to linearize meter

bc - 213.00 bytes - 03/06/2016 at 05:47

Download

meter.wm

calibration data ready to input to Wolfram

Microsoft Windows Media - 123.00 bytes - 03/06/2016 at 05:47

Download

meter.sh

shell script that checks Sparkfun data page and displays latest entry on meter

Bourne Shell Script - 185.00 bytes - 03/06/2016 at 05:47

Download

View project log

  • 1
    Step 1

    FINDING THE RESISTOR VALUE

    Solder a 10K resistor to the Zero's header connector hole at pin 12, and connect the other end to the meter plus terminal. The meter minus terminal is connected to pin 14. To test it type the following:

    sudo gpio -g mode 18 pwm
    sudo gpio -g pwm 18 100

    The meter needle should move. Then re-type the second line, using different numbers in place of the 100, until the meter is at full scale. Don't go over 1023. If the meter is at full scale at less than 500, replace the resistor with one that's approximately double the value and test again. If you can't get it to go full scale even at 1023, use a lower value resistor and test again. Don't go much below 330 ohms. Your goal is full scale with pwm value somewhere between 500 and 1000. Since it may take a couple of tries to get it right, you might not want to solder the resistor in: you can just hold it in place with your fingers until you determine the correct value. When you have the right value solder it in.


    CALIBRATION

    The meter is (probably) slightly non-linear so we'll generate an equation to linearize it. This is most likely overkill in this instance, but it's a technique that's very useful, so we'll go ahead and cover it. First we'll need to determine some calibration values. The process is simple if tedious: find pwm values for several meter needle settings. Try to get around ten equally spaced ones. For instance, my meter goes from 0 to 100, marked at 12.5 intervals. Here are my values, organized in x,y pairs with x being the meter value, and y the pwm setting:

    0,0 12.5,75 25,150 37.5,237 50,316 62.5,395 75,470 87.5,545 100,622


    LINEARIZATION

    Next we'll use Mathematica and these values to generate coefficients for a fourth order polynomial (Quartic) linearizing equation. Enter your calibration values into a text file named meter.wm, formatted like the meter.wm file in this project's files section. I would type it out here but the formatting gets too jumbled up.

    Then run the following command:

    wolfram < meter.wm > meter.bc

    After a few seconds the meter.bc file will be written. Mine is in this project's files section and is called wolfram-output.txt.

    The important part in it is the Out[2] line. Note that the exponents are actually on the line above, and some coefficient may be in scientific notation. Edit the file to fix these and remove the unneeded stuff. The file should eventually be a single line. Mine looked like this (ignore the line break):

    y = 0.47397 + 5.33866 * x + 0.0449517 * x^2 - 0.000653095 * x^3 + .00000291207 * x^4

    Now we'll finish up by adding some text to make it into a proper bc program. Refer to the meter.bc file in this project's files section for an example of what needs to be done. Basically you need to just substitute your equation for mine.

    Save the file as meter.bc and make it executable by typing

    sudo chmod 755 meter.bc

    What's bc you ask? It's a command line arbitrary precision calculator program. We're using it because the meter control program will be written in shell script, which doesn't have floating point math capability. (We could use Wolfram instead of bc, but I want to eventually use this on a Zero with the Lite image, which doesn't have Wolfram. Gotta use up those 2G micro SD cards!) Since bc doesn't come with Raspbian we'll need to install it by doing the following:

    sudo apt-get install bc


    USING IT

    All that's left is to whip up a shell script to grab a single value from my Sparkfun data stream and display it on the meter. My file that does this is in this project's files section and is called meter.sh.

    You can modify it to get data from your own Sparkfun data page. (They email you the access key you'll need when you sign up.) As written, it gets the first field of the most recent value.

    You can use the meter for other purposes too. The general idea is to get an input value from somewhere and pipe it into the meter.bc linearizing program, then take it's output value and use it to set the PWM value. Reverse single quotes are your friend.

    You could even use it to display how many Pi Zeros are in stock at Adafruit!

View all instructions

Enjoy this project?

Share

Discussions

Similar Projects

Does this project spark your interest?

Become a member to follow this project and never miss any updates