 shane kirkbride
We are using two main embedded controllers. The ESP8266 and the STM32F446RET6. The ESP is going to do most of the 'heavy lifting' for this project. It will need to do over the air updates and manage the data coming in from the STM as well as upload this data and interface with the cloud. The hardware is capable of these things but the big question is...can the software do it too?
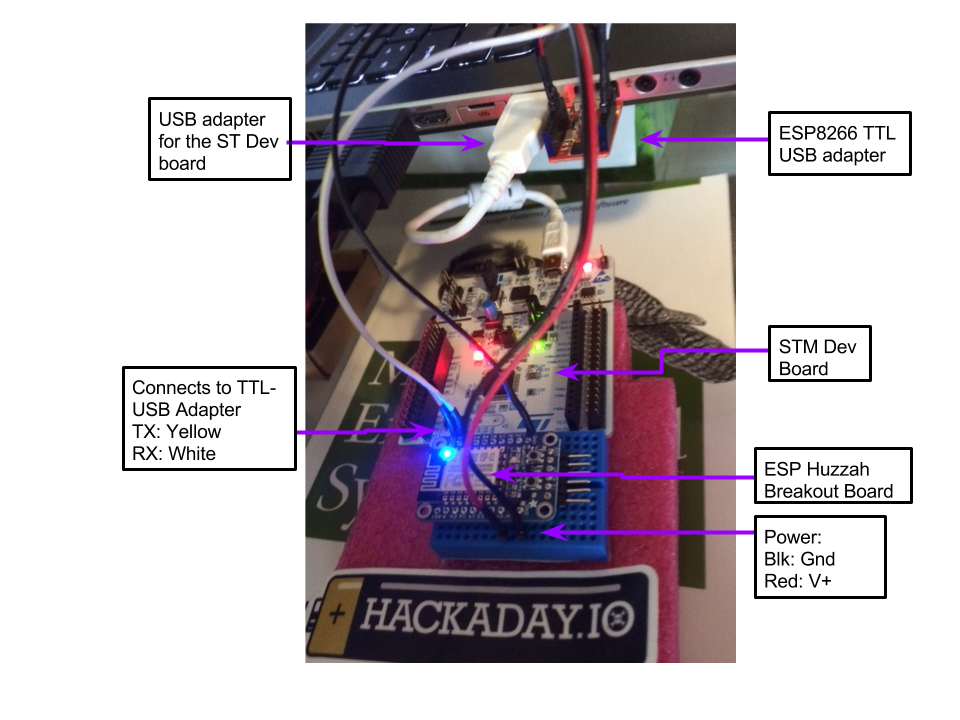
Here is an image of the prototype setup:
For the ESP
- Set up the virtual box
- Install the tool chain
- Flash the ESP
For the STM:
- Download and install the software
- Flash the STM
Set up the virtual box
Since I'm running Windows 8.1 I decided to use the Oracle VirtualBox. It is a nice piece of software to run operating systems. So download it and install it. Make sure to also get the extension pack. This will allow you to do fancy things with USB 2.0 and USB 3.0.
Here's what it will look like:
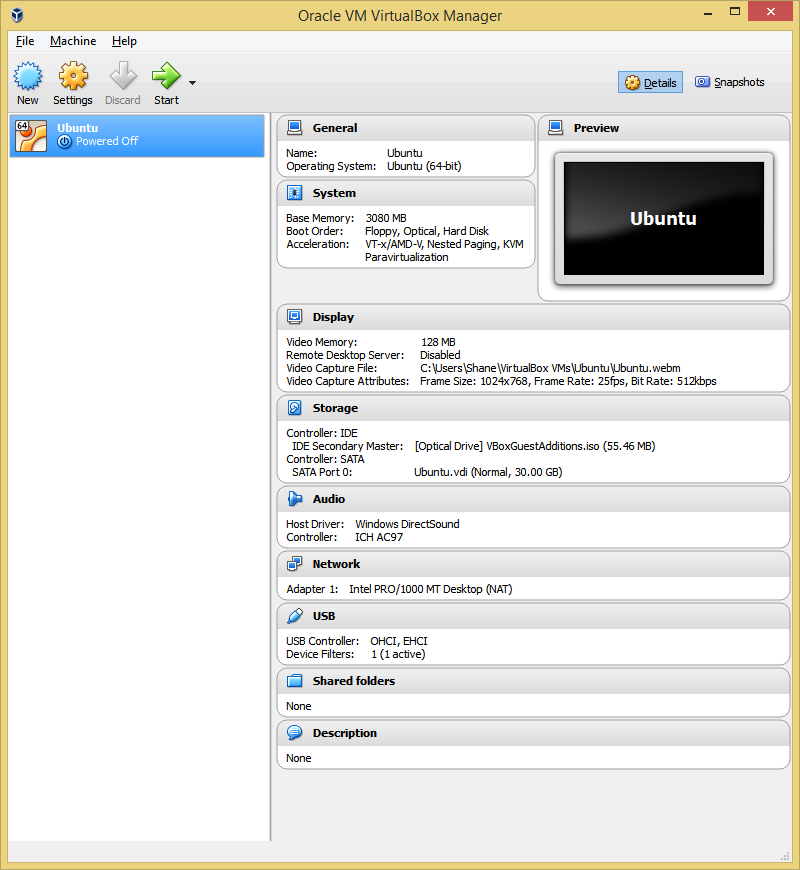
You'll see I'm using Ubuntu 14.04 32 bit image. The image is about 1GB so it takes a while to download. But this is what I found worked best. Make sure to use a build that is supported. DO NOT use something like Ubuntu 14.10 because it is no longer supported so apt-get can't do anything useful for you...don't ask how I know... There is a smaller OS that they claim will work for the ESP8266 but I wasn't able to make it work. I'll talk about why shortly. So after you download this image set it up. Just click on 'New' and follow the prompts. Make sure to allocate enough space for the ESP toolchain. 30GB was enough to load the image and the tool chain.
I had extensive issues getting the screen resolution to work correctly after I loaded the image. It was stuck at 640x480. To resolve this I went here: http://askubuntu.com/questions/451805/screen-resolution-problem-with-ubuntu-14-04-and-virtualbox and followed the instructions. You'll probably have to try a few different suggestions depending on your situation.
You will also want to make sure to set up your serial ports so you can program them through the VirtualBox. This is what I did:
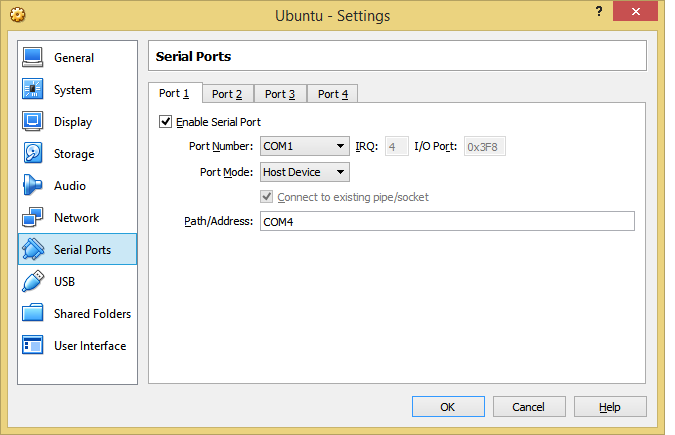 Keep in mind I'm on a Windows 8.1 Host system and the Ubuntu 14.01 is my Guest system. Your configuration might be different.
Once you get the image set up you'll be ready to install the ESP toolchain.
Incase you accidently mess up the regex for your USB to TTY board here is how you fix it:
1) First of all open regedit and navigate to HKEY_LOCAL_MACHINE > SYSTEM > CurrentControlSet > Control > Class > {36FC9E60-C465-11CF-8056-444553540000}
After you need to delete UpperFilters reg key from the right side.
2) Reboot your computer.
3) Now connect the USB device to your computer and open VirtualBox.
4) From the list select the virtual machine and from top open Settings and go to "USB" menu.
5) Now at right side press on "USB plus" green button and select USB device. Press onOK button and start the virtual machine.
6) Now disconnect USB device. Turn off the virtual machine and completely close VirtualBox.
7) Now connect the USB device and start virtual machine again.
If you are doing right then, USB device should work on your virtual machine.
I found this at this site: http://www.cyberprogrammers.net/2015/04/how-to-fix-usb-device-is-busy-with.html But it might not be at that site forever...
Install the ESP toolchain
The first thing you'll need to understand is that there are a few different ways to program the ESP. We first looked at NodeMCU. I don't think this platform is quite ready for code that you can deploy. There are some nice examples but there are also some issues that won't allow us to do over the air updates. So while NodeMCU might look like the fast and easy approach it won't work for this project.
The ESP RTOS and non-RTOS packages I couldn't get these to work directly on the system I was using and I didn't want to re-invent the wheel so I moved on. Here is a description of what they are here:
http://bbs.espressif.com/viewtopic.php?t=838
The package that worked best was the esp-open-sdk: https://github.com/pfalcon/esp-open-sdk . The readme file describes what this package is all about and how to set it up. There is another nice guide here: http://www.penninkhof.com/2015/03/esp8266-open-sdk/ but it is a little out of date. Here is what I did:
Install the dependencies
sudo apt-get -y install git autoconf build-essential
sudo apt-get -y install screen gperf bison flex texinfo libtool libncurses5-dev wget gawk libc6-dev-amd64 python-serial libexpat-dev dpkg-dev unzip
This takes about 20 mins from scratch. I guess it depends on your internet connection mine is fast but it took awhile. The output is the typical apt-get output. As long as you don't encounter any errors you'll know it installed correctly. Next get the toolchain:
Install the esp-open-sdk toolchain
cd /opt
sudo git clone https://github.com/pfalcon/esp-open-sdk.git
sudo chown -R <username> esp-open-sdk
cd esp-open-sdk
now you are ready to build the toolchain. Make sure to change <username> to your username... Building this toolchain took about an hour on my machine. Here is what I did:make STANDALONE=yThere will be a lot of output. You can just type make but if you have it compile as a standalone platform it will be easier to upload later...at least this is my understanding. This is a pretty extensive build. You can sit and watch what it does and you'll gain a lot of respect for the work that went into it. Or you could do something else productive....After you go and do something else productive for about an hour you can come back and type these commands to add the compiler to your path:echo 'PATH=$PATH:/opt/esp-open-sdk/xtensa-lx106-elf/bin' >> ~/.profile
echo 'PATH=$PATH:/opt/esp-open-sdk/esptool' >> ~/.profile
PATH=$PATH:/opt/esp-open-sdk/xtensa-lx106-elf/bin
PATH=$PATH:/opt/esp-open-sdk/esptoolnow you'll want to make sure it installed successfully.
Flash the ESP
To do this compile upload 'blinky' to your ESP. First compile blinky:
cd examples/blinky
make
Here is what the output looks like:
You've cross compiled your source (blinky.c) and now you're ready to flash your ESP. Make sure you have your /dev/ttyUSB0 connected. For my hardware I needed to symbolically link my /dev/ttyACM0 to my /dev/ttyUSB0 :
sudo ln -s /dev/ttyACM0 /dev/ttyUSB0This is because the default port is /dev/ttyUSB0. You can change the default port but I decided to link it. It worked fine. Also you'll want to add yourself to the dialout group:
sudo adduser <username> dialoutPut the hardware into upload mode.
Next put the ESP into upload mode. Press the GPIO0 pushbutton while pressing the reset-button. then Let go. The blue and red LEDs will flash then the Red led will be dim (on the Huzzah breakout board). Other boards may be different but the idea is the same.Now you can flash your ESP:
make flashYour blue LED will flash while the firmware is being downloaded. Here is the output when you are successful:
and your blue LED will be blinking every half second.
I had to make one change in blinky.c for the Huzzah board to blink it's blue LED:
Changed from:
static const int pin = 1;To:
static const int pin = 2;Now we need to make sure the ST board environment works. I just used my windows 8.1 machine for this environment.
Download and install the software for the Nucelo Board
There is so much here:
http://www2.st.com/content/st_com/en/products/embedded-software/mcus-embedded-software/stm32-embedded-software/stm32cube-embedded-software/stm32cubef4.html#
You can really just go to this site and follow the instructions. ST makes it really easy to use their dev board and I was able to get it set up with no issues. I'm not going to go into it in detail.
Next we'll look at making an ESP web-server and getting some data from the ST board to the ESP chip.
Discussions
Become a Hackaday.io Member
Create an account to leave a comment. Already have an account? Log In.