Close
0%
0%

explorad

Work in progress: The explorad combines a microcontroller, a display, and star charts in a head-up display for astronomical telescopes.

Similar projects worth following
There are a number of useful things that make an amateur astronomer's life easier. The "Telrad" displays circles of 0.5, 2 and 4 degrees diameter in your field of view. Some astronomical charts also have these circles printed around objects, and together these make it easier to navigate through the night sky and find what you want to look at.

The explorad combines these features in a single device:
- A display and some more optical hardware is used to show telrad circles and some more information, projected into your view at the sky.
- Object information is stored on an SD card. Objects can be marked as a target for easier lookup, but the explorad can also display the position of other objects - there might be something interesting just around the corner!
- The telescope's viewing direction is determined with an electronic compass or with digital setting circles. With an explorad mounted on top, the explorad helps you point your telescope at an object and take a close look.

How the Telrad works:

Here's a little drawing that shows how the Telrad works. It just shows the main parts:
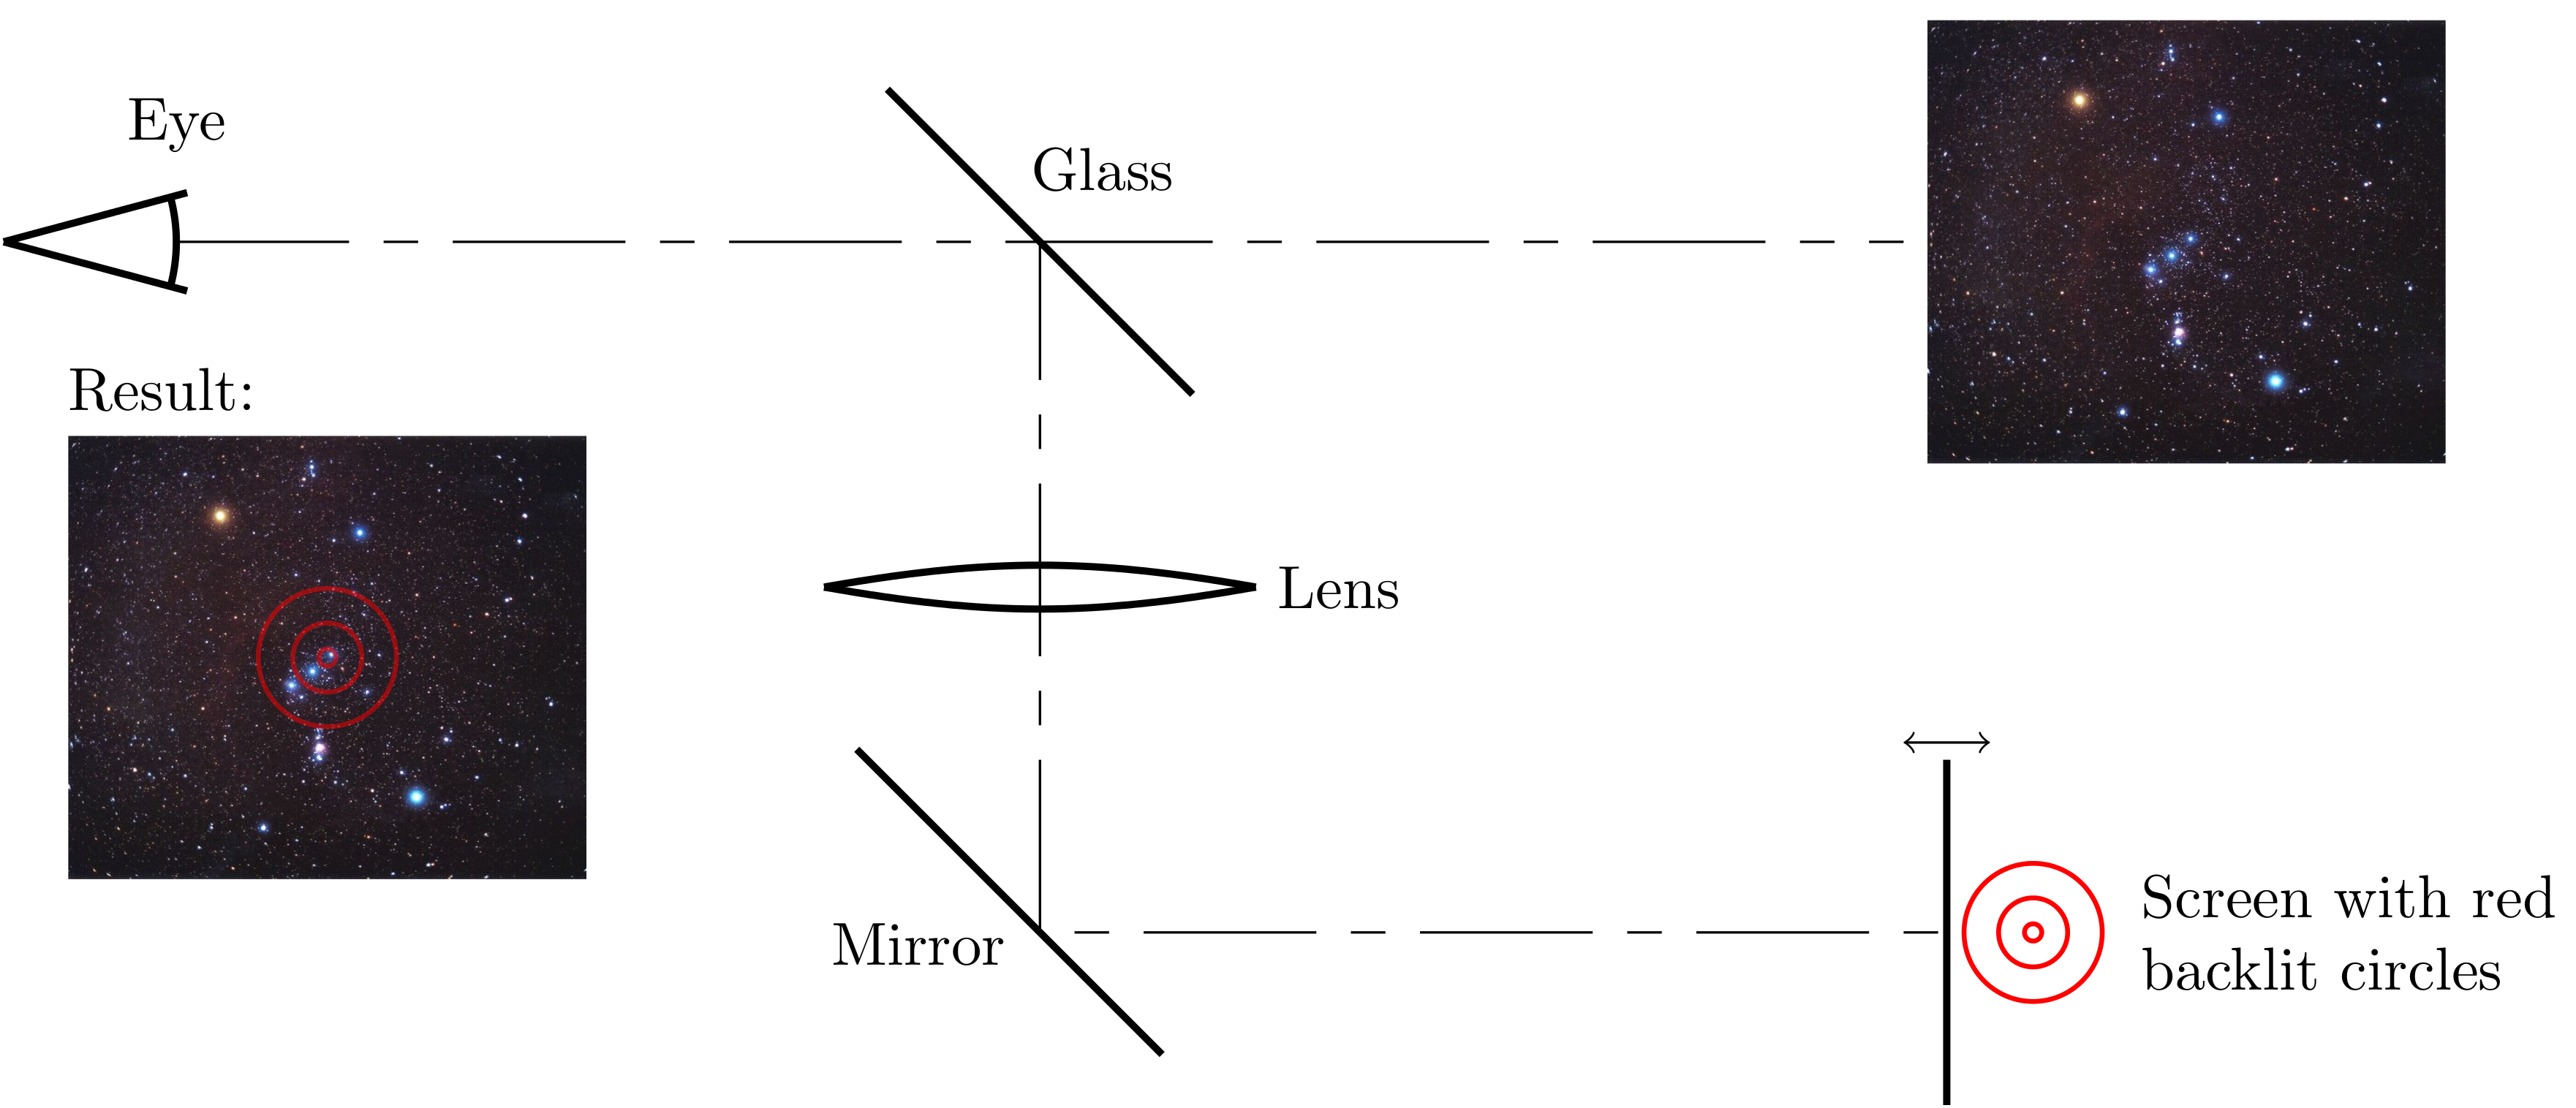
The Telrad contains a screen with three backlit circles. Light emitted from that screen is mirrored to a lens which brings the circles into infinity focus, and then (partially) reflected into the observer's view by a glass plate. The observer's eyes are focused at infinity, looking at a distant object. The resulting image contains the both the object and the red circles.

The size of the circles on the screen and the lens' focal length are chosen to have circles with 0.5°, 2° and 4° diameter. The screen can be moved to hit the right focus point. When you look through a Telrad, you'll see something like this:
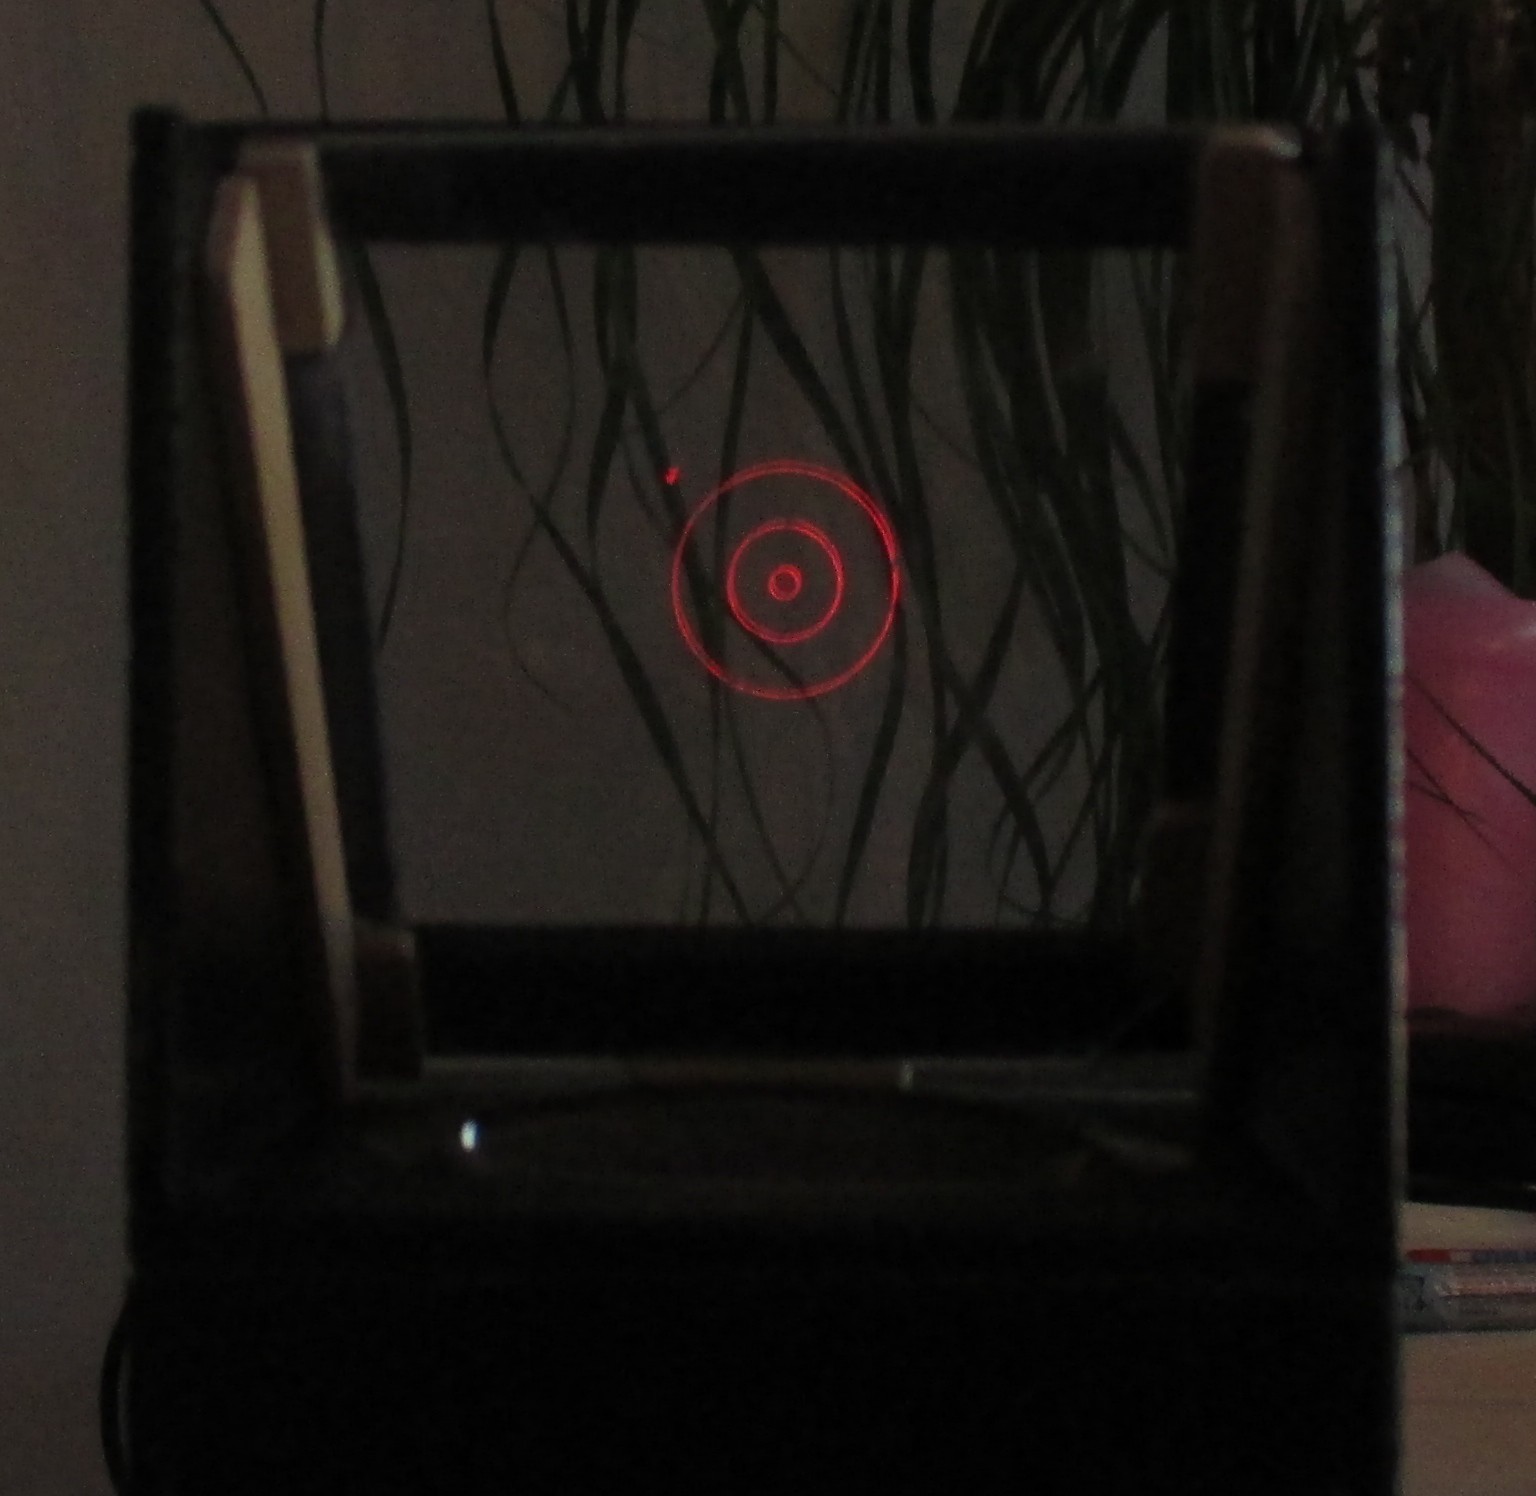
(That's a selfmade Telrad clone I made)

How that relates to star charts:

Star charts contain circles with 0.5°, 2° and 4° around interesting objects and around points that are easy to find (bright stars). Here's a sample:
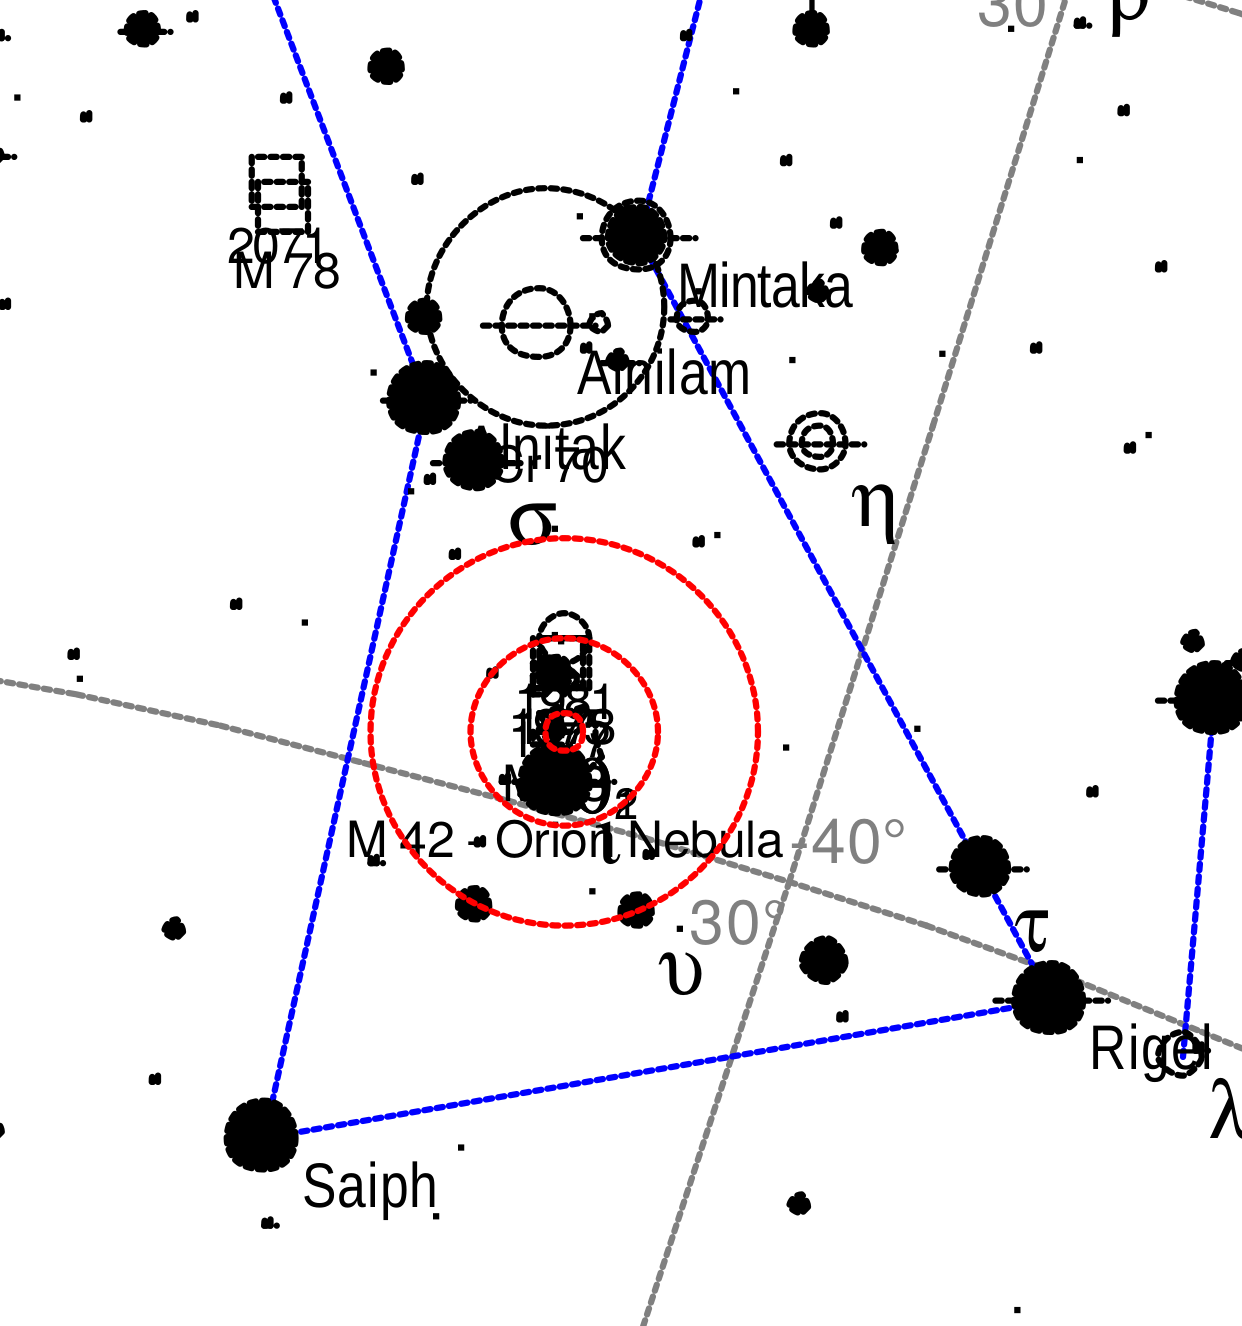
The star chart/Telrad combo can be used to easily navigate through the night sky to find an object for observation.

What the explorad does:

The explorad replaces the Telrad's screen with an OLED display. Why an OLED?

At night, the eyes adapt to the darkness. This adaption is easily disturbed by bright light, especially with wavelengths which the eyes are sensitive to. The eyes are least sensitive to red light, and that's why the Telrad's circles are red. An OLED display has no backlight which could bleed unwanted wavelengths, and we can choose to display only red pixels. That way the eyes are least disturbed.

If only circles are displayed, the explorad does the same thing as the Telrad.

What the explorad also does:

In addition to displaying the Telrad circles, the explorad can determine the telescope's viewing direction and use that information to do two main things:

  • display how the telescope must moved to bring a target into the field of view
  • display nearby objects on the screen which might be interesting to look at.

Determining the telescope's viewing direction is not too hard. A 3D accelerometer is used to measure the altitude (angle between the horizon and the telescope's viewing direction) and roll. I tried using a magnetometer for the azimuth, but that didn't work well - I got distorted readings caused by almost every object around the sensor. That's why I'm attaching an optical encoder to the telescope's base to measure the azimuth.

Demo Video

showing the current hardware, Telrad circles, Target tracking, and nearby objects display:


The display you see in the video will replace the Telrad's fixed 3-circle screen.

Licenses

If the SdFat library is used in the project, the whole project probably has to be published as GPLv3 (I guess).

  • 1 × Teensy 3.1 Cortex-M4 prototyping board
  • 1 × Adafruit 128x128 OLED display
  • 1 × Pololu LSM303D breakout board Electronic Compass
  • 1 × Avago HEDS-5540 H06 optical encoder digital setting circle
  • 1 × input device Look left for the link to the proxy project

View all 8 components

  • Semi-paused

    Christoph01/26/2015 at 12:35 2 comments

    In case anyone was wondering: I'm still working on this, but a 12" telescope is watiting to be finished as well. When it's done I'll post more about explorad and try to finish it.

  • Github repo, System Design Document and licenses

    Christoph08/19/2014 at 20:45 0 comments

    I've created a github repo, added a system design document (SDD) and added license information as required by the contest rules.

    The github repo is linked to in the project's link section. It currently only contains the SDD. Code will be added once it is easier to handle (bugs aside). License information was added in the project description, but that's preliminary.

  • I've got a video!

    Christoph08/19/2014 at 18:45 0 comments

    After a bit of fighting I can present this video. The annotation looked ok when I watched the video on youtube, but not here.

  • ...and WiFi

    Christoph07/05/2014 at 17:42 0 comments

    I've added the CC3000 module quite some time ago, but couldn't use it along with the SD card and my DMA display driver - all use the SPI. SD card and display cooperated, but the CC3000 did something the other drivers didn't like. So I created a small, almost brain-dead library that can save and restore SPI settings and voilá - all three are working.

    The remaining huge problem is that the adafruit library for the CC3000 doesn't seem to support non-blocking operations. I cannot try to update my display 25 times per second, read data from the SD card between frame updates and wait for a ping response that takes 200 ms. A delay function that takes negative arguments would be cool now...

  • Making it a bit more "mobile"

    Christoph07/01/2014 at 21:55 0 comments

    I admit it, breadboards are not really mobile even if battery powered, but I'm now working on the input device again. It served me well so far - providing 5 buttons - but it's still lacking a battery and a charger circuit. When I've done that, I'll get back to the main device.

  • Tip of the day

    Christoph06/30/2014 at 18:35 0 comments

    Don't try to debug GPS code when you just can't get enough satellites into view. It will ruin your day.

  • Yay! Object Database!

    Christoph06/29/2014 at 19:10 0 comments

    I downloaded the Revised New General Catalogue and Index Catalogue by Wolfgang Steinicke, which contains 13957 objects (galaxies, nebulae, star clusters, and so on). It comes as an Excel spreadsheet, so I converted it to ascii (fixed column width) and converted that to a custom binary format. The catalogue contains cross identifications where applicable, such as those for the Messier objects.

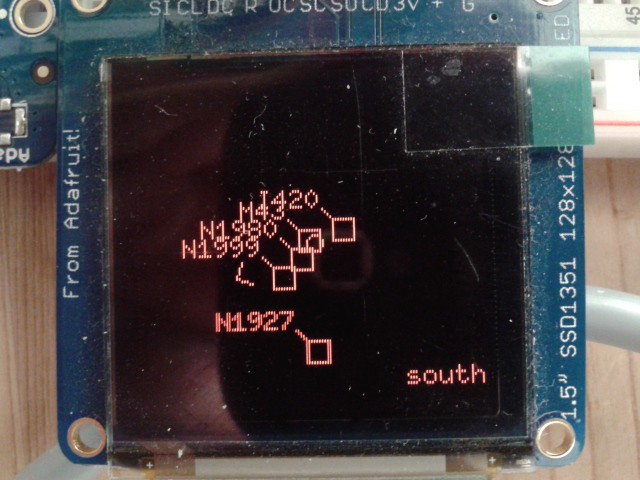
    The Messier IDs are included in my binary format as an alternative ID for on-screen display. For example, the Great Orion Nebula (NGC 1976) has the alternative ID M 43, which is the displayed ID. Other NGC/IC entries don't have a Messier ID, and are displayed with their NGC or IC number. Here's a display picture of the region around M 43:

    When the mount orientation changes, new patches are loaded. That's the theory.
    Some patches contain as many as 267 objects, and some are empty. I need to filter out most of them, otherwise the display would get far too crowded (apart from the fact that the CPU and memory couldn't handle that many). This is done by loading the objects in each patch, one by one, adding them to an array, while overwriting fainter ones. The resulting displayed objects are the 10 objects with the greatest visual magnitude. Still crowded, but I'm not too worried about that now.

    In the above picture you can also see that the target name (lower right corner) is still the hard-coded "south" target. I need to implement an object search that can look for NGC, IC and Messier objects.

    Compared to the main project picture: I'm getting closer!

    The code is becoming more and more obfuscated, but that's normal I guess...

  • Target direction hint

    Christoph06/25/2014 at 21:58 0 comments

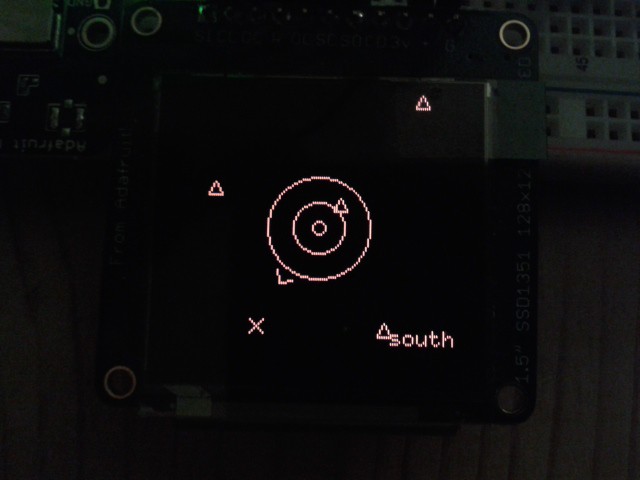
    A minor detail, but it gave me quite a headache. If a target is not in view, you want to know where it roughly is, right? I've created a target hint that is drawn just outside the telrad circles.

    In the picture below, the target is south, below left, and the hint points right at it:

    The target hint follows azimuth, altitude and roll. I still have to test how it behaves for targets near the zenith, but I'm too lazy right now.

    Special Thanks to the folks in the gamedev.stackexchange chat!

  • This was the biggest "OMG THAT WORKS!!!" so far

    Christoph06/24/2014 at 12:52 0 comments

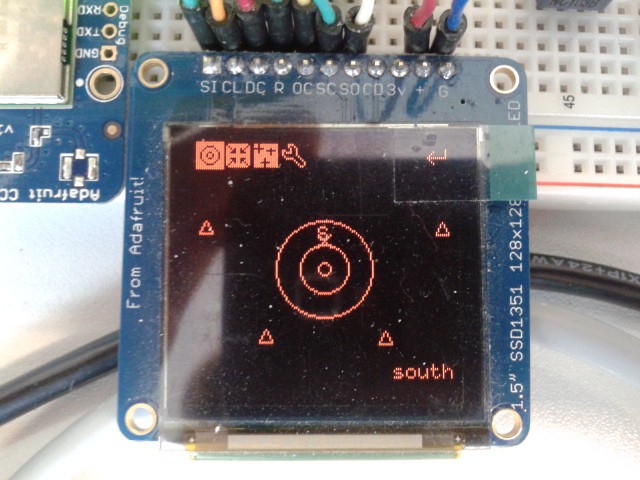
    I've implemented all those coordinate conversions and added an "objects" widget that can be enabled in the on-screen menu. So far, this widget just displays the centroids of each sky patch as a little triangle. That a huge step forward, because the patches' centroids are stored in terms of right ascension and declination - just like the real objects I want to read from a database. Here's a typical picture:

    At the top, you can see the menu with the "Telrad Circles", "Target" and "Objects" icons activated (the first three from left to right). The "S" marker near the center is an artificial marker I needed for debugging, and it marks the horizontal south. The Target is "south" as well, indicated by the small "x" just below the "S".
    When I move the device (lift up one edge) or turn the artificial azimuth potentiometer, the screen shifts or tilts accordingly and new sky patches are reloaded on the fly. CPU load is about 55 % depending on what is displayed, and I still draw at 25 fps.

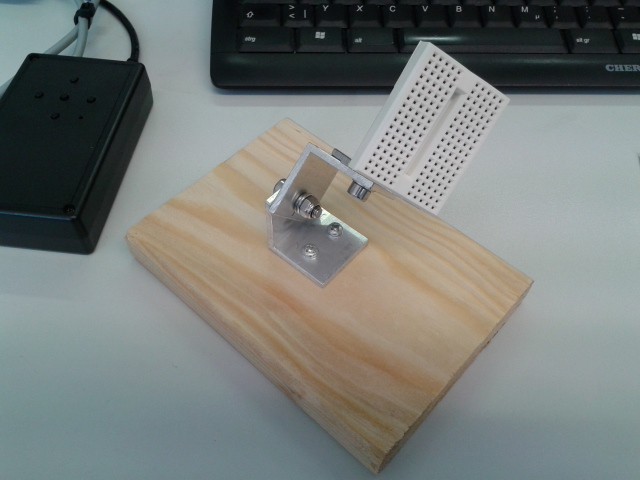
    I've also built a small dummy dobson mount which will hold the accelerometer and the artificial azimuth pot as long as I don't have anything better. It's made of 30 x 30 mm L-shaped aluminium, a piece of wood and the usual nuts and bolts (M5 x 16 screw - washer - aluminium - aluminium - spring washer - washer - self-locking nut):

    Coming up next: the third attempt at object databases or a battery plus charger circuit for the input device.

  • Coordinate Conversions

    Christoph06/23/2014 at 12:50 0 comments

    I'm currently implementing the conversion between equatorial coordinates (object positions in catalogues) and horizontal coordinates (positions in the observer's coordinate system) and back. I need the universal time (UTC might be sufficient as we don't need to be overly precise here) and the observer's position for that. Both can be obtained with GPS, but there's one problem with that: GPS doesn't work inside buildings and I'm writing and testing the code inside. I will add a menu that allows to set both to sensible defaults or to manually entered values.

    My goal is to have an automatic startup procedure that tries to obtain a GPS fix and switches to the default/manual mode if that cannot be obtained within a reasonable time. That should be ok for the location as I'm usually observing from the same place, but the time must be set manually nonetheless if there's no GPS available.

    There are some very helpful sites that on those conversions:

    Wikipedia article on Julian Day

    Approximate Sidereal Time - US Naval Observatory

    Local Sideral Time clock - an online calculator that is very helpful during debugging

    Wikipedia article on Astronomical Coordinate Systems

    It's kinda cool when your coding problems boil down to the fact that earth rotates.

View all 24 project logs

Enjoy this project?

Share

Discussions

*BRY Christophe wrote 03/05/2017 at 21:21 point

hello

what news ?

Bordeaux

  Are you sure? yes | no

sergel wrote 08/22/2015 at 16:02 point

Super Project. I just finished my 16" telescope and will give a try to the Stellarduino system i am building. But i'm interrested by your project as well. Thank's for sharing your knowledge.

  Are you sure? yes | no

Tiago wrote 07/06/2014 at 16:35 point
I hear you about the magnetometers, such a pain in the ass. Really sucks that there isn't any better alternatives.

  Are you sure? yes | no

Christoph wrote 07/06/2014 at 17:05 point
I threw out the magnetometer, i.e. I'm using the electronic compass only to get altitude and roll values. When I figured out how to properly process the magnetometer values, I might use it again.

  Are you sure? yes | no

pixelk wrote 06/26/2014 at 16:23 point
I'm working on a distantly similar project (an aid for polar alignment) and yours is very interesting to me. I try to work with Navspark's module (http://navspark.mybigcommerce.com/) but the truth is, the Arduino environment they ported isn't really ready yet. Too bad as the hardware is a nice addition to the teensy I use for the main board. I'm still trying to interface it with Sparkfun's LSM9DS0 breakout to have an all-in-one navigation reference.

  Are you sure? yes | no

Christoph wrote 06/27/2014 at 08:35 point
Which Teensy are you using? If it's an AVR-based one, try the Teensy 3.1 as an upgrade. It looks like it doesn't have as much power as the NavSpark, but I think Paul will soon have the Teensy 3++ (or whatever its name will be) ready.

  Are you sure? yes | no

pixelk wrote 06/27/2014 at 09:22 point
Yes, I'm using a teensy 3.1. I pledged for the original Kickstarter for the 3.0 and since then I'm huge fan. Paul Stoffregen delivered as expected and the support is excellent.

  Are you sure? yes | no

Mike Szczys wrote 06/05/2014 at 16:15 point
Nice start to this project! Thanks for submitting it to The Hackaday Prize. Have you thought about how this is a "connected" device (see the Basic Judging Criteria here: http://hackaday.io/prize/details)? Part of it could be the input device, which you could package up with a protocol and make it extendable for other uses. But perhaps you want to make a way to save, share, and import information if many people had this rigged up to their telescopes? Just a thought.

I love the logo on the boot screen!

  Are you sure? yes | no

Christoph wrote 06/06/2014 at 07:23 point
The input device will have a wired connection to the main device because the input device will (I've almost settled on that now) carry the battery for both. That way, the input device can be detached for charging and the main device can be left on the telescope without destroying its alignment (it must be aligned with the telescope's optical axis).

This device will be "connected" with a WiFi module for downloading the positions of solar system bodies, as they are more dynamic than objects in the milky way or deep-sky objects. I'm also thinking about a link between the explorad and stellarium.

  Are you sure? yes | no

x3n0x wrote 05/15/2014 at 23:14 point
Looks really cool! Cant wait to see how it pans out!

  Are you sure? yes | no

Michael O'Brien wrote 05/12/2014 at 22:06 point
When might you be putting up a parts list, even partial? I'm curious about performance and the like. Is that an OLED display? I commend the choice since you don't have to deal with backlight bleed :)

  Are you sure? yes | no

Christoph wrote 05/12/2014 at 22:12 point
What you can see in the pictures is already included in the parts list, and the parts list will grow with the project.
The display is an OLED for exactly the reason you state - no backlight, only red. I can even dim it by adjusting the red value, because the display uses 16-bit rgb.
I will keep updating this project with details as I go along.

  Are you sure? yes | no

Quinn wrote 05/07/2014 at 12:59 point
Cool project! Are you going to make the display appear as an overlay to the sky at infinity focus like the Telrad does?

  Are you sure? yes | no

Christoph wrote 05/07/2014 at 13:30 point
Yes, it will have the same optics as a telrad and display everything at infinity focus. I'm thinking about adding a secondary display for tasks that don't require seeing the sky in the background.

  Are you sure? yes | no

Similar Projects

Does this project spark your interest?

Become a member to follow this project and never miss any updates