Internet security is a hot topic nowadays, having computers exposed to the internet (opened ports) is a very real risk and you wouldn't believe the number of bots that are scanning through all the IP addresses in hope of finding an ill-configured system or simply brute forcing everything.
I recently had an experience where one of the computers I managed, which had an exposed port 22 (SSH), was being brute forced from a Chinese IP addresses. Fortunately SSH was not enabled for the the root account, which it tried to break. However sooner or later on unchecked systems a robot will succeed and compromise the network.
This is why I'm writing about a simple way to set up a truly robust connection, as the Tvheadend server in this project obviously needs remote access.

Enter OpenVPN: an open, free, robust and easy to setup virtual private network software. It has a slight learning curve which might be discouraging at first, but this tutorial here explains how to set it up for the current use case, actually it's surprisingly easy and painless (as long as you use tunnelling mode and not ethernet bridging)
The VPN provides an encrypted connection, it does not require any configuration of the remote router, which is really nice as the Tvheadend server might be left at a friends or relatives place and changing their router settings is not always possible/allowed.
The network is set up as follows:
- The DVB-T dongle is connected to the Tvheadend server, which is a OpenVPN client
- The OpenVPN server is a Raspberry Pi 1
- The media center is another client connected to the OpenVPN server
- The local network router needs to forward the incoming UDP packets on port 1194 to the OpenVPN server
- The clients and server can communicate securely on the virtual private network between themselves on the 10.8.0.x subnet
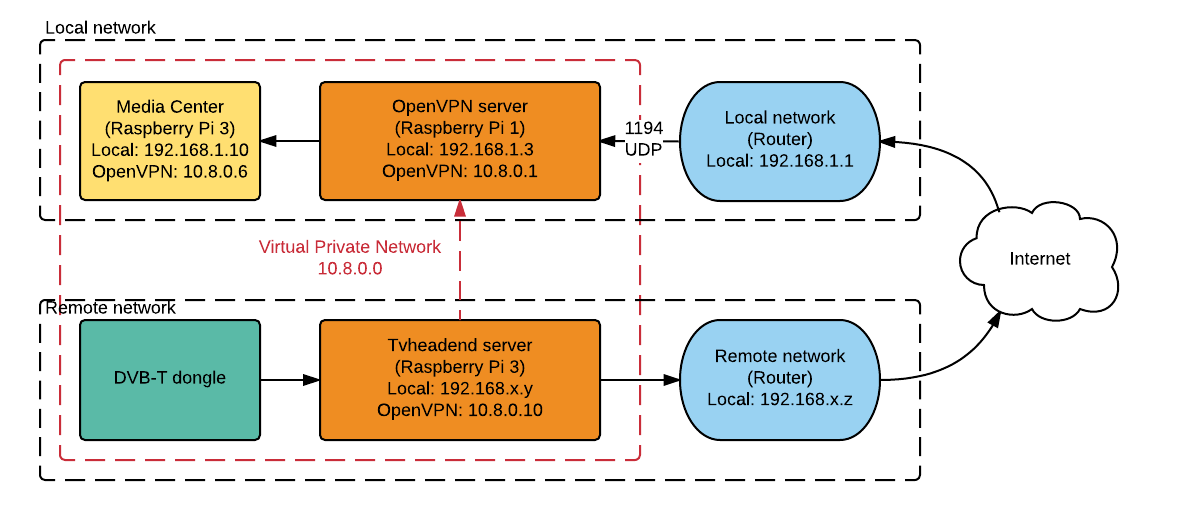
This is the network setup I'm going for here. The media center (10.8.0.6) I'm using, based on Kodi, will be able to access the Tvheadend server via the IP address 10.8.0.10, through the OpenVPN server on 10.8.0.1. The red arrow indicates the virtual connection, the true physical connection is represented by the black arrows.
One could also set up the OpenVPN server on the media center computer, however I want to run a couple other services on the Raspberry Pi 1 which I don't want on the media center itself (Pi-Hole, OwnCloud...).
Installing OpenVPN
DietPi has pre-configured packages that one can install by simply checking a box, it is super useful in this case.
Simply call:
dietpi-software
Which opens the software installation process:
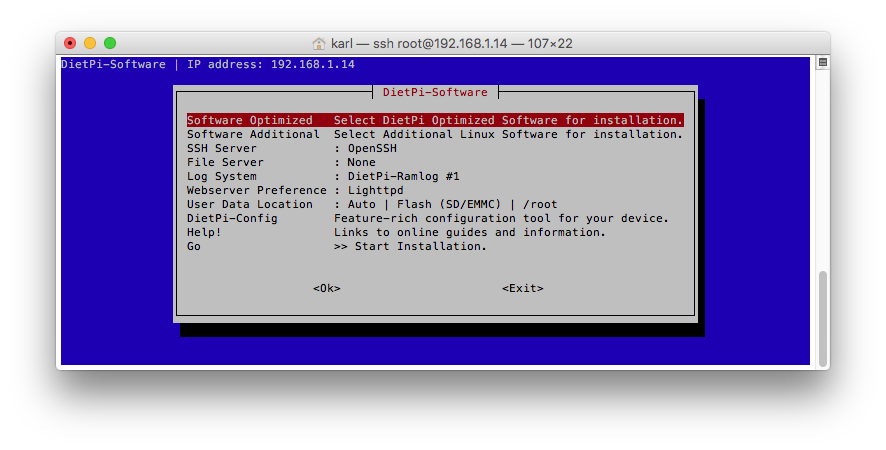
Select "Software Optimized", scroll down until you see "OpenVPN", hit the space-bar to select it and follow the instructions to install it. Do the same for the server and client.
Generating certificates
Configuring the OpenVPN server is a fairly straight forward procedure, you don't need to understand everything (I sure didn't), some certificates (read: impossible-to-guess-super-long-passwords) simply need to be generated and copied from the server to the client.
I followed the instructions on the official OpenVPN how-to tutorial.
First go to /etc/openvpn/easy-rsa/ where all the tools for certificate creation are located. Execute the following commands in order and hit enter or reply with "y" whenever it asks for something:
. ./vars
./clean-all
./build-ca
./build-key-server server
./build-key client_tvheadend
./build-key client_osmc
./build-dh
It created some files under /etc/openvpn/easy-rsa/keys/ which need to be copied to /etc/openvpn/ on the server and client computers.
Configuring OpenVPN server
Copy the following files to /etc/openvpn/ on the server:
- ca.crt
- ca.key
- dh1024.pem
- server.crt
- server.key
Create the configuration file for the server, named server.conf in /etc/openvpn/. This is the main file that needs some custom setup and it is the only thing that differentiates the server from the client. I used the template provided by OpenVPN for the server.
To allow the clients to access each other modify the following lines in server.conf:
- Uncomment "client-to-client"
- Save the configuration
- Reboot
Since the client connects to the OpenVPN server over the internet the local router should properly forward the OpenVPN port. I left the default 1194 UDP port and forwarded it in the router to the OpenVPN server computer (for me it was 192.168.1.3).
Configuring Tvheadend client
Copy the following files to /etc/openvpn/ on the Tvheadend client:
- ca.crt
- client_tvheadend.crt
- client_tvheadend.key
Create the configuration file for the client, named client_tvheadend.conf in /etc/openvpn/. Use the template provided by OpenVPN for the client.
- Configure "remote...", for me it was "remote <your OpenVPN server IP/URL> 1194"
- Change "cert..." to "cert client_tvheadend.crt"
- Change "key..." to "key client_tvheadend.key"
- Reboot
Configuring the media center client
Just like the Tvheadend client copy the following files to /etc/openvpn/ on the media center client:
- ca.crt
- client_osmc.crt
- client_osmc.key
Create the configuration file just as before, add the proper modifications as above and reboot.
Establishing connection
If everything was configured properly the VPN should now be running and the clients connected, the server and clients can see each other on the 10.8.0.x subnet. The server shows the connected clients in the /etc/openvpn/openvpn-status.log file.
End notes
- The OpenVPN will start automatically upon boot, you don't need to do anything. The connection will reestablish itself if it's broken.
- Save the .conf files somewhere safe in case of a total system corruption.
- Do not disclose the generated certificates (.crt and .key files), they're the thing that makes this secure.
- You may now move the Tvheadend server to anywhere in the world, as long as it is connected to the internet it will establish a secure connection to the OpenVPN server.
- You might be interested in setting up a dynamic DNS service in case the OpenVPN server IP changes, otherwise the client might not be able to reach it anymore. I use Duck DNS, which is free and easy to set up.
Discussions
Become a Hackaday.io Member
Create an account to leave a comment. Already have an account? Log In.