 Danny Caudill
I have found quite a few 1-handed chording keyboards, and I even built one a year ago to give it a try. My problem was almost always with finding the time to learn a new key layout.
So here is my approach for the first iteration of this project. It should be quick to learn by those that already know braille (and for those that do not, then they will by the time they’ve learned the chording patterns!).
Look at the U.S. Braille patterns (https://en.wikipedia.org/wiki/English_Braille#System). For the 26-letter alphabet, there are 3 rows of 2 dots. There is an extended version that includes a 4th row, which this chording system supports. The numbers 1 - 9 and 0 are produced with the letters a - j when they are preceded by a special # character (think of it as a ctrl or alt key). Similarly, the letters can be capitalized by preceding them with a Shift character.
Now, consider how one hand rests on home row of a standard qwerty keyboard. Now shift the four fingers up by one row. There are 4 buttons under the fingertips (q-w-e-r), 4 buttons above (1-2-3-4), and 4 buttons below (a-s-d-f). Furthermore, notice that the thumb can easily access ‘v’, ‘b’, and ‘n’. These will be the primary modifier keys (number indicator, capitalization indicator, and macro indicator).
Here is a diagram of how I map the Braille patterns to those 12 buttons, so that one hand can type them all.
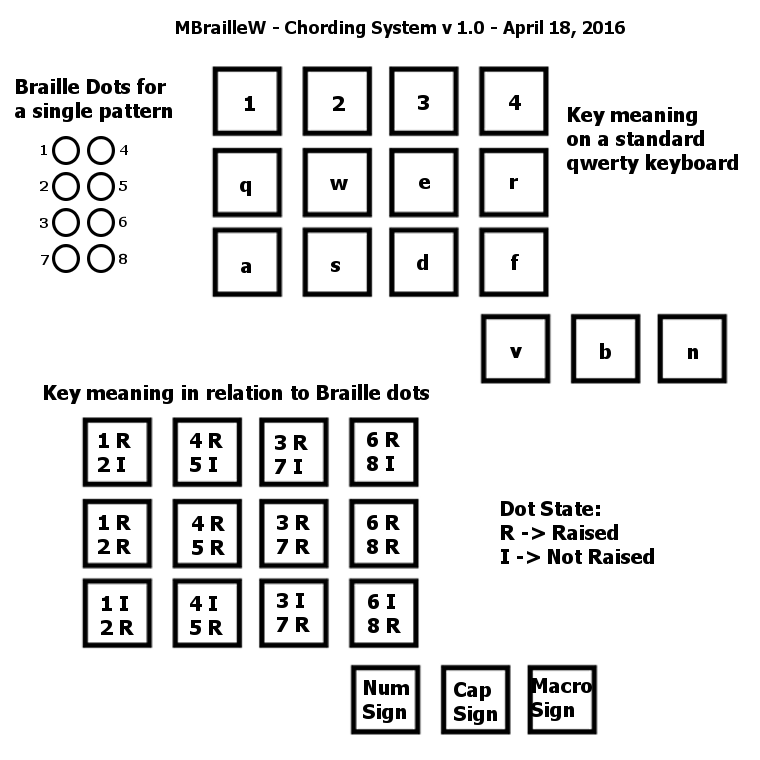
Here is an attempt to explain that diagram in words. The left-most finger specifies the state of the top 2 dots in the left column (either the top-only is raised (upper button), both are raised (middle button), or the bottom only is raised (lower button)). If no buttons are pressed, then neither dot is raised. The next finger sets the state of the top 2 dots in the right column. The 3rd finger sets the state of the bottom 2 dots in the left column, and the 4th finger sets the state of the bottom 2 dots in the right column.
So any combination of those 8 dots can be represented by only pressing 1 button (or no buttons) with each of the four fingers. Some readers may be thinking that there are only 8 “bits” here, so why do we need 12 keys. The answer is that only 4 buttons can (easily) be pressed at once (aside from the modifier keys, which the thumb controls). Since 2 bits can represent the numbers 0, 1, 2, or 3, a single button press can represent 2 bits at a time.
The first two thumb-controlled Modifier keys mimic the braille signs for numbers and capitalized letters. The third is used for user-programmable macros (a common feature of 1-handed keyboards).
The software will detect when a ‘chord’ of keys is released, and will translate that into the appropriate character/macro. Also note that the software will work for right-hand chording as well (using 7-8-9-0, u-i-o-p, j-k-l-;, and b-n-m for the thumb).
As anyone that just tried this out on their keyboard can attest, the ‘slant’ of a keyboard makes this feel a little awkward (and sorry if you are using an ergonomic keyboard, where the ‘n’ key isn’t exactly reachable). Hence the idea to make a custom chording keypad.
One of my next log entries will contain the entire chord map (or a new approach if I find holes in this plan once I start writing out the mappings).
Here is a good overview of the generalized 8-dot Braille patterns that Unicode includes: https://en.wikipedia.org/wiki/Braille_Patterns. Here is the official Unicode chart: http://www.unicode.org/charts/PDF/U2800.pdf
Have a great day!
Discussions
Become a Hackaday.io Member
Create an account to leave a comment. Already have an account? Log In.