 Tom Meehan
Being very, very new to working with Bluetooth, myself, I decided to include some additional information so that others can hopefully avoid making the same mistakes that I've made:
Slave vs Master- Master is the device at the center of a Bluetooth network (in this case – your phone, tablet or computer)
- a Master can pair with multiple Slave devices
- a Master can pair with multiple Slave devices
- Slaves send and receive data only to or from the Master (in this
case – the MindFlex headset, you could, conceivably, pair multiple
headsets to one Master device)
- a Slave can only be paired to 1 Master at a time
- a Slave can only be paired to 1 Master at a time
Pairing
- Bonds Slave device to Master device
- After pairing devices automatically connect when they are both powered on and close enough
- uses authentication data saved on the 2 devices
- uses authentication data saved on the 2 devices
Profiles (devices need to support the same profile to communicate - "communication profiles") – this is not an exhaustive list
- HSP -head set profile
- HFP – hands free profile
- HID – human interface device (generally a keyboard, mouse, etc.)
- SPP – serial port profile (this is what we need for communication)
- A2DP – advanced audio distribution profile (streaming audio data to speakers, etc)
- AVRCP – A/V remote control profile (Bluetooth remote for TV, etc.)
- A little note on profiles and their importance: I have an
older android smartphone (Bluetooth and WiFi capable), an IPhone 5 and a
Kindle Fire. It turns out that
none of them support the Bluetooth Serial Port Profile and
as a result the only way I can use the Bluetooth connection is with my
laptop and a Bluetooth USB dongle. So, if you are planning to use this
with a specific device make sure to check if it supports
SPP (Serial Port Profile) Bluetooth Profile. If your device does not Bluetooth SPP (turned out that none of the devices I have support it) then you'll need a USB Bluetooth dongle that supports SPP (around $5).
Be sure to ca
- The first modules I purchased were actually just back planes (essentially just the breakout board without the module – read descriptions very carefully – not a costly mistake but annoying and time consuming).
- The next module was a Master – (projects I looked at never seemed to mention if I needed a Master or Slave module... well it turns out I needed a Slave module, of cour.
- Slave Module!
You can find these on the datasheets for the Bluetooth Serial Modules (you can find them online - none of the ones I ordered included the datasheet). AT commands apply to both the HC-05 and HC-06 boards. These are the ones we need to setup the HC-06 breakout:
- AT pings the device (response back “OK”over serial)
- AT+PINxxx
- AT+NAMExxx
- AT+BAUD4 (sets baudrate to 9600 – default rate)
- AT+BAUD7 (sets baudrate to 57600)
Setting up the HC-06 Bluetooth Slave Module (SPP – Serial Port Profile)
Configuring the Bluetooth Slave Module for 57600 baud rate (most modules seem to be configured for 9600 baud rate as the default setting) **This step should be done with the Bluetooth Module alone (not connected to the TGAM1 board)**
Wiring the HC-06 and configuring using an Arduino
- The logic level shifter is not optional - these modules use 3.3v logic (RX/TX lines must be 3.3v)
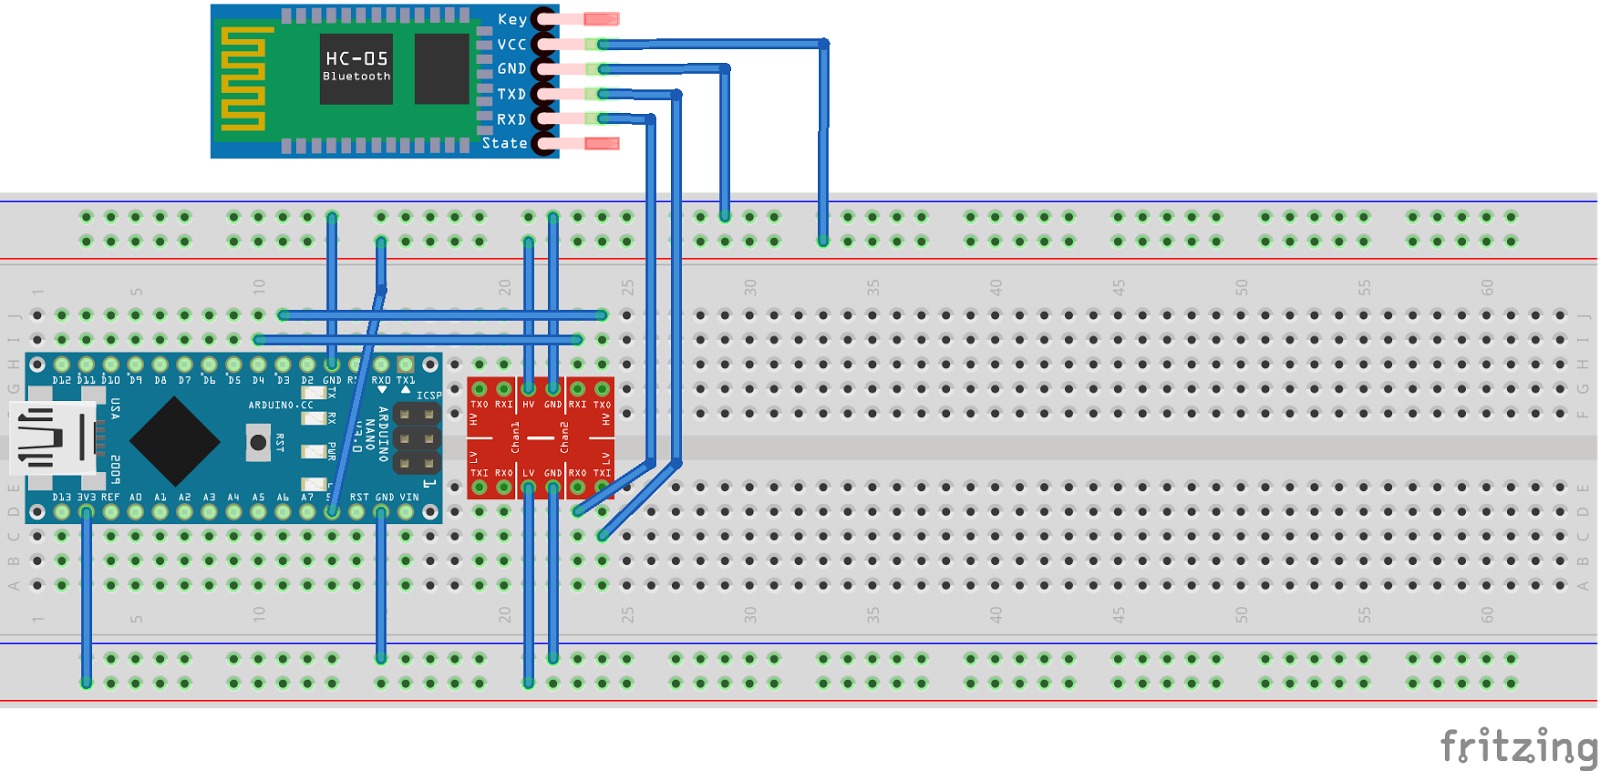 Bluetooth TX goes thru level shifter to Arduino TX (Pin 3). Bluetooth RX goes thru level shifter to Arduino RX (Pin 4).
Arduino Code:
/*
HC-06 Bluetooth simple setup sketch

*** Important. If you change the HC-06 baud rate, you must change the "myserial" baud to match what was just set.
* Steps:

Changing default 9600 baud to 57600 baud needed to communicate raw data from TGAM1 chip
1) uncomment (remove the double backslash) the line:  //btSerial.begin(9600);
2) uncomment the line:  //btSerial.print("AT+BAUD7"); // Set baudrate to 57600
3) run the sketch.  This will set the baud to 57600.  However, you may not see the response OK.
4) comment out (add double backslash back) the line btSerial.begin(9600);
5) uncomment the line //btSerial.begin(57600); and compile and load the sketch again - this sets "btSerial" to the new setting.
6) open the serial monitor from the Arduino IDE - this will restart the sketch.  Be sure that the communication speed
on the serial monitor is set to 57600.  If all is well you should see a secomd line after "Hello Bluetooth"
that will show the BT module responding to the change.
7) you can verify the connection by typing "AT" in the serial terminal and sending.  You should recieve "OK" back


*/
#include <SoftwareSerial.h>

SoftwareSerial btSerial(3, 4);      // RX, TX

void setup()
{
pinMode(3, INPUT_PULLUP);
//Serial.begin(9600);                 //Step one - Comment out after setting tp 57600
Serial.begin(57600);
Serial.println("Hello Bluetooth");  //prints in serial monitor when it is opened
//btSerial.begin(9600);               //Step one - Comment out after setting to 57600
btSerial.begin(57600);            //Un-Comment - after setting baud to 57600
//delay(1000);
//btSerial.println("AT+RESET");
delay(1000);

btSerial.print("AT");               //pings the HC-06 - should send back OK to serial monitor
delay(1000);
btSerial.print("AT+PIN1234");       //Set pin to 1234
delay(1000);
btSerial.print("AT+NAMEBrain");   //Set the name to Brain
//delay(1000);
//btSerial.print("AT+BAUD4");       //Set baudrate to 9600
btSerial.print("AT+BAUD7");       //Set baudrate to 57600
Serial.write(btSerial.read());
delay(1000);
}

void loop()                         //run over and over
{
if (btSerial.available())
Serial.write(btSerial.read());
//Serial.println(btSerial.read());
if (Serial.available())
btSerial.write(Serial.read());
}
I'll post this code in the Documents Section and on the GitHub Repository.If you followed the directions in the Arduino code (above) then your module is ready to connect to the TGAM1 board.
Discussions
Become a Hackaday.io Member
Create an account to leave a comment. Already have an account? Log In.
Please write a little more on the profiles and how to configure the Bluetooth modules to those profiles
Are you sure? yes | no
Great tutorial!
I think it will be very useful for me :)
I would like to use HFP and PBAP protocolls.
Are you sure? yes | no