Close
0%
0%

Abacus Clock

A clock that uses Abacus logic to display the current time.

Similar projects worth following
This project is inspired by the Abacus clock in the faculty for Informatics at the TU München in Bavaria. The clock is the emblem of the faculty and the only in existence (at least to my knowledge).

This will be a variant of the clock because I don't have the time and skills to build the wooden, motorized version myself. I will try when I have a bit more breathing room from school.

Refer to the following link to see images: https://www.in.tum.de/rbg/mediendienste/referenzprojekte/abakus-uhr/geschichte/bilder-der-herstellung.html

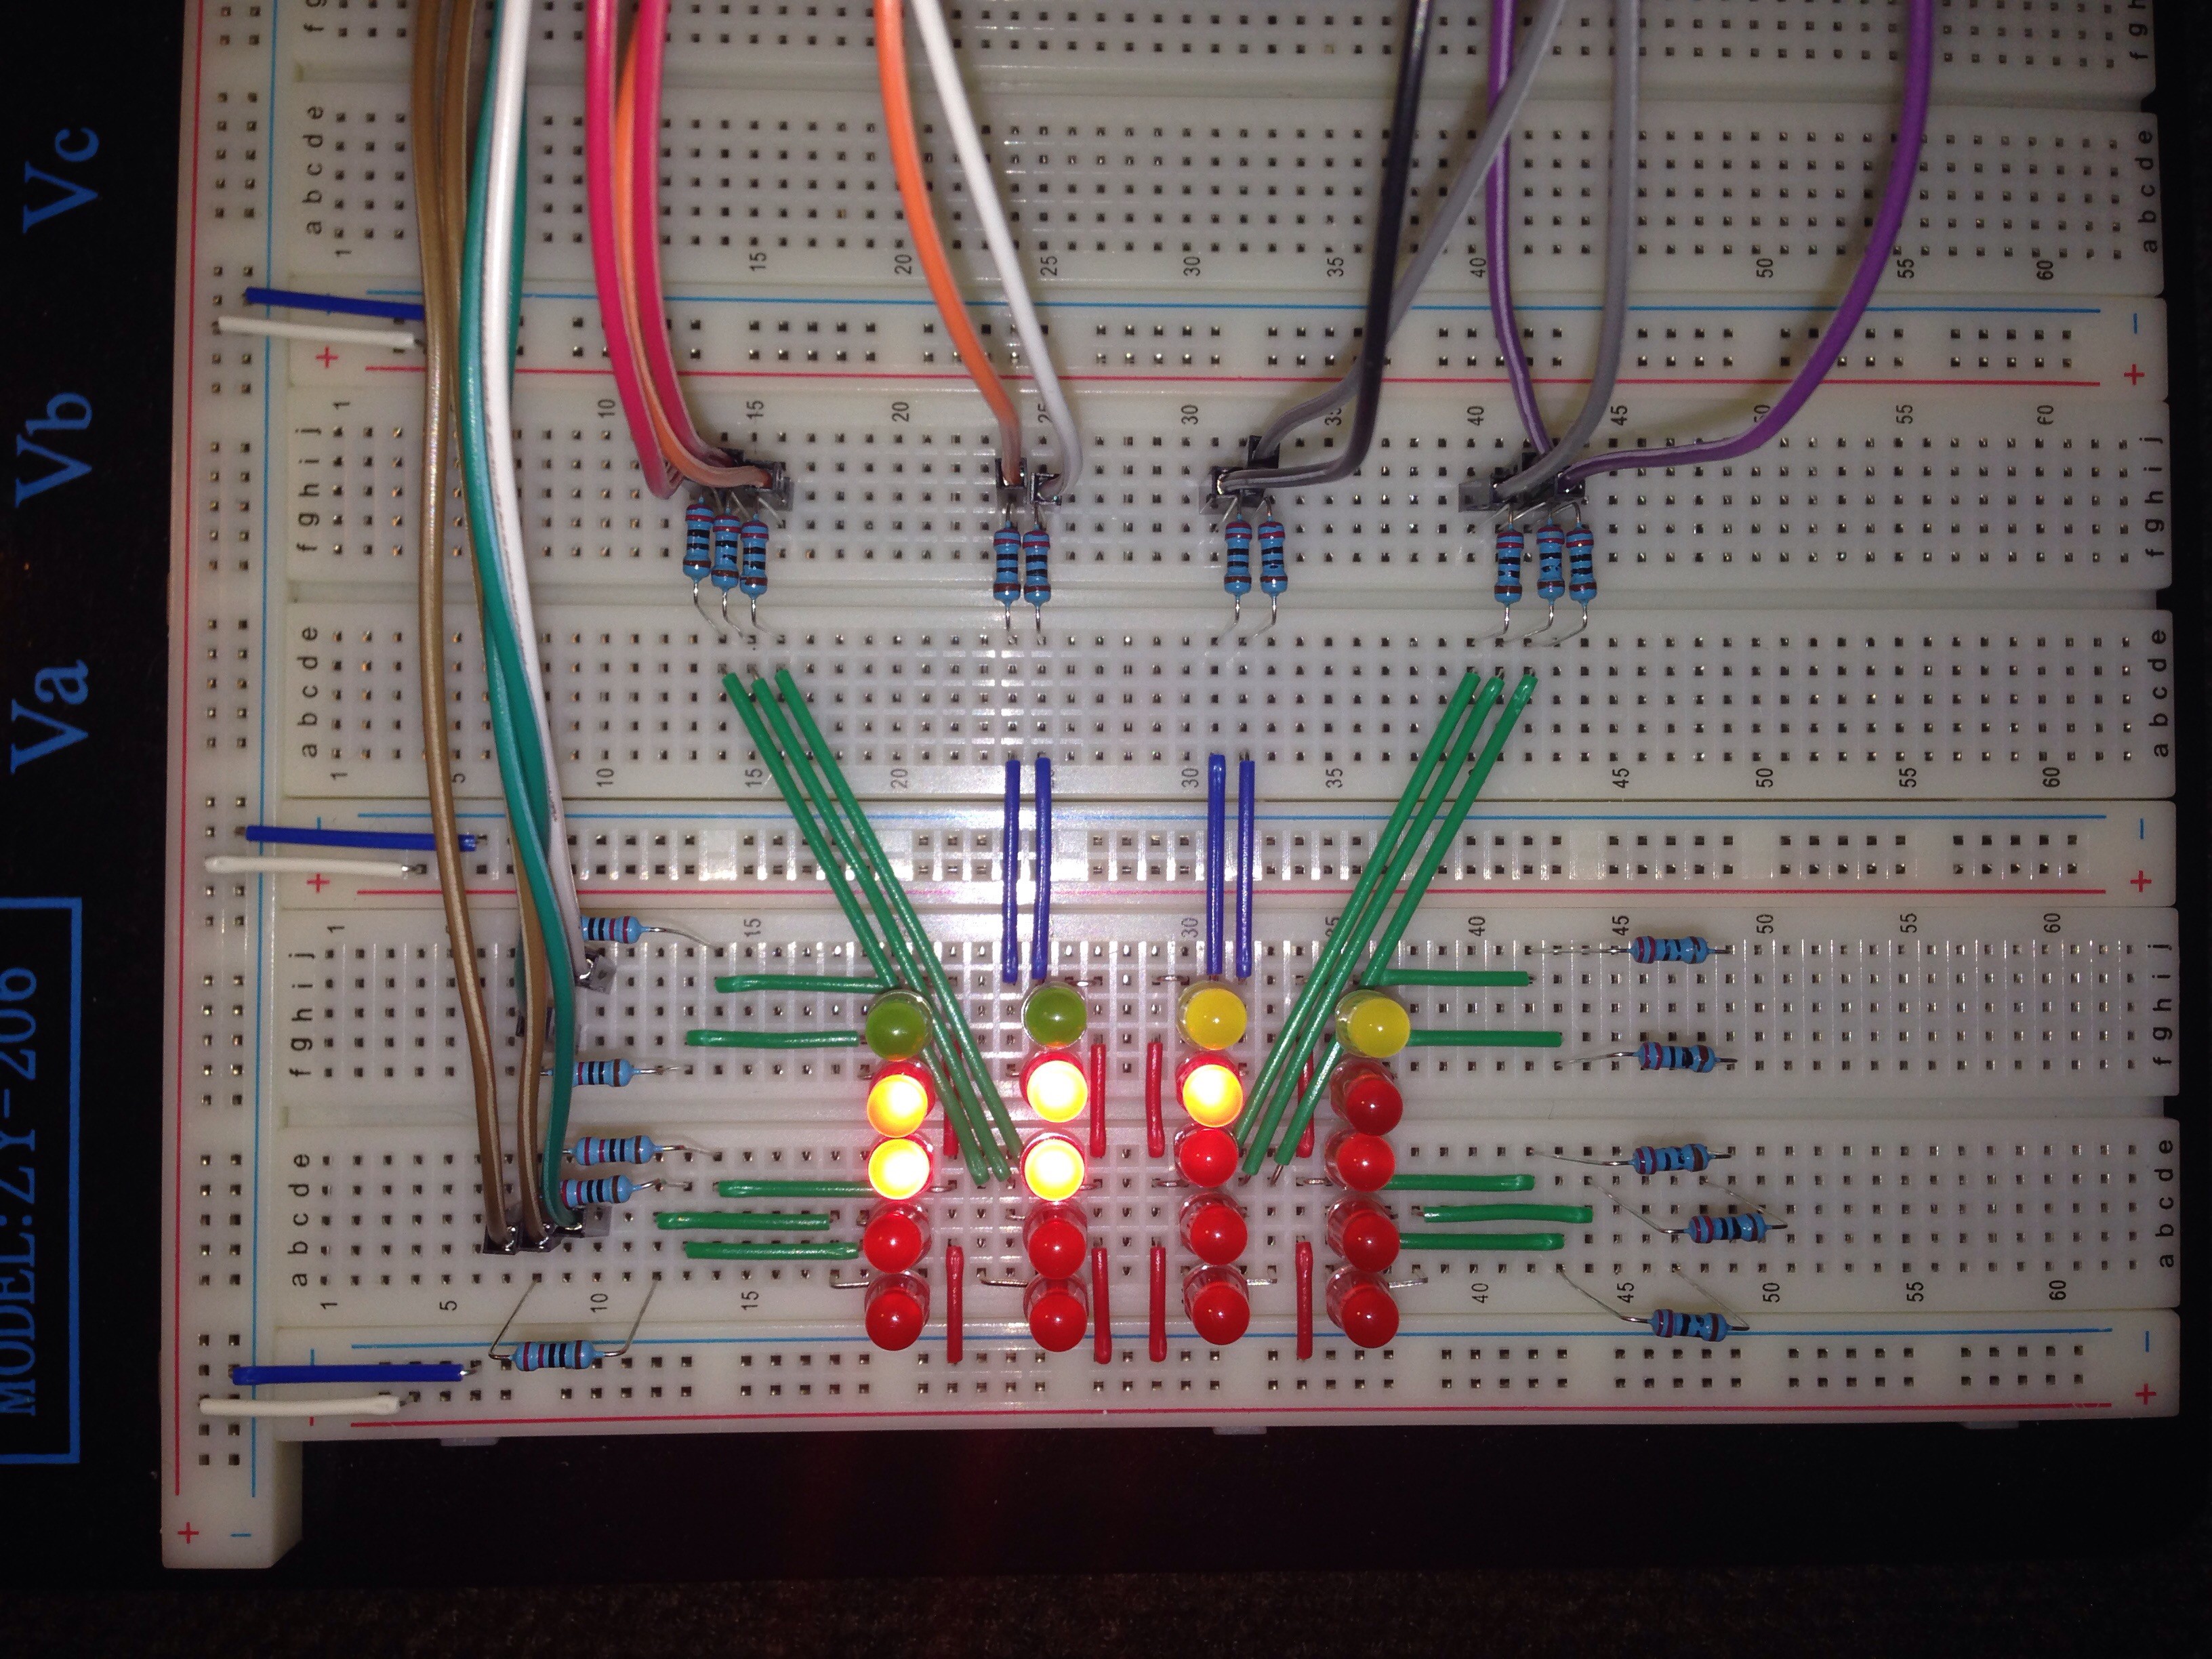
The principle is very simple. The spheres above the wooden board are worth 5 each and the spheres below are worth 1. This allows us to display every the time in the 24h clock-style.

I will split the project into two parts. The first part will be about rebuilding the clock with LEDs and in the following part we will add some more LEDs to display the seconds as well.

x-python-script - 5.11 kB - 05/18/2016 at 10:08

Download

  • 1 × Raspberry Pi Electronic Components / Misc. Electronic Components
  • 1 × Breadboard Electronic Components / Misc. Electronic Components
  • 16 × LEDs (red) Electronic Components / Misc. Electronic Components
  • 4 × LEDs (green) Electronic Components / Misc. Electronic Components
  • 20 × 220 Ohm resistors Electronic Components / Misc. Electronic Components

View all 6 components

  • Nothing near finished (do not rebuild yet)

    Steven Roch05/18/2016 at 10:07 0 comments

    -- UPDATE FOUR--

    So guys,

    today my wires finally arrived but in the meantime I read about the Pi's 3.3V rail and their maximum current draw.

    So I came across this problem that the maximum current the Pi can handle on its 3.3V rail is 51mA (correct me if I'm wrong), which is reached after 3 LEDs lighting up. Take e.g. 19:49 and you will have 15 LEDs burning each drawing 15mAs.

    Since this is my only Pi and I can't afford another one I will rebuild the circuit a little bit but I am not yet sure whether I want to use transistors or go over the 5V rail which can handle 750mA to my knowledge.

    Anyway, Yann Guidon / YGDES who is a follower of this project answered my questions on how to optimize the circuit and we will team up in a second project which will have an optimized version both of the circuit and the code to be more compact.

    I will now upload the source code how it came to my mind when I first thought of the project. Be careful not to re-build my circuit yet because it could potentially damage your Pi!

    When I was testing if everything works my Pi2B did not have any problems or instability problems but I never had more than 7-9 LEDs glowing at the same time and to be honest I do not want to risk executing the code at 19:49!

    I hope you had fun following the project (this is not the end) and I will soon post a link to our (Yann and I) new project. Stay tuned and feel free to follow me for more easy but practical stuff done with the Raspberry Pi.

  • Resistance is futile!

    Steven Roch05/15/2016 at 19:04 0 comments

    -- UPDATE THREE--

    Guys, I couldn't help it. I had to continue working and now the clock is near to its final state.

    I'm lacking 5 m-f-jumper wires but I already ordered some and they are expected to ship on Thursday.

    While waiting I completely assembled the rest of the clock's circuitry and added the lines to get row 3 to work.

    Here's an image of the clock:

    When everything is finished on Thursday I'll post the complete source code as well. I am always open for suggestions on code-improvement and other stuff.

    See you then!

  • Getting messy

    Steven Roch05/14/2016 at 14:21 1 comment

    --UPDATE TWO--

    Now I've come up with a way to reduce the amount of code drastically.

    I will use 10 functions to turn the LEDs on and off depending on the current time. This is 'eight' for example:

    def displayEight(led_1, led_2, led_3, led_4, led_5):
        GPIO.output(led_1, True)
        GPIO.output(led_2, True)
        GPIO.output(led_3, True)
        GPIO.output(led_4, True)
        GPIO.output(led_5, False)

    In addition I installed another row of LEDs today but now I don't have any more LEDs and need to order some which is why I won't be posting any updates for a few days.

    Here's how my breadboard is looking right now (don't mind the knife, I needed to open a pack of resistors):

  • Display the minutes, please!

    Steven Roch05/13/2016 at 22:09 1 comment

    --FIRST UPDATE--

    So after a bit of experimentation I finally came up with an unoptimized code to display the factors of 10 of the minutes.

    Like I said, this is just for me to be sure everything will work like I imagined.

    I took a picture of the testing-setup while it was displaying 23:3xh.

    Today I will continue to get the second part of the minutes section to work.

    Her you have my unoptimized code. Let's see what I can do to make it a bit shorter in the final product:

    #!/usr/bin/python
    # -*- coding: utf-8 -*-
    
    
    # modules
    import RPi.GPIO as GPIO
    from time import strftime, sleep
    
    
    # setup GPIO
    GPIO.setmode(GPIO.BCM)
    GPIO.setup(5, GPIO.OUT)
    GPIO.setup(6, GPIO.OUT)
    GPIO.setup(13, GPIO.OUT)
    GPIO.setup(19, GPIO.OUT)
    GPIO.setup(26, GPIO.OUT)
    
    
    # functions
    def displayTime():
      minutes = strftime("%M")  
      row_3 = int(minutes)/10    
      row_4 = int(minutes)%10    
      if row_3 == 5:
        GPIO.output(5, True)
        GPIO.output(6, False)
        GPIO.output(13, False)
        GPIO.output(19, False)
        GPIO.output(26, False)
      elif row_3 == 4:
        GPIO.output(5, False)
        GPIO.output(6, True)
        GPIO.output(13, True)
        GPIO.output(19, True)
        GPIO.output(26, True)
      elif row_3 == 3:
        GPIO.output(5, False)
        GPIO.output(6, True)
        GPIO.output(13, True)
        GPIO.output(19, True)
        GPIO.output(26, False)
      elif row_3 == 2:
        GPIO.output(5, False)
        GPIO.output(6, True)
        GPIO.output(13, True)
        GPIO.output(19, False)
        GPIO.output(26, False)
      elif row_3 == 1:
        GPIO.output(5, False)
        GPIO.output(6, True)
        GPIO.output(13, False)
        GPIO.output(19, False)
        GPIO.output(26, False)
      else:
        GPIO.output(5, False)
        GPIO.output(6, False)
        GPIO.output(13, False)
        GPIO.output(19, False)
        GPIO.output(26, False)
    
    
    # main program
    def main():
      try:
        while True:
          sleep(0.1)
          displayTime()
      except KeyboardInterrupt:
        GPIO.cleanup()
    
    if __name__ == "__main__":
      main()

    I hope you have fun following the project! See you soon.

  • Project Start

    Steven Roch05/10/2016 at 21:25 0 comments

    Tue, May 10th 2016, 23:25 CEST

    Project started.

View all 5 project logs

Enjoy this project?

Share

Discussions

Yann Guidon / YGDES wrote 05/13/2016 at 23:41 point

Hallo !

I *think* you could do something with balls, as well, using a single motor per bar.

The trick woud be to use a rope with knots. The knots are separated with a longer distance than the rod. The motor pulls/winds the rope until you detect the expected number of knots.

Balls have a hole and can let smaller knots go through them, so they are pulled up by a knot with the correct size, and accumulate at the top.

Sorry I'm tired, I can see it clearly in my head, it's harder to explain it with words ;-) but you could start to play with simple motors as well... It would be easier and cheaper than the TÜ version.

Viel Spaß

  Are you sure? yes | no

Steven Roch wrote 05/13/2016 at 23:46 point

I think I'm getting what you mean. Thanks for that! But it also takes time to build something like that :) Time I sadly don't have at the moment. 

  Are you sure? yes | no

Yann Guidon / YGDES wrote 05/13/2016 at 23:50 point

I think you're going to learn a lot, and hopefully, have a lot of fun ! And here is a great place to get feedback. I'll be watching your progress :-)

  Are you sure? yes | no

Similar Projects

Does this project spark your interest?

Become a member to follow this project and never miss any updates