 thjubeck
Alright so maybe I was kidding about the sparks part but still.
For the control part of this project, I decided to use an arduino.
My first order of business was to choose a communication packet (kinda). I decided to keep this project simple.
1 = all off
2 = lights toggle
3 = fan toggle
4 = lights status
5 = fan status
I have updated the code below if you downloaded the code already you may want to look at the new changes.
int LightRelay = 7;  // pin the light relay is connected to
int FanRelay  = 6;  // pin the fan relay is connected to

int FanSwitch = 3;   // pin the fan switch is connected to
int LightSwitch =2;  // pin the light is connected to

int relayValLight = 0; // sets the lights initially to off
int relayValFan = 0;  // sets the fan initially to off

char ser;  // Serial character received

int reading;           // the current reading from the input pin
int previous = HIGH;    // the previous reading from the input pin

int reading1;           // the current reading from the input pin
int previous1 = HIGH;    // the previous reading from the input pin

void setup(void){
 Serial.begin(115200);
 pinMode(FanSwitch,INPUT_PULLUP);
 pinMode(LightSwitch, INPUT_PULLUP);
 pinMode(LightRelay, OUTPUT);
 pinMode(FanRelay, OUTPUT);
 }

void loop(void){
if (Serial.available()) {
   ser = Serial.read();
   if (ser == '1')
     AllOff();
   else if(ser == '2')
    toggleFan();
   else if(ser == '3')
    toggleLight();
   else if(ser == '4')
   Serial.println(digitalRead(LightRelay));
   else if(ser == '5')
   Serial.println(digitalRead(FanRelay));
  }

  reading = digitalRead(FanSwitch);
  if (reading == HIGH && previous == LOW || reading == LOW && previous == HIGH){
   toggleFan();
  previous = reading;
  }
  reading1 = digitalRead(LightSwitch);
  if (reading1 == HIGH && previous1 == LOW || reading1 == LOW && previous1 == HIGH){
   toggleLight();
  previous1 = reading1;
  }
}

void toggleFan() //Function for fan
 {
   relayValFan ^= 1; // xor current value with 1 (causes value to toggle)

    if (relayValFan){
      digitalWrite(FanRelay, HIGH);
    }
    else{
      digitalWrite(FanRelay, LOW);
    }
 }
void toggleLight()  // Function for light
 {
   relayValLight ^= 1; // xor current value with 1 (causes value to toggle)

    if (relayValLight){
      digitalWrite(LightRelay, HIGH);
    }
    else{
      digitalWrite(LightRelay, LOW);
    }
 }

void AllOff() //Function to turn all lights off
{
    relayValFan = 0;
    relayValLight = 0;

    digitalWrite(LightRelay, LOW);
    digitalWrite(FanRelay,LOW);
}
For the power wiring, I used a usb Power supply and tapped into the 5v and GND lines after I had disassembled it. I will not be posting a how to on this part as each power brick is different.
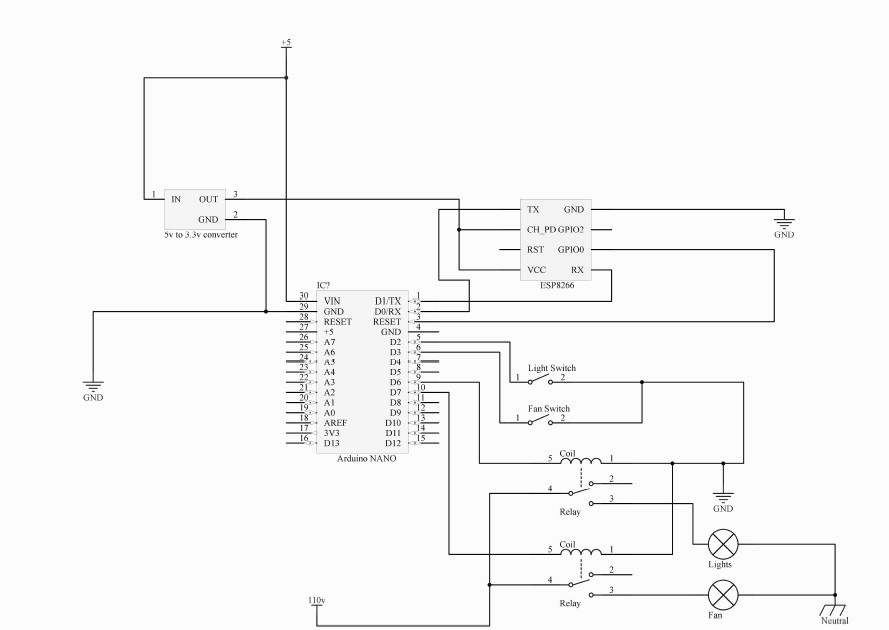
Please check the schematic before you use it as I have tried to be sure I made all connections correctly. I used 5v controlled relays so not exactly my schematic but close enough to understand the concept.
Discussions
Become a Hackaday.io Member
Create an account to leave a comment. Already have an account? Log In.