Initial demo. Getting the TV out to work with FPV trasmitter was easier than I thought. Pi Zero is consuming about 0.2 A while recording 1080P video.
Here's a video from Raspberry Pi and PiCam v2 in action, on a drone!
Pi Zero and camera weigh 13 grams making it an ideal setup for data logging, HD video recording and custom On Screen Display for FPV.
To make the experience fit your profile, pick a username and tell us what interests you.
We found and based on your interests.
Initial demo. Getting the TV out to work with FPV trasmitter was easier than I thought. Pi Zero is consuming about 0.2 A while recording 1080P video.
Here's a video from Raspberry Pi and PiCam v2 in action, on a drone!
OSD-recording.pyFull example of functional OSD that records video for 10 seconds while displaying GPS coordinates in the UIx-python-script - 6.03 kB - 08/17/2017 at 06:20 |
|
|
videoNoGPS.pyBetter UI for FPV previewx-python-script - 2.58 kB - 01/23/2017 at 01:32 |
|
|
overlayAndRecord.pyFirst version of recording and overlayingx-python-script - 1.56 kB - 07/14/2016 at 16:31 |
|
I am working on a better version of the user interface that is displayed on the FPV receiver.
Looking at the PiCamera Python package documentation, I found that I can create multiple overlays and control their precise dimensions and positioning. Not making overlays fullscreen allows to have clear central frame and information above and below the frame: http://picamera.readthedocs.io/en/release-1.10/api_renderers.html#picamera.renderers.PiRenderer
Using this, and also using a crosshair image, you can create a better looking UI for the display. Here's the code that I used to create display in the image below:
#!/usr/bin/python

import picamera
import time
import numpy as np
import string
import random
import os

from PIL import Image, ImageDraw, ImageFont

# Video Resolution for recording
VIDEO_HEIGHT = 940
VIDEO_WIDTH = 1280

baseDir='/home/pi/osd/' # directory where the video will be recorded

os.system('clear') # clear the terminal from any other text

# Create empty images to store text overlays
textOverlayCanvas = Image.new("RGB", (704, 60))
textOverlayPixels = textOverlayCanvas.load()

# Use Roboto font (must be downloaded first)
font = ImageFont.truetype("/usr/share/fonts/truetype/roboto/Roboto-Regular.ttf", 20)

with picamera.PiCamera() as camera:
   camera.resolution = (VIDEO_WIDTH, VIDEO_HEIGHT)
   camera.framerate = 60
   camera.led = False
   camera.start_preview()

   topText = "Alt: 310m       Spd: 45km/h         Dir: N"
   bottomText = "47.6062 N, 122.3321 W   Home: 322m    Rec: 3:22"

   topOverlayImage = textOverlayCanvas.copy()
   bottomOverlayImage = textOverlayCanvas.copy()

   # Load the crosshair image
   crosshairImg = Image.open('crosshair.png')

   # Create an image padded to the required size with
   crosshairPad = Image.new('RGB', (((crosshairImg.size[0] + 31) // 32) * 32, ((crosshairImg.size[1] + 15) // 16) * 16))
   crosshairPad.paste(crosshairImg, (0, 0))

   # Attach overlays
   topOverlay = camera.add_overlay(topOverlayImage.tostring(), size=(704,60), layer=3, alpha=128, fullscreen=False, window=(0,20,704,60))
   bottomOverlay = camera.add_overlay(bottomOverlayImage.tostring(), size=(704,60), layer=4, alpha=128, fullscreen=False, window=(0,500,704,60))
   crosshairOverlay = camera.add_overlay(crosshairPad.tostring(), size=(704,512), layer=5, alpha=10, fullscreen=False, window=(20,30,704,512))

   try:
      while True:
         topOverlayImage = textOverlayCanvas.copy()
         bottomOverlayImage = textOverlayCanvas.copy()

         drawTopOverlay = ImageDraw.Draw(topOverlayImage)
         drawTopOverlay.text((200, 15), topText, font=font, fill=(255, 0, 255))

         topOverlay.update(topOverlayImage.tostring())

         drawBottomOverlay = ImageDraw.Draw(bottomOverlayImage)
         drawBottomOverlay.text((150, 20), bottomText, font=font, fill=(255, 255, 255))

         bottomOverlay.update(bottomOverlayImage.tostring())

         time.sleep(1)

   except KeyboardInterrupt:
      camera.remove_overlay(topOverlay)
      camera.remove_overlay(bottomOverlay)
      camera.remove_overlay(crosshairOverlay)

      print "Cancelled"

   finally:
      camera.remove_overlay(topOverlay)
      camera.remove_overlay(bottomOverlay)
      camera.remove_overlay(crosshairOverlay)
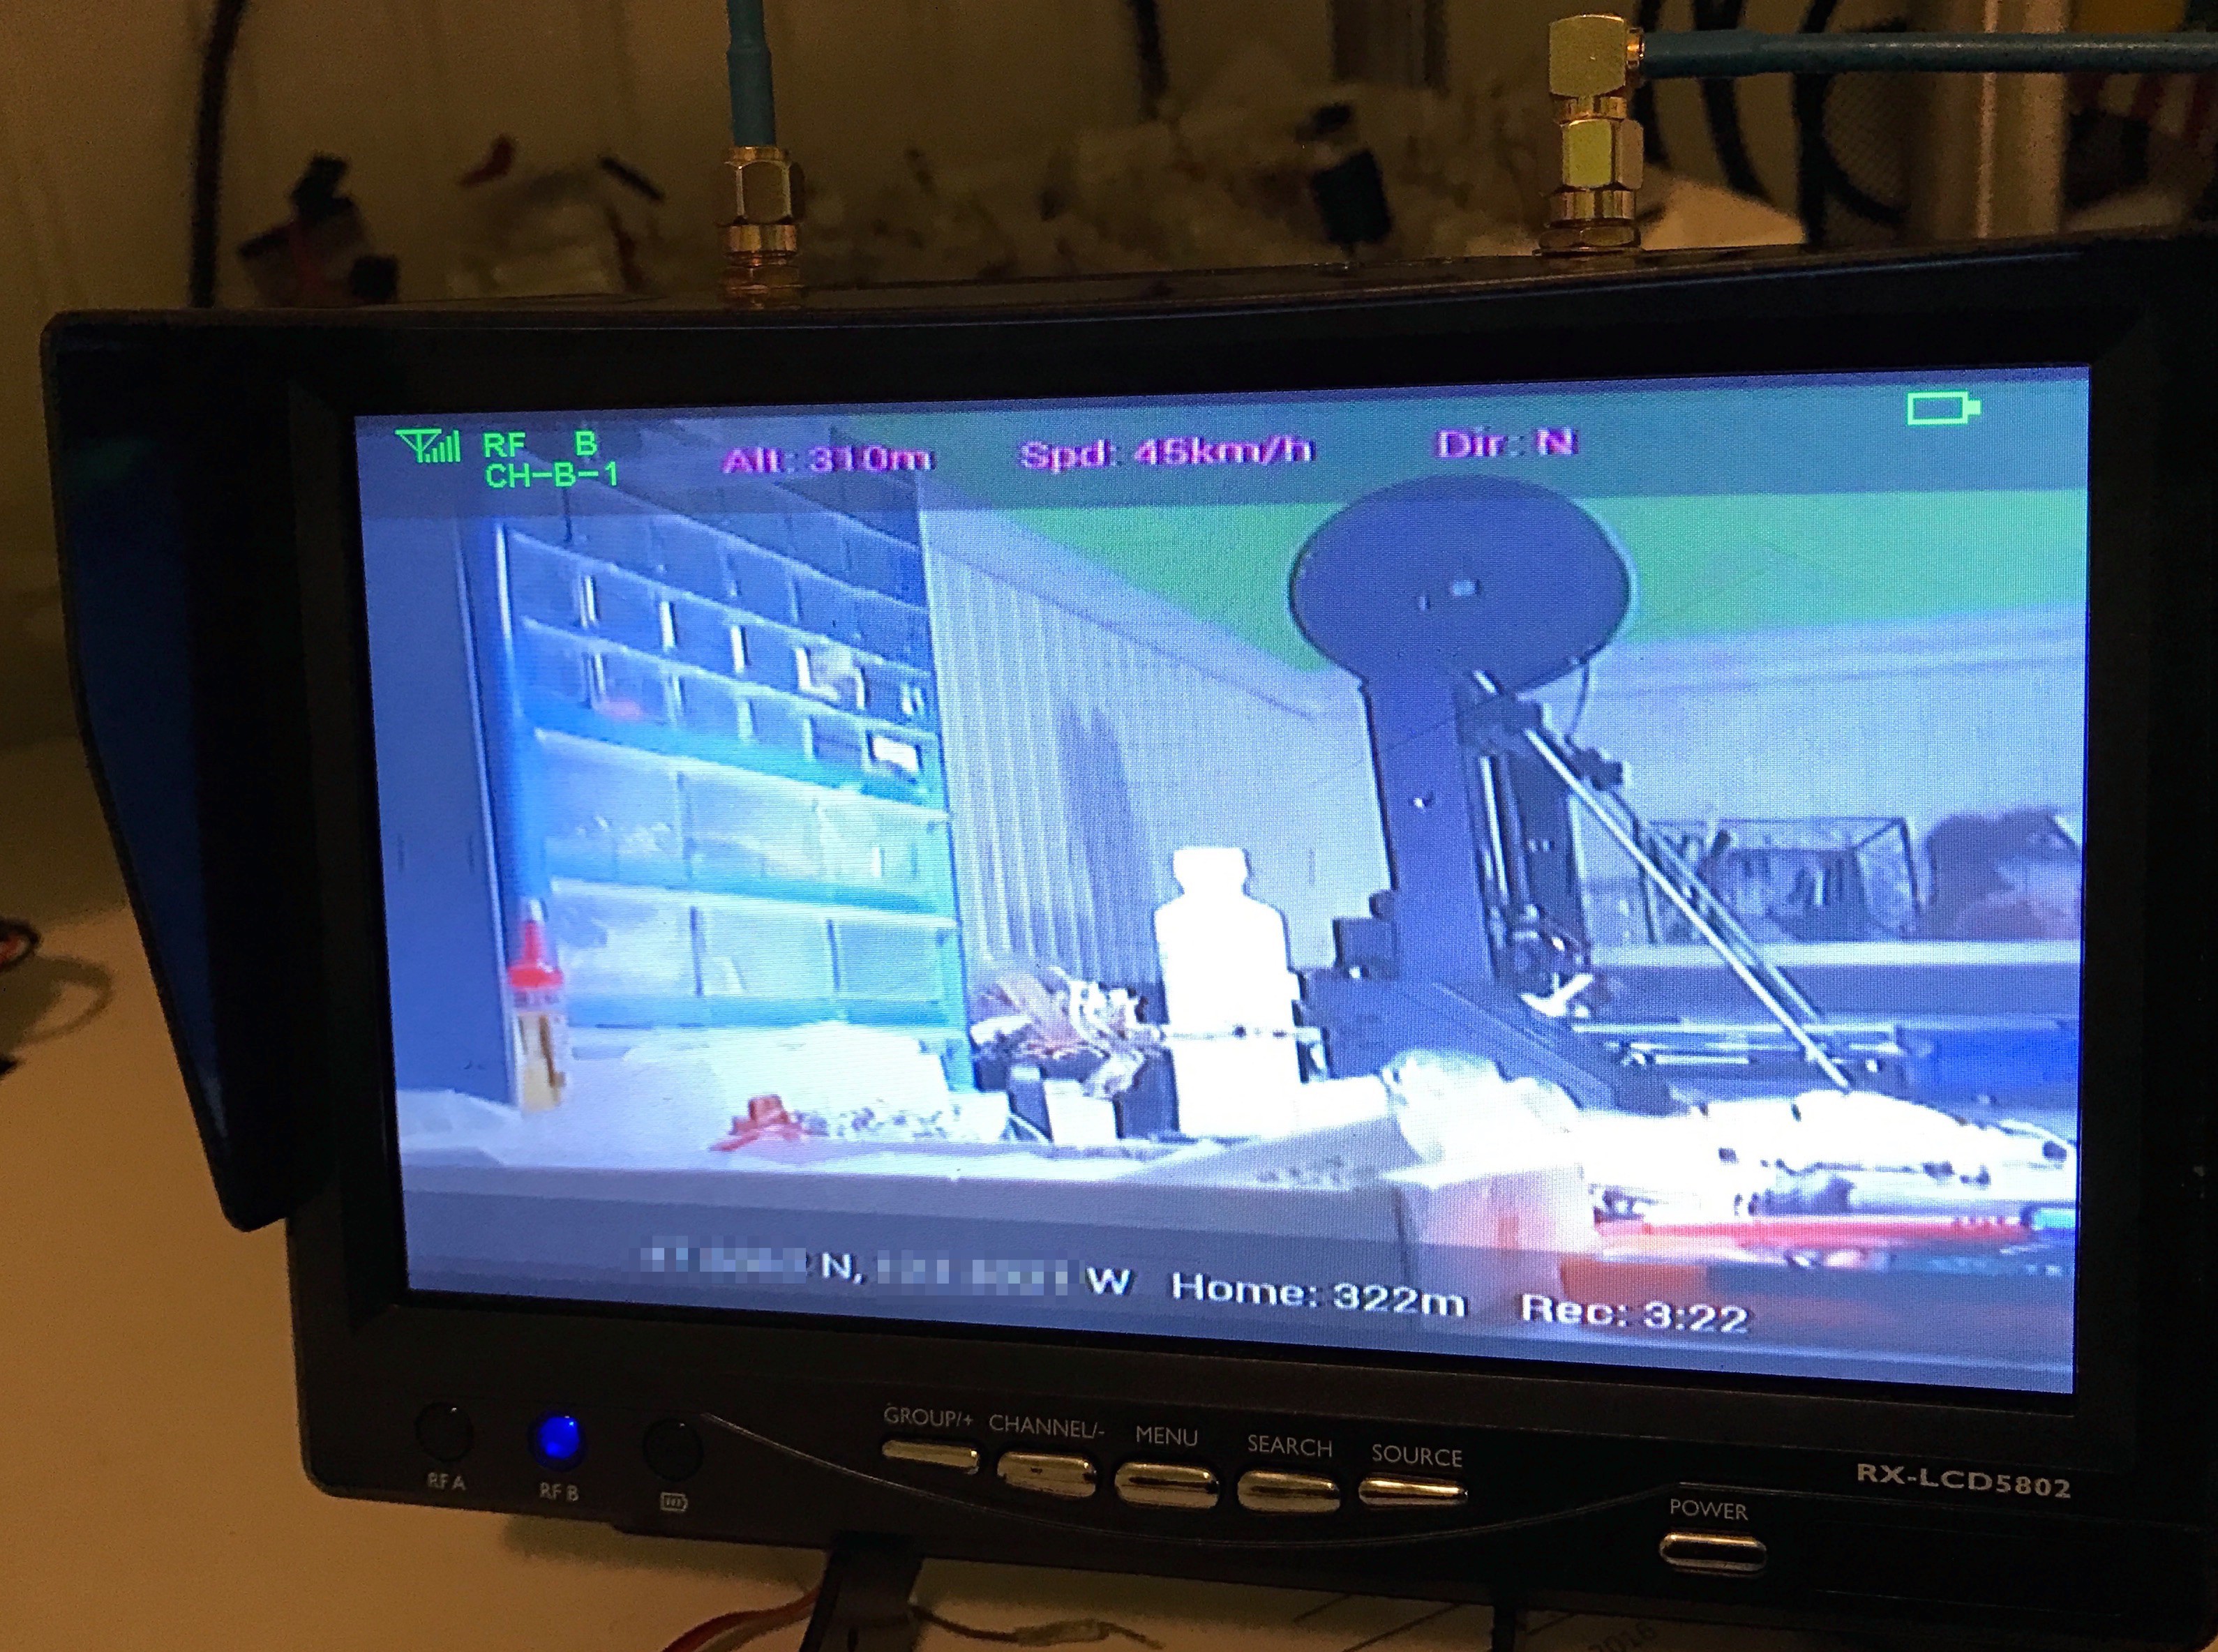
Next steps would be to display information from the GPS sensor attached to the Raspberry Pi via serial interface.
WiFi is not really suitable for real time video streaming unless you have powerful CPUs and strong connection. This fact alone makes it very hard to use Pi Zero and WiFi to get steady video stream over large distances. Perhaps there is another way?
It is not widely known, but all Raspberry Pis have analog TV output on board (in addition to HDMI), even Pi Zero sports one! You can use that analog TV output to stream a video feed from the Pi Zero to a screen far far away via a hobby grade FPV transmitter.
For my setup I used a $15 transmitter from RangeVideo.com that is tiny, yet powerful enough to fly about quarter a mile away and still have clear signal.
I connected the TV out on the Pi Zero to Video input on the FPV transmitter as you can see in the picture below:
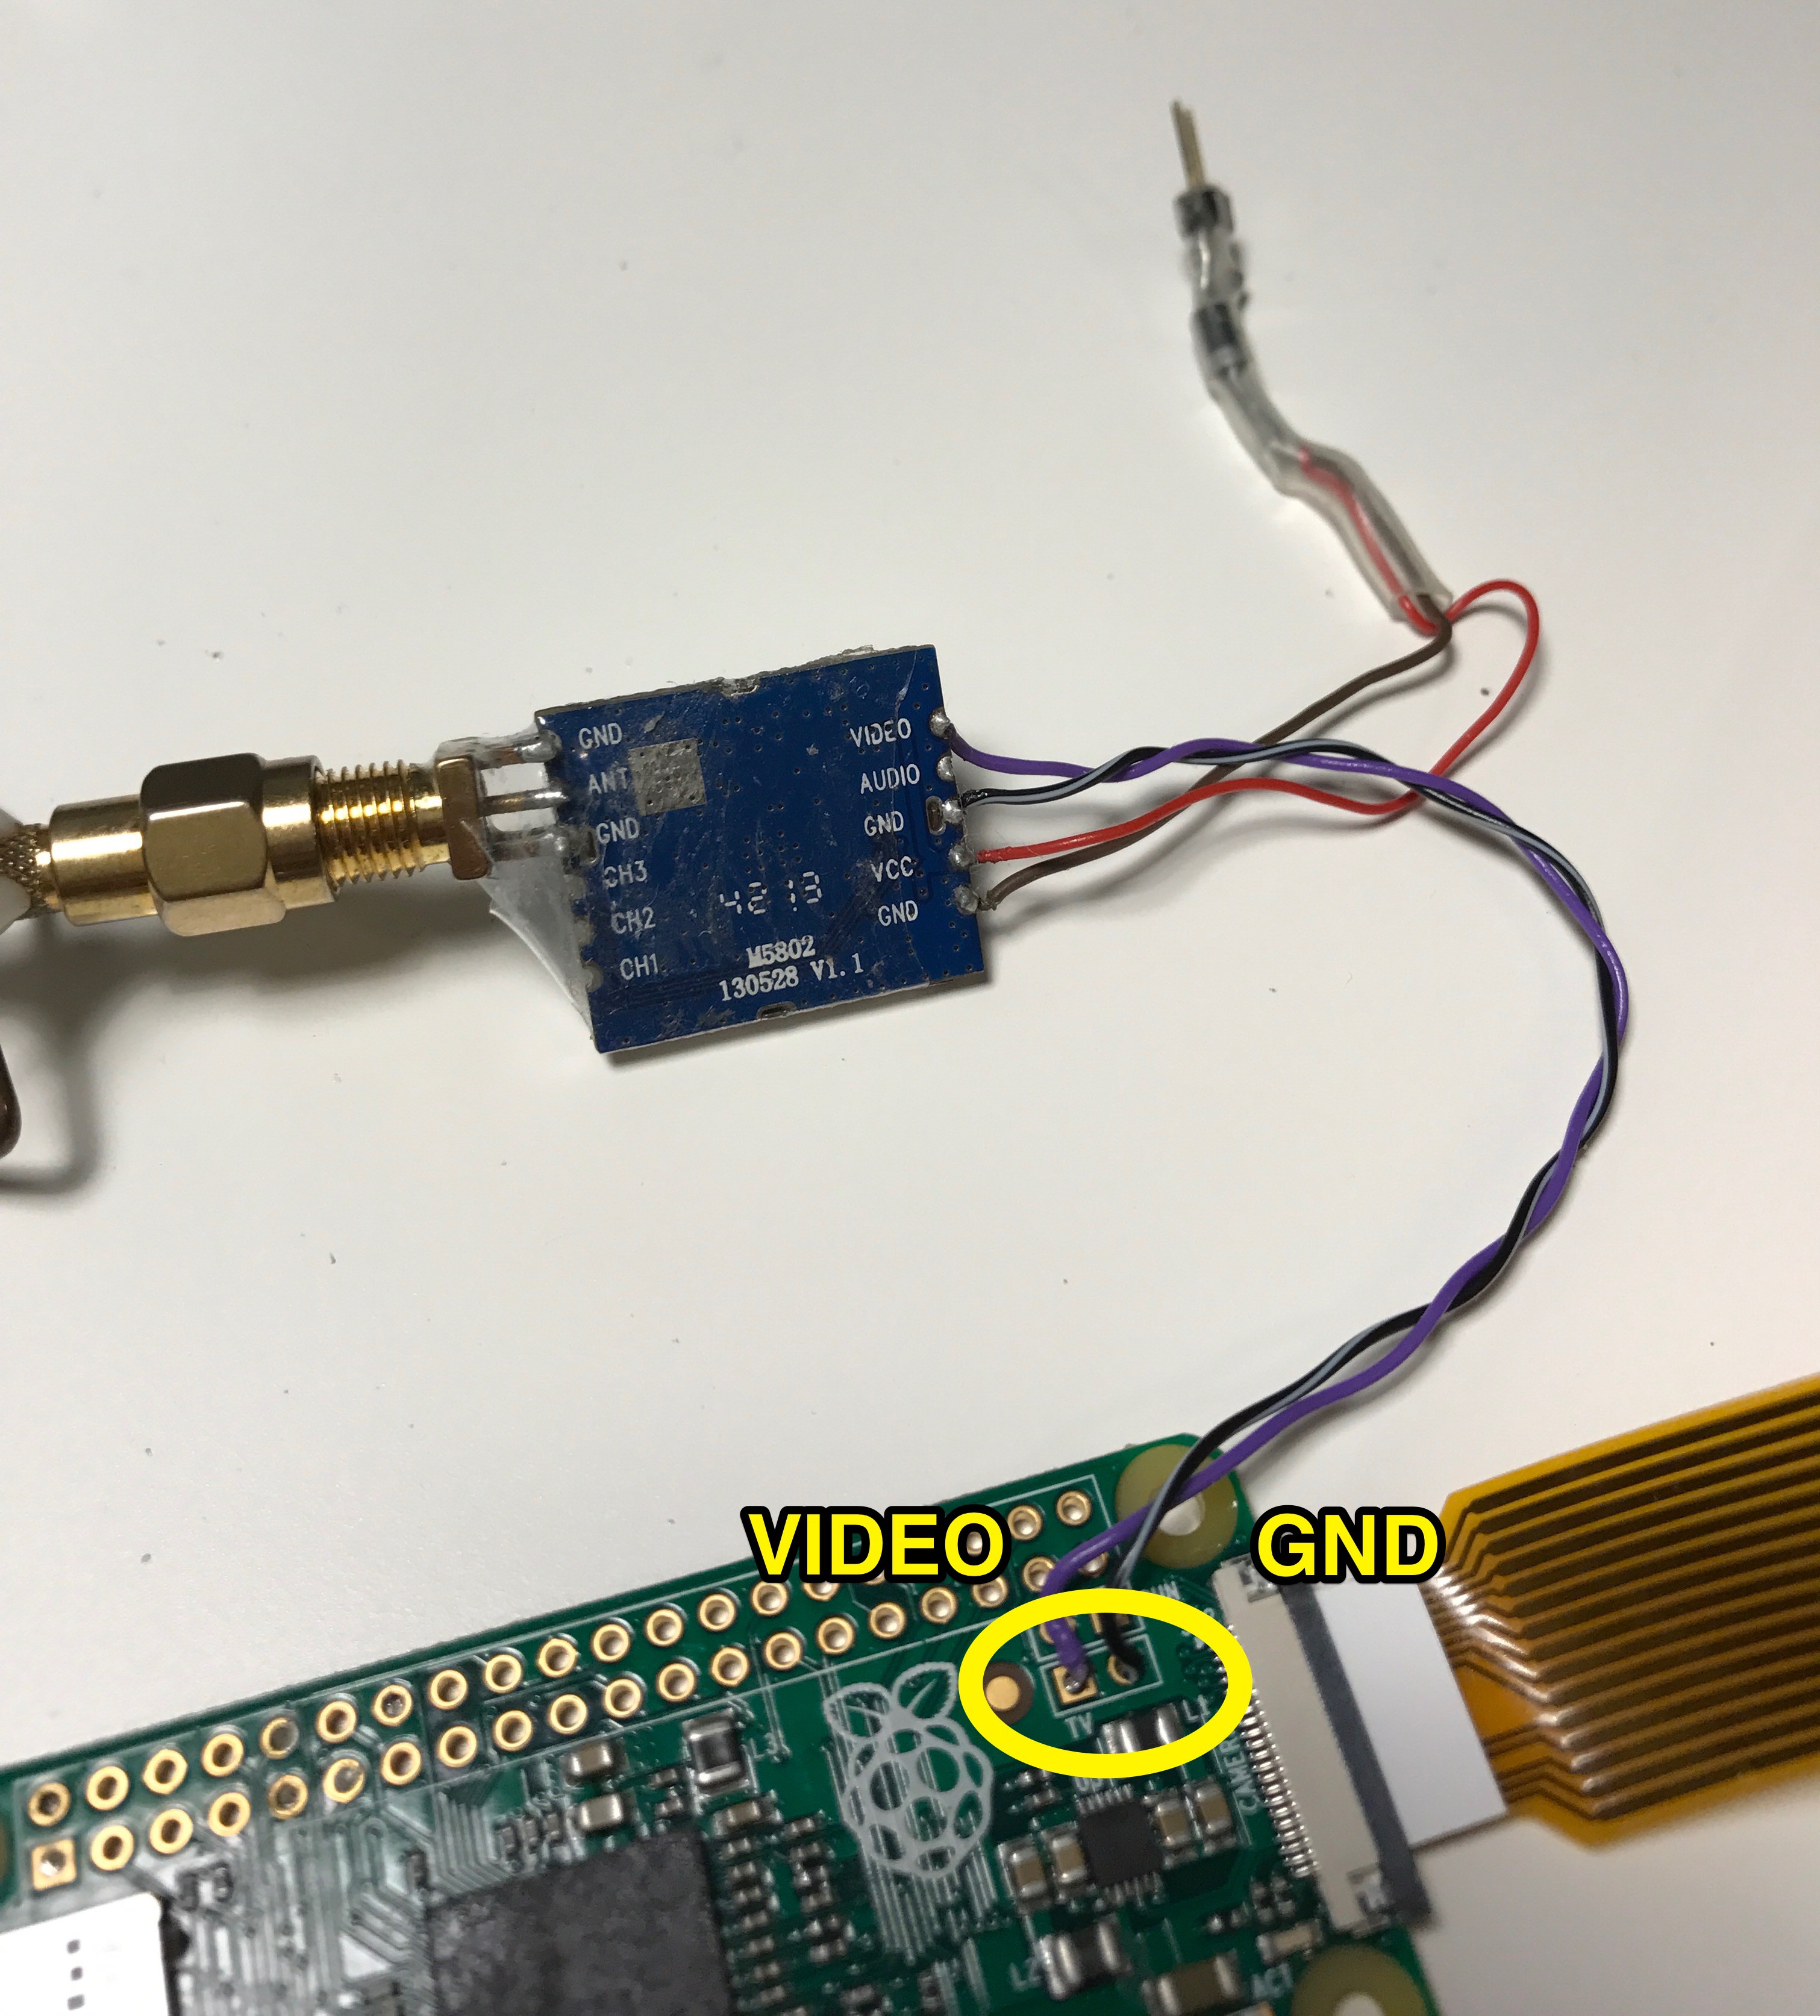
This is all you need to be able to see your Pi Zero video output remotely! Simple enough (2 connections), but the biggest advantage of this system over WiFi streaming is that there is minimal latency because analog signal doesn't require handshakes, packet verification, packet reconstruction, etc. Analog output just streams video as it is output from the Pi Zero, in real time!
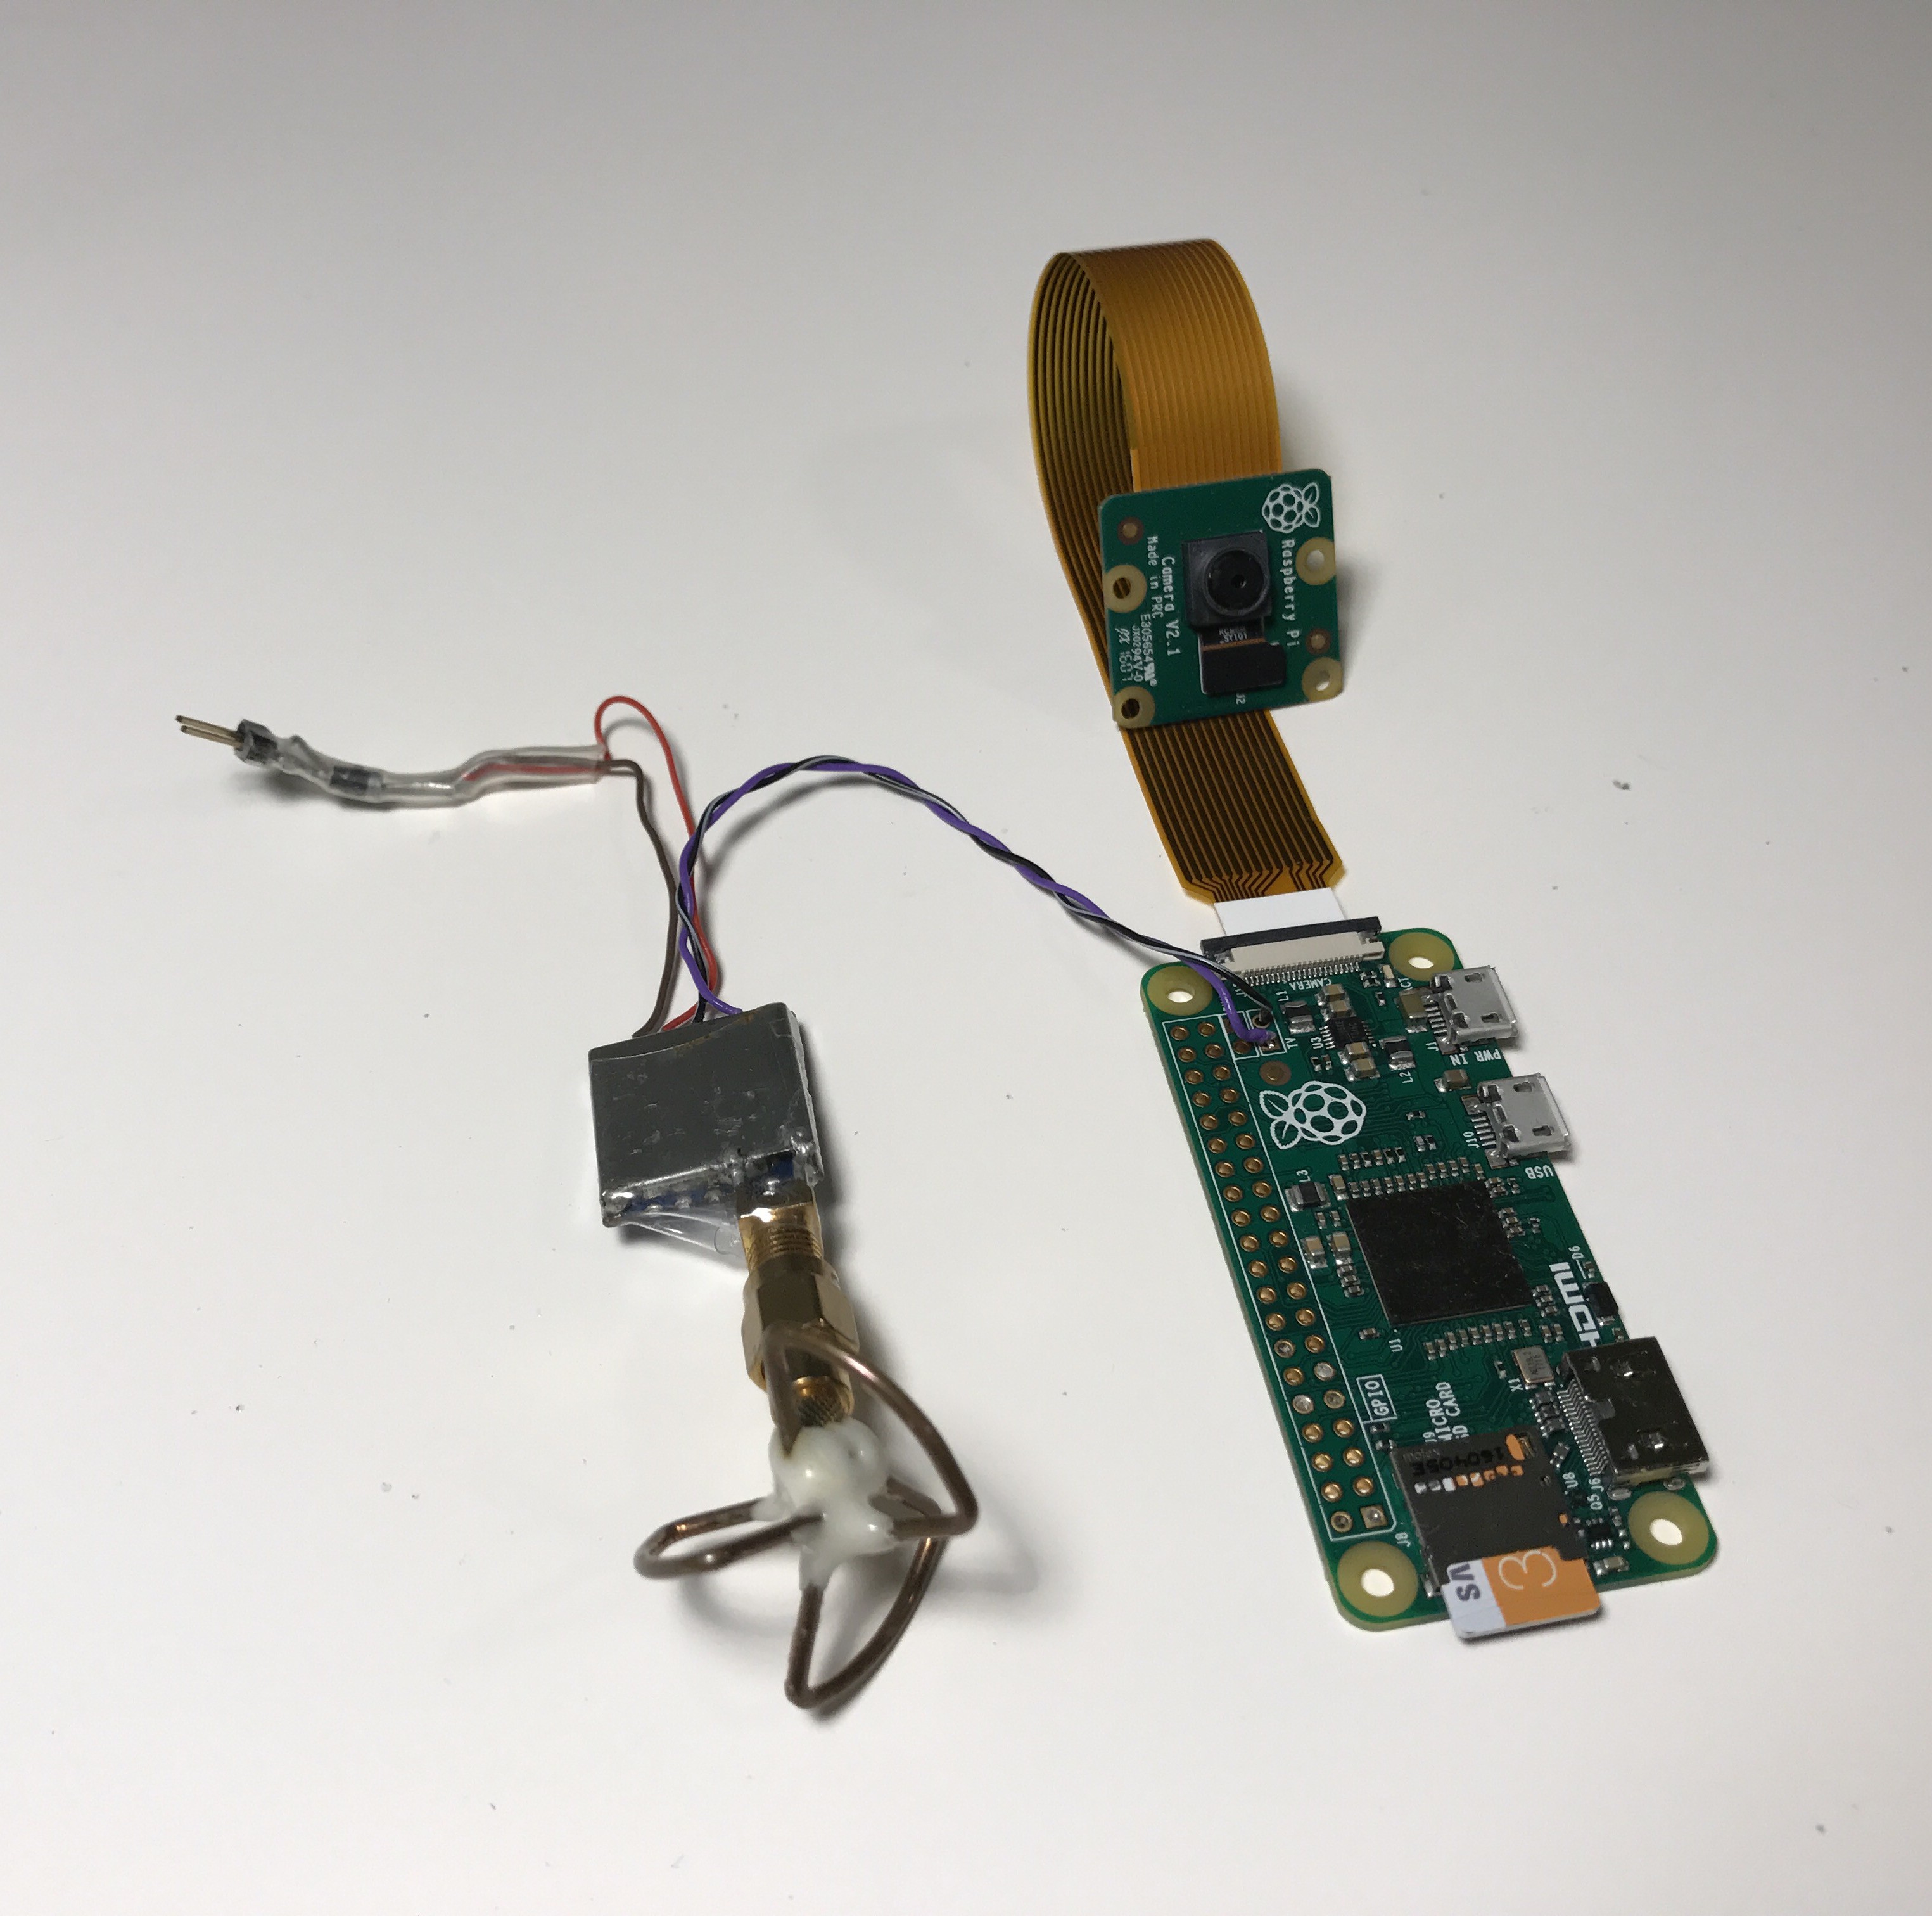
There are many tutorials on connecting GPS to a Raspberry Pi available online so I followed some of them to connect a GPS sensor I had laying around to the Pi Zero.
The best resource I found for this was https://learn.adafruit.com/adafruit-ultimate-gps-on-the-raspberry-pi which has a full explainer on how to connect, configure and troubleshoot your GPS sensor.
I had to use 3.3V -> 5V logic converter to make sure there is not excess voltage from the sensor. When I got the GPS sensor to work on the Pi Zero, I was faced with a few choices on how to retrieve the data from it in my Python program:
- Run "gpsd" service in the background and grab nicely formatted data from it in Python application
- Read raw NMEA data from the serial interface directly and parse it in the Python application on the fly
I have tried both methods and because I do not have that much experience with Python and threading, I had plenty of obstacles with either one. The following code somewhat worked to retrieve altitude, position and ground speed from my sensor's serial data stream:
import serial
import pynmea2
import string

...
sentence = serialStream.readline()
  if sentence.startswith('$GPGGA') :
    data = pynmea2.parse(sentence)
    gpsLocationText = "TIME: {time}, POS: {lat}, {lon}".format(time=data.timestamp, lat=data.latitude, lon=data.longitude)
    gpsAltitudeText = "ALT: {altitude}, {units}".format(altitude=data.altitude, units=data.altitude_units)
  if sentence.startswith("$GPVTG") :
    data = pynmea2.parse(sentence)
    gpsSpeedText = "Speed: {speed} Kmh".format(speed=data.spd_over_grnd_kmph)
  if sentence.startswith("$GPRMC") :
    data = pynmea2.parse(sentence)
    gpsSpeedText2 = "Speed: {speed} Kmh".format(speed=data.spd_over_grnd)
One problem I had with this code is that it needs to run in a continuous thread that is separate from the application in which my camera overlay is being constructed and I just don't know how to work with Python to do that. Perhaps you have some pointers on how to continuously read serial data while sending that data to main application?What worked fine for me but made the RPi's CPU a lot more loaded was GPSD service with its Python bindings. I followed the tutorial here to get it to work: http://www.danmandle.com/blog/getting-gpsd-to-work-with-python/.
Adding GPSD as a service made the CPU about 20% more loaded for some reason but the Pi Zero was still OK with this kind of load and had another 40-50% to spare.
Another big problem I encountered was running my Python application that uses GPSD on startup instead of running it by SSHing into the Pi. I have tried a lot of different solutions but still couldn't make the GPS coordinates show up if I just restarted the Pi and booted into my application.
Short term solution was for me to SSH into the Pi and start the Python application from the console:
There should be very little latency with this setup because I am not doing digital transmission here like using WiFi or similar wireless protocol.
The TV video output from the Raspberry Pi is directly fed into an analog wireless video transmitter, then analog wireless video receiver is used to get the video signal and display it on screen.
To check the latency of RPi FPV system I set up the Raspberry pi with a camera pointing at my computer and had a phone ready to take a picture. On my computer I started an online timer and captured a few photos to see how long it took for the whole setup to display the captured timer.
Here are some of the latencies encountered:
From a few other tests and from these images I was able to figure out that the delay was 8-60 milliseconds while recording video on Raspberry Pi. In my opinion that is good enough to fly a drone at low speeds and still be able to respond on time to avoid obstacles.
I have researched various ways to achieve basic requirements such as having a preview with On Screen Display (OSD) that is streamed through FPV transmitter and recording unmodified video at the same time.
From my research I found a few ways of overlaying text and additional information while using the Raspberry Pi camera:
- By using UV4L library (www.linux-projects.org/uv4l/tutorials/text-overlay/ and chrome-extension://klbibkeccnjlkjkiokjodocebajanakg/suspended.html#uri=http://www.linux-projects.org/home/wp-content/uploads/2016/06/uv4l-overlay.cpp)
- By using OpenGL libraries, some of which are outdated and are hard to get started with
- By using PiCamera Python library and its feature of overlaying an arbitrary array of pixels in Preview mode (picamera.readthedocs.io/en/release-1.12/recipes1.html#overlaying-images-on-the-preview)
I settled on the third option as it is easy to program and has great documentation. I then searched Github for existing projects that use the preview overlay feature in PiCamera and found a single example that pointed me in the right direction. PiCamera library allows overlaying an array of pixels which means you can either create your own drawing library to create that array or use existing Python libraries that will do that for you based on your requirements. The project at https://github.com/darkcrash21/raspberry_pi uses Image and ImageDraw Python libraries to create a great looking HUD. Another example in the same project had a basic implementation that proved to be useful for my FPV OSD project.
Based on that find, here's the code I wrote that displays a crosshair and current timestamps in multiple positions on the preview screen while recording unmodified HD video:
import picamera
import time
import numpy
from PIL import Image, ImageDraw, ImageFont


# Video Resolution
VIDEO_HEIGHT = 720
VIDEO_WIDTH = 1280

# Cross Hair Image
crossHair = Image.new("RGB", (VIDEO_WIDTH, VIDEO_HEIGHT))
crossHairPixels = crossHair.load()
for x in range (0, VIDEO_WIDTH):
   crossHairPixels[x, 360] = (255, 255, 0)

for x in range(0, VIDEO_HEIGHT):
   crossHairPixels[640, x] = (255, 255, 0)

with picamera.PiCamera() as camera:
   camera.resolution = (VIDEO_WIDTH, VIDEO_HEIGHT)
   camera.framerate = 30
   camera.led = False
   camera.start_preview()
   camera.start_recording('timestamped.h264')

   img = crossHair.copy()
   overlay = camera.add_overlay(img.tostring(), layer = 3, alpha = 100)

   time.sleep(1)
   try:
      while True:
         text = time.strftime('%H:%M:%S', time.gmtime())
         img = crossHair.copy()
         draw = ImageDraw.Draw(img)
         draw.font = ImageFont.truetype("/usr/share/fonts/truetype/freefont/FreeSerif.ttf", 20)
         draw.text((10, 10), text, (255, 255, 255))
         draw.text((10, 100), text, (0, 255, 255))
         draw.text((10, 200), text, (255, 0, 255))
         draw.text((10, 300), text, (255, 255, 0))
         draw.text((200, 10), text, (255, 255, 255))
         draw.text((300, 100), text, (0, 255, 255))
         draw.text((400, 200), text, (255, 0, 255))
         draw.text((500, 300), text, (255, 255, 0))
         overlay.update(img.tostring())
         camera.wait_recording(0.9)

   finally:
      camera.remove_overlay(overlay)
      camera.stop_recording()
I have tested this code on the Pi Zero and was able to get consistent 30FPS recording while overlaying the text in multiple places on the preview screen. The CPU load was at about 23% because the overlay is updated once a second or so.
Now with this basic functionality working I can get to plugging in the sensors and reading the data from the flight controller that has serial interface.
My next steps are:
- Get GPS data and display it on the screen
- Get positional/rotational data from the Flight controller and display it on the preview screen
- Get battery status and display it on the screen
Connect the Pi to the GPS sensor and the FPV transmitter.
Depending on the voltage level, the GPS sensor might need to be connected directly to the Pi without TTL converter.
Connect the Pi to the Camera module.
FPV transmitter and the Pi might be powered from the ESCs or from the drone power distribution board (depends on the voltage)
First, you need to enable the Pi Camera and disable using Pi Serial interface via this command:
sudo raspi-config
Then, install the GPSD package and its Python bindings:
sudo apt-get update
sudo apt-get install gpsd gpsd-clients python-gps
After GPSD is installed, I recommend disabling its automatic start:
sudo systemctl stop gpsd.socket
sudo systemctl disable gpsd.socket
Now, if your GPS sensor is hooked up to the Pi's serial interface and is designed to run at 38400 Baud, run this command:
stty -F /dev/ttyAMA0 ispeed 38400If you are on Pi Zero W or Pi 3, you might need to switch up the default port:
stty -F /dev/ttyS0 ispeed 38400Finally, start up the GPSD service manually (use /dev/ttyS0 port on Pi Zero W or Pi 3):
sudo gpsd /dev/ttyAMA0 -F /var/run/gpsd.sock
You can now try out if your GPS sensor works ok by launching CGPS:
cgps -sIf this command works fine, you should be able to use Python to get the data from the GPS sensor!
Create an account to leave a comment. Already have an account? Log In.
Are you running the full raspbian on the raspberry pi or did you find a way to do it headless?
Recording with overlay ?
Did you find a solution for this ?
Noob here. Can someone tell the purpose of the GPS module. I am adapting to for fpv for a nitro RC Truck. What does the GPS provide?
Maksim, can you add an ultrasonic/lidar range detector to this and have that on the OSD?
hi,
is there any coding required for the video transmitter?
Cual es la distancia maxima de tx video y que puedo hacer para tx a 500 metro
I have some errors, i think that the problem is python 2/3. picamera library is 3, scripts are 2.
can you exaplain who install the libraries o fix the code to python3,
last error is 'unable to determine format from source size')
picamera.exc.PiCameraValueError: unable to determine format from source size
hi all, I'm thinking of attaching a pi zero to the bottom of my SYMA x5sc1 drone. But what about power, external lipo battery or lower off the existing battery on the drone? All tips appreciated. Not sure if syma will have the power to lift it!
You can use a USB powerbank to power the Pi Zero or use a separate LiPo with a step up DC converter. Pi Zero consumes very little energy so even a small battery can last a while.
hey I have a syma x5 too, I saw that the chineses cameras shown in aliexpress are about 60g (if you have the x5c version you could weigh it) so I think we have enough power to carry a pi zero. Maybe we can put an additional battery. I would like to see how the authors of this project had powered it, but i saw in pimorino, the "zero lipo" board would be great as a step up converter (expensive compared with chineses converter but smaller and lighter)
Awesome project!
What receiver, screen and antennas (on both ends) you're currently using?
I haven't tried that indoors yet, I imagine it depends on the material that the walls are made out of and the type of the GPS receiver...
How are you managing the power of the pi? I'm just getting together everything I need to replace the gopro with the zero & camera
Just using the ESC 5V output that powers the RX board. My flight controller has 3 extra channels available for other uses so I plugged the Pi power into one of the extra channels to get the power.
@hanno I believe there is no latency. The video is coming from Video Out on the RPi so it is as fast as video out can show it, it is not transmitted in digital form on FPV transmitter so it is as real time as you can possibly get.
I think hanno is interested in the latency introduced between camera and video output on the pi.
Thanks for trying to clarify that. The latency is 30-80ms, the method that I used is described in one of the project logs :)
I flashed a bright led in front of the pi camera and hooked the led plus the cvbs output to my scope. the maximum delay i found was around 17ms which is really close to cameras framerate, so my guess is it's fast enough for even speedy fpv.
nice idea!
Cool project! Can you give an estimate of the latency of transmission?
The latency is 30-80ms, the method that I used is described in one of the project logs :)
Is there a possibility of you being able to use mavlink data instead? I use arducopter with my pi zero using a diy version of the pxfmini. I would like to be able to have the osd overlay mavlink data. which would include gyro, compass, flight mode etc.
Become a member to follow this project and never miss any updates
 Mahmut
 Matthew Gorr
 Lithium ION
 kutluhan_aktar
Did you use any code to transmit video? or enable something in the raspberry?