Close
0%
0%

ESP8266 I2C Extender

A PIC18F27J53 connected to an ESP8266 via i2c to provide extra I/O, including a possible 10 channels of 12-bit ADC

Similar projects worth following
The ESP8266 is magic; it's also cheap, but it is fairly constrained on the I/O front. The basic concept of this project is to add a second microcontroller which would provide extra I/O and would be configurable for different tasks. The two processors communicate via the i2c bus.

The PIC18F27J53 has a pretty good selection of peripherals, is a 3v3 part (but has some 5v tolerant pins), needs very few external components to get up and running (an internal oscillator with phase-locked-loop control means that even the USB port will operate without the need for an external crystal) and is also a relatively cheap part. I also just happen to have a few of them to hand. :-)

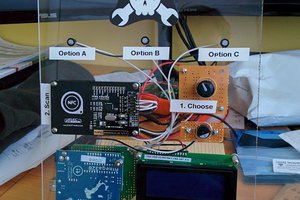
Using a second processor to extend the capabilities of the first is hardly novel; that's pretty much what the i2c bus was designed for in the first place, so I can't claim any great originality. However, the peripheral mix on the PIC means that this combination can provide a lot of flexibility with very little in the way of additional components.

I gave up programming the ESP with straight C a few months back, when I discovered that using the Arduino-ESP core meant that you didn't have to do anything special to have the application fit into memory and that you no longer had to fight with the SDK every time Espressive pushed out an "update". I've since moved on to PlatformIO, as I've always been a CLI, rather than a GUI kinda' guy (and I thoroughly recommend it).

My language of choice on the PIC would probably be C ...if the Microchip stuff wasn't just so damn difficult to use. I really don't want to spend three days bouncing back and forth between on-line manual pages and forum postings just trying to find out how to get a simple lib #include to work. The Microchip MPlabXpress IDE looks great, but same problem ...where is the i2c library file and how do I include it (oh, and how on earth do I access the shared programs which other people have written? Did everyone else give up in frustration, too?). The CSS C compiler was okay while it lasted, but I can't afford to pay their prices for hobby use. So I go back to using JAL2 and the excellent JALLIB support libraries.

JAL2 is very much like a simplified subset of C, but lacking pointers. There are libraries available for almost anything you care to mention in the JALLIB package and there's a metric ton of example code for different PIC variants included too. I've used the JALLIB i2c libraries to get multiple PIC processors talking to each other before, so using it again for the PIC slave sideof this project seems like a reasonable choice.

  • 1 × ESP8266 module ESP12 or ESP13/WROOM-02
  • 1 × PIC18F27J53 Microprocessors, Microcontrollers, DSPs / Microcontrollers (MCUs)

  • Hardware

    PuceBaboon07/22/2016 at 15:38 0 comments

    The hardware for the prototyping stage of this project is basically a no-brainer. I have a few of the AI Thinker "yellow" development boards, which are an excellent way to get your ESP12's already soldered to a PCB with all of the pins broken out and debug LEDs already attached (plus a good number of other, useful parts).

    The PIC is currently sitting on some strip-board with a voltage regulator and a few decoupling caps. I added a couple ofpull-up resistors for the i2c bus and we were in business.

    The PIC (slave) side firmware was stolen from the previous (all PIC) project, with very few modifications.

    The first step with the ESP (master) side was to grab Mike Causer's nice little i2cdetect library, which makes it nice and easy to see whether your i2c devices are actually visible to the master. Just fire it up and it'll interrogate the given address range and print out a nice little table of everything it can see on the bus. If your hardware doesn't pass this simple test, it's a 98% certainty that you've screwed up something pretty basic. In my case, I added a known good i2c device (a DS3231 board with a serial memory chip) on a different address to the PIC, so that I had something to compare with.

    I2CDetect
    Scanning address range 00-7f
    
     0  1  2  3  4  5  6  7  8  9  a  b  c  d  e  f
    
    00: -- -- -- -- -- -- -- -- -- -- -- -- -- -- -- --
    
    10: -- -- -- -- -- -- -- -- -- 19 -- -- -- -- -- --
    
    20: -- -- -- -- -- -- -- -- -- -- -- -- -- -- -- --
    
    30: -- -- -- -- -- -- -- -- -- -- -- -- -- -- -- --
    
    40: -- -- -- -- -- -- -- -- -- -- -- -- -- -- -- --
    
    50: -- -- -- -- -- -- -- 57 -- -- -- -- -- -- -- --
    
    60: -- -- -- -- -- -- -- -- 68 -- -- -- -- -- -- --
    
    70: -- -- -- -- -- -- -- -- -- -- -- -- -- -- -- --

    Yup, the DS3231 and memory are on the 0x57 and 0x68 addresses and my PIC shows up a bit further down the address range at 0x19. It's alive!

View project log

Enjoy this project?

Share

Discussions

Similar Projects

Does this project spark your interest?

Become a member to follow this project and never miss any updates