The overall power consumption depends on how much current the device will draw in active or standby mode and how much time it will send in these modes. I measured that with my code, the Atmega takes about 100 ms from triggering the interrupt to going into sleep mode again. This process happens once per minute to update the display. This means that only 1/600 of the time is spent in active mode, where the watch draws around 5-7 mA. So my main focus was the current draw in standby.
Although the first version of the PCB was already functional, it was drawing around 450 μA in standby. The original goal of this project was to get below 100 μA, which would equal 1-2 months of battery life with the CR2025 (160mAh). For calculating this, Oregon Embedded has a very nice online tool: http://oregonembedded.com/batterycalc.htm.
Finding out where a device is wasting power can be tricky. Luckily the first PCB only had three active components: The Atmega, the RTC and the display. After unplugging the display and soldering off the RTC, the standby current was still at a nearly 400 μA. As the Atmega has an advertised sleep current of 100 nA, something was off. The first thing I noticed was, that after leaving out the voltage monitoring part of the code, the sleep current got down to 280 μA (with RTC and display reconnected). It turns out, that when measuring the battery voltage, the ADC (analog/digital converter) gets activated and stays on even in standby. The current consumption by this module significant. Turning it off completely in the ADCSRA register, reduced the sleep current to only 130 μA. One way to solve this problem without loosing the functionality is turning the ADC off before entering sleep mode. But I instead switched to a library that does this automatically, lowPower by Rocketscream: https://github.com/rocketscream/Low-Power. It also has an option to turn off BOD (brown-out-detection), which means that the Atmega might do weird stuff if the battery voltage gets critically low. By doing that the sleep current was reduced to 110 μA.
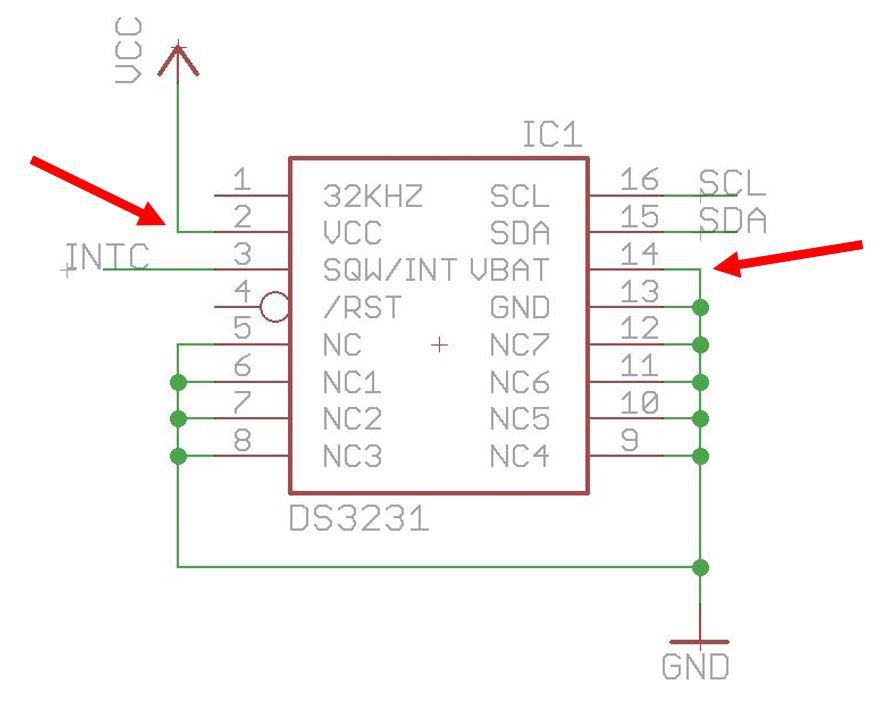
I already would have considered 110 μA a success at the time, but there was one more thing I was able to do. I figured out, that the Atmega was basically running at its advertised 100 nA, as I was not able to measure the current with my multimeter anymore. The DS3231 was the one draining over 100 μA by itself. After checking the datasheet, I found out, that by using only the dedicated battery input pin (VBAT) to power the RTC, the power consumption can be greatly reduced.
To verify this, I bent the VCC and VBAT pins of the device up to disconnect them from the traces on the PCB. I then connected the VBAT pin to the VCC line and left the VCC pin floating. The improvement of doing this was not just a few μAs. The entire sleep current of the watch was now at 2 μA. This would equal over a year of battery life.
I now had a fully functional prototype with an incredibly low power consumption. Unfortunately it didn't stay that way for long. While running a first test, the watch stopped after just about 5 days. Also the screen was showing more and more burn-in, that would disappear after removing the battery for a few minutes. Solving this problem turned out to be a lot of work, so I will dedicate a separate project log to it.
 Max.K
Max.K
Discussions
Become a Hackaday.io Member
Create an account to leave a comment. Already have an account? Log In.
Great investigation!
Are you sure? yes | no