 erhanyilmaz.ytu
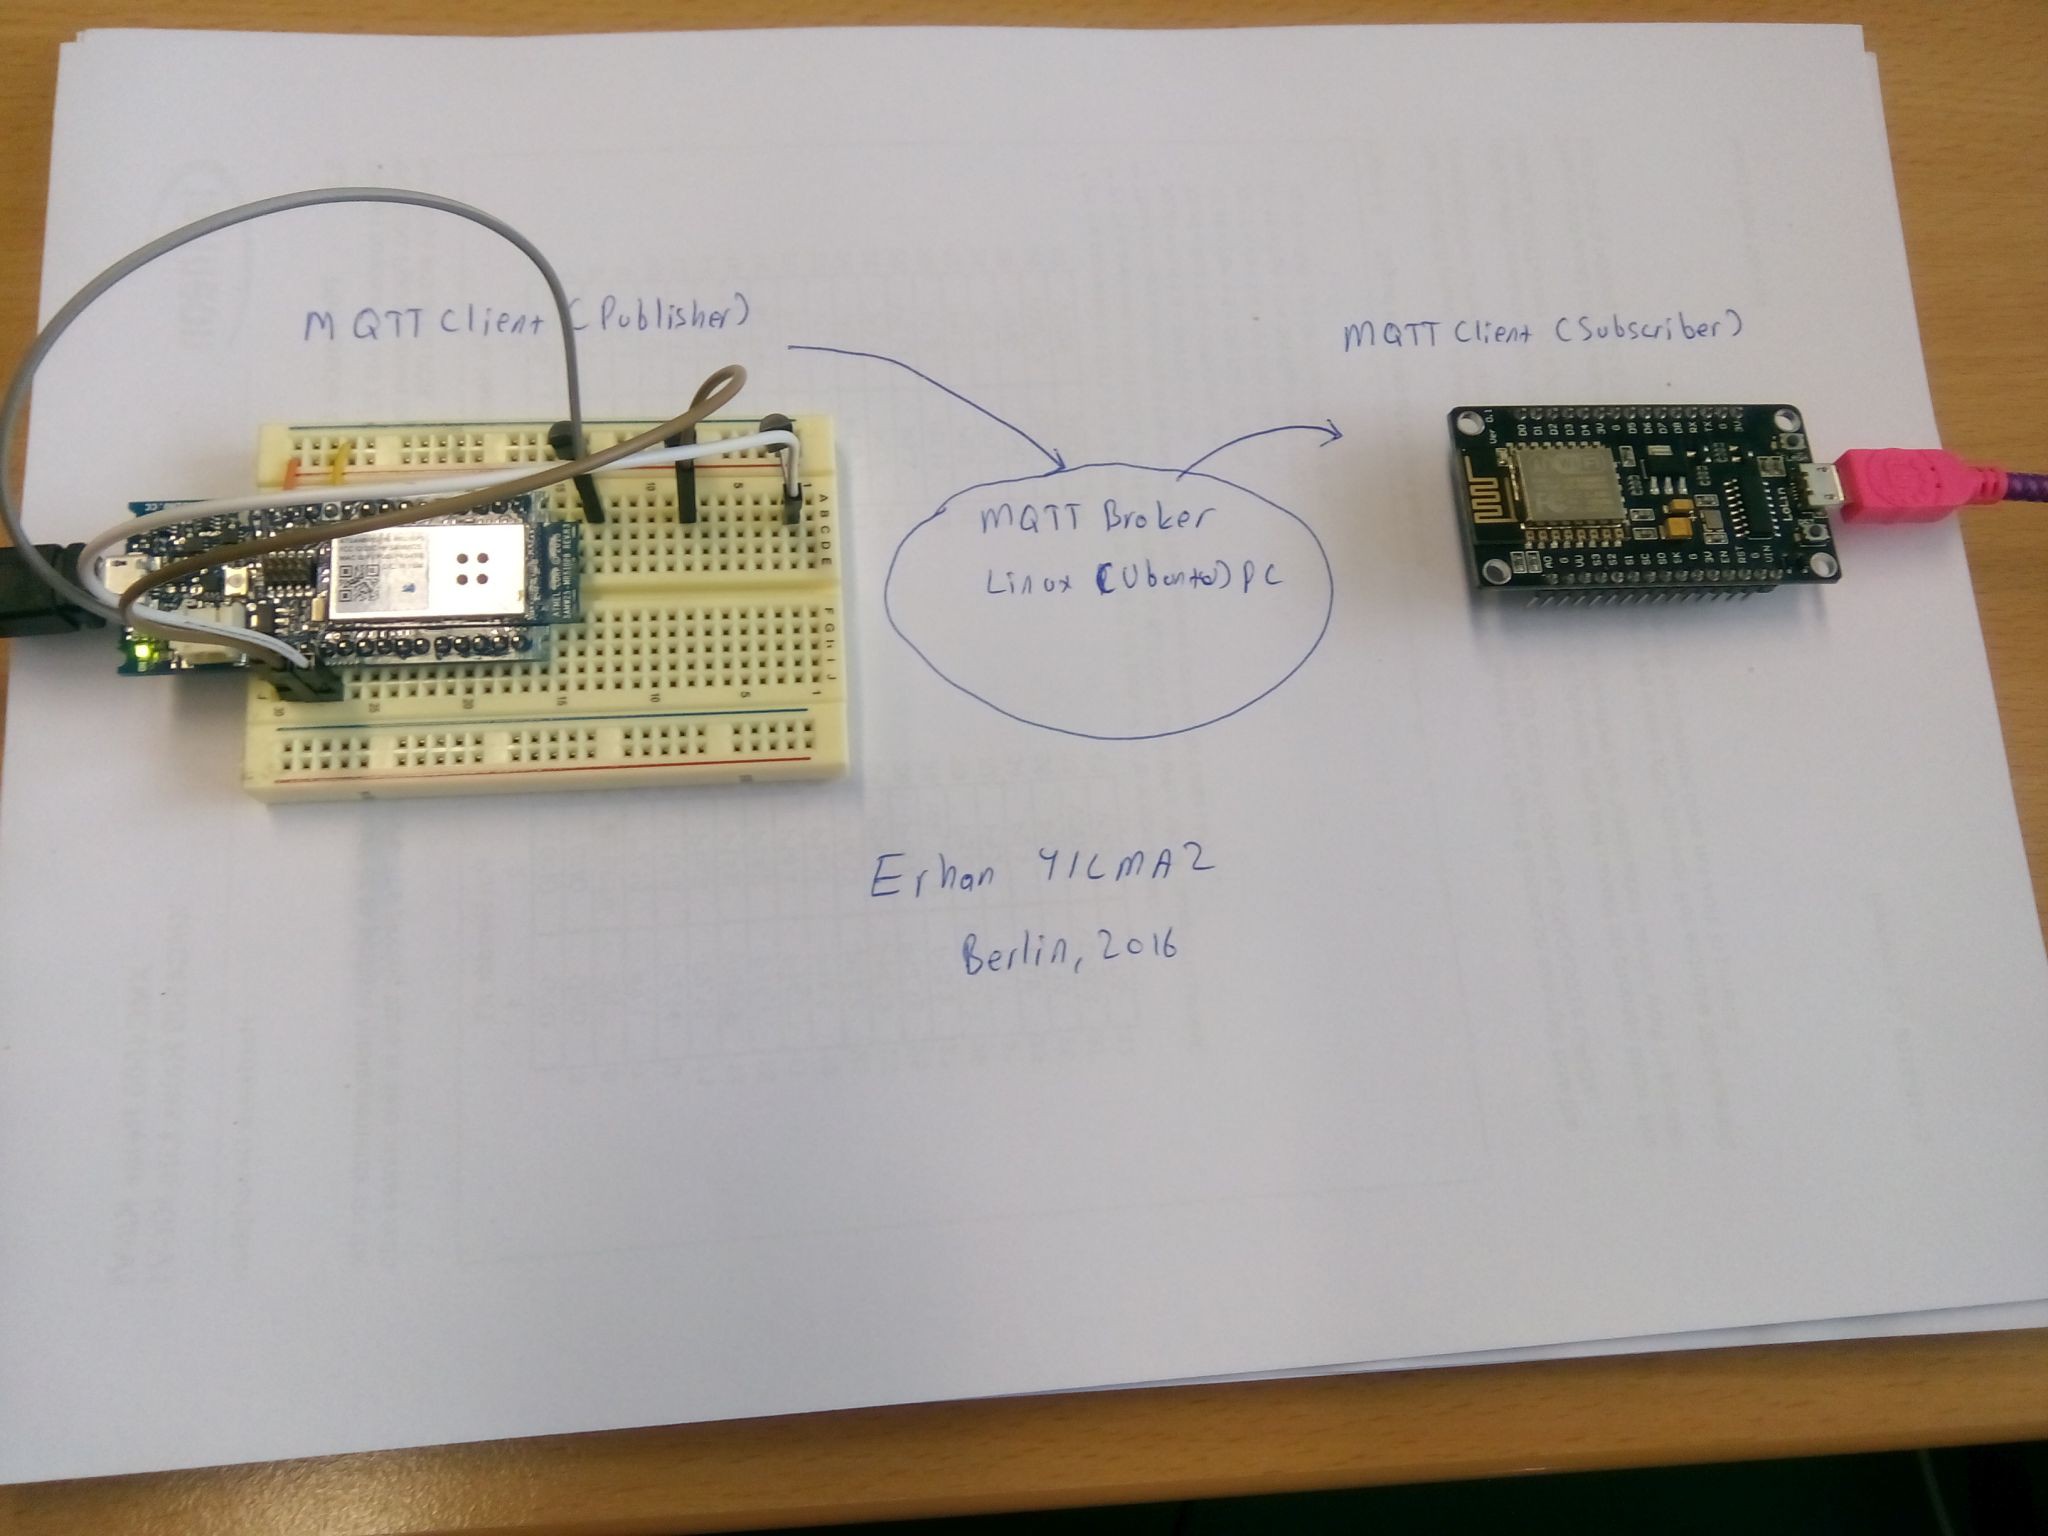
Hallo Liebe folk!
I would like to start like "Once upon a time, when i was a kit" but unfortunately it's not a cool story about me. It is about MQTT, but no worries it is also cool!
Currently i was hearing a lot about MQTT and i checked it to figure out what it is. Then i got that it is really cool messaging protocol for IoT, M2M such applications. So, i thougth perhaps to use it also shows me a bit cool. Then i wanted to make some apps about it. There was a lot of topics, documents about it on the internet, but i couldn't find enough and clear applications about it. So that's why i wanted make somethings with my Arduino MKR1000 and NodeMCUboards. Lets talk about it!
What is MQTT
"MQTT is a machine-to-machine (M2M)/"Internet of Things" connectivity protocol. It was designed as an extremely lightweight publish/subscribe messaging transport. It is useful for connections with remote locations where a small code footprint is required and/or network bandwidth is at a premium. For example, it has been used in sensors communicating to a broker via satellite link, over occasional dial-up connections with healthcare providers, and in a range of home automation and small device scenarios. It is also ideal for mobile applications because of its small size, low power usage, minimised data packets, and efficient distribution of information to one or many receivers"
It is a official description of MQTT from http://mqtt.org. So you can communicate your devices using MQTT with many advantages. Of course you can use other protocols such as ZigBee6LowPAN, etc. But since MQTT works with TCP/IP you could implement it for any hardware which has ethernet, wifi, gsm etc. kind of hardwares. So its well fitted for lot of applications.
How does it work?

As you see at the picture to explain easily how it does work, i made simple application with two boards and a computer(Ubuntu).
There are two main parts in MQTT. One of them is mqtt broker and other one is mqtt client. Broker like a governor. It manages all clients so network. Clients also can publish some messages under topics or could subscribe already published topics. So clients could be publisher, subscriber or both. To make it easy understandable i made Arduino as publisher and NodeMCU subscriber. Of course my ubuntu pc is broker.
As you see in the picture Arduino measures 3 LM35 temperature sensors and send values to broker as topics. So it publishes 3 topics(3 sensor values), then NodeMCU subscribes these topics and get these temperature values. Scenario is simple!
MQTT Library and Broker
To make MQTT application you need a Broker. Broker is also program which runs under some hardwares such Raspberry pi, PC etc. Of course to make it logical we should make it run under with cheapest hardware! So I also searched a bit on the net to use NodeMCU, Arduino kind boards or Android phones as broker but now it isn't possible yet. For this application i used my Ubuntu installed computer to run Broker. So i am also not so logical person.
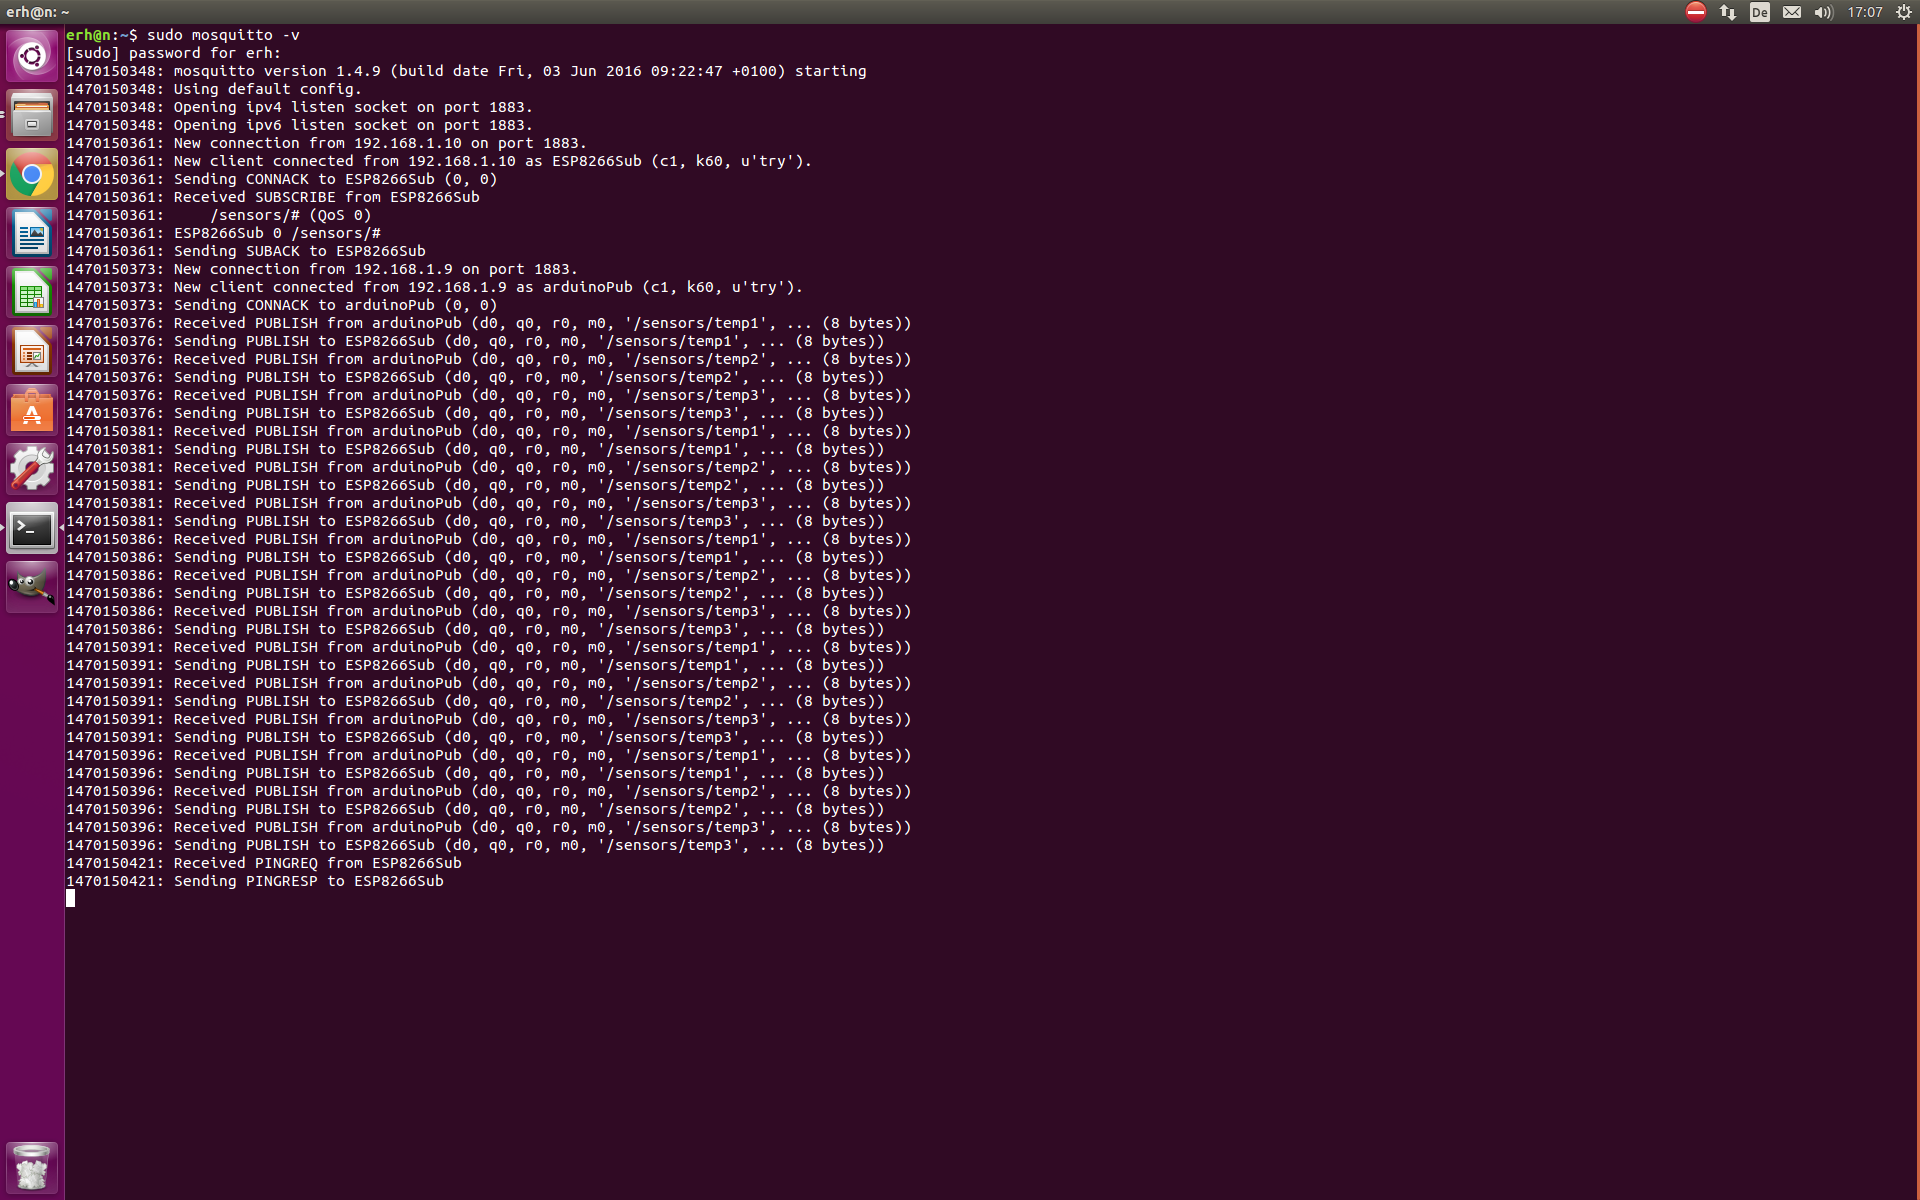
Next question is which broker program should we use? So again i searched a bit then i have noticed most of people use Mosquitto! Mosquitto is broker program for MQTT applications. It also has client program. So you can test it or emulate some MQTT applications only using your computer with mosquitto. As you see on the picture Mosquitto is just console program. Run it and leave alone. It would start to manage MQTT network. As you remember it is TCP/IP based. So default port is for MQTT usually 1883, perhaps some times it could be 1884. Also dont forget your IP address of pc whic runs Mosquitto. We need it to connect clients to Broker.
For Arduino boards i found some mqtt libraries then i have decided to usearduino-mqtt library. Because it worked well with both of my boards.(Arduino and NodeMCU) But i couldn't install it with library manager. That's why i installed it as zip file. So i think i explained everything. If somethings missing or less ask me or google it please. Let's talk about aplication codes.
Arduino(Publisher) and NodeMCU(Subscriber) Code
Since NodeMCU also supported by Arduino community i used same library at all. So i just changed a bit codes to make it publisher or subscriber. Also i put some comments to explain it more.
/***************************************************************************** Author: Erhan YILMAZ ** Application: MQTT Test application(Publisher) ** Date : 02.08.2016 ** Version : 1.0 ** Description: It is a publisher part of a mqtt test application ** which is works with arduino mkr1000. ** It gets 3 channels temp values with LM35 sensors then send values ** as topics to subscribers. ** As broker mosquitto used on Ubuntu based pc. ** MQTT deneme uygulaması ** Gilberto Conti tarafından yazılan MQTT kütüphanesi kullanılmıştır. ** https://github.com/256dpi/arduino-mqtt buradan kütüphaneye erişilebilir. ** Uygulama MQTT client olarak çalışıp LM35 sıcaklık sensörlerinden ölçtüğü ** değerleri topicler halinde yayınlamaktadır(Publish). *****************************************************************************/// Libraries#include <SPI.h>#include <WiFi101.h>#include <MQTTClient.h>// Wifi infochar *ssid = "SSID_NAME";char *pass = "SSID_PASS";WiFiClient net;MQTTClient client;unsigned long lastMillis = 0;// Setup for used modules/libraries(ADC,Uart,MQTT,WIFI)void setup(){Serial.begin(115200);analogReference(AR_INTERNAL1V0);analogReadResolution(12);WiFi.begin(ssid, pass);// Use your Broker ip addressclient.begin("192.168.1.8", net); // Begin client with broker Ip and wifi clientconnect();}void connect(){// Connect to wifiSerial.print("checking wifi...");while (WiFi.status() != WL_CONNECTED){Serial.print(".");delay(1000);}// Connect to brokerSerial.print("\nconnecting...");while (!client.connect("arduinoPub", "try", "try")){Serial.print(".");delay(1000);}Serial.println("\nconnected!");// client.subscribe("/example"); // No subscription for any topic// client.unsubscribe("/example"); // No unsubscription aswell}void loop(){char temp[50];client.loop();if(!client.connected()){connect();}// publish a messages roughly every 5 seconds.if(millis() - lastMillis > 5000){lastMillis = millis();int sensorValue = analogRead(A0);float temperature = sensorValue / 40.96;sprintf(temp,"%.2f°C", temperature);// /sensors/temp1 topic for temp sensor 1client.publish("/sensors/temp1", temp);sensorValue = analogRead(A1);temperature = sensorValue / 40.96;sprintf(temp,"%.2f°C", temperature);// /sensors/temp2 topic for temp sensor 2client.publish("/sensors/temp2", temp);sensorValue = analogRead(A2);temperature = sensorValue / 40.96;sprintf(temp,"%.2f°C", temperature);// /sensors/temp3 topic for temp sensor 3client.publish("/sensors/temp3", temp);}}void messageReceived(String topic, String payload, char * bytes, unsigned int length){// Callback function for subscriptions}
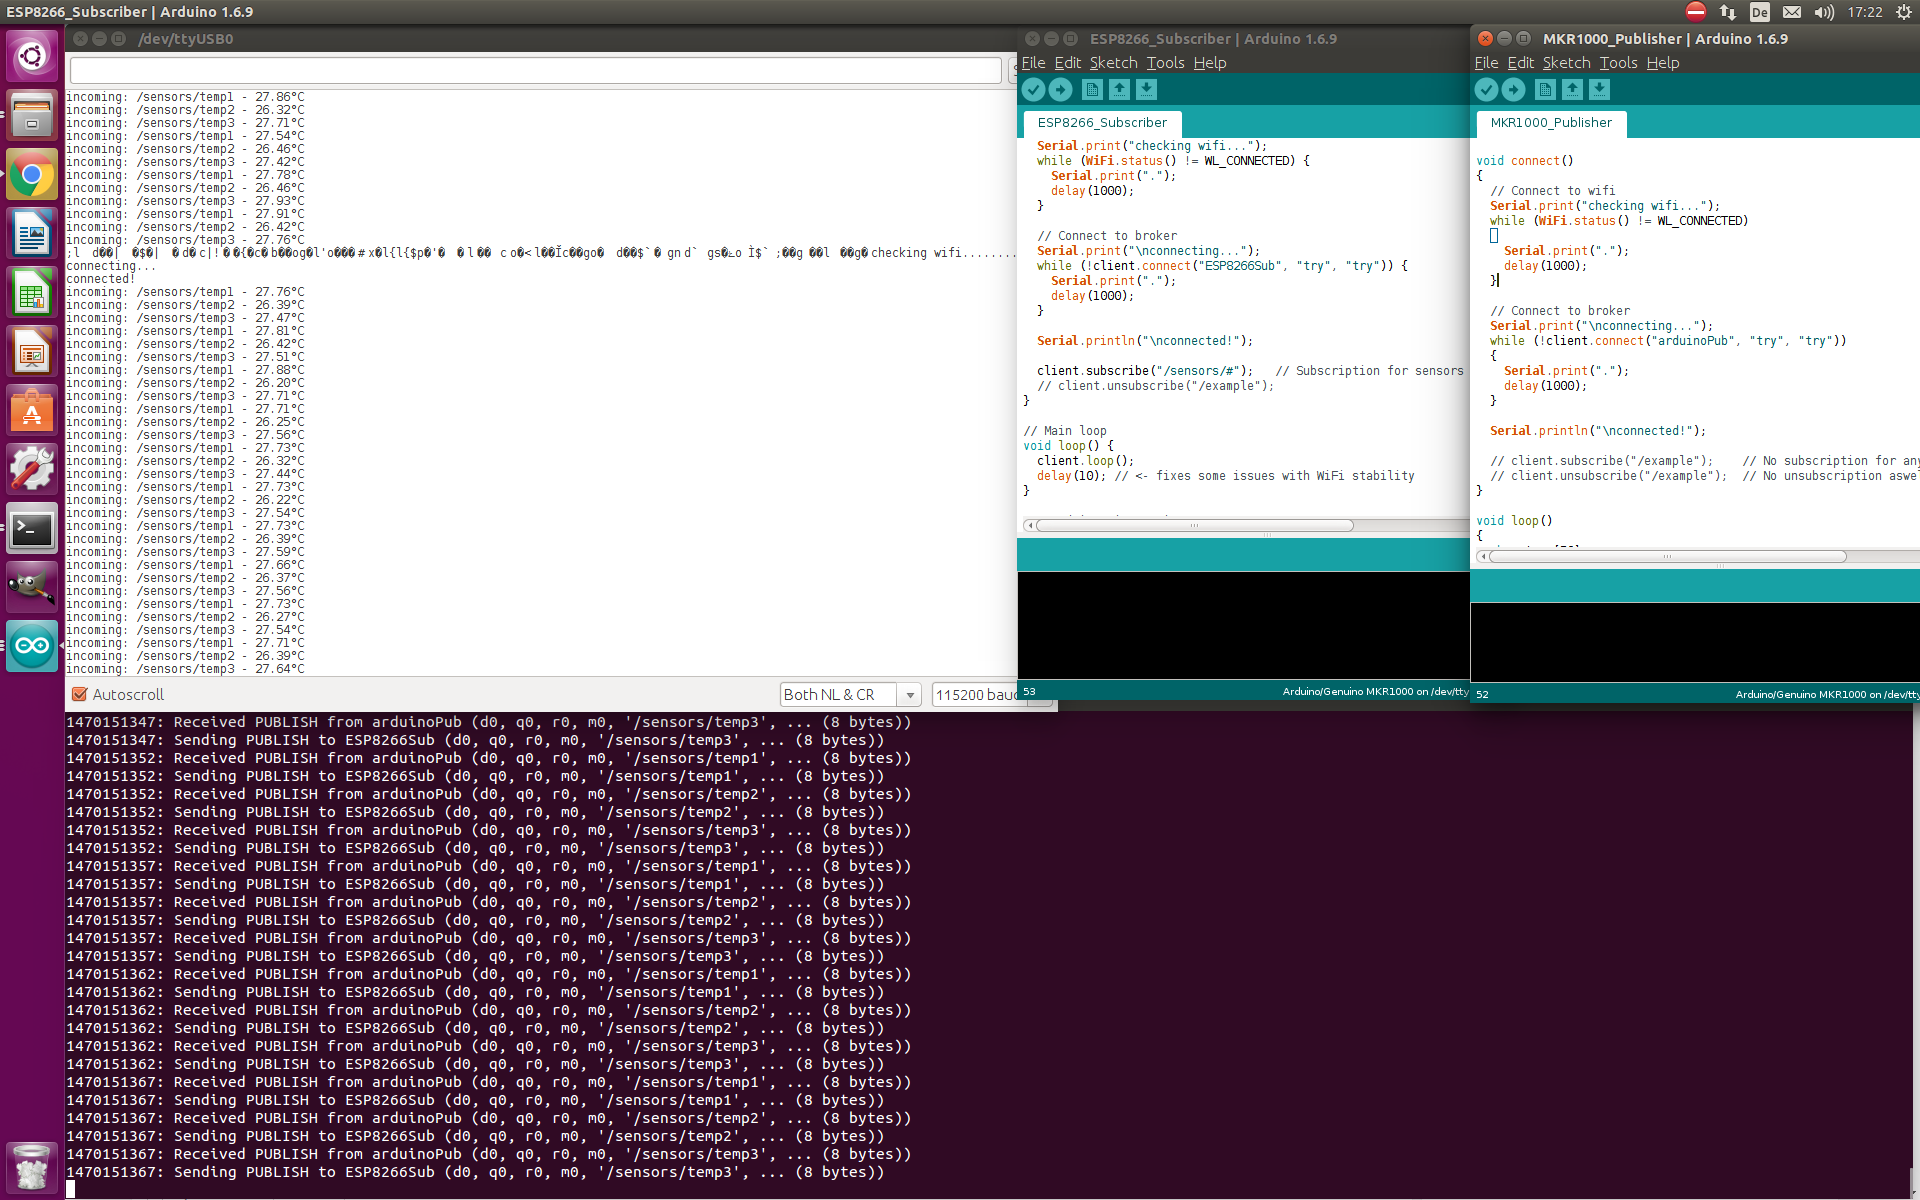
As you see in the code Arduino connects wifi and make some setup then publish tempereture values as topic those called as /sensors/temp1, /sensors/temp2 and /sensors/temp3 in everey 5 seconds approximately. That's it!
/****************************************************************************
* Author: Erhan YILMAZ *
* Application: MQTT Test application(Subscriber) *
* Date : 02.08.2016 *
* Version : 1.0 *
* Description: It is a subscriber part of a mqtt test application *
* which is works with NodeMCU(ESP8266). *
* It subscribes to "/sensors/#" topic to get all messages under /sensors/ *
* As broker mosquitto used on Ubuntu based pc. *
* MQTT deneme uygulaması *
* Gilberto Conti tarafından yazılan MQTT kütüphanesi kullanılmıştır. *
* https://github.com/256dpi/arduino-mqtt buradan kütüphaneye erişilebilir. *
* Uygulama MQTT client olarak çalışıp /sensors/ altında gelen topiclerde ki *
* mesajları almaktadır(Subscribe). Alınan mesajları uarttan pcye gönderir. *
****************************************************************************/
// Libraries
#include <ESP8266WiFi.h>
#include <MQTTClient.h>
// Wifi info
const char *ssid = "SSID_NAME";
const char *pass = "SSID_PASS";
WiFiClient net;
MQTTClient client;
unsigned long lastMillis = 0;
// Setup for used modules/libraries(Uart,MQTT,WIFI)
void setup()
{
Serial.begin(115200);
WiFi.begin(ssid, pass);
// Use your Broker ip address
client.begin("192.168.1.8", net); // Begin client with broker Ip and wifi client
connect();
}
void connect()
{
// Connect to wifi
Serial.print("checking wifi...");
while (WiFi.status() != WL_CONNECTED) {
Serial.print(".");
delay(1000);
}
// Connect to broker
Serial.print("\nconnecting...");
while (!client.connect("ESP8266Sub", "try", "try")) {
Serial.print(".");
delay(1000);
}
Serial.println("\nconnected!");
client.subscribe("/sensors/#"); // Subscription for sensors
// client.unsubscribe("/example");
}
// Main loop
void loop() {
client.loop();
delay(10); // <- fixes some issues with WiFi stability
}
// Send incoming topic messages over uart
void messageReceived(String topic, String payload, char * bytes, unsigned int length) {
Serial.print("incoming: ");
Serial.print(topic);
Serial.print(" - ");
Serial.print(payload);
Serial.println();
}
As you also see NodeMCU code is also smilar to Arduino code. After initialization it subscribes to all topics under the name of /sesnsors by texting "/sensors/#" # is a one kind of syntax of MQTT. So /sensors/# mean is i wanna subscribes all topic under the name of /sensors so /sensors/temp1, /sensors/temp2 and /sensors/temp3. There are few more syntax about mqtt. You could check it on the internet. It is enough for our application.
Anyways when NodeMCU get some messages it sends it to computer over uart. You can see the running of the application on the picture.
Conclusion
As result as we ended up such a nice application. Thanks Allah. You can get all files about application here as github repo. if somethings is not clear, missing or wrong don't hesitate to write down. Also i am always open to hear some feed backs etc. Thanks for your attention. See you on next post. Cheers...
Erhan