Close
0%
0%

evive: a prototyping platform for makers

An open-source Arduino based toolkit to learn, build & debug electronics and robotics projects

Similar projects worth following
evive is an opensource prototyping platform. With Arduino MEGA at its heart, it offers a novel way of interacting with your hardware using it's menu based visual interface. The accurate current & voltage sensing capabilities let you collect and analyze data from your projects. The whole world of Internet of Things, with power supplies and support for sensors & actuators is available in one small portable unit. This all-in-one kit saves your time and allows you to be more creative and innovative. Its just like a maker's tablet.
Explore more at http://igg.me/at/evive.

Features

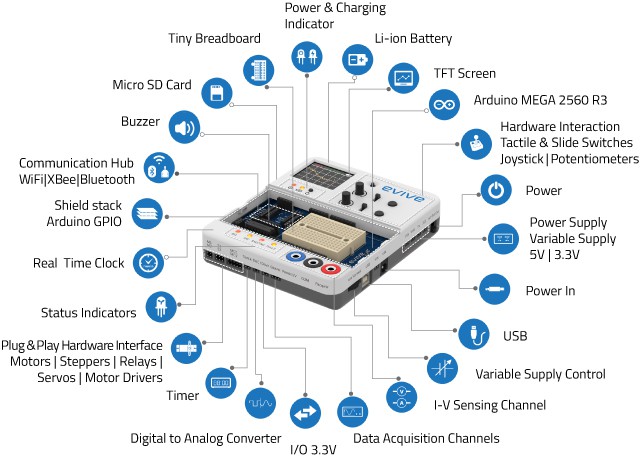
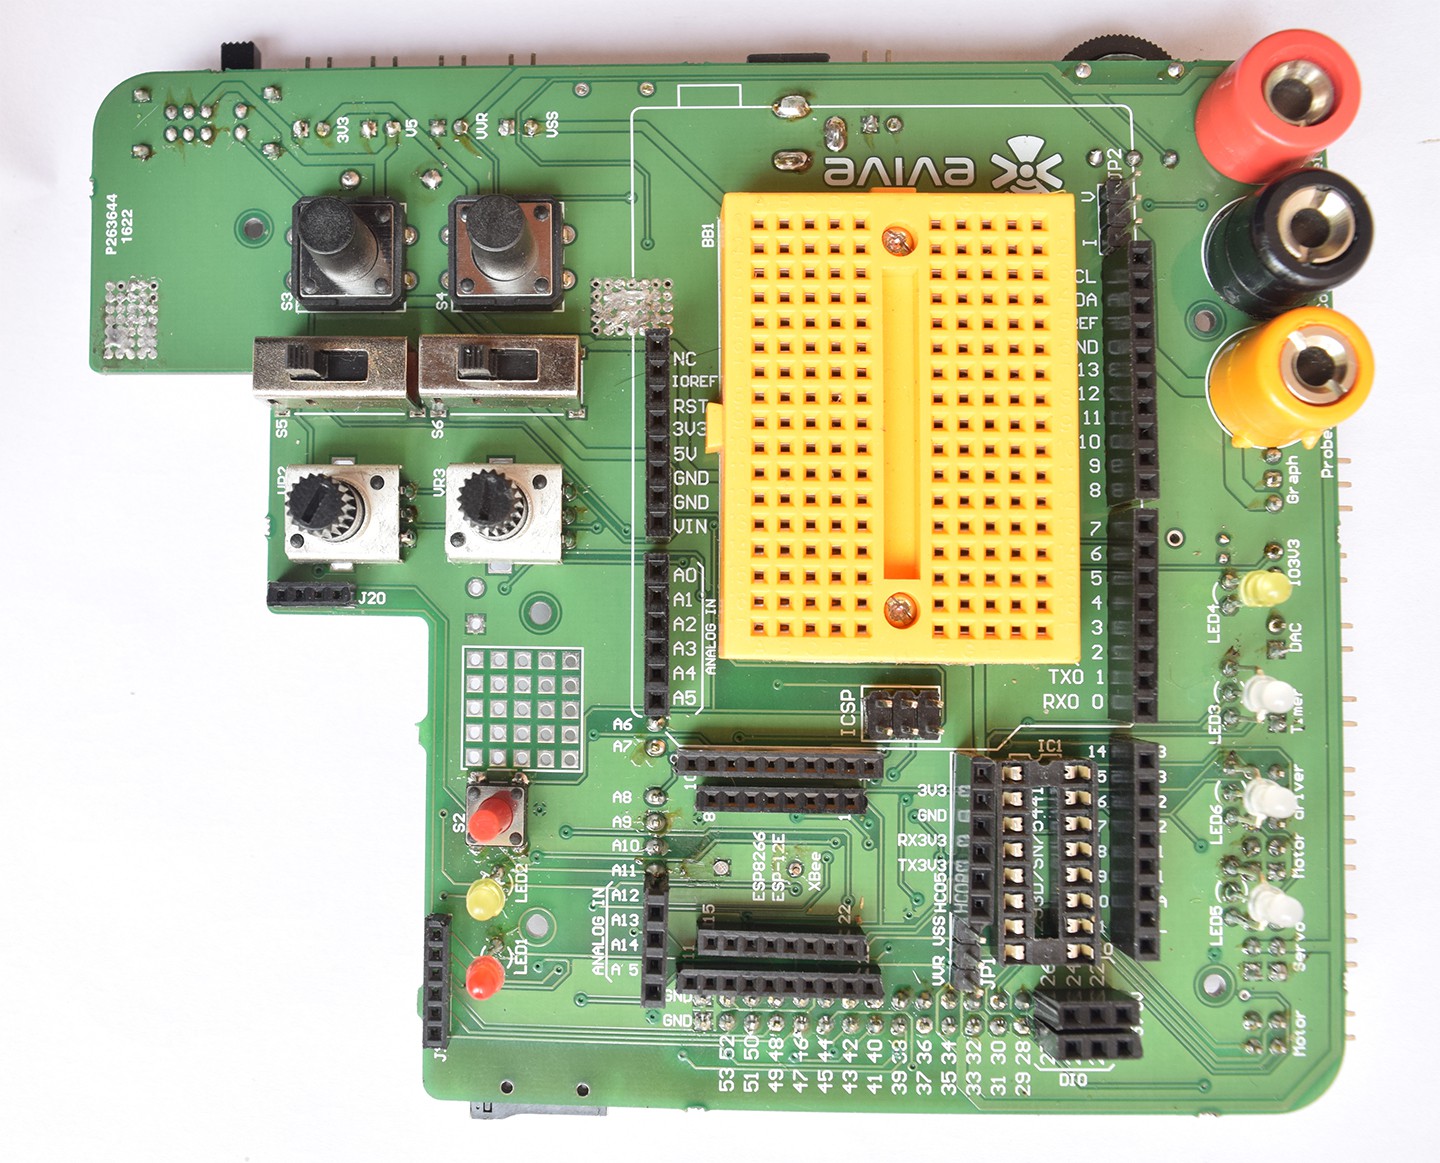
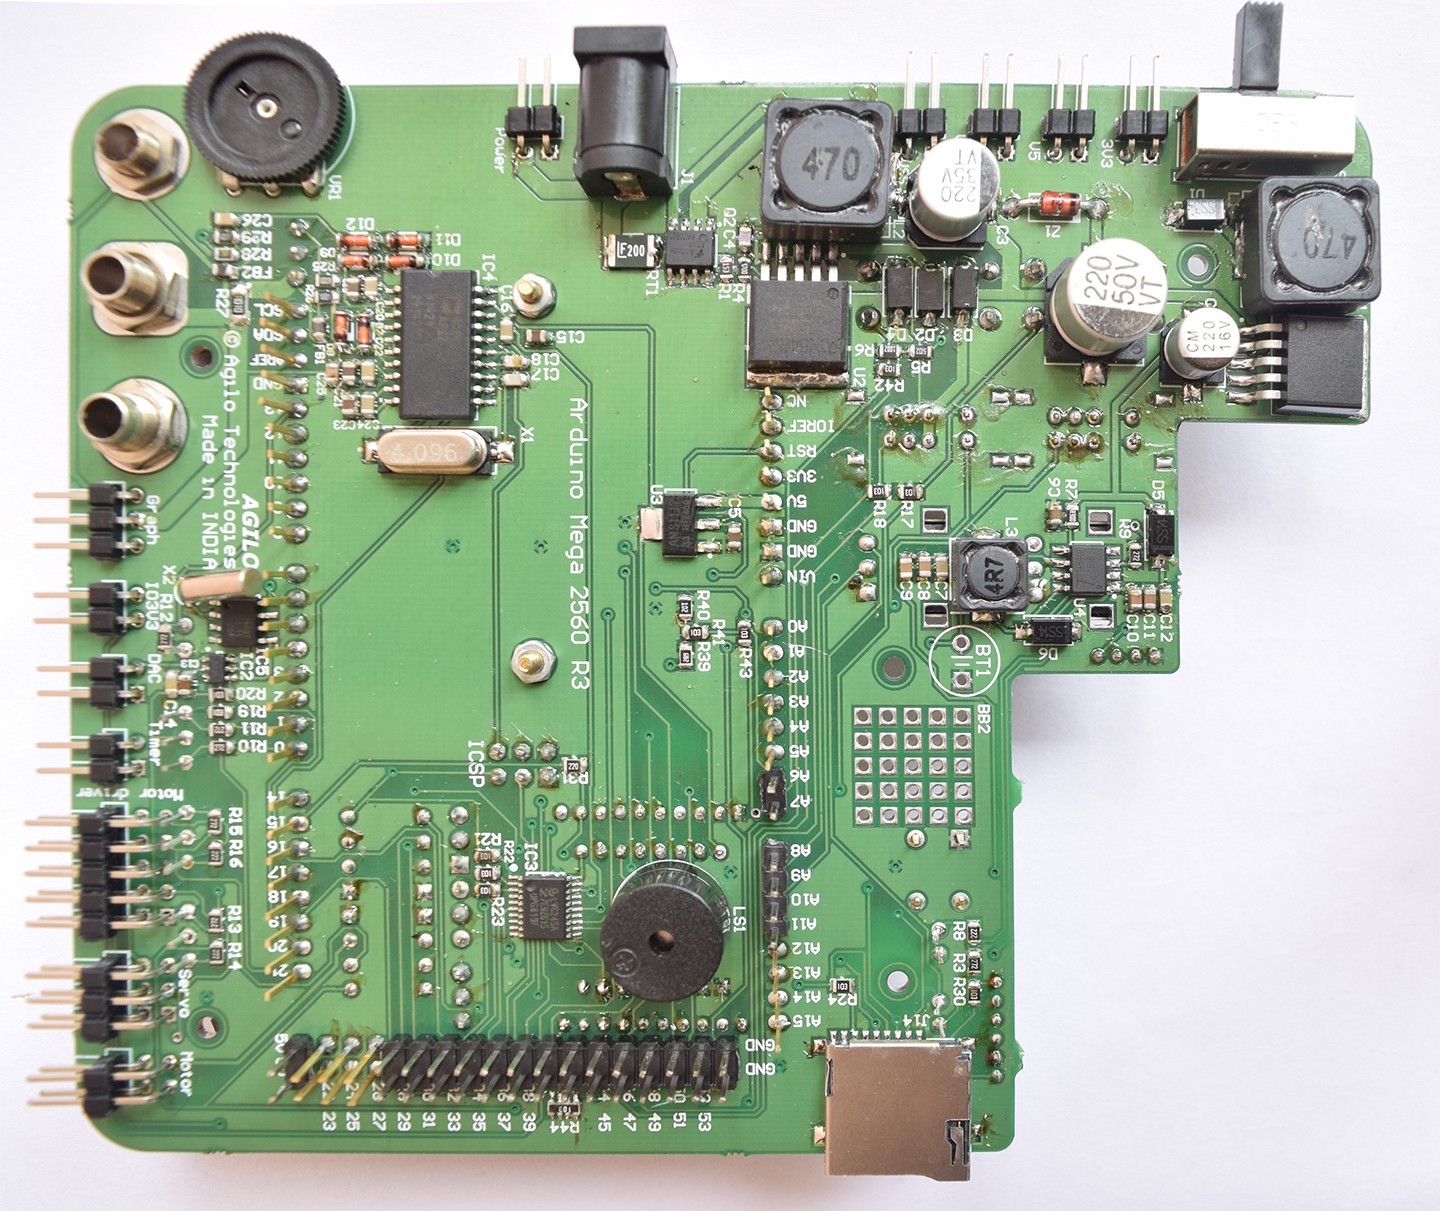
evive serve as an all-in-one kit for learning, building and debugging interactive programming, electronics, embedded and robotics projects. It uses Arduino MEGA as micro controller with lots of commonly needed hardware to simplify the art of making. It can be used as a Voltmeter or Ammeter as it has isolated ADCs working upto -+30V range and -+3A with resolution of millivolt and milliampere respectively. It can also be used as mini oscilloscope. It has reverse polarity, overcurrent and over voltage protections. Evive is loaded with lots of features as shown in image below. This video explains the features in detail: click here.

The following video shows all the technical specifications of evive in detail.

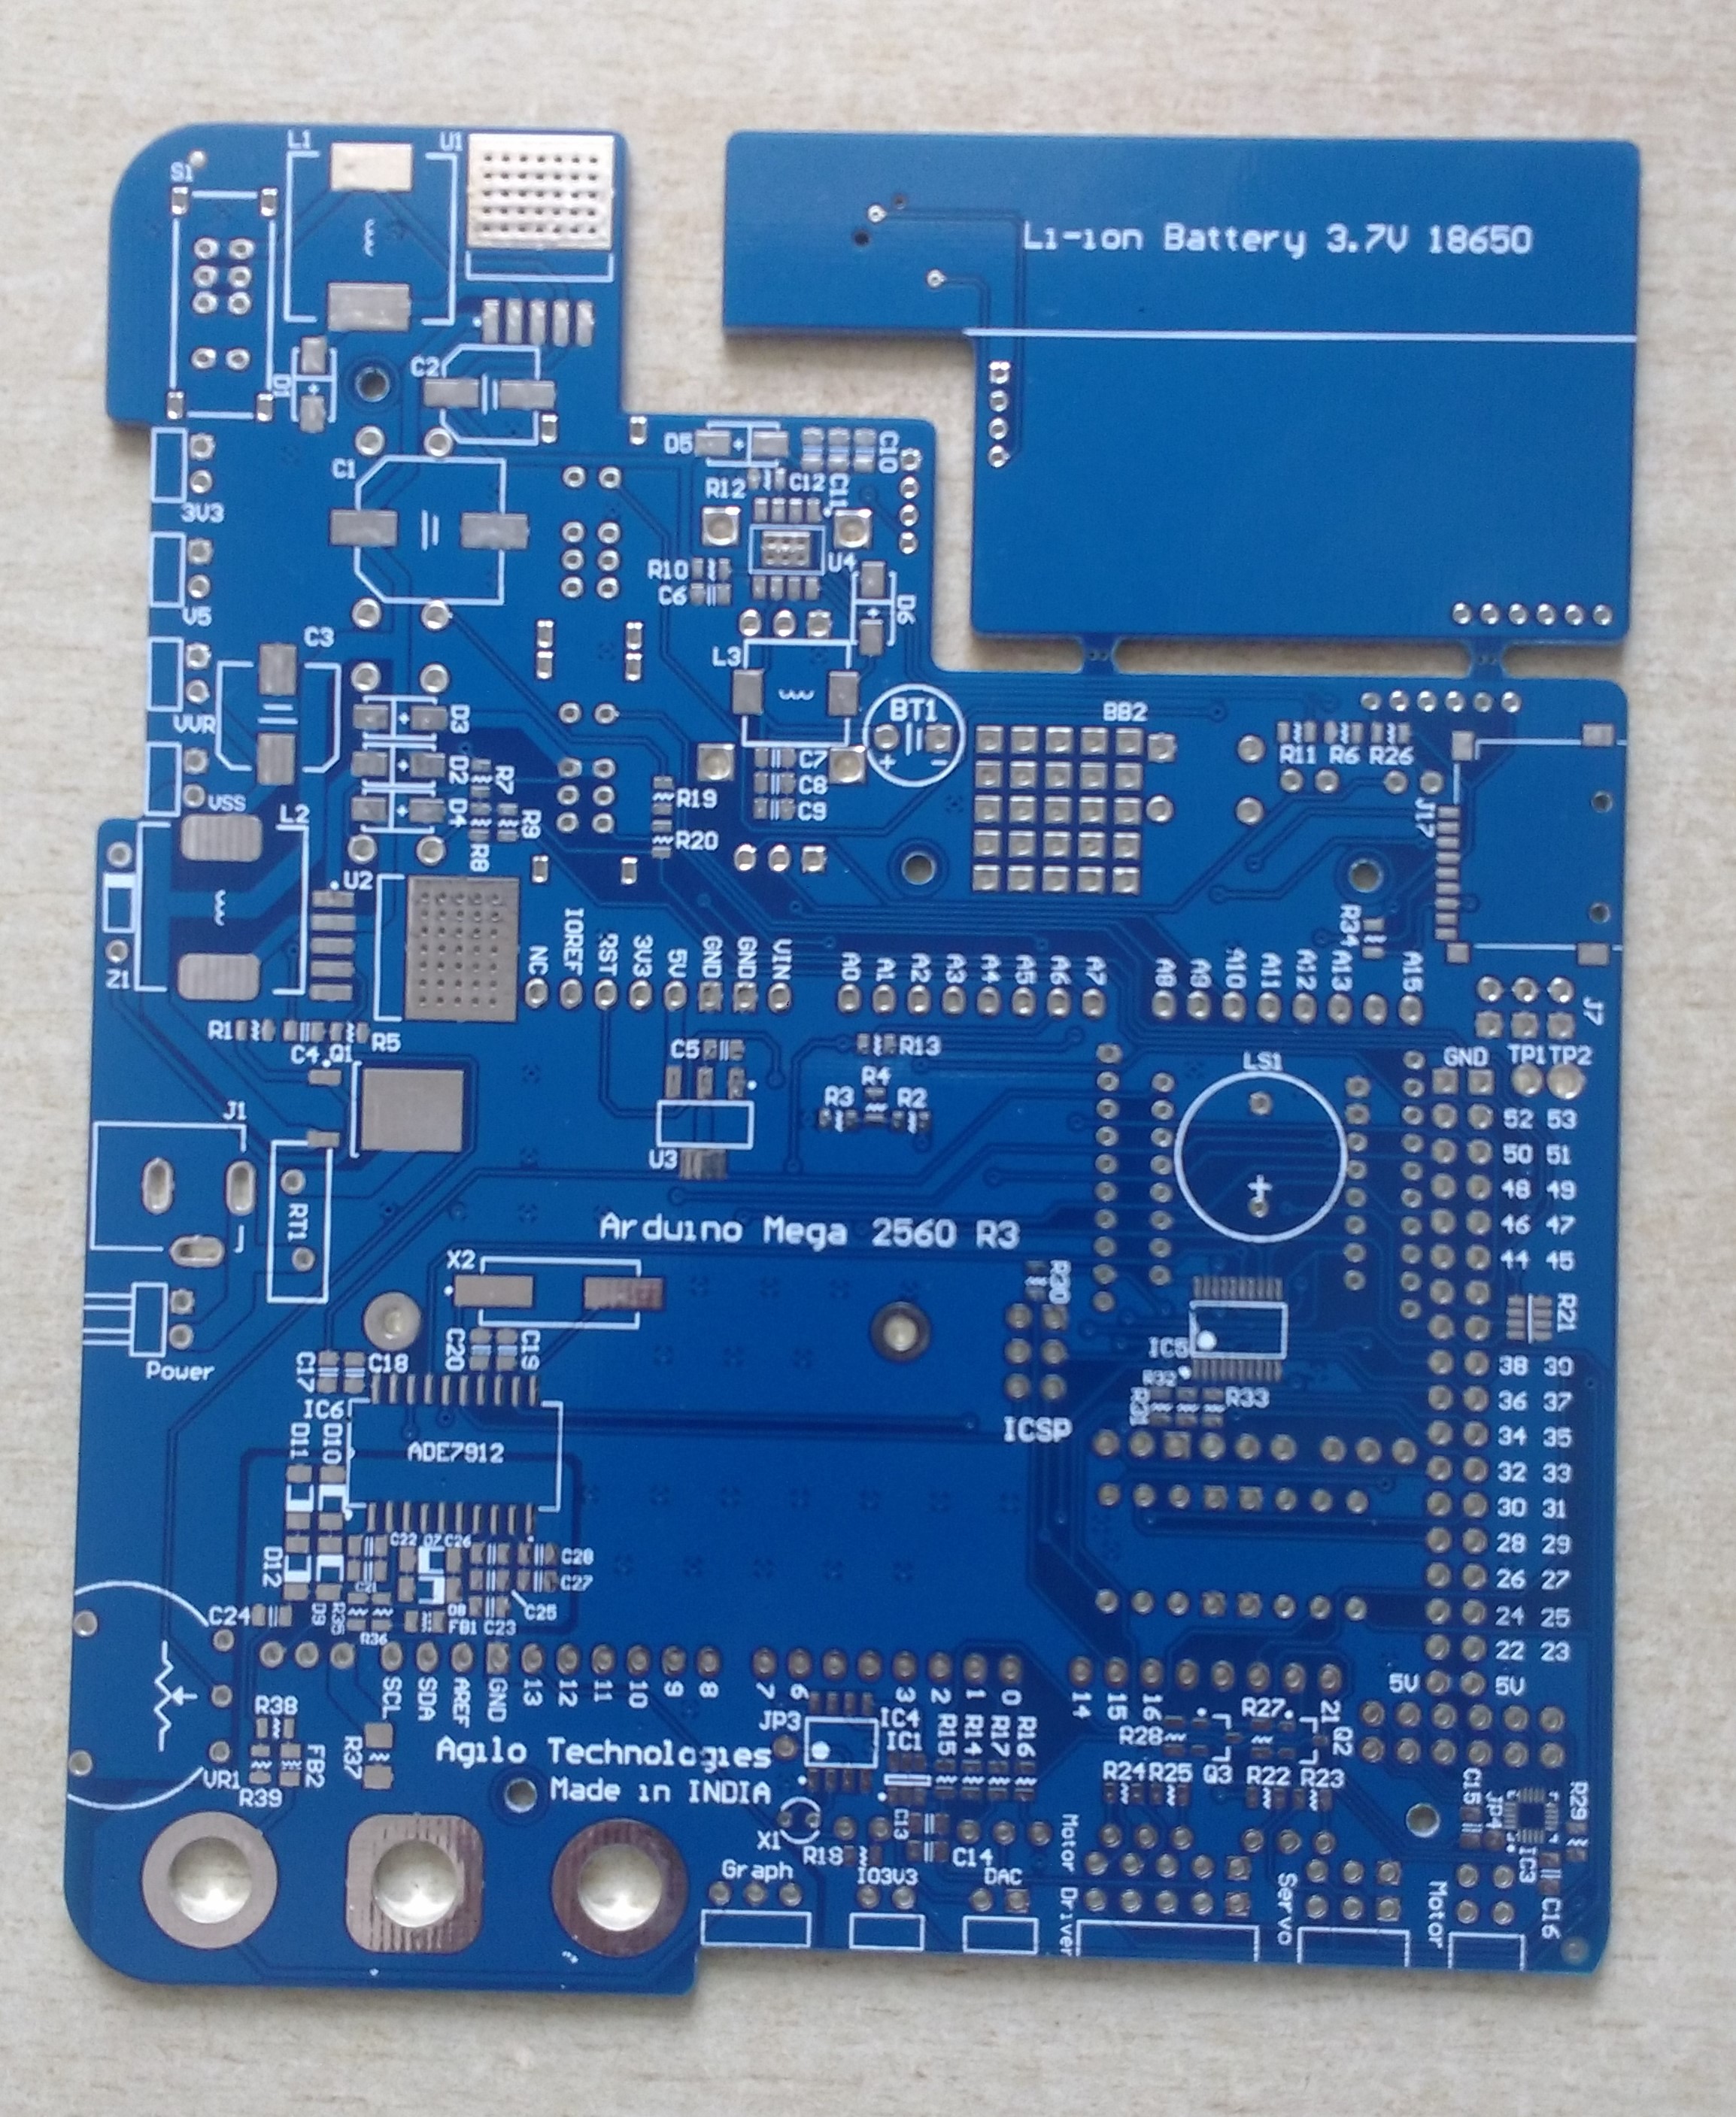
User-friendly Schematic Diagram

The user-friendly schematic shows the I/Os for power module (3.3V, 5V and Variable Voltage (1.25 to Vin-1)), Li-ion battery, plug&play section (motors, servo, stepper, relays etc), inbuilt hardware (3 Position Slide and tactile switches, potentiometers), IoT hub for WiFi (ESP-12E), XBee and Bluetooth (HC-05), Buzzer, tiny breadboard, TFT Screen, Joystick, Real Time Clock, DAC, dual channel 24-bit isolated ADC (ADE7912), SD Card slot and Arduino MEGA available pinouts.

Software

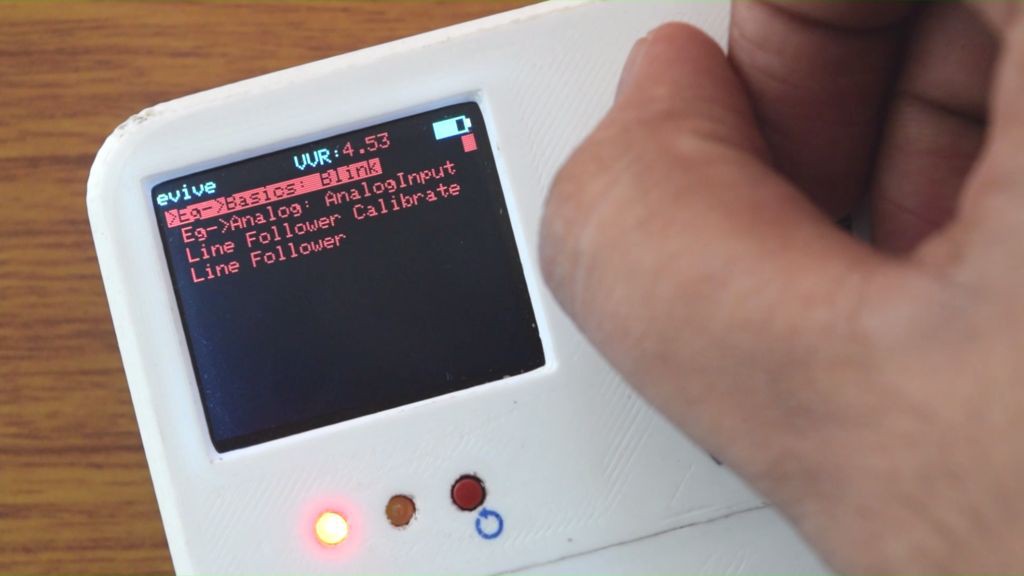
Although evive can be programmed in the same way as Arduino MEGA 2560 R3, but since we have TFT screen, Joystick, large memory of ATmega 2560 and lots of inbuilt hardware, so we are building a Arduino based Software for very easily using evive in cases like it for controlling harware like motors, servos, using it as voltmeter or ammeter, etc. Also it has user defined functions menu, where you can load more than one Arduino code at once. Its all open-source and available here (under development).

Blog on evive by Hackaday: http://hackaday.com/2016/08/12/hackaday-prize-entry-a-good-electronics-learning-toolkit/

The project is is still in development to include more features for making it more versatile solution for all makers. Suggestions and reviews are warmly welcome. Explore more at evive's crowdfunding page: http://igg.me/at/evive. We need your support to make this product a reality.

This project is released under Creative Commons BY-SA 4+ Licence. https://creativecommons.org/licenses/by-sa/4.0/

  • 1 × Arduino MEGA 2560 Micro-Controller
  • 1 × LM2596 5V Buck Converter
  • 1 × LM2596 ADJ Buck Converter for Variable Voltage
  • 1 × AMS1117 3V3 Electronic Components / Misc. Electronic Components
  • 1 × 2600mAh Lithium-ion Battery 18650 Type

View all 20 components

  • evive | Starter Kit

    Pankaj Kumar Verma07/31/2017 at 14:03 0 comments

    evive Starter Kit comes with several basic electronics and mechanical components, which makes it very easy for students and beginners to get into the world of DIYing, electronics and robotics. Given below are few projects which you can make with evive Starter kit::

    • Light Tracking Robot
    • Automatic Railway Crossing System
    • Alarm Clock and Timer
    • Piano with fruits
    • Smartphone controlled Mobile Robot
    • Pick and Place Robot
    • Line Follower Robot
    • Obstacle Avoidance Robot
    • Automated Sling Shot and many more

    All the sensors and projects are compatible with Scratch. That means, you can make interactive games and animations in Scratch with evive. Also, you can program all your robots with Scratch. 

    To know more visit: https://www.tindie.com/products/evivetoolkit/evive--starter-kit/

  • Use Case: evive tweets using ESP 8266 Wi-Fi module

    Dhrupal R Shah10/12/2016 at 09:52 0 comments

    evive comes with on board Wi-Fi adapters making it perfect for IoT applications. This use case will demonstrate communication with ESP8266 via evive and using it for connecting your devices with the world. evive will tweet whatever you type on the attached keypad using your twitter account. ThingTweet app ( from Thingspeak ) has been integrated opening up immense possibilities for IoT applications. Use it to tweet sensor data, tweet today's weather, tweet security risks in your home and make evive your security buddy.

    Visit here to explore more.

  • PCB fabrication and assembly

    Dhrupal R Shah10/10/2016 at 19:45 0 comments

    For prototyping PCBs, there are lots of options from local vendors (like in India, PCB power) which deliver very fast within a week or international portals (like OSH Park, Elecrow and PCBWay) but have a long shipment delivery time (~ a month) for economical options.

    We have used PCB power in India for multiple rounds of prototyping and they gives best quality PCBs and nearly on-time delivery. They have sufficiently good online portal for instant pricing and lots of options. But for bulk order, they seems little costly while Chinese options provides cheaper per piece price but takes lot shipping cost (and customs). So, it depends on locality and prior experience with particular vendor. We have tried PCBWay for prototyping and the quality and shipping time was good for India via DHL. I will recommend to try out the vendor for a small round of batch production before bulk manufacturing.

    For assembly of SMD and TH components during the prototyping phase and small batch production, we have done it by hand soldering. We were advised to use components bigger than 0805 for resisters/capacitors, but based on package availability of ICs, we have to go to very low footprint size like 3 mm x 3 mm x 0.65 mm 20 lead QFN package (8mil distance between pads (edge to edge)), but surely we should avoid using QFN packages for hand soldering.

    This video by EEV blog is very useful for beginners.

  • Uploading multiple arduino sketches simultaneously

    Dhrupal R Shah10/10/2016 at 18:22 0 comments

    One of the most important feature of evive's menu interface is uploading multiple Arduino Sketches (programs) and change them without the need of re-programming. In the Arduino IDE, the user will add his custom codes in space provided in file named userDefinedFunctions.cpp in similar fashion to “void setup_user_defined_function(){….}” and “voidloop_user_defined_function(){….}”. And just upload the program to evive using Arduino IDE via USB cable. So the code with be available under the user defined menu list item. When the user will select that particular user defined function in the sub-menu of user defined function, the code will start running in loop.


  • Designing Boss for Casing

    Dhrupal R Shah10/10/2016 at 18:15 0 comments

    There are lots of methods for PCB mounting in enclosures (casing) like snap fitting the PCB or mounting it using mounting holes (Boss) or using the standoff. Boss are a plastic feature for mechanical fastners.

    For evive's PCB, we have used 4 mounting holes. The PCB is placed between the top and bottom plastic parts. The sandwiched PCB and casing are hold together using 4 bosses.

    This tutorial explains some of these design aspects for plastic parts.

    We have used self-threading screws of 2mm diameter as commonly used in electronics device enclosures. For designing the Boss, we have used this guide (or as per design catalogue of self-threading screw manufacturer)

  • Designing Snap joints for evive's lid

    Dhrupal R Shah10/10/2016 at 17:44 0 comments

    evive has a "magic lid" which enclose arduino shield stack space, IoT hub (Bluetooth, XBee and ESP8266 ESP 12e) and prototyping area. The lid has been provided with one snap joint from where the user will open and other two passive snaps for locking. Designing the snap joint took multiple iterations before the final Plastic Injection Molding using SLS 3D printing.

    Snap joints are compliant mechanisms. A beginners guide for snap joint design can be found here.

    The design parameters depends mostly on how easily/frequently we want to open the snap joint, the number of snap joints provided, material used and manufacturability.

    A snap have two basic parts, Snap Hook and Snap Hook Groove. Usually snap hook are made flexible to get deflected and hence snapped. But in our design we have made the lid flexible (Deflecting Part), as the snaps are small in size as compared to the thickness of the case.

    The problems faced by us includes interference of passive snap while removing the lid and hence wearing of groove in first iteration. It was corrected by providing proper clearance and fillets. Iterations helps us for reaching the final design of snaps.

  • Reverse Polarity protection for high current and voltage range

    Dhrupal R Shah10/02/2016 at 08:16 0 comments

    Many times we face the need of reverse polarity protection for our circuits. Even experts can made mistakes of connecting in reverse and blowing up the circuit. Since evive is desgined for all age groups including students starting their first step in hardware prototyping, so it was a MUST feature. We want to give working range of 30V and 3A.

    Common method of doing this is by using a diode, but it has a voltage drop of 0.7V across it and eats up some power based on current flowing through it. evive's current rating is about 3A max. Hence it is not suitable for most of similar applications.

    Another practical is way is by using PFET or NFET. (Reference: Section 3.3).

    We used similar circuit as follows:

    The reason for selection of AOD4185 is that its high current capacity, very low R_ds_on (~15mOhm), high V_ds limit in reverse (-40V) and cost effectiveness as it is largely used in TV LCD circuits.

    The reason for using Zener diode D1 (of about 8~15V breakdown voltage) is the limit of V_gs of +-20V. But, we want to provide working range of 30V in evive. So this Zener diode will limit the voltage across the gate-source, while the resistor R1 will limit the current after zener breakdown.

    [If someone want a smaller package of IC till absolute maximum of 30V range, than FDS6675bz (V_ds limit -30V) can also be used. We earlier tried with that, it was working ok for 40V foward bias and till -30V reverse bias. But on applying greater reverse voltage than -30V, the output started becoming negative as VSS ~= 30 - VIN, ie if we apply -36V than about -5V appeared. Hence we decided to use higher V_ds PFET]

    The circuit is working absolutely fine and evive is now SAFE to reverse voltages till -40V :P

  • Enabling capacitive touch in evive

    Dhrupal R Shah09/07/2016 at 08:06 0 comments

    Now a days, lots of projects involves use of touch inputs as switches or sensors. Particularly, students are very crazy about using bananas or apple or a inked paper as switch for their DIY projects. So, We thought to include 12 capacitive touch inputs in evive.

    It uses MPR121 IC with auto calibration feature for enabling touch inputs. It communicates to Arduino MEGA 2560 over IIC communication.
    Along with TFT screen, buzzer, plug and play interface and touch, lots of interesting projects can be made.

  • Precision Sensing using 24-bit isolated ADC (ADE7912)

    Dhrupal R Shah08/13/2016 at 16:59 0 comments

    One drawback of ADCs in almost all development boards ranging from Arduino to Pi to Udoo is that its limited to 0 to 5 (or3.3V) and the accuracy is also not very good (~20mV). So we tried to have larger range and selected the Analog devices 24-bit dual channel isolated ADC (Analog to Digital Converter) ADE7912. Its a recently announced precision sensing and measuring IC, which is very fast and works with SPI communication. Its calibrated for range of -30V to +30V on one channel, while the other can be used for current sensing in range of -3A to +3A or voltage sensing in range of -5V to +5V. By isolated ADC, it means that even if the actual potential is like say 48V at some point and 20V at other, still it can work (something like differential ADC). Also the speed is also very fast and one data sample takes ~15us while in Arduino MEGA it takes ~112us. The accuracy is upto 3mV and 3A respectively and working to improve this.

    Hence, we can use it like a voltmeter or ammeter or a mini oscilloscope (since we have a TFT screen also)
    All the codes are available (opensource) at our Github repository: https://github.com/evivetoolkit/evive/tree/master/testCodes/testGraphingNavKeyADE7912

    This video shows the working of evive as a mini oscilloscope (with limited frequency range):

  • Procuring/Ordering components and parts for projects

    Dhrupal R Shah08/13/2016 at 16:09 0 comments

    One of the important challenge we faced was to procure or order parts for prototyping some new design. Regularly we need to get new parts (which are not in our inventory :) ) as for product level development we need to iterate for making it robust and cost effective. So we have used following channels:

    1. Element 14 (Works very good in India)
    2. DigiKey (or Mouser)
    3. Aliexpress (the quality is decent, but sometimes the products are faulty)
    4. Analog Devices
    5. Texas Insturments
    6. [India] Lajpat Rai market, Chandani Chowk, Delhi
    7. [India] Nehru Nagar Market, Kanpur, India

    Most of the ICs can be ordered as samples from the manufacturer website like Analog Devices and Texas Instruments. It was really helpful as they ship using very fast modes.

View all 12 project logs

Enjoy this project?

Share

Discussions

Craig Hissett wrote 08/16/2016 at 11:41 point

This is a fantastic project.

I've always wanted to create a portable Arduino prototyping development environment.

I'm a big fan of how you can store multiple scripts as user functions.

  Are you sure? yes | no

Dhrupal R Shah wrote 08/16/2016 at 16:31 point

@Craig Hissett Ya, Portability is best. evive can work for upto 4.5 hours on single charge. It can be charged via laptop or your mobile charger or battery.
Storing multiple scripts alongside is very useful sometimes and by making it portable, the usability of multiple programs is escalated :P

  Are you sure? yes | no

Roman wrote 08/15/2016 at 21:45 point

Very nice product.

  Are you sure? yes | no

Dhrupal R Shah wrote 08/16/2016 at 16:12 point

Thanks for appreciation. Suggestions are welcome.
Explore more about evive at: http://igg.me/at/evive 

  Are you sure? yes | no

Flow wrote 08/15/2016 at 08:03 point

Very nice project. Are you going to make the schematics open source? Please!! :)

  Are you sure? yes | no

Dhrupal R Shah wrote 08/15/2016 at 08:18 point

@Flow Thanks for appreciation.
We have made a user friendly schematic: evive.cc/files/eviveSchematicPinOutDiagram.png
Also the PCB files and schematic will be available soon at our Github repo: https://github.com/evivetoolkit/evive

You can support us at: http://igg.me/at/evive 

  Are you sure? yes | no

Flow wrote 08/15/2016 at 09:05 point

I allready found the "user friendly schematics", but for building a PCB it's not that "user friendly" ;)

So i will have an eye on the repo. 

I'd love to support you. But i need a prototype as soon as possible because we want to use it for a class at university. So schematics will be nice to build a own device and to evaluate if it will really fit our needs.

  Are you sure? yes | no

Adam Fabio wrote 08/12/2016 at 02:05 point

Very Cool! Any chance of an "extended" cover that can be used while components are installed on the breadboard?  This would be perfect for students or hackerspace projects that travel!

  Are you sure? yes | no

Dhrupal R Shah wrote 08/12/2016 at 09:49 point

@Pankaj Verma
Note this interesting idea given by @Adam Fabio
Lets sometime try out extended "magic lid".

  Are you sure? yes | no

Similar Projects

Does this project spark your interest?

Become a member to follow this project and never miss any updates