Close
0%
0%

Balambér

a robotic handpuppet

Similar projects worth following
I have an old forester hand puppet, and I would like to make him move. I am beginner in mechatronics and programming. So I hope my logs will be useful for other beginners.

Video with four servos: https://youtu.be/1r1sjAlH9-M

Previous video: https://youtu.be/iQVTSU0HwvM

3D files made with Autodesk Fusion 360: http://a360.co/2dY9rPy

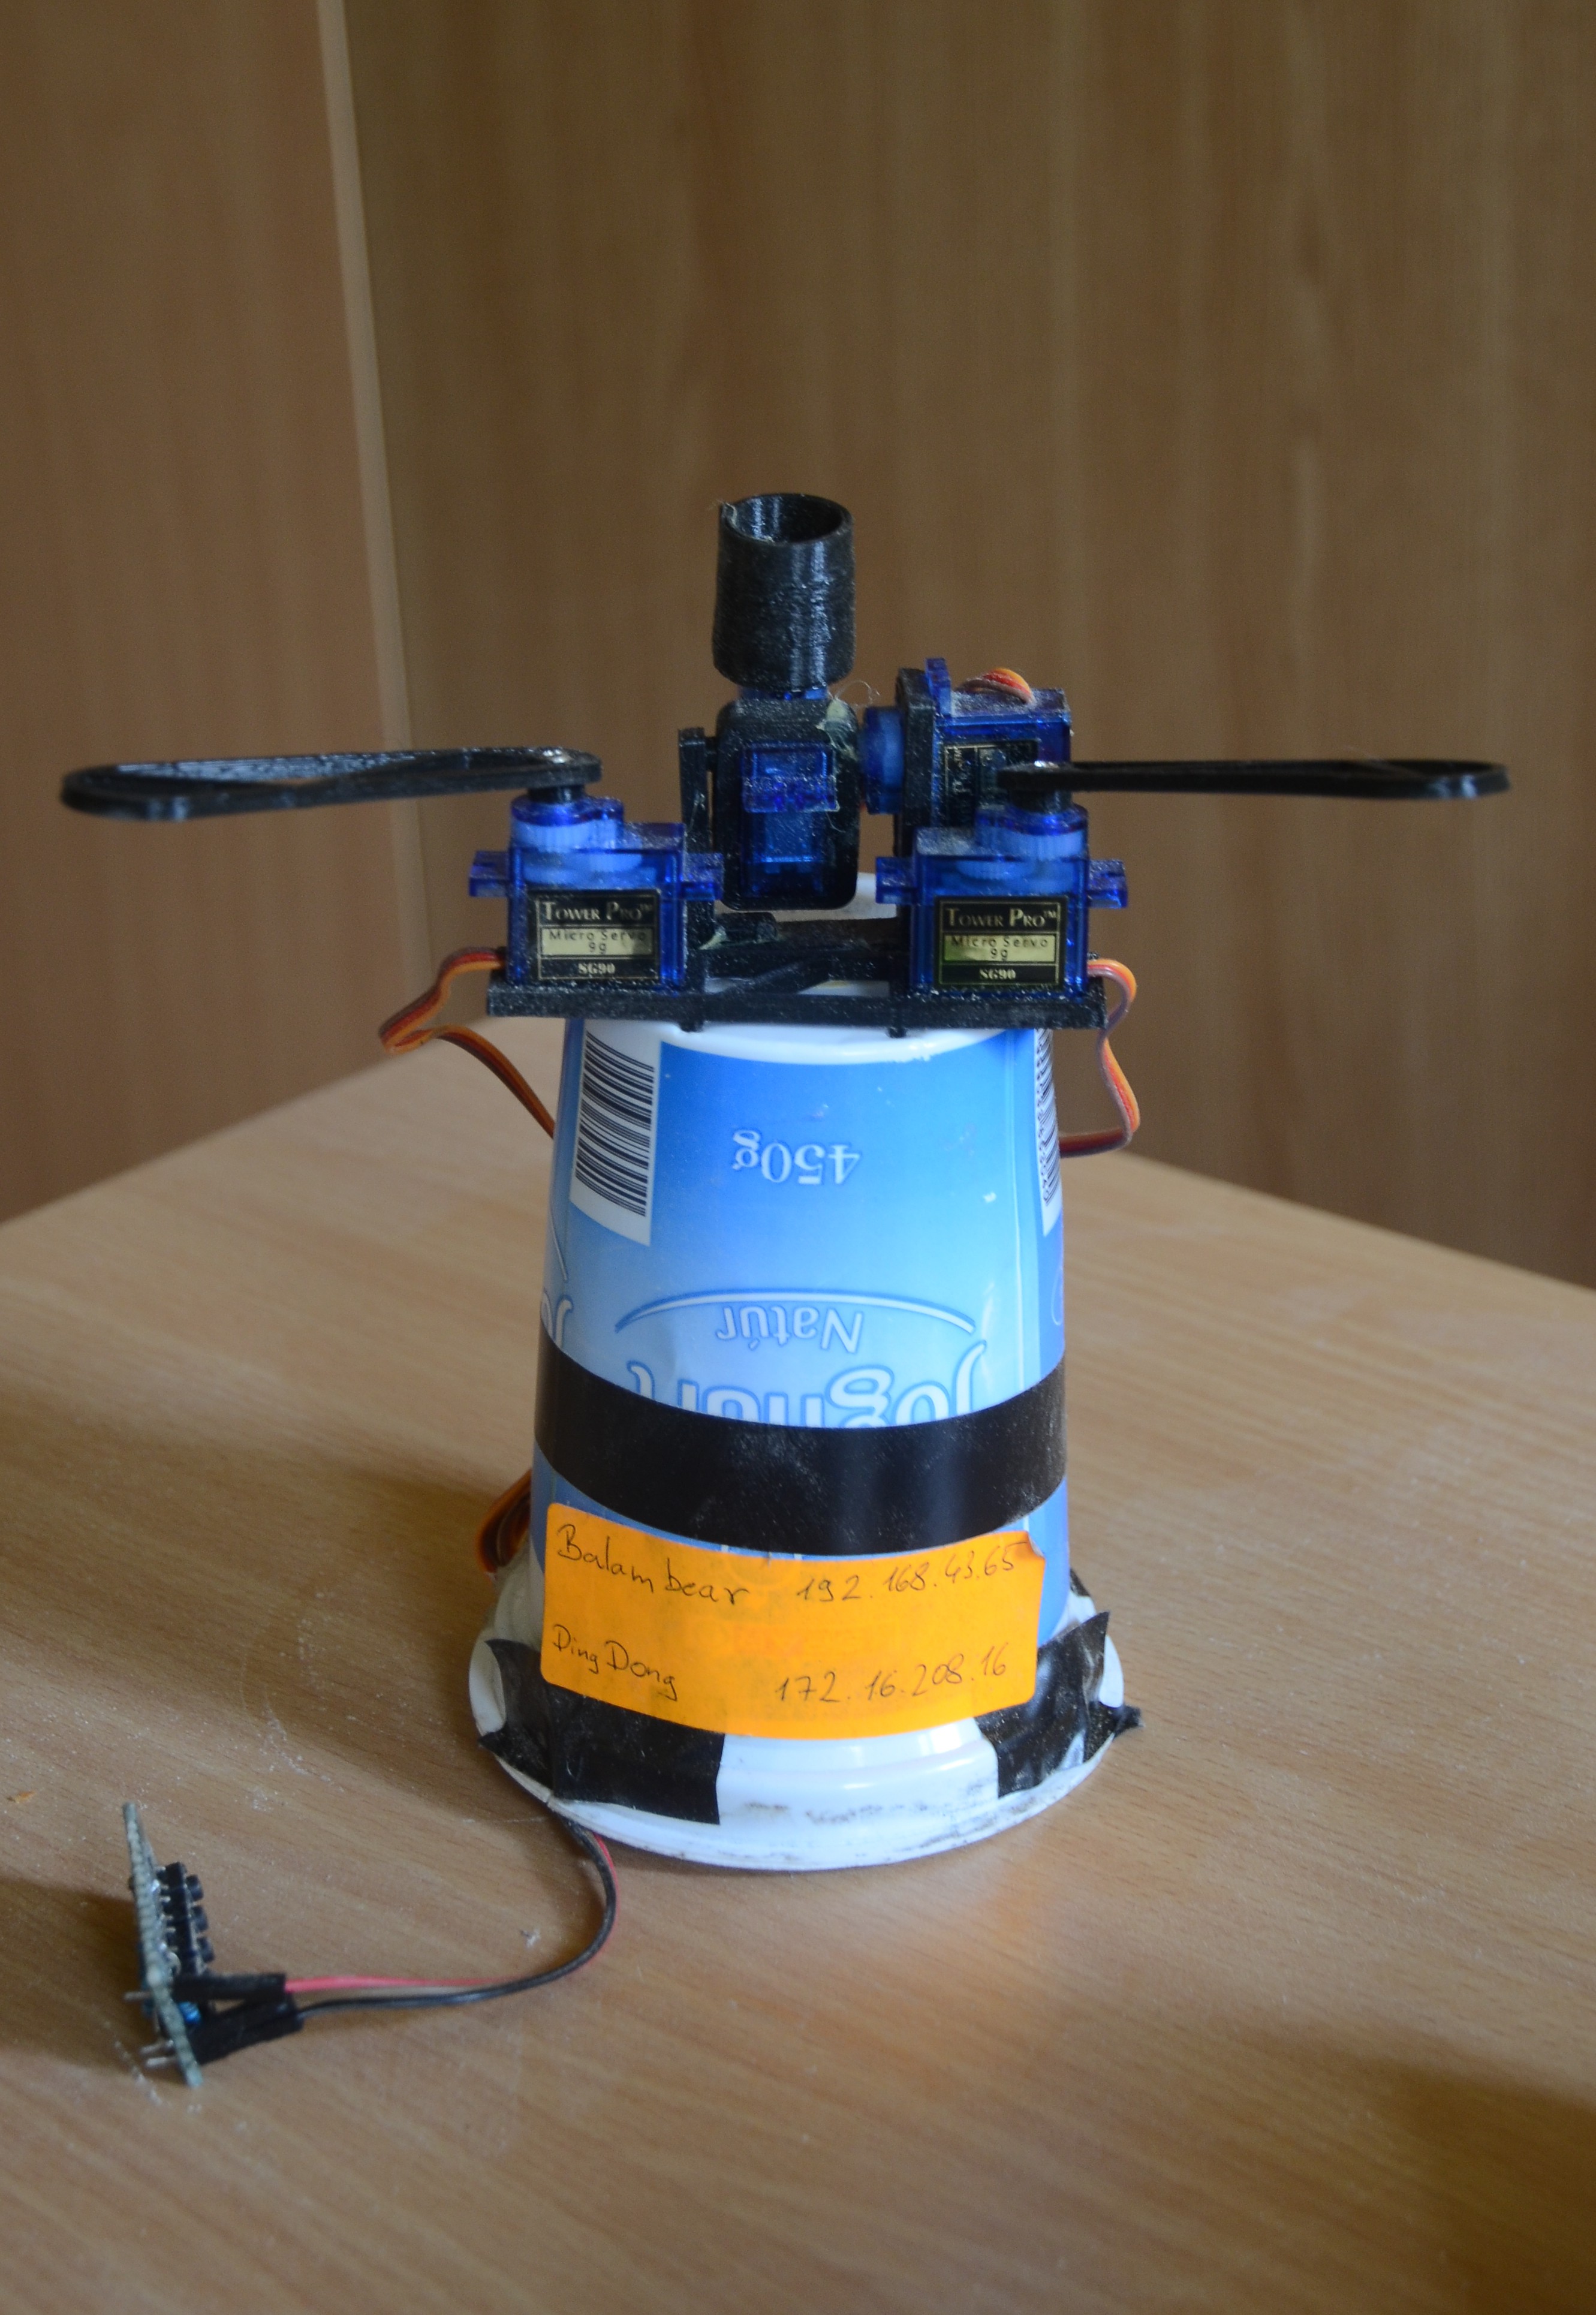
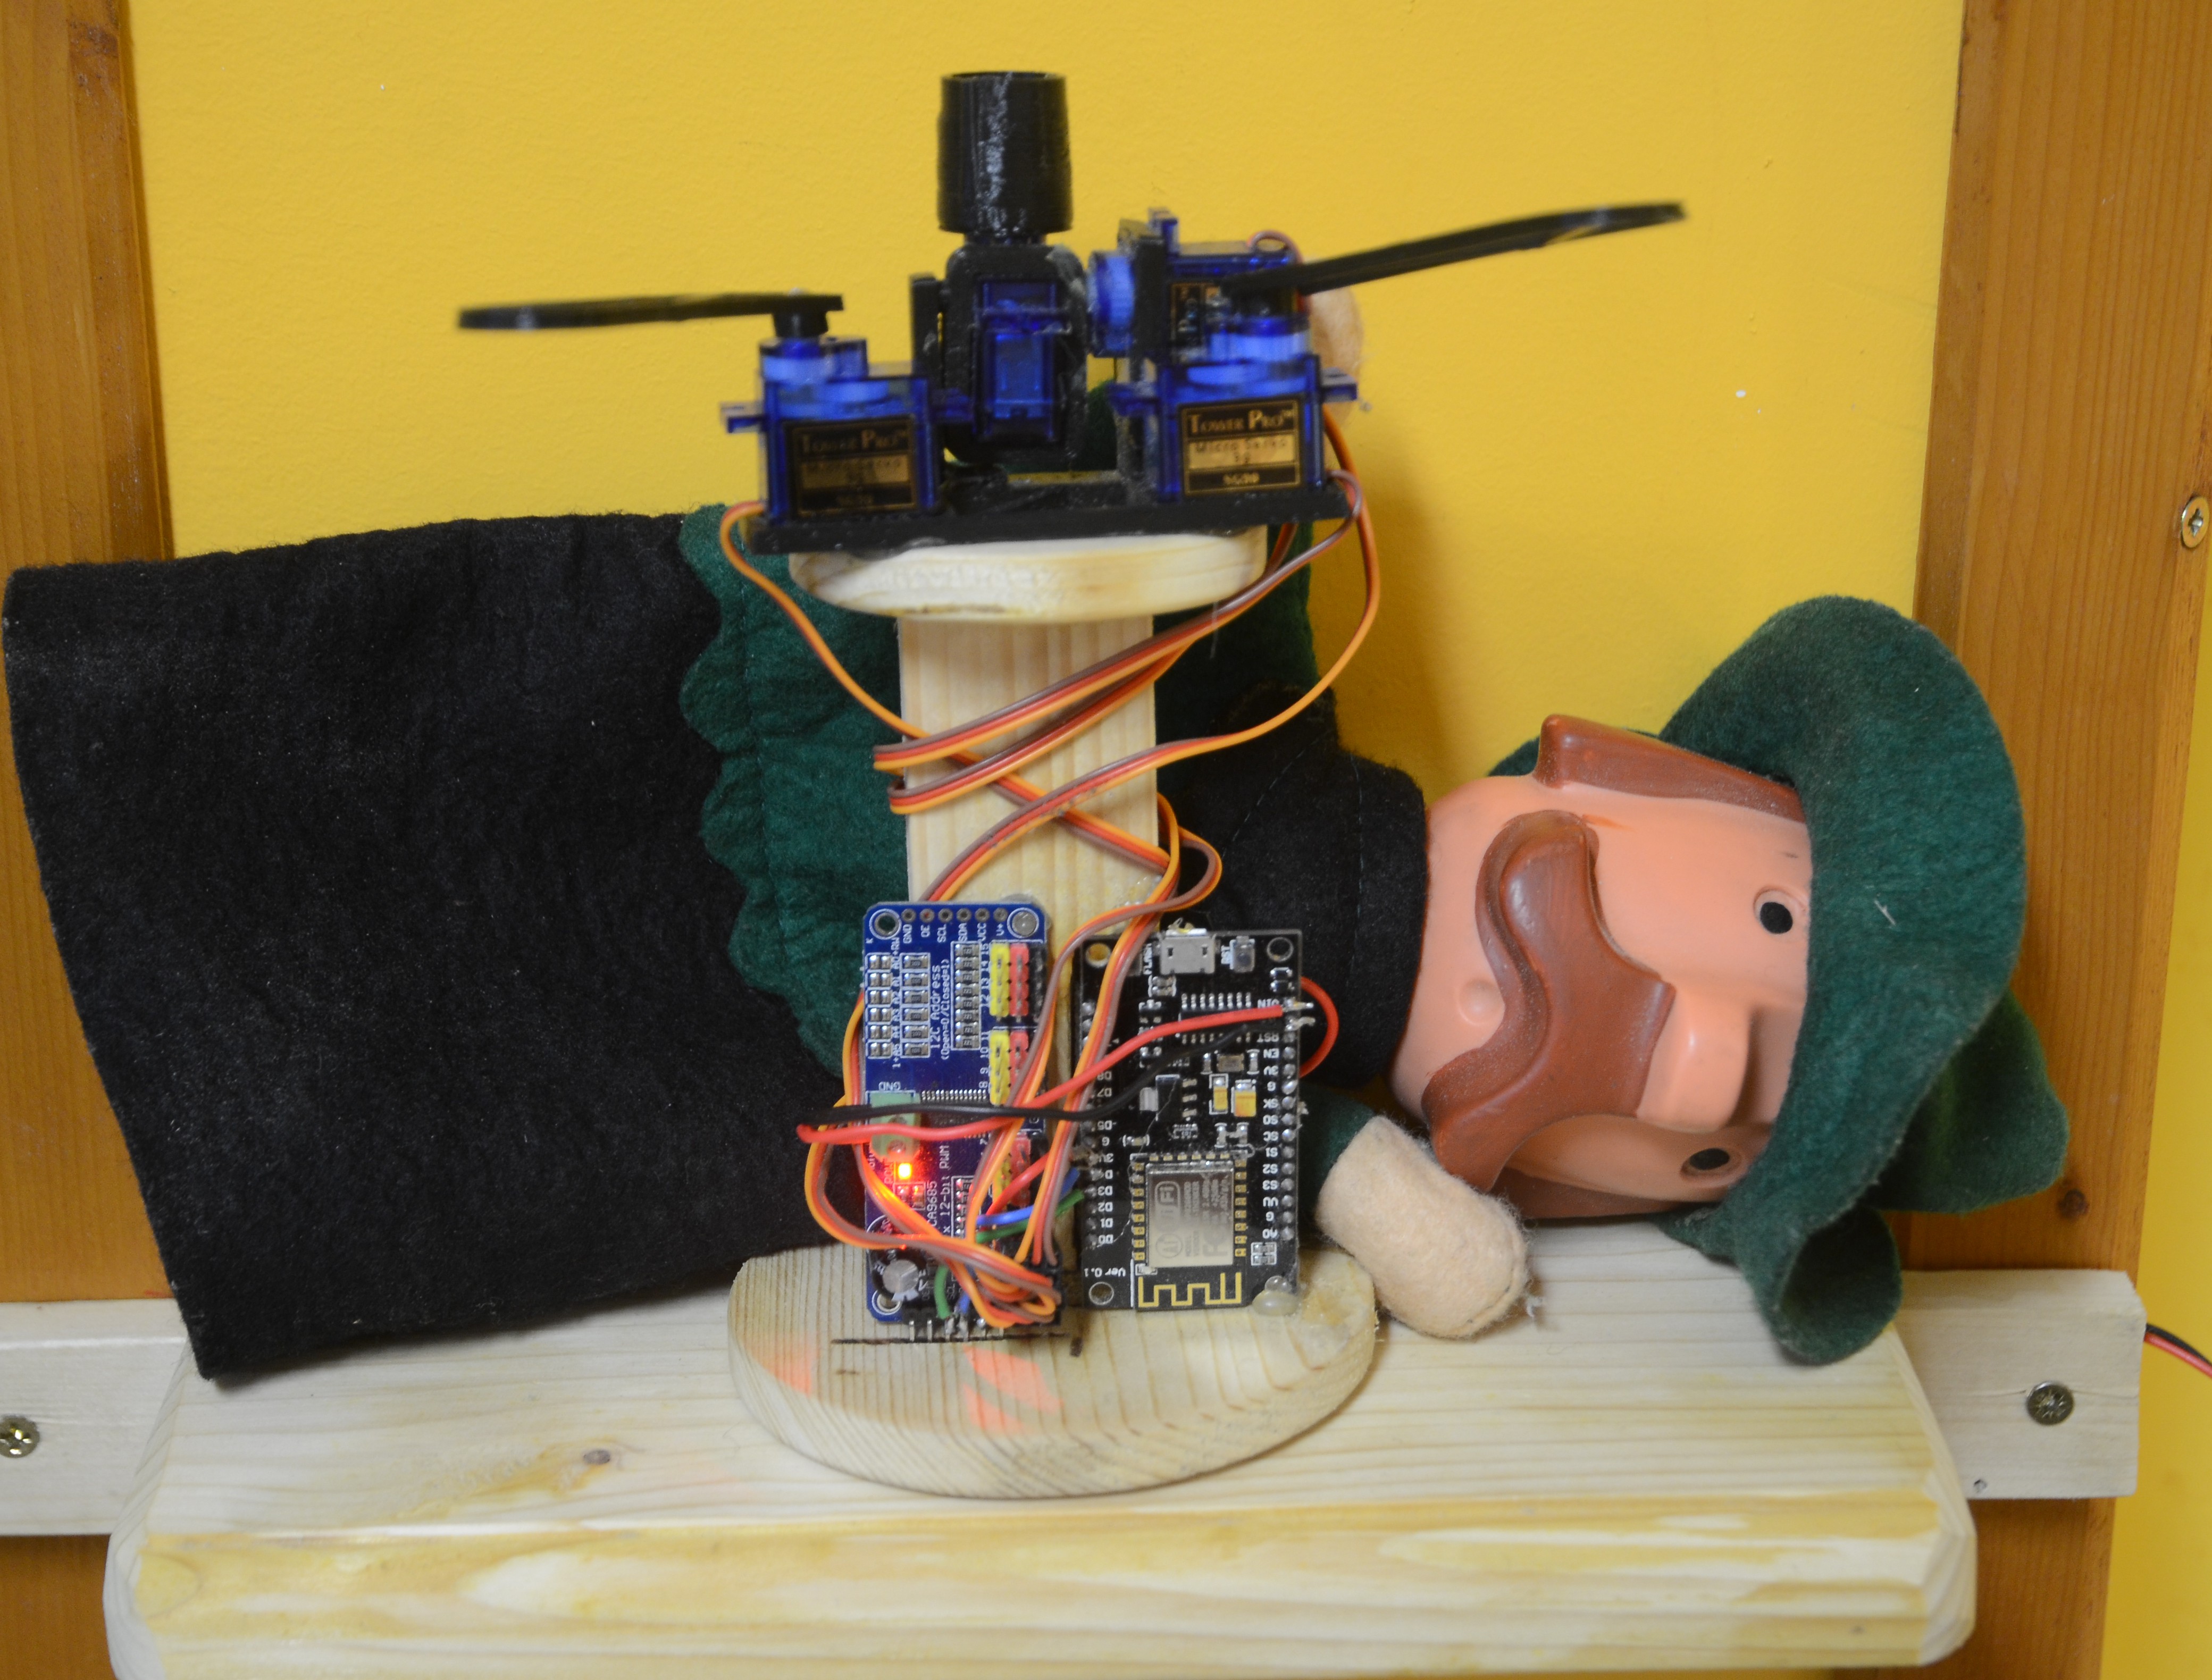
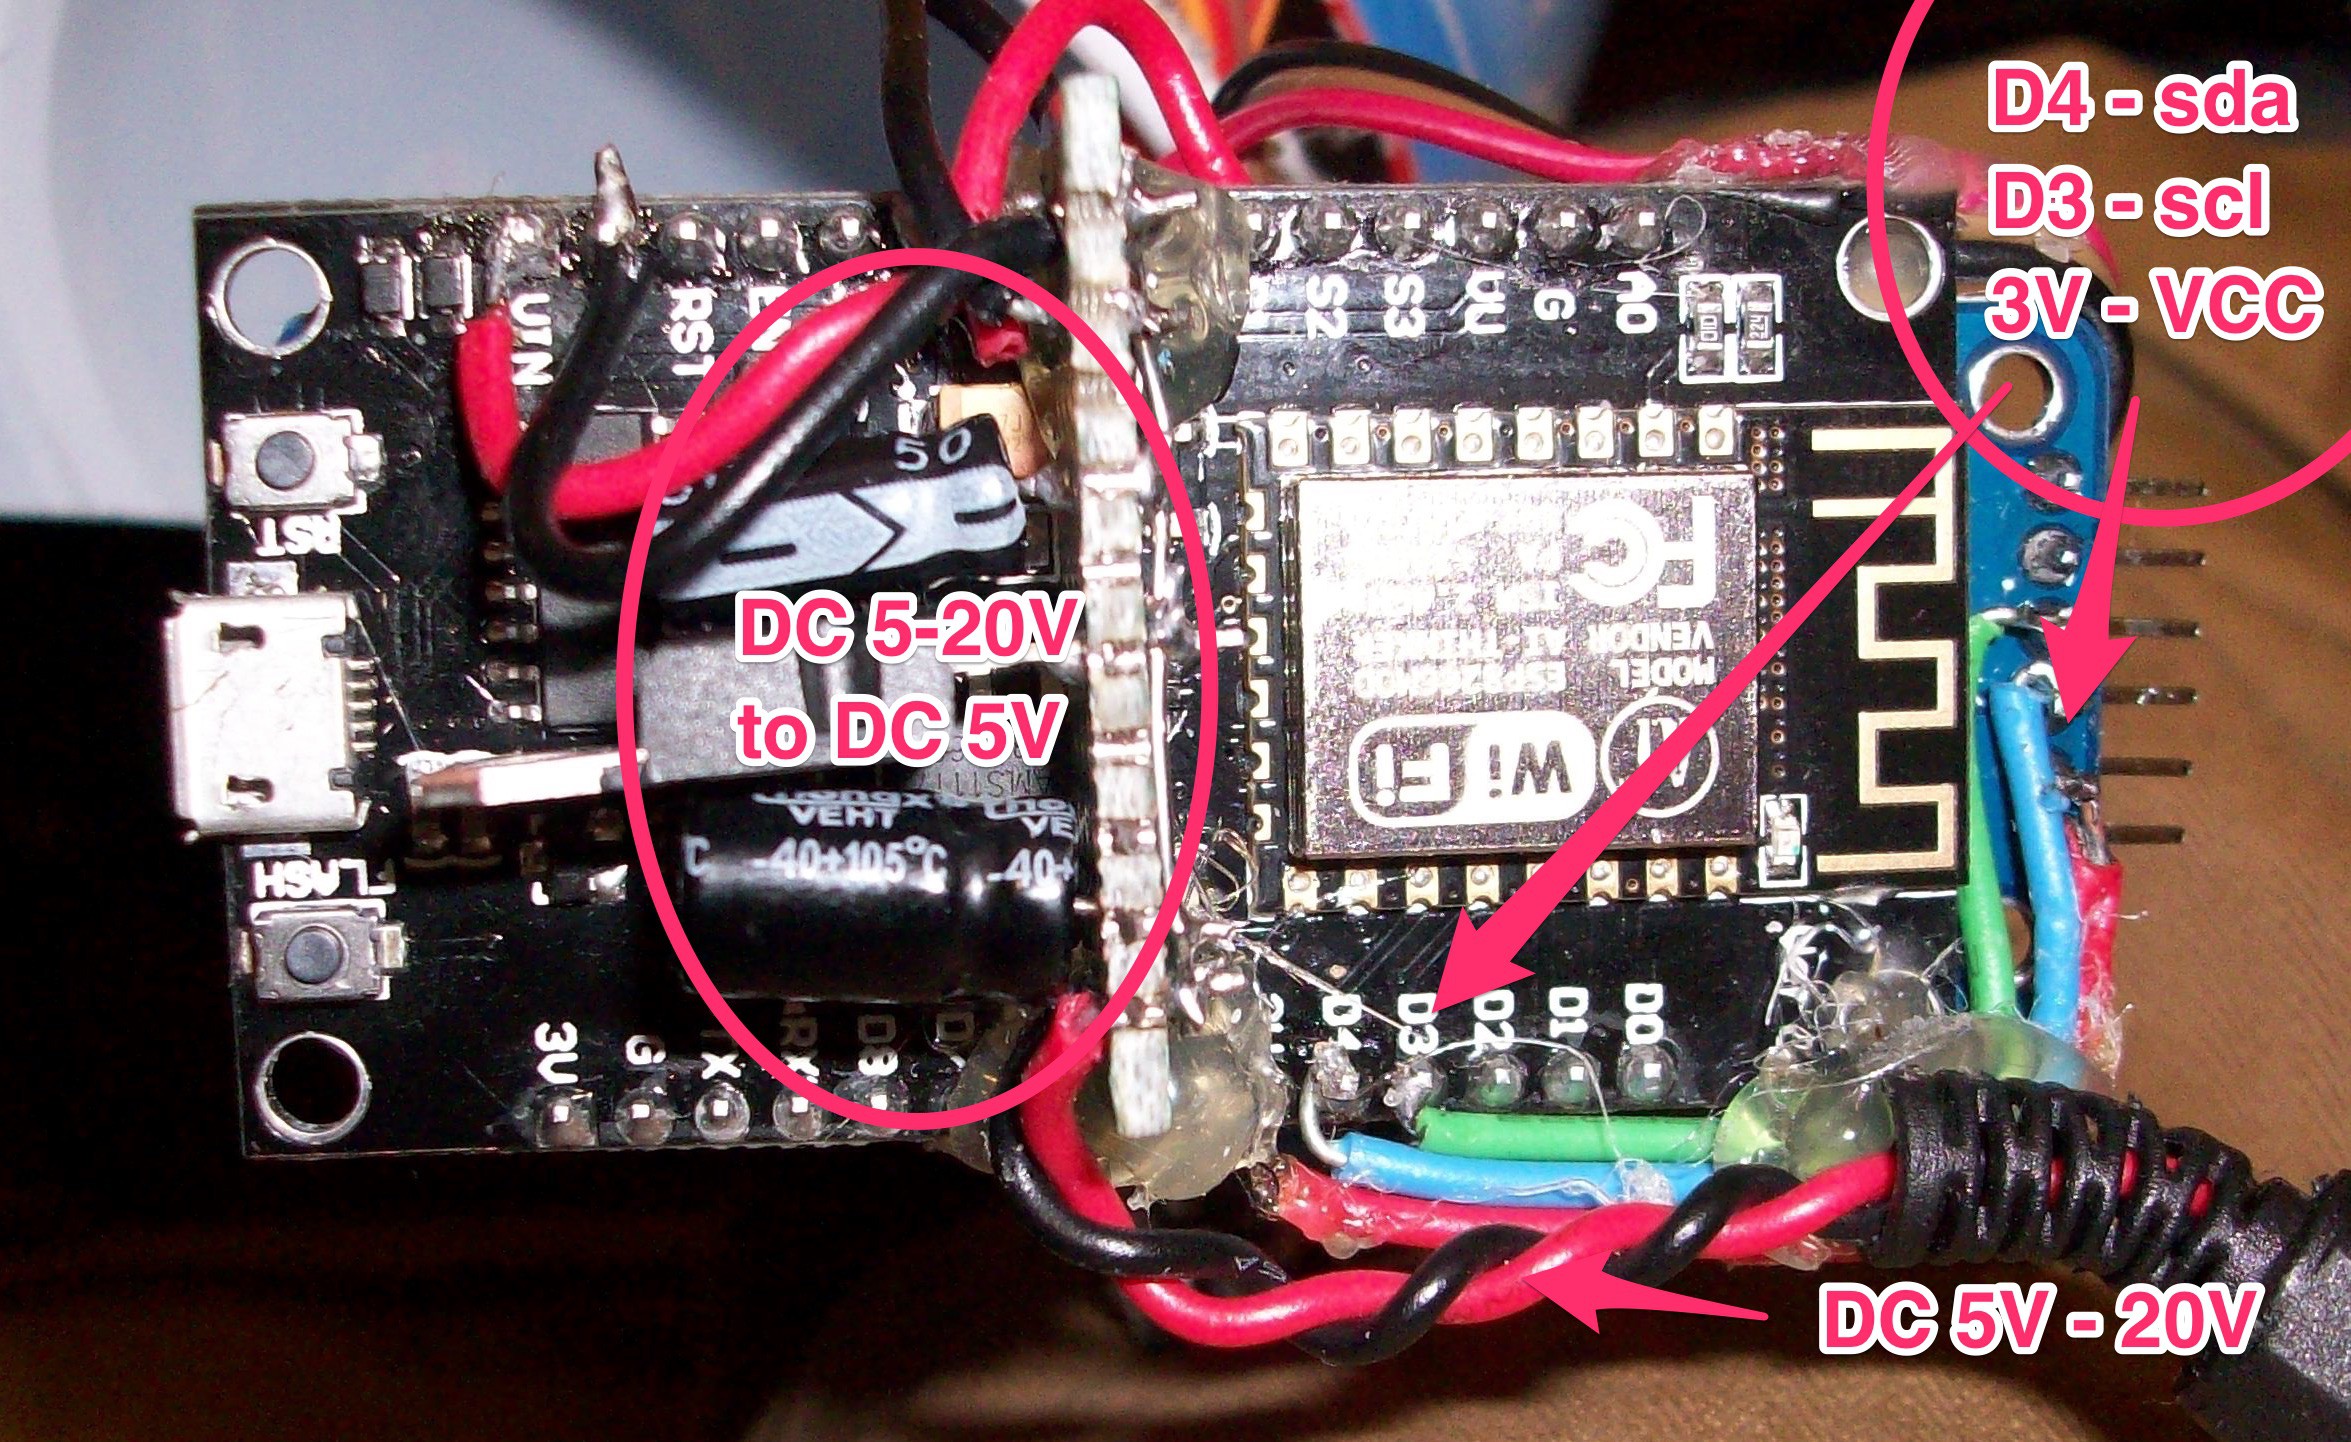
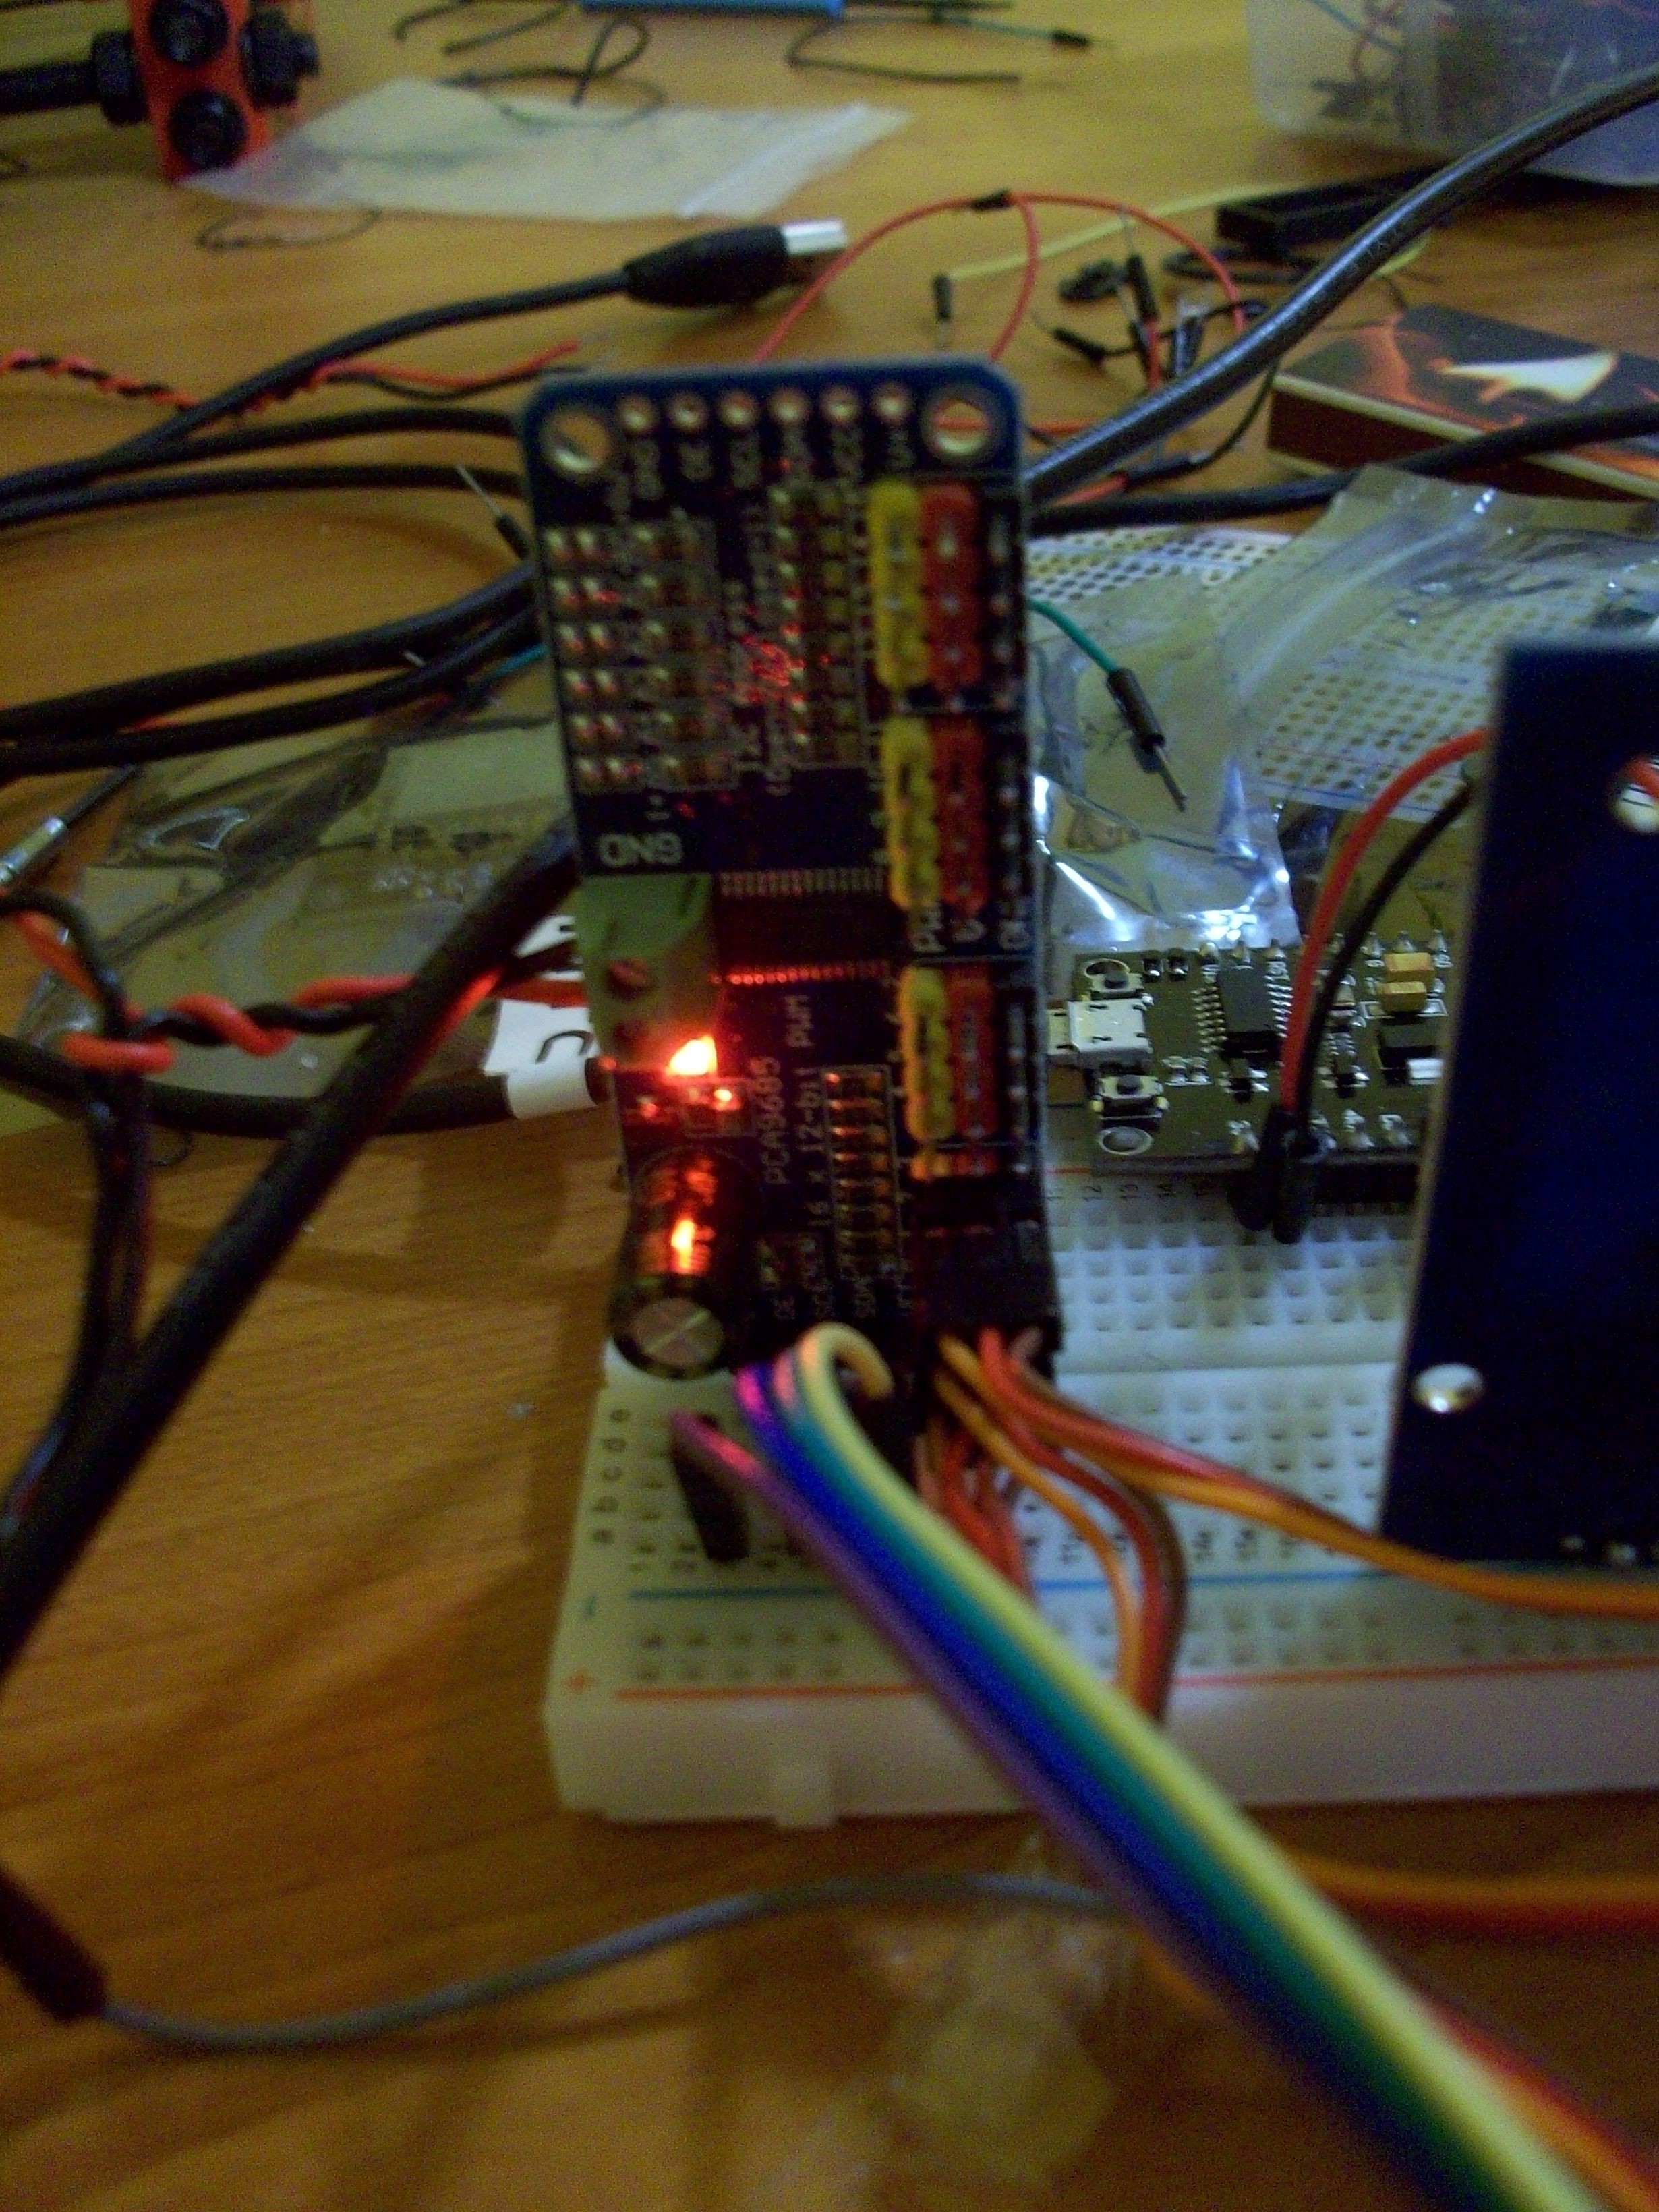
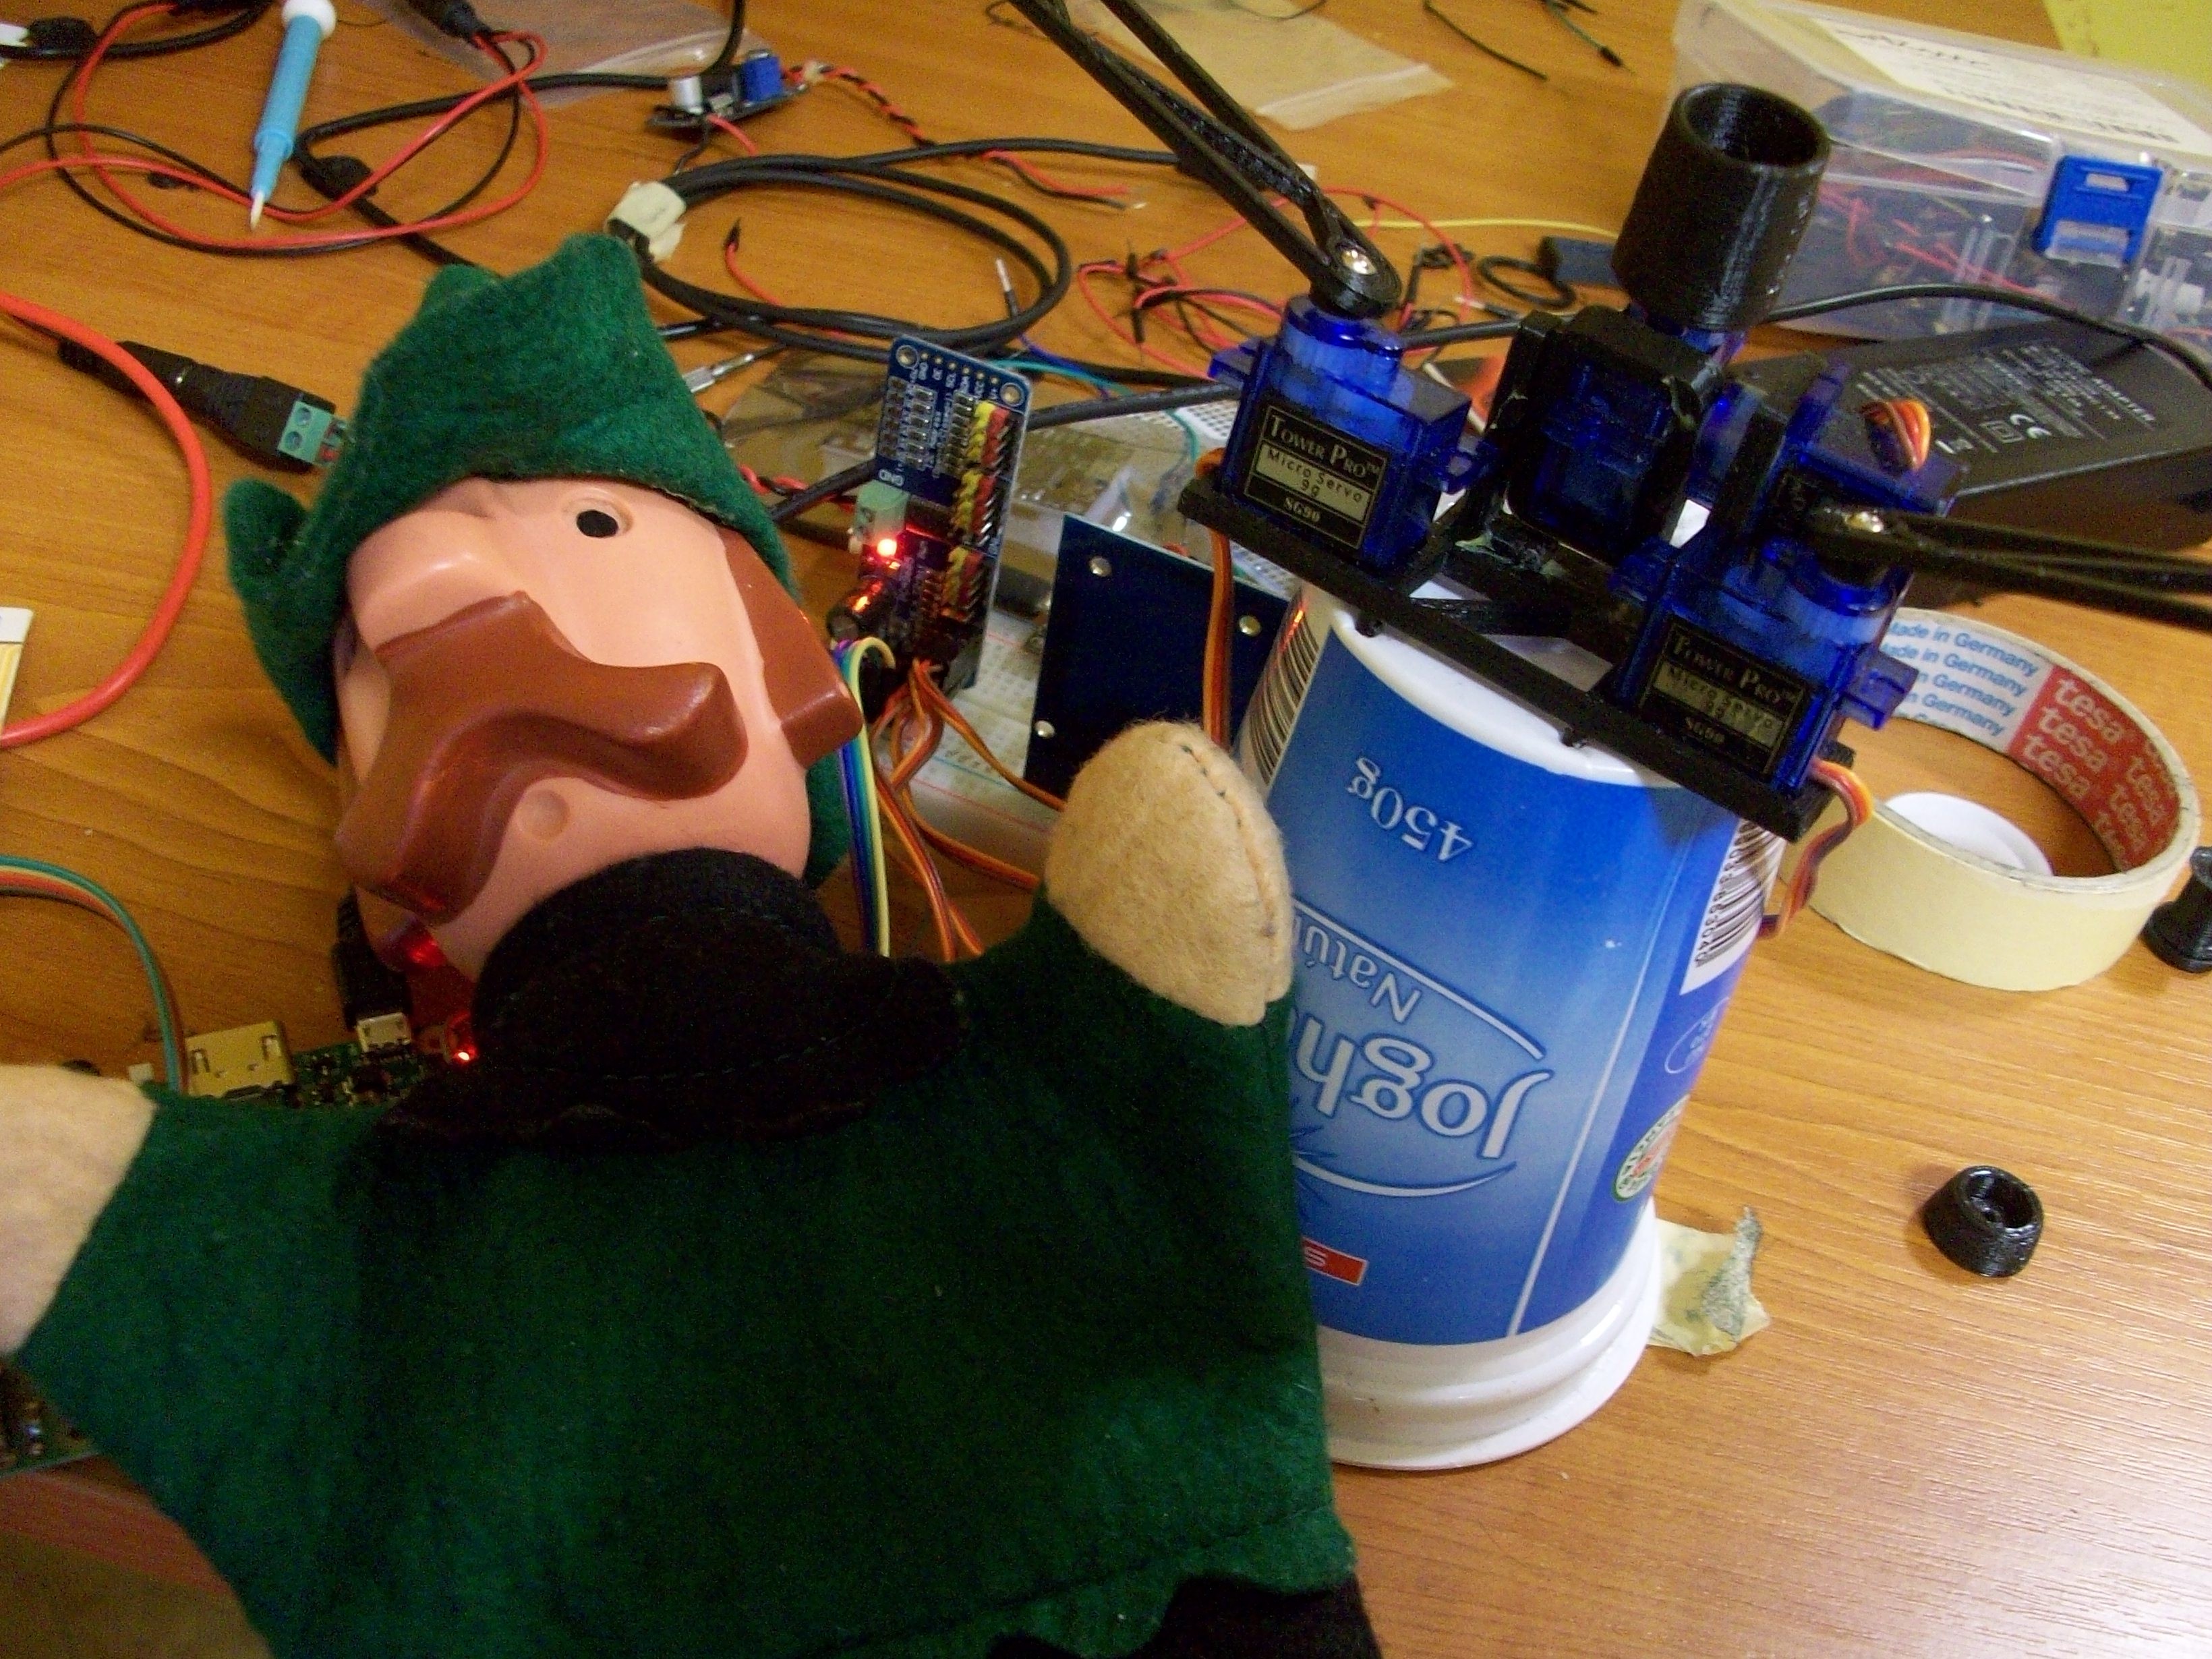
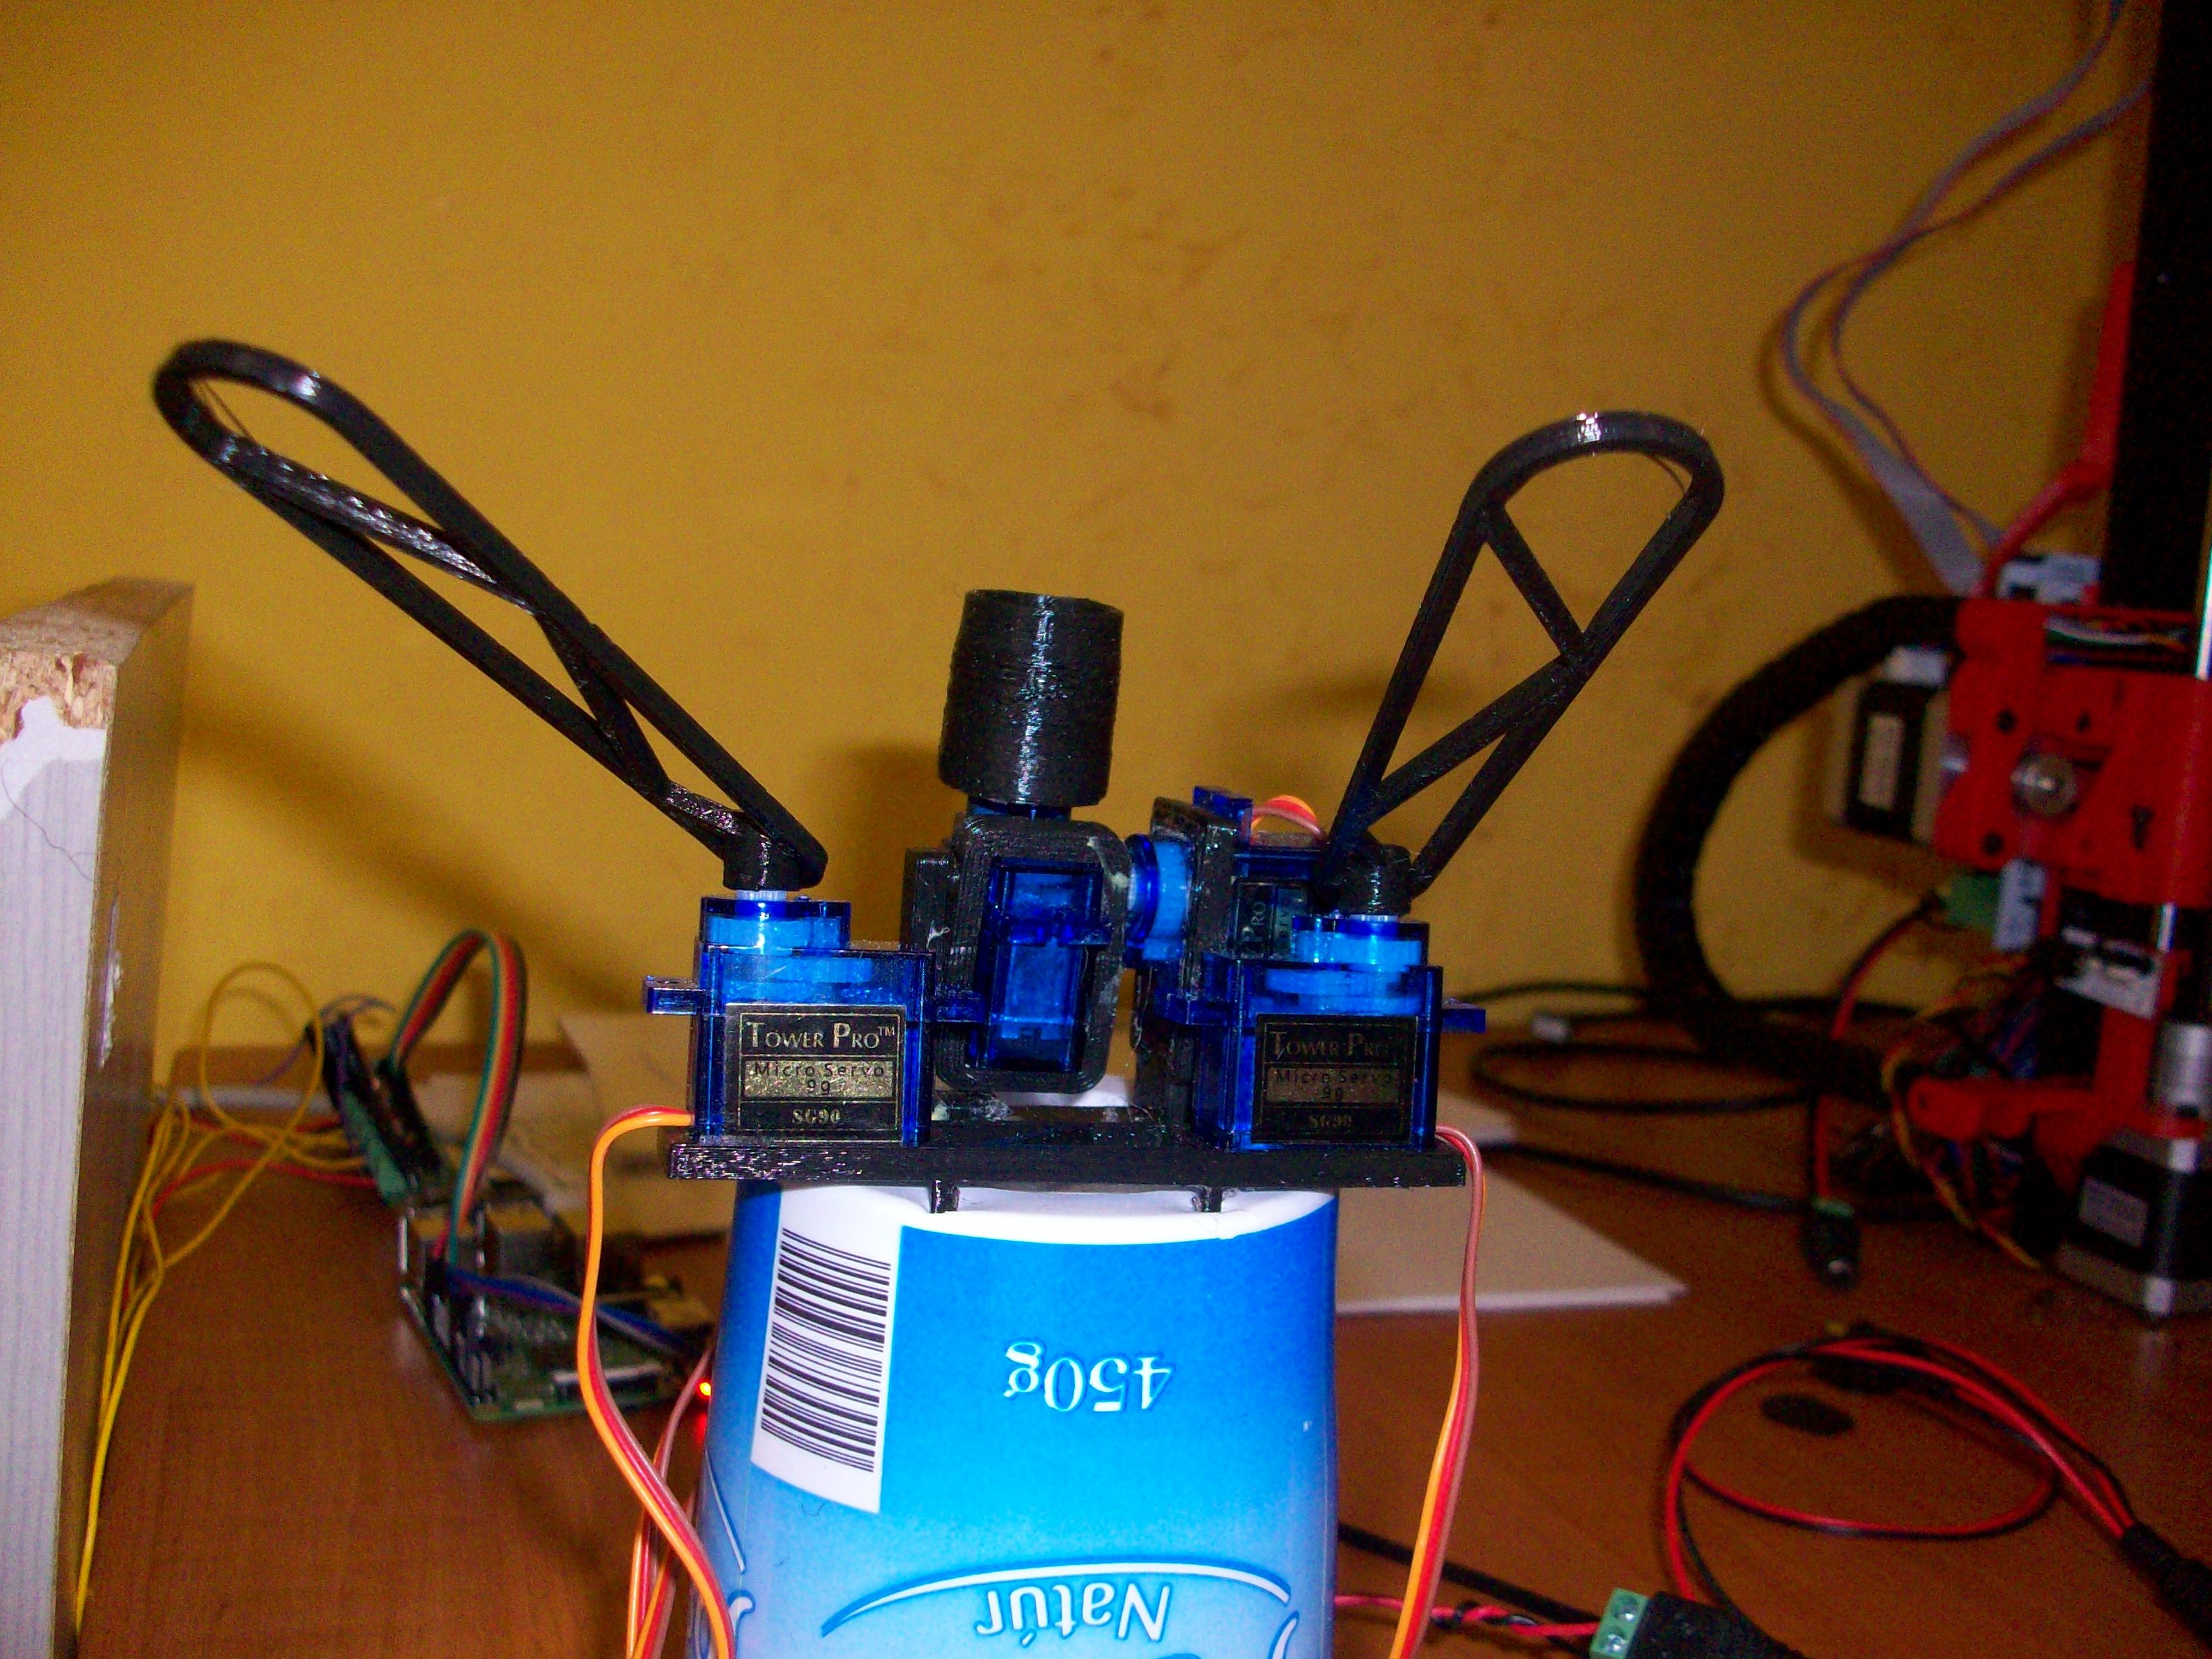
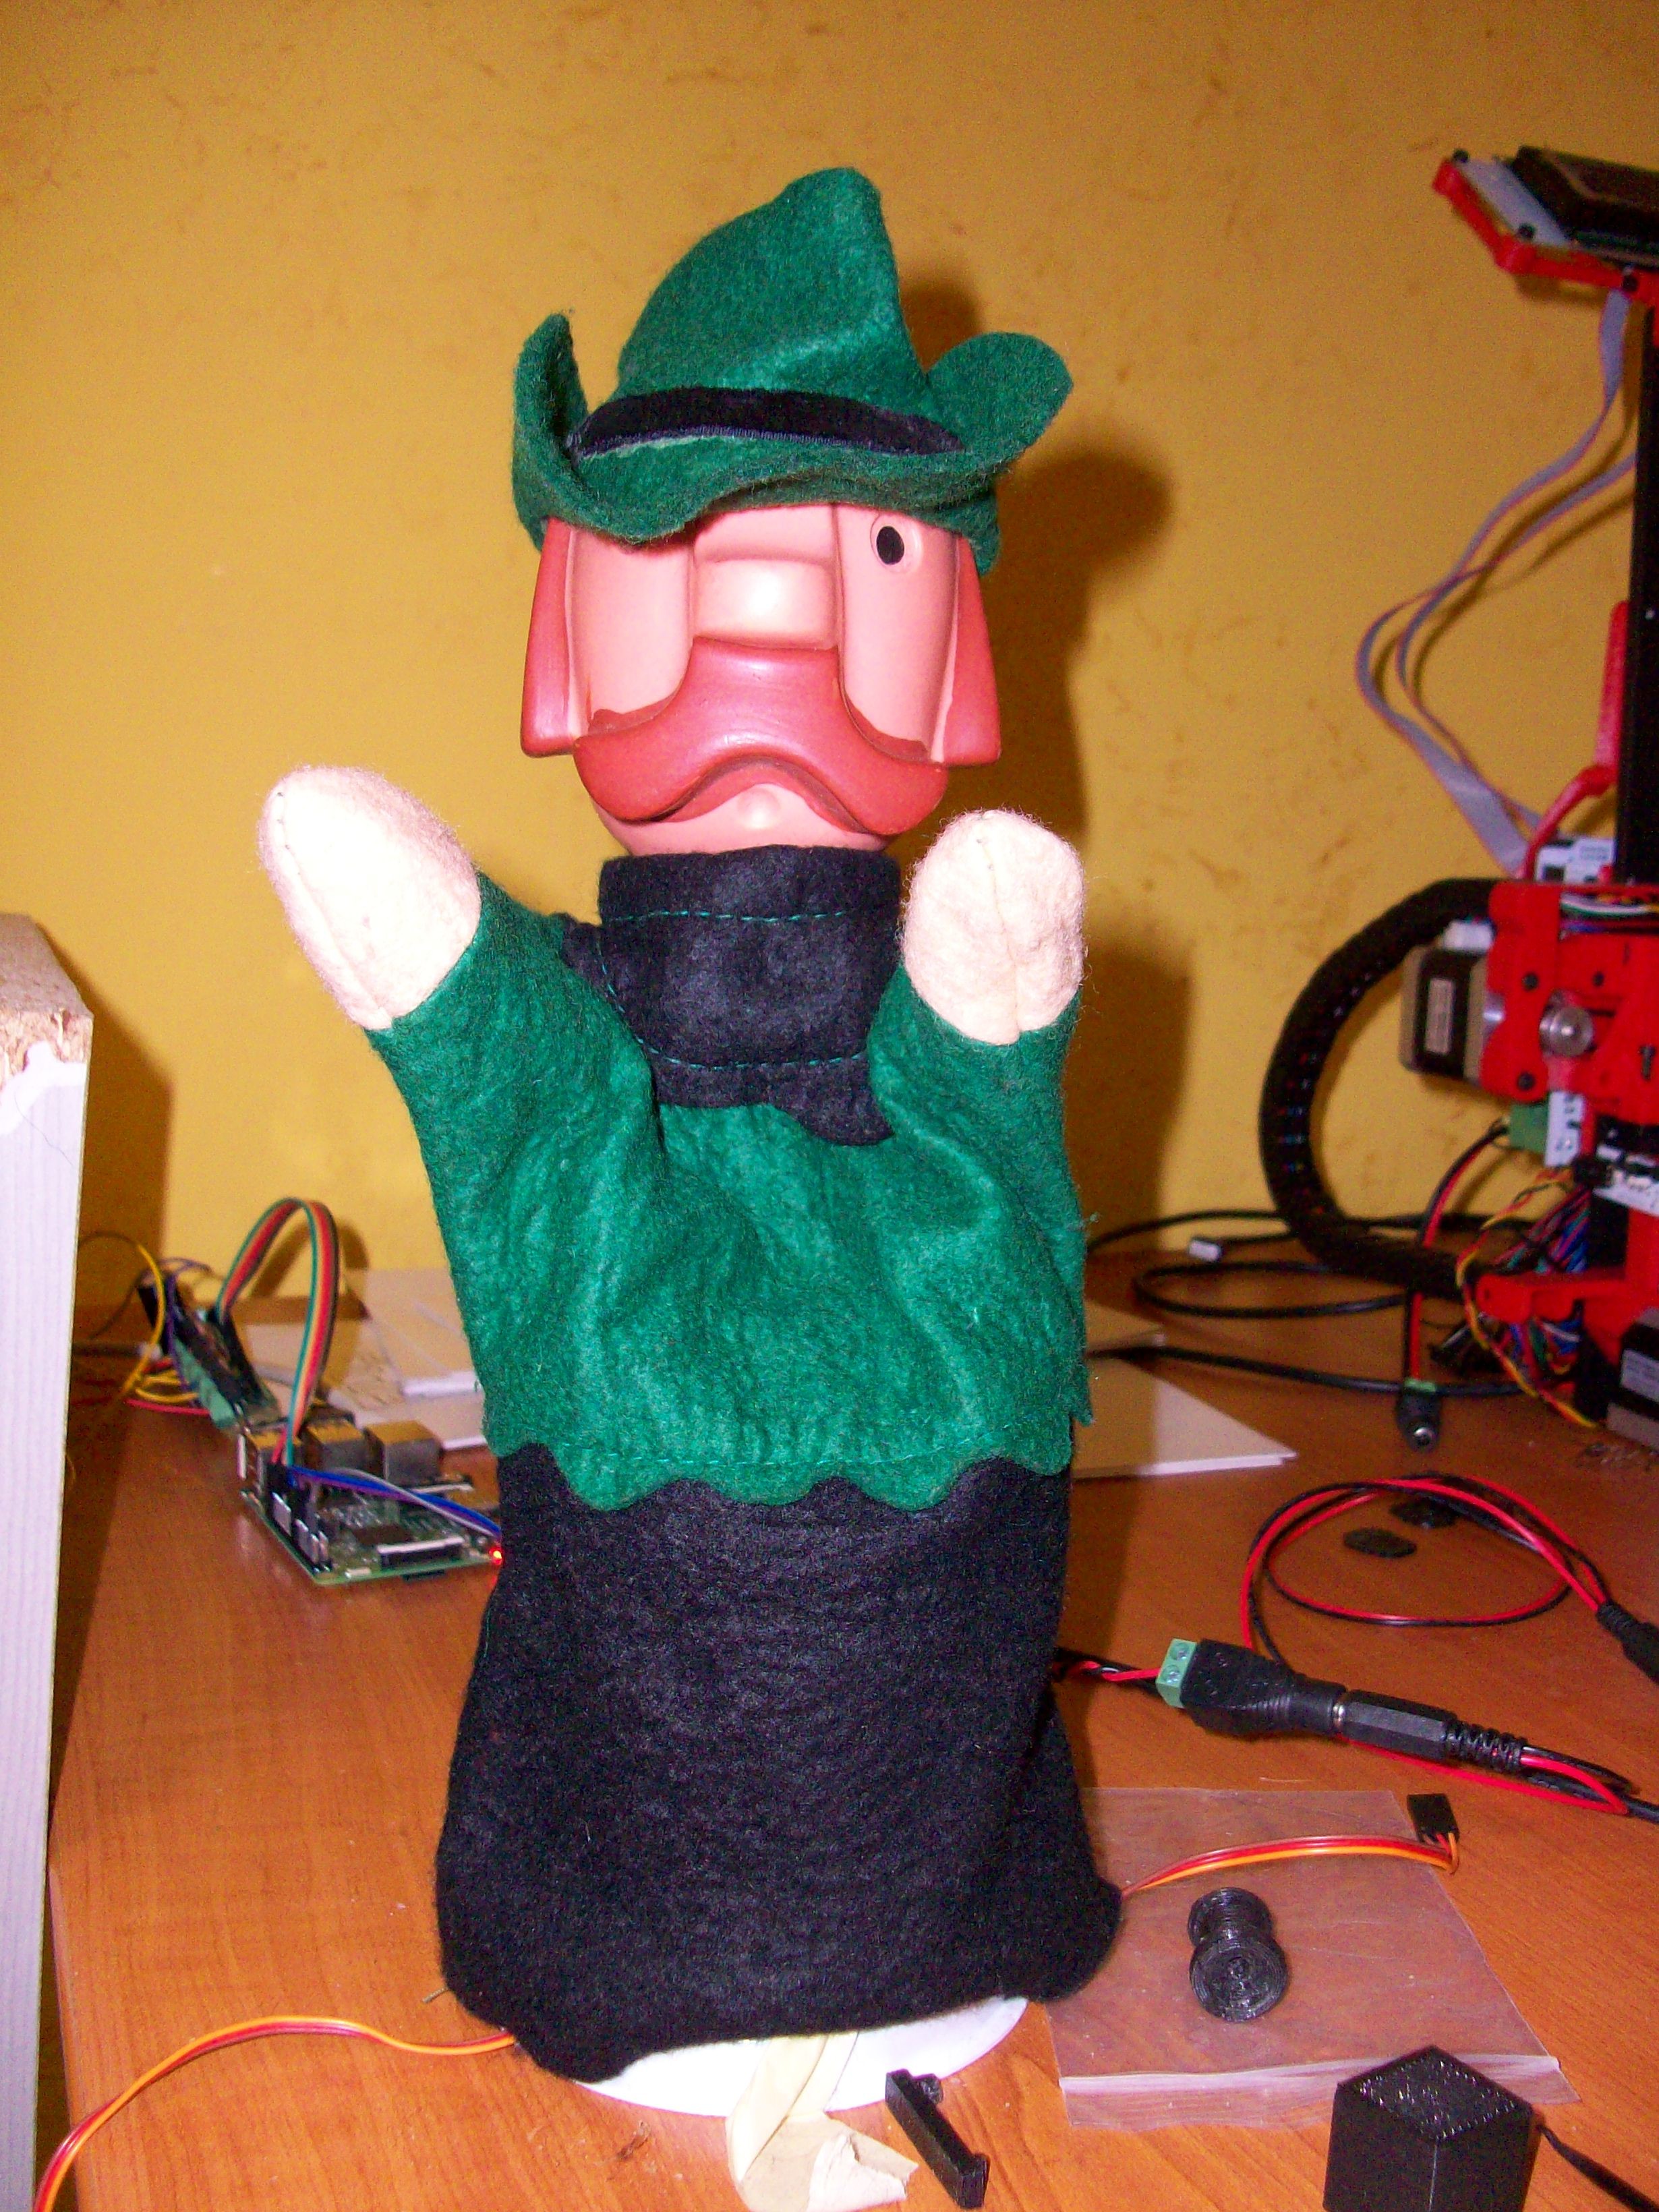
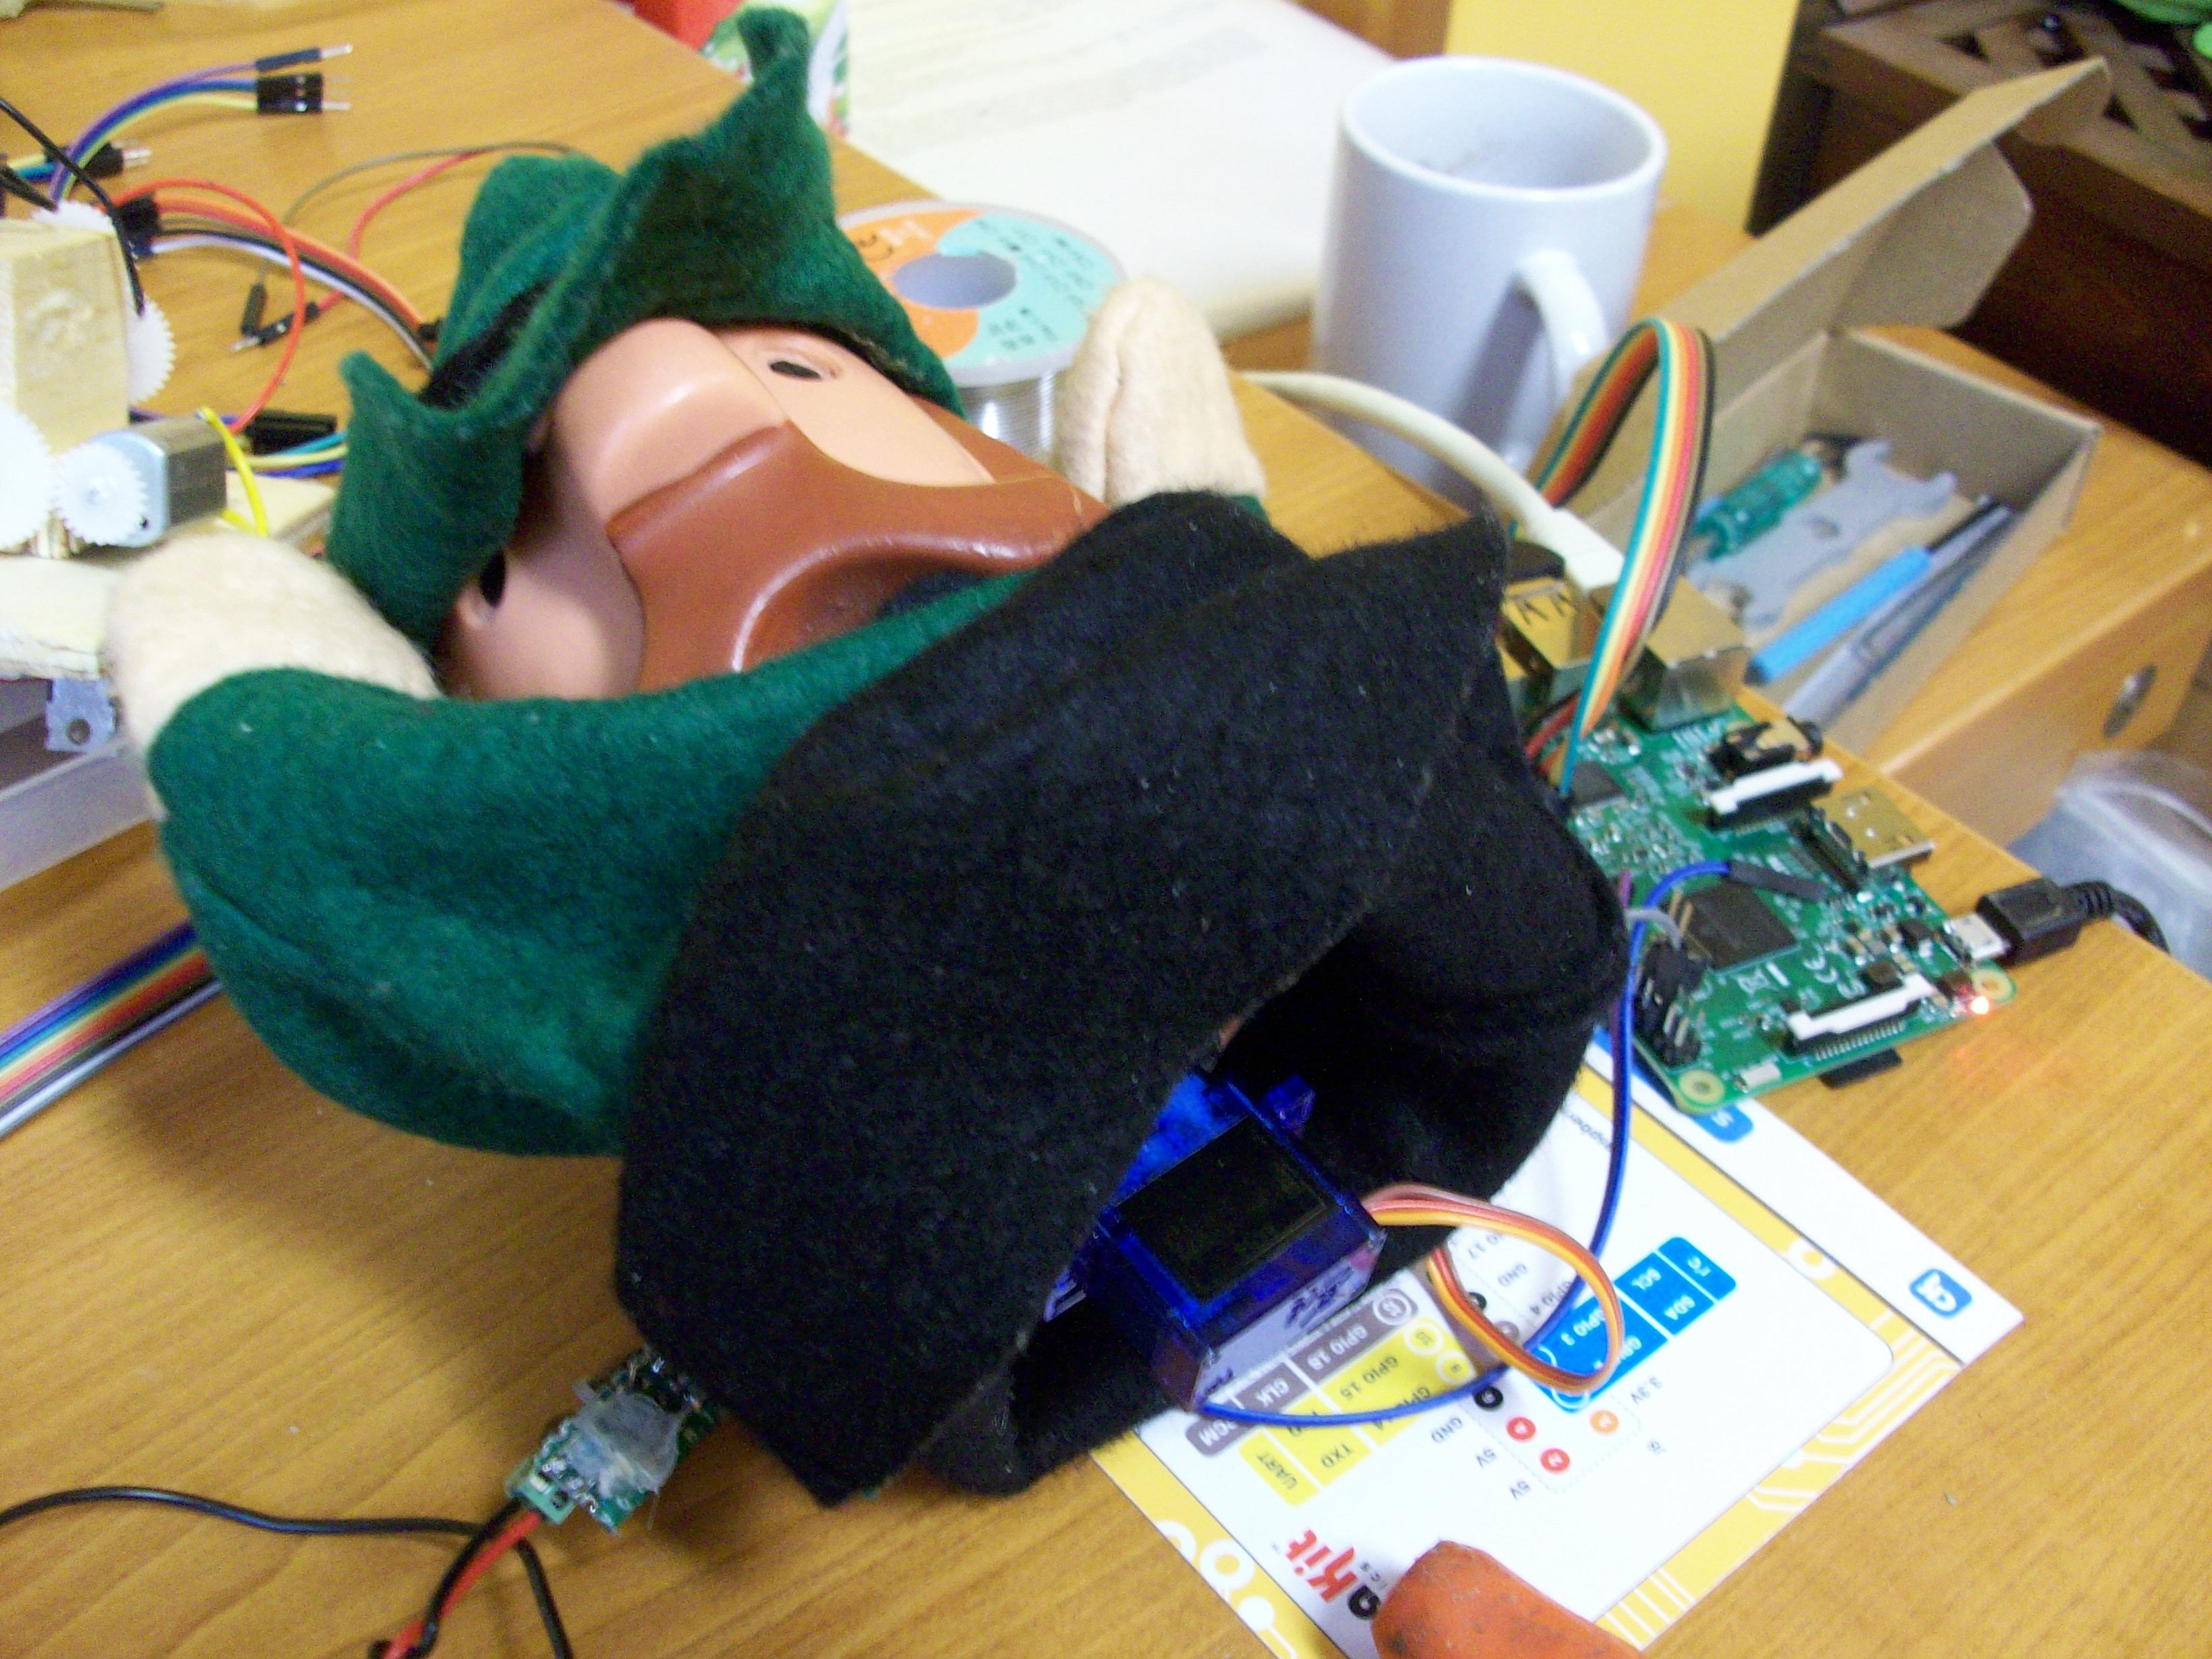
The brain of my handpuppet will be Raspberry Pi instead of an arduino, as I have no arduino. Small SG90 micro servos will make him move. These servos need for PWM, but I have only PigPio. I have a Prusa i3 Hephestos 3D printer, so I can print small parts I need.

  • 1 × Balambér, the DDR handpupper forester
  • 1 × NodeMCU v3 ESP8266 For a long time I used a Raspberry Pi, but I switched to arduino.
  • 4 × SG90 Micro Servo
  • 1 × 3D printed parts
  • 1 × PCA9685 16 Channel 12 PWM Servo motor Driver I2C Module The first version worked without this module: https://hackaday.io/project/14817/log/46927

  • Woodworks

    borazslo06/05/2017 at 18:20 0 comments

    Balambér's body was a plastic sour cream box. But working with other projects I have began to learn woodwoking. So I renewed his body.

    Here is the original body:

    Then I worked with my DIY lathe:

    And here the new body of Balambér:

    If you were not read this post you you would never recognize the internal changes:

  • From RaspberryPi (Python) to NodeMCU (Arduino)

    borazslo12/20/2016 at 13:45 1 comment

    Balambér has worked well with the Raspberry Pi, but I needed a lightweight solution as well so as to be able to run Balambér on battery only. So I bought a NodeMcu ESP8266 V3 WIFI Internet Development Board. It is a nice and small arduino compatible board with wifi module so I can continue to give orders to Balambér through a webpage.

    Hardware

    I followed the simple steps of this guide on instructables.com, and my LED began to blink easily. So I could begin to work with PCA9685 16 Channel PWM Servo motor Driver. Adafruit has an easy to follow step by step guide to use this driver with any arduinoish boards.

    I connected the NodeMCU's D4 pin to the drives's SDA, D3 to SCL, and 3V to VCC. This last one is very important as my servos should not consume current from the NodeMCU but from the power supply. And where is GND? I use the same power source (a homemade DC 5V voltage regulator) to power the NodeMCU and the servos. In this way the NodeMCU's GND and the motor driver's GND has already connected.


    The Code

    As the hardware was ready the time to rewrite the code has come. I installed the ESP8266Wifi module and the Adafruit_PWMServoDrive as I learnt from the guides above.

    The script after connect2wifi() waits for an user input from the browser. Looking at the serial monitor you can find out the IP address of the NodeMCU. When getHttp() returns with a code of a command, we run the proper command like yes, now, bow, or clap.

    Here you can check out the new code. If you have any problem understanding or adapting it, please give me a comment and I am ready to try to help you.

    #include <Wire.h>
    #include <ESP8266WiFi.h>
    #include <Adafruit_PWMServoDriver.h>
    
    const char* ssid = "ssid";
    const char* password = "passwordForSsid";
    
    WiFiServer server(80);
    
    #define pwmSda D4
    #define pwmScl D3
    
    #define servoHeadVertical 0
    #define servoHeadHorizontal 2
    #define servoLeftArm 3
    #define servoRightArm 1
    
    void moveServo(int servo, int servoFrom, int servoTo, int servoDelay) {
      int servoStep = 5;
      
      if(servoTo > servoFrom) {
        for (uint16_t pulselen = servoFrom; pulselen <= servoTo; pulselen = pulselen + servoStep) {
          pwm.setPWM(servo, 0, pulselen);
          delay(servoDelay);
        }
      } else {
        for (uint16_t pulselen = servoFrom; pulselen >= servoTo; pulselen = pulselen - servoStep) {
          pwm.setPWM(servo, 0, pulselen);
          delay(servoDelay);
        } 
      }
    }
    
    void commandYes() { 
      moveServo(servoHeadVertical,440,370,15);
      moveServo(servoHeadVertical,370,480,15);
      moveServo(servoHeadVertical,480,440,15);
    }
    
    void commandBow() { 
      moveServo(servoHeadVertical,440,280,80);
      moveServo(servoHeadVertical,280,440,60);
    }
    
    void commandNo() { 
      moveServo(servoHeadHorizontal,300,450,10);
      moveServo(servoHeadHorizontal,450,150,10);
      moveServo(servoHeadHorizontal,150,300,10);
    }
    
    void commandNod() {
        pwm.setPWM(servoHeadVertical, 0, 410);
        delay(300);
        pwm.setPWM(servoHeadVertical, 0, 450);
    }
    
    void commandClap() {
      int servoStep = 3;
      int stepCount = 75;
    
      for (uint16_t stepstep = 0; stepstep < stepCount; stepstep++) {      
          pwm.setPWM(servoRightArm, 0, 210 + ( stepstep * servoStep) );
          pwm.setPWM(servoLeftArm, 0, 170 + (servoStep * stepCount) - (stepstep * servoStep));
          delay(2);
       }
      for (uint16_t stepstep = stepCount; stepstep > 0; stepstep--) {      
          pwm.setPWM(servoRightArm, 0, 210 + ( stepstep * servoStep) );
          pwm.setPWM(servoLeftArm, 0, 170 + (servoStep * stepCount) - (stepstep * servoStep));
          delay(2);
       }
      
    }
    
    void connect2wifi(int timeout) {
      WiFi.mode(WIFI_OFF);
      delay(100);
      WiFi.mode(WIFI_STA);
    
      WiFi.begin(ssid, password);
      Serial.println(ssid);
      Serial.println(password);
      
      int endTime = millis() + timeout;
      while (WiFi.status() != WL_CONNECTED && millis() < endTime ) {
        delay(500);
        Serial.print(".");
      }
      if(WiFi.status() != WL_CONNECTED) {
        Serial.println("Could not connect to " + String(ssid) );
        commandNo();
        return;
      } else {
        Serial.println("");
        Serial.println("WiFi connected");
        
        // Start the server
        server.begin();
        Serial.println("Server started");
      
        // Print the IP address...
    Read more »

  • From soft(ware) PWM to hard(ware) PWM

    borazslo11/03/2016 at 15:25 0 comments

    In the beginning I had no external PWM module and my Raspberry Pi3 has only 2 native PWM output. So I have used PigPio module as a software solution. It was a good temporary solution even though the PWM had an interference with my room's lights.

    So I've ordered a PCA9685 16 Channel PWM Servo motor Driver. The Raspberry Pi can communicate with this cheap module via I2C protocol. So now I have 16 channels. :D

    The new module needs new wiring and new code. I followed this post: Adafruit 16 Channel Servo Driver with Raspberry Pi. It was fine and easy. So I moved on to write the new code with extra features like clapping and bowing. (Do not forget to install the Adafruit_PCA9685 as it was written in that adafruit post.) So here my new code:

    import time, sys
    import Adafruit_PCA9685
    
    class Servo:
     
       min = 100
       max = 480
    
       pwm = Adafruit_PCA9685.PCA9685()
       pwm = Adafruit_PCA9685.PCA9685(address=0x70, busnum=1)
       pwm.set_pwm_freq(50)
    
       def __init__(self, channel):
          self.channel = channel
          pass
    
       def setLimits(min, max):
            self.min = min
            self.max = min
            pass
    
       def set_pwm(self, on, off):
           self.pwm.set_pwm(self.channel, on, off)
           pass
    
       def setDegree(self, degree):  
            oneDegree =  (self.max - self.min) / 180 
            self.set_pwm(0, self.min + int(oneDegree * degree))
            pass
    
       def move(self, degreeFrom, degreeTo, speed = 0.01):  
            if degreeFrom < degreeTo:
                step = 1
            else:
                step = -1
            for degree in range(degreeFrom, degreeTo, step):
                self.setDegree(degree)
                time.sleep(speed)
            pass
    
    
    class Arm(Servo):
       
       def __init__(self, channel, limits):
          self.channel = channel
          self.limits = limits
          pass
    
       def wave(self):
          self.move(self.limits[1],self.limits[3], 0.002)
          self.move(self.limits[3],self.limits[1], 0.004)
          pass
    
       def reset(self):
          self.setDegree(self.limits[1])
          pass
    
    class Arms():
        
        def __init__(self):
          self.rightLimits = [20, 50, 155, 160] # -, normal, clap, full
          self.leftLimits = [140, 110, 35, 10]
    
          self.Left = Arm(3,self.leftLimits)
          self.Right = Arm(1,self.rightLimits)
          pass
    
        def clap(self, speed = 0):
            leftDistance = self.leftLimits[1] - self.leftLimits[2] 
            rightDistance = self.rightLimits[2] - self.rightLimits[1]
            if leftDistance > rightDistance:
                distance = leftDistance
            else:
                distance = rightDistance
            
            for count in range(0, distance):
                self.Right.setDegree(self.rightLimits[1] + count)
                self.Left.setDegree(self.leftLimits[1] - count)
                time.sleep(speed)
            for count in range(distance, 0, -1):
                self.Right.setDegree(self.rightLimits[1] + count)
                self.Left.setDegree(self.leftLimits[1] - count)
                time.sleep(speed)
            pass
    
        def claps(self, quantity):
            for c in range(0,quantity):
                self.clap()
            pass
    
    
    class Head():
    
       def __init__(self):
          self.Horizontal = Servo(2)
          self.Vertical = Servo(0)
          
          self.horizontalBase = 90
          self.verticalBase = 160
          pass
    
       def shake(self):
          limits = [40,self.horizontalBase,140]
          speed = 0.002
          self.Horizontal.move(limits[0],limits[2],speed)
          self.Horizontal.move(limits[2],limits[0],speed)
          self.Horizontal.move(limits[0],limits[1],speed)
          pass
    
       def nod(self):
          limits = [self.verticalBase,130]
          self.Vertical.move(limits[0],limits[1], 0.01)
          self.Vertical.move(limits[1],limits[0], 0.01)
          pass
    
       def bow(self):
          limits = [self.verticalBase,100]
          self.Vertical.move(limits[0],limits[1],0.05)
          self.Vertical.move(limits[1],limits[0],0.01)
          pass    
    
       def reset(self):
          self.Horizontal.setDegree(self.horizontalBase)
          self.Vertical.setDegree(self.verticalBase)
          pass   
    
    Arms = Arms()
    Head = Head()
    
    
    if len(sys.argv) > 1:
        command = sys.argv[1]
        if command == "no":
            Head.shake()
        elif command == "reset":
            Head.reset()
            Arms.Left.reset()
            Arms.Right.reset()
        elif command == "yes":
            Head.nod()
            Head.nod()
        elif command == "bow":
            Head.bow()
        elif command == "right":
            Arms.Left.wave()        
        elif command == "left":
            Arms.Right.wave()        
        elif command == "clap":
            Arms.claps(3)        
        else:
            print "Invalid command"
    else:
        print "Arguments needed"
    You can give commands to Balambér through arguments of the command. So he is happy again. :D


  • Arms - the easiest is the best

    borazslo10/12/2016 at 20:42 0 comments

    Next step to make Balambér's arms to move. First I planned an arm with moving shoulder and elbow. I was thinking about a parallel (but crossed) mechanism. (Thank you @Radomir Dopieralski.) Finally I made a design with two axis but one servo only.

    Then I realized that the more simple is the better. So I designed the arms:

    So Balambér has two arms now, even though he has a chest missing:

    Because of the four servos the new code a little bit more complex. Only a little bit:

    import time
    import pigpio
    import sys
    pi = pigpio.pi() 
    
    GPIONeckHor= 24
    NeckHorMin = 1100
    NeckHorMid = 1500
    NeckHorMax = 2100
    GPIONeckVer = 27
    NeckVerMin= 1900
    NeckVerMid = 2200
    NeckVerMax = 2300
    
    GPIORightHand = 22
    RightHandMin = 1000
    RightHandMid = 1050
    RightHandMax = 2000
    GPIOLeftHand = 23
    LeftHandMin = 1000
    LeftHandMid = 2000
    LeftHandMax = 2100
    
    
    speed = 0.005
    
    def shake(gpio,min,mid,max):
    	for x in xrange(mid, min, -10):
    		pi.set_servo_pulsewidth(gpio,x)	
    	  	time.sleep(speed)
    		pass
    	for x in xrange(min,max,10):
    		pi.set_servo_pulsewidth(gpio, x)	
    	  	time.sleep(speed)
    		pass
    	for x in xrange(max,mid,-10):
    		pi.set_servo_pulsewidth(gpio, x)	
    	  	time.sleep(speed)
    		pass
    	pass
    
    if len(sys.argv) > 1:
        command = sys.argv[1]
        if command == "-h" or command == "--help":
            print "Example: no, yes, right, left"
            sys.exit()
        #SET command
        elif command == "no":
            shake(GPIONeckHor,NeckHorMin,NeckHorMid,NeckHorMax)
        elif command == "yes":
            shake(GPIONeckVer,NeckVerMin,NeckVerMid,NeckVerMax)
        elif command == "right":
            shake(GPIORightHand,RightHandMin,RightHandMid,RightHandMax)
        elif command == "left":
        	pi.set_servo_pulsewidth(GPIONeckVer, NeckVerMid)	
            shake(GPIOLeftHand,LeftHandMin,LeftHandMid,LeftHandMax)
        else:
            error("Invalid command")
    else:
        print "Arguments needed"
    
    pi.set_servo_pulsewidth(GPIONeckVer, 0)
    pi.set_servo_pulsewidth(GPIONeckHor, 0)
    pi.set_servo_pulsewidth(GPIOLeftHand, 0)
    pi.set_servo_pulsewidth(GPIORightHand, 0)

    And a short video about the movement of Balambér:


  • Headbang - The second servo

    borazslo10/04/2016 at 21:46 0 comments

    With more 3D designing and printing, I put in work the second servo as well. Balambér is now able to say yes (shaking his head) or no (headbanging).

    This is the not-elaborated python code:

    import time
    import pigpio
    pi = pigpio.pi() 
    
    GPIOHor= 23
    HorMin = 1000
    HorMid = 1500
    HorMax = 2000
    GPIOVer = 24
    VerMin= 1800
    VerMid = 2200
    VerMax = 2300
    
    speed = 0.01
    pi.set_PWM_range(GPIOHor, 2500)
    pi.set_PWM_range(GPIOVer, 2500)
    
    pi.set_servo_pulsewidth(GPIOHor, 0)	
    pi.set_servo_pulsewidth(GPIOVer, 0)	
    
    def shake(gpio,min,mid,max):
    	for x in xrange(mid, min, -10):
    		pi.set_servo_pulsewidth(gpio,x)	
    	  	time.sleep(speed)
    		pass
    	for x in xrange(min,max,10):
    		pi.set_servo_pulsewidth(gpio, x)	
    	  	time.sleep(speed)
    		pass
    	for x in xrange(max,mid,-10):
    		pi.set_servo_pulsewidth(gpio, x)	
    	  	time.sleep(speed)
    		pass
    	pass
    
    shake(GPIOHor,HorMin,HorMid,HorMax)
    shake(GPIOHor,HorMin,HorMid,HorMax)
    shake(GPIOHor,HorMin,HorMid,HorMax)
    time.sleep(0.5)
    shake(GPIOVer,VerMin,VerMid,VerMax)
    shake(GPIOVer,VerMin,VerMid,VerMax)
    shake(GPIOVer,VerMin,VerMid,VerMax)
    time.sleep(1)
    
    pi.set_servo_pulsewidth(GPIOVer, 0)
    pi.set_servo_pulsewidth(GPIOHor, 0)

    And the video for those who has read this log:

  • Balambér's Neck and My First Servo Motors

    borazslo10/04/2016 at 12:15 0 comments

    My new SG90 Micro Servo motors have arrived, so I can begin to work.

    1. Mechanics

    I would like to make Balambér able to turn around his had. So I designed a small attachment that connects the SG90's "shaft' with the empty neck of Balambér. The small 3D printed part makes its job pretty well. (I will share the STL files later on.)

    2. Electronics

    The servos ask for PWM but the Raspberry Pi has only one (or two) of these outputs. So I use the "poor man's PWM": the PigPio.

    2 .1. Cables and connections

    The outputs of the Raspberry Pi is very week, so I feed the servo with 5V from external source. (Do not forget to connect your external source's ground to one of the Raspberry Pi's ground.) Then I connected the servo's PWM line (orange) to the RPi's GPIO 23 (pin 16). (Yes, you can choose any of the normal GPIO-s.)

    2. 2. Software

    I downloaded and installed the PigPio library as it was told on its website. Then I had to begin with:

    sudo pigpiod

    I made a very simple but working python example how to turn his head around.

    import time
    import pigpio
    
    GPIO = 23
    
    pi = pigpio.pi() 
    
    for x in xrange(50,250):
    	pi.set_servo_pulsewidth(GPIO, x * 10)	
      	time.sleep(0.2)
    	pass
    
    pi.set_servo_pulsewidth(GPIO, 0)

    Please send me a message if you find problems with this code.

    And now, let's work on the head-bang servo. :D

View all 6 project logs

Enjoy this project?

Share

Discussions

Similar Projects

Does this project spark your interest?

Become a member to follow this project and never miss any updates