 Tom Van den Bon
The HackMe Shield
So here is a basic overview of the HW HackMe shield. The main parts consist of two processors/microcontrollers connected by 9 datalines. Each processor is also connected with i2c lines. Hooked onto the i2c line we have a eeprom. Each processor also has 3 indicator led's.
Each of the grey dots (1) are testpoints where you can hook up your analyzing and testing equipment. Not shown on the diagram but each line can also be disconnected by removing jumpers.
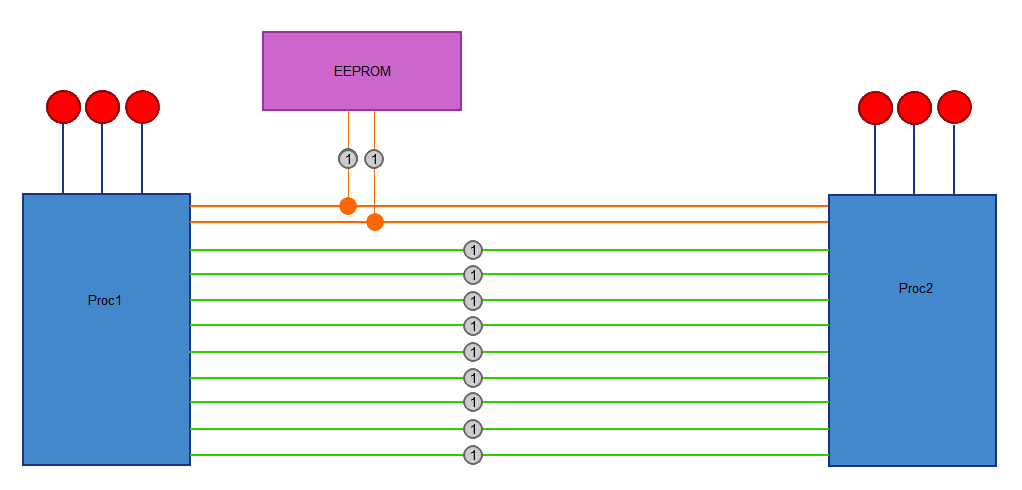
So, in it's simplest form we can now load a hackme scenario on the two processors (with data on the eeprom) and using the various test points reverse engineer the hardware.
For example, lets say the two processors are communicating with each other using an unknown protocol. We can now hookup a logic analyzer to the test points and try to figure it out (reverse engineering).
After reverse engineering the process we can now either move on to another scenario (using the same board) or maybe even take this scenario further by manipulating the data communication. By removing the jumpers between the processors we now have points to hookup our own tools and send false data to the real processor....
The eeprom adds another dimension because data can be stored on there which the processors need to communicate with each other. Using the test points on the i2c lines we can easily sniff the activity, dump the data for analyzing or even write our own data onto the eeprom.
Learned everything you need to know about this technique? Then just load another scenario to reverse engineer or to practice with.
So what about the nucleo board?
The diagram above is essentially the whole 'reverse me' hardware, but for each scenario you need to load onto there you would need to reprogram each of the microcontrollers and load data on the eeprom. It works, but is time consuming. We're here to learn new stuff not reflash the board over and over. This is where the nucleo board comes in. It has a single serial connection to your pc. It takes care of receiving all the scenario data from the pc app and setup the scenario on each microcontroller and load data on the eeprom chip. By making it a 1 time operation you can spend more time on the reverseme scenario :)
The reason for choosing the nucleo board is mostly because it's so cheap. It's available for between ~$10 depending on where you buy it. Incorporating all the parts onto the main shield would make it more expensive (especially on low qty).
Until next time :)
Discussions
Become a Hackaday.io Member
Create an account to leave a comment. Already have an account? Log In.