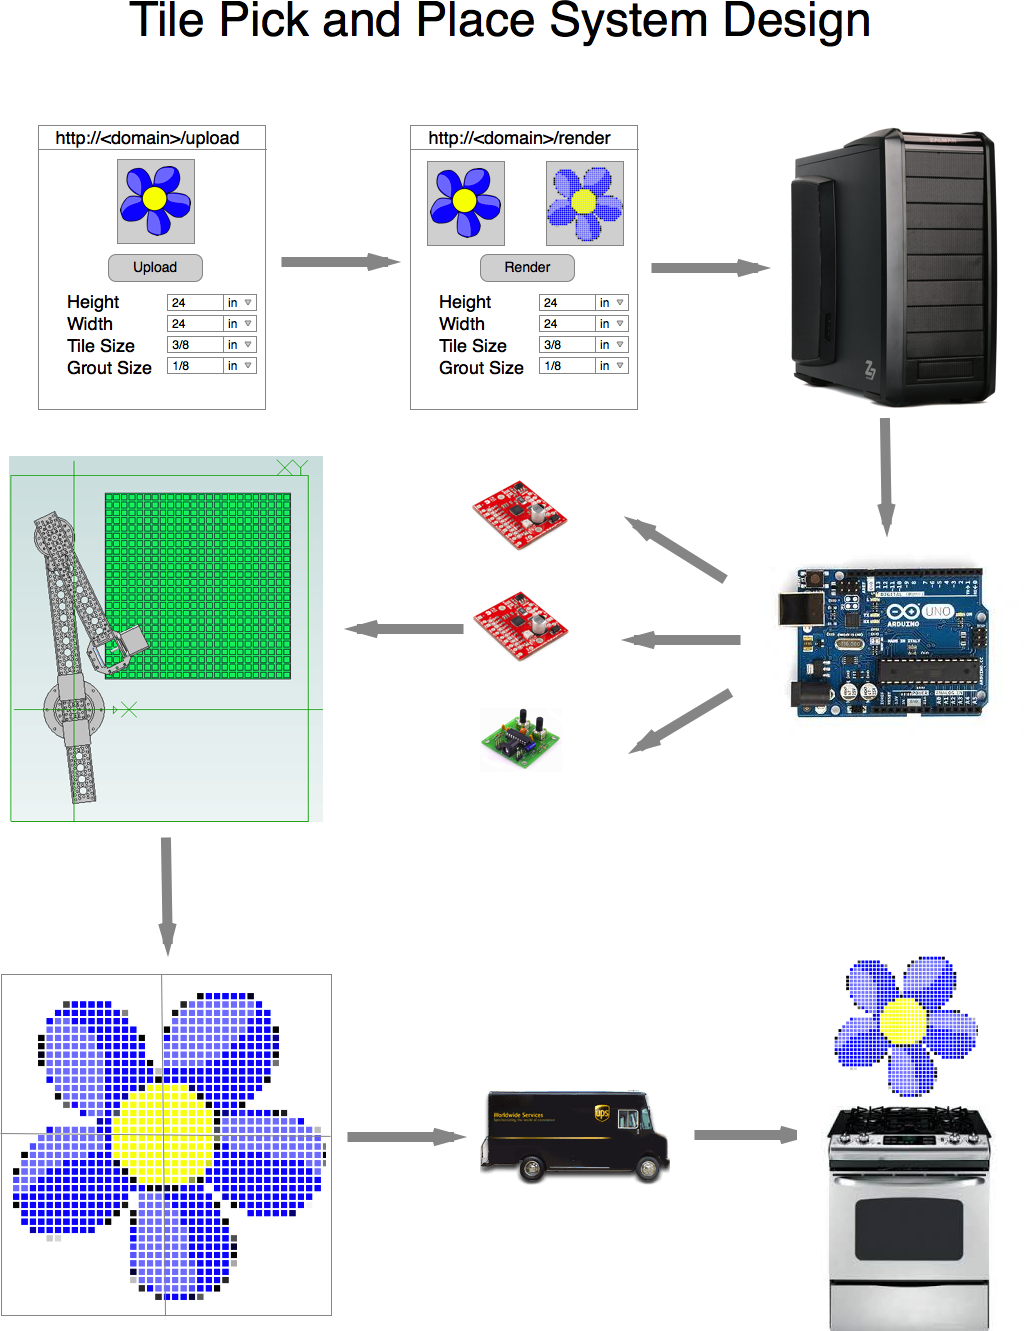
Close
0%
0%

Tile Pick and Place

Ever wanted to create your own mosaic patterns? While putting up a tile backsplash I said, I want a robot for this!

Similar projects worth following
Tiling is surprisingly fun and easy! I learned this while putting in a backsplash in the kitchen my wife uses for her cake decorating business. As I was putting up the tile I couldn't help but think how fun it would be to make a cnc pick and place to create mosaics rather than the random patters. I know that there is a company that uses a 6 axis robot arm to make high end mosaics but I figured this was something I could do myself.

This project has a lot of different parts and is pretty ambitious. Fortunately, it can also be tackled in bite size pieces. The major parts are:

1. Either a scara or gantry style cnc machine that will place the tiles properly.
2. A website for uploading an image and turning it into a mosaic
3. Using a sensor such as an Adafruit TCS34725 (http://www.adafruit.com/product/1334) or perhaps OpenCV to identify tiles and correct their orientation.
4. Optimizing tile sorting

System Design - 

  • A user uploads an image to a server
  • The user specifies the height, width, tile size, and grout line size and manipulates as necessary to get the image to look good tiled
  • An order is placed and the design is downloaded to a local server
  • The local server divides the image into 12" x 12"
  • The local server uses a camera mounted on a scara style arm and open cv to select a tile and place it in order to build up the image
  • An arduino with big easy stepper drivers and servo drivers moves the arm
  • A preview of the sheets is emailed to the customer
  • Accepted sheets are shipped out to the happy customer!

  • Part Selection

    jpcutler08/05/2014 at 04:13 0 comments

    I decided to try out the SCARA style arm. For whatever reason it's more interesting to me than the cartesian robot. All this planning was fun, but I really want to start making something! With that in mind I decided to order some parts from Sparkfun. My initial part list was quite long and came in over $400 which was a bit of a surprise. I don't mind spending that much money, but if I was going to do so I decided to do it in stages with each axis being a stage.

    The first stage would be the base and the first rotational axisas pictured below:

    Another great thing about using a program like Cubify is that if you leave an axis unconstrained it's super simple to make an animated GIF showing the motion. If you want to make one yourself checkout out LICEcap, it's really easy to use and is free. 

    I'm going to list the parts from bottom to top. If a part is repeated I'll list it twice but I'll mark the first one with the total count in parantheses. I made some mistakes along the way and I'll call them out as I go along.

    I haven't wired up the electronics yet, but I'm planning on using the Big Easy Driver. The motor I ordered may be larger and more accurate then I need, in which case I could use a smaller stepper motor and a quad driver board. I need to do more analysis, but first  I'm going to make it move!

    The biggest mistake I made when spec'ing out parts was with the gears. I initially ordered the 84 tooth gear and a 16 tooth pinion gear, when I put everything in place the gears were too close together. I would have saved a lot of aggravation if I had gone to the product page which clearly states about a third of the way down that if you want to have a 1.5" spacing the total number of gear teeth must equal 96. I was able to order the 80 tooth gear from ServoCity and they delivered it in 3 days via USPS Priority Mail.  The rest of the parts were ordered from Sparkfun and shipped via UPS Ground which took 5 days. Personally I hate dealing with UPS, but it's the only way to get an insured package from Sparkfun for a decent price.  

    Some of the part choices were made solely on the basis of availability. At any particular moment Sparkfun seems to be sold out of various Actobotic parts. ServoCity seems to have similar issues but since they sell the parts to Sparkfun they seem to get things in faster. I'd imagine that I will probably end up getting more stuff from ServoCity directly in the future due to the more agreeable shipping terms/speed. I wish Adafruit carried the Actobotics parts because if you get an order in early enough they get it to me the next day even by their cheapest shipping option.

    You'll notice an extra spacer in the imagebelow between the top of the 3.75" channel and the 80 tooth gear. I probably won't be using that since everything fits together fine without it. Not pictured is the shaft coupler, the shaft, and the pinion gear.

  • Design Software

    jpcutler06/23/2014 at 20:42 0 comments

    My first job out of college was with Parametric Technologies (PTC) the company that makes Pro/Engineer. At the time Pro/E was the number one CAD software and I felt it was very easy to use.  I worked for PTC for 4 years in various roles and did a lot with their modeling package called Mechanica. After finishing up there I've worked in the software industry for the most part, including a stint as a robot programmer. Pro/E is very expensive, but it's also really powerful, I really missed it's capabilities.

    As part of a consulting gig I got to use Alibre Design which has since become Geomagic Design. It had all the power and usability of Pro/E at less than a tenth of the cost. At the time (2007) I believe I was able to get a full license for $599. When I started this project I decided to see what was available for a hobbyist class package so I tried out Sketchup, 123 Design, and FreeCAD. It's really easy to do simple stuff in Sketchup and 123 Design, but doing assemblies and motion analysis just wasn't easy or intuitive. After using a parametric modeler like Alibre going back to solids based manipulation feels unintuitive. I like being able to quickly and easily define a model that can be changed on the fly. FreeCAD is a decent attempt at a parametric modeler, but it is very buggy. I figured with how much time I'd waste working around it's bugs I might be better off paying for something.

    I tried out Pro/E Creo and I was very saddened to discover that in an attempt to make things easier for new users they had made it unintuitive for people familiar with Pro/E.  I'm sure that it demos really well, but I don't want to be held back by the UI and I just couldn't get a hang of it.  After a couple of hours banging my head against the wall I decided to try out Geomagic Design which turned out to be a real eye opener. I had models going in minutes and was doing reach studies with the SCARA style arm prototype that first day.

    Awesome. 

    Damn, they don't list the price. After the 15 day trial was up I contacted sales and was quoted a number North of $1000. It was tempting, but not that tempting. I spoke with the salesperson for a bit and he recommended I take a look at Cubify which it turns out is Geomagic Design and I was able to get a license for $199. Still seems like a lot, but I have been so much more productive since I've been using it that I really feel like it's worth the money. 

    I recommend downloading the trial and giving it a try. It's amazing how productive you will be.

  • SCARA Style

    jpcutler06/22/2014 at 16:47 0 comments

    For the first iteration of this project I've got a fundamental decision regarding the frame of the machine. I've gone through a few designs and looked at some material choices. The working envelope of the robot needs to be a few inches larger than 12"x12" since that's the size tile sheet I want to make. I'll need an area for the robot to pick up the tiles as well. I haven't decided yet whether I want to just have a field of tiles to pick from or preload tubes of tiles. Presorted tiles would allow for the fastest system but I'd either have to build another system for doing the sorting or do it by hand. Personally I think I'd like the robot to do the sorting for mark 1.

    The first thing that came to mind is a SCARA robot for a couple of reasons, they're generally fast, accurate, and there aren't a lot of DIY versions out there. The software for a SCARA robot is generally more complicated, but there are open source packages out there that can handle it. I definitely feel an attraction to the idea of doing something that not a lot of makers have done, but the practical reality is that I also have a limited amount of time and I really want to see this project completed. From a back of the envelope perspective the cost of materials for a SCARA arm should be less than a gantry style robot, but that's really back of the envelope and I'm sure that there are a lot of unknowns. 

    SCARA Arm Maximum Reach

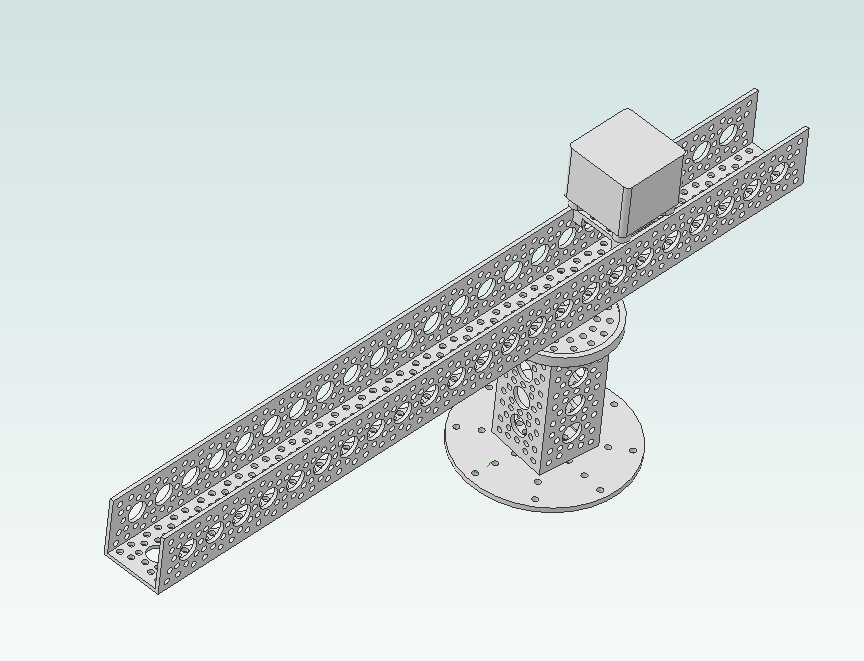
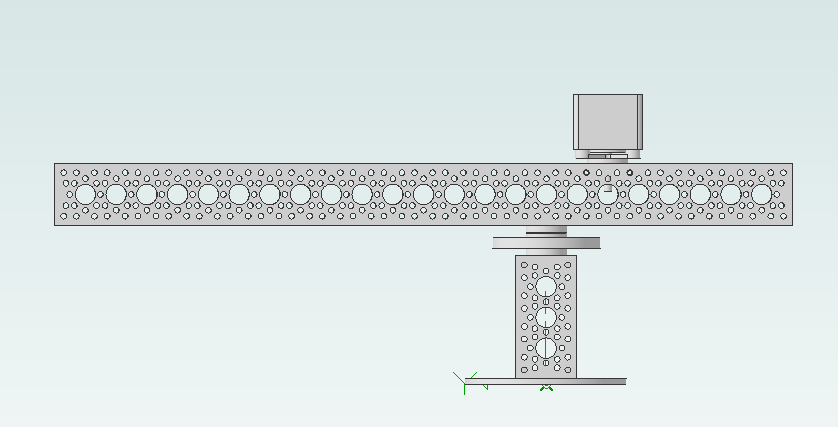
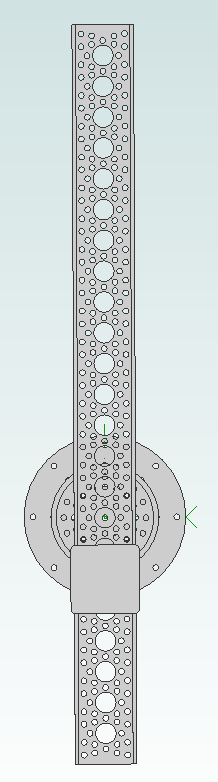
    SCARA Arm Minimum Reach

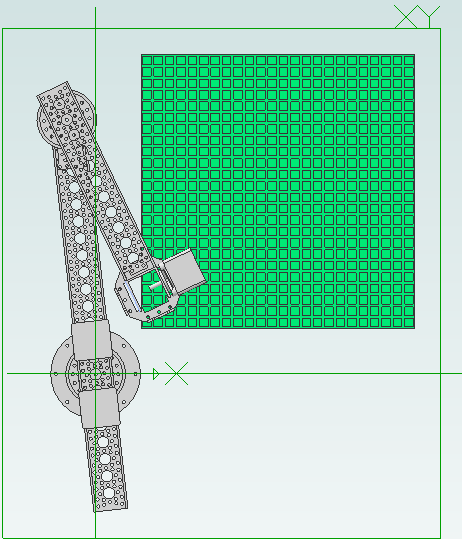
    As you can see in the minimum reach image I need to make the second arm longer in order to get the last few tiles into place. One of the really nice things about using a SCARA robot is that I would essentially have 4 quadrants to work in. This means that I could either do a few fields of source tiles and a few sheets at once or any combination thereof. I'm concerned that the arms may not be stiff enough, especially since I haven't defined the end connector yet.

    You'll notice that this arm is using some off the shelf parts from Actobotics (Servocity and Sparkfun) for this design. 

  • Prototyping Tile Selection in Processing

    jpcutler06/21/2014 at 04:14 0 comments

    I'm a Ruby programmer by day so it's highly likely that the processing of images will eventually end up occurring in that type of environment (or perhaps Python). To get started however I decided to whip something up quick in Processing since I've got a little bit of experience doing some image processing from a project I did a few years ago. 

    Obviously tiles are a relatively low resolution 'pixel'. If I were to use 3/8" tiles with no grout spacing a 640 x 480 image would be 20 x 15 feet and would use 307,200 tiles! So the first task is to reduce the resolution of the image. Processing provides a bunch of functions for manipulating images, however if we want to manipulate individual pixels we need to know how to reference each pixel.

    Processing stores images as a one dimensional array of Red Green Blue and Alpha (transparency) values. Since you know the width of the image you know where the second row starts by adding the width of the image to 0. The third row starts at 3 times the width, etc...

    To reduce the image size I'll need to know the height and width of the space to be filled, then I'll figure out which dimension constrains the size of mosaic. From these pieces of information, as well as the size of the tile and grout lines I can calculate how many pixels will represent one tile. Then I can average the RGB values of those pixels and reduce the image to a series of tiles. I'll cover that in my next post.

View all 4 project logs

Enjoy this project?

Share

Discussions

Adam Fabio wrote 06/23/2014 at 04:14 point
Now this is neat - Thanks for submitting your Tile placing robot to The Hackaday Prize! I love the modular design you're using. Do you think your 'bot could be scaled up to do things like a mosaic floor?
Don't forget to keep updating as you move along with your project - the more information the better!

  Are you sure? yes | no

jpcutler wrote 06/23/2014 at 13:58 point
Right now I'm just going to do 12" x 12" sheets on a sticky backing which would be manually placed. One could certainly make a floor from a bunch of those though!

It would be interesting to make a robot that would place the tile on location as well.

  Are you sure? yes | no

Similar Projects

Does this project spark your interest?

Become a member to follow this project and never miss any updates