Close
0%
0%

Software Defined Lighting

Configure your light switches with Bluetooth LE

Similar projects worth following

Is it your dream, when you walk into a dark room, to whip out your cell phone, unlock it, open an app, and press a button to turn on your lights? No, it’s not mine either. The standard “switch on a wall” interface that’s been around for 100 years is good enough for me (although, I’m not a millennial, who knows what they want). On the other hand, would you like to move a switched lamp in your room without having to run an extension cord to the hard wired switched outlet? Would you like to create a three way (or 4 way, or N-way) switching arrangement without having to run new wires in your walls? Would you like to switch your outside outlet with your porch light switch for 1 month out of the year, to operate your Christmas lights, at the same time configuring a light timer from your computing device? How about a master switch beside your bed that turns out all the lights before you go to sleep? If like me, you answer yes to these questions, you are looking for Software Defined Lighting.

I have a few requirements for my system.

  1. It must be resilient. That means no single points of failure. While I really can’t get around requiring the electricity in the house be running, the system must run even if you’ve lost your Internet connection, Wi-Fi router, or IOT Hub.
  2. It must work on low power. It’d be nice to be able to stick a new light switch anywhere on the wall that runs a year on a coin cell.
  3. It must be simple to configure. The app that configures the lighting must be intuitive enough that you don’t have to have a degree in engineering to layout the system.
  4. It must be secure. You don’t want the Russians, Chinese, or NSA messing with your lights.

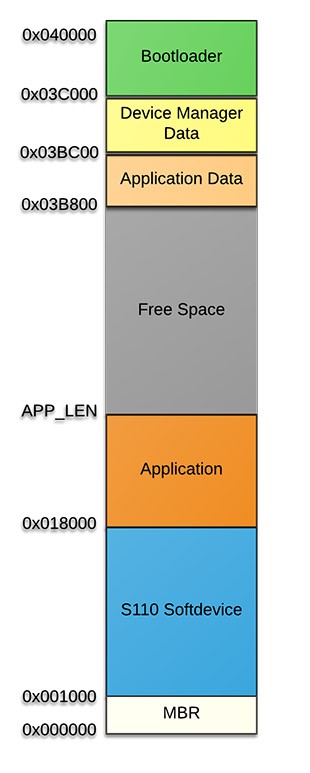
After considering these requirements, I decided the technology basis for this system will be Bluetooth LE Mesh networking. The problem? The specification for Mesh Networking hasn’t been released yet, and while it is supposed to be released sometime in 2016, I don’t think I will get an official implementation of Bluetooth Mesh usable by a mere hobbyist anytime soon. Luckily, Nordic Semiconductor has an implementation of Bluetooth Mesh on Github, and there are cheap Bluetooth Modules based on their NRF5 series of Bluetooth SOCs available from the usual sources.

This project will track my adventures in using Bluetooth Mesh technology to control my lights.

MeshSwitch.gif

Proof Of Concept Animated GIF

Graphics Interchange Format - 12.24 MB - 10/06/2016 at 02:46

Preview
Download

  • Hacking the Etekcity Zap

    Kevin Kessler03/23/2017 at 05:08 0 comments

    I ran across these radio power outlet controllers and I've decided to hack to make them bluetooth controlled. This blog entry, https://blog.kkessler.com/2017/03/23/transformerless-power-supply-characterization/, describes my analysis of the power supply of these devices.

  • Memory Map

    Kevin Kessler12/12/2016 at 03:31 0 comments

    I made this memory map to help me keep straight where things are loaded in memory.

  • DFU Complete

    Kevin Kessler12/12/2016 at 02:38 0 comments

    The master branch of my firmware now has fully functioning bootloader code, which uses the Nordic nRF Connect app to flash the firmware. The configuration flash storage now also uses the pstorage module, and the device manager allows storage of bonding information. Unfortunately, while pstorage and the device manager were current in the SDK version 9 that the rbc_mesh requires, they are both deprecated in SDK12, which means once I can move up to the newest SDK, all that code will have to be replaced.

    I also created a new repository, sdl-bootloader. This is required because the bootloader had to be recompiled with a setting to keep the configuration information stored in flash from being overwritten when new firmware is loaded. The #define, DFU_APP_DATA_RESERVED, is configured in dfu_types.h. I also removed a lot of the evaluation board specific buttons and leds from the bootloader code that I did not need.

  • "FU" DFU

    Kevin Kessler12/09/2016 at 18:09 0 comments

    My approach to this project is really to follow the "agile" methodology of a lot of little incremental firmware update, each adding a little more functionality. In order to do that, I really need to create some hardware, install it in a real location, and be able to update the firmware easily, ideally without having to tear apart where ever the device is located to access a programming header. The simple solution, of course, is Over The Air updates. When I was working with the ESP8266, a gentleman named Richard Burton created a nice bootloader, and it was easy to implement. You'd think with a big company Nordic Semi would have an easier implementation of Device Firmware Update, but you'd be wrong.

    To be fair to Nordic Semi, the fact that the OpenMesh project forces me to use an old SDK (V 9.0 instead of the current v12) doesn't help matters, but the highly fragmented and complexly interrelated SDK is the root of the issue. Now the nrfOpenMesh project is actively working on DFU through the mesh, but it is unclear to me how you actually would use it. It seems their driving use case is a mesh member is connected to a computer through a serial port, and then, in some unclear fashion, propagate through the mesh updating all the other devices. I can't really follow how the updates are controlled. My main use case is just to update the firmware though BLE, and if I have to go to each individual device to do it, no big deal at this point, so I can safely ignore the mesh update. The DFU examples in the Nordic SDK do just this, so I decided that is the direction I would head.

    It turns out that the Nordic SDK bootloader requires the Device Manager (which handles bonding information) that in turn requires the pstorage library, which changed how I store configuration information, and the pc-nrfutils tools current release is designed for the V12 SDK which supports signed firmware, so I had to checkout older releases of that utility to support my SDK, and so on and so forth down many rabbit holes of complexity I did not want to address at this point of my project. I've reached the point now, though, where I can successfully update the firmware, in somewhat of a kludgy fashion, so I have some hope. Right now, I need to connect to the device and start a DFU, the device restarts in DFU mode and the firmware update fails, but the device stays in the bootloader mode. I then reconnect to the device in bootloader mode, and I can flash it successfully. This is caused by connection information not being properly passed between the application and bootloader through the restart. The new firmware also wipes out the configuration of the device (the value handle which the switches and outlets communicate on), because the bootloader is not compiled to ignore these flash pages. I think both of these issues are solvable, and I think I might be getting close to building something that starts to do something useful.

  • ESP8266 Firmware

    Kevin Kessler11/02/2016 at 04:28 0 comments

    I haven't put the firmware on Github for the ESP8266 in the Sonoff device, because it is just slapped together to get the project started. When I really start to work on the full featured ESP8266, I will put it up on Github, but for now, here is the firmware for reference:

    #include <user_config.h>
    #include <SmingCore/SmingCore.h>
    
    #define RELAY_PIN 12 // GPIO12
    
    Timer procTimer;
    bool state = true;
    
    void onSerialDataCallback(Stream& stream, char c, unsigned short charCount)
    {
    	Serial.print("0x");
    	Serial.print(String(c,HEX));
    	Serial.print(" ");
    	Serial.print(charCount);
    
    	while(stream.available())
    	{
    		char cmd=stream.read();
    		if(cmd == 'N')
    			digitalWrite(RELAY_PIN,true);
    
    		if(cmd == 'F')
    			digitalWrite(RELAY_PIN,false);
    	}
    
    }
    
    void init()
    {
    	Serial.begin(115200);
    	pinMode(RELAY_PIN, OUTPUT);
    	Serial.setCallback(onSerialDataCallback,true);
    }
    

  • Firmware on Github

    Kevin Kessler11/01/2016 at 03:37 0 comments

    I've put the current state of the firmware on on Github at https://github.com/kevinkessler/sdl-nrf51. The same firmware is loaded on any type of device, and jumpers on the GPIOs P00-P02 will select the device type. I only have 2 device types now; the SWITCH and POWER_WITH_IP, which is the interface with the Sonoff device. I plan to also support a momentary contact BUTTON (to work as a power toggle, or a master power off), and a POWER relay that doesn't use the Sonoff and its IP connectivity. Reading the GPIOs occur in sdl_config.c and the results are used to initialize the device either in sdl_switch.c or sdl_power_with_ip.c.

    The connectivity between all device is handled by the nRF OpenMesh project from Nordic Semiconductor. The mesh software uses Bluetooth LE advertisements to synchronize mesh values of up to 23 bytes in length. There can be up to 65535 values addressed through an unsigned integer called the value handle. Currently the SWITCH firmware write a 0 or 1 to the mesh value, and the POWER_WITH_IP Sonoff gets the mesh value change event and switches the Sonoff power by sending it a uart serial character. This will probably become more complicated as I code in support for 3 way switching and other functionality.

    The sdl_service.c file creates a Bluetooth LE service with a characteristic used to set the value handle the SWITCH and POWER_WITH_IP will use to communicate. Nordics nRF Connect software, available here, is used to poke the value handles into the configuration. nRF Connect is free, and well worth playing around with just to get a feel for how BLE works. The value handle configured in the SWITCH and the POWER_WITH_IP must match in order for them to work together, and configuring which switches and power relays talk to each other will just be a matter of having that group of devices listening to the same value handle. The configured value handles are saved to flash in the sdl_config.c file.

    I learned two important things when writing this code:

    The Nordic SDK is very event driven, and these event handler by default run inside interrupt handlers. I learned that this is very problematic when it came to writing to flash, because, like every microcontroller I've used, writing to flash is slow, so you must wait for the first flash operation to finish (the erase), before you can start the second (writing the new value). The signals that occur when the flash operations are complete are interrupt driven, so if you are executing flash operations inside an interrupt (the characteristic value changed event in my case), the flash operation interrupt event handler never runs since interrupts are disabled inside the original interrupt handler. The solution to this is to run the application code outside of the interrupt handlers, in what is called the application context. The mesh software does this in a loop in main, where execution waits for some event to occur with sd_app_evt_wait(), and the loop wakes up on any event triggered in the system. The code checks to see if it was a mesh event, and if so, dispatches it for processing. Nordic has a generalized version of this called the Scheduler. The event generating subsystems are configured to use the scheduler, and when sd_app_evt_wait() wakes up, app_sched_execute() dispatches to the event handlers executing in the application context. At this point, the interrupts required for the flash operations work.

    I had been using an ST-LINK v2 programmer and openocd to flash the devices, but I ended up buying a Segger J-Link EDU version ($60), because they support RTT debugging. RTT allow printfs to a debug viewer, and is easier to deal with than the alternative of using a serial to USB device and sending the debug output to serial. The problem I've found is RTT works in every case, except when I start to use the uart. When I send a couple of bytes the the uart, RTT stops, although the device continues to function (I can still turn on and off the light). I submitted a questions to the Nordic...

    Read more »

  • The Proof Of Concept

    Kevin Kessler10/06/2016 at 15:54 0 comments

    When I started going down the path of automating my lighting, I came across the Itead Sonoff Wi-Fi Smart Switch, a very inexpensive mains switch operated by an ESP8266. The supplied app was one of those "call out to a server on the internet to turn on your lights" ones I had no interest in, but a blogger, Peter Scargill, showed how easy it was to re-flash the firmware because the serial pins are broken out to pin holes on the PCB. I whipped up some firmware that would respond to serial commands to turn off and on the mains switch (Wi-Fi is not even active in this incarnation of the ESP8266 firmware). An NRF51822 module is then connected to the serial and power pins of the Sonoff Switch. The NRF51822 is flashed with a slightly modified BLE_Gateway example from the nRF OpenMesh repository, which sends those serial commands to the ESP8266 in response to a value change in the mesh.

    On the other side, another NRF51822 modules is flashed with modifications to the BLE_Gateway, which change that mesh value in response to a switch. The result can be seen below.


    After proving out this functionality, the rest of this project is basically software. A lot of software.

    The inclusion of the ESP8266 based Sonoff gives the possibility of a bridge between the Bluetooth Mesh, and IP based services. While this bridge opens up another attack surface that must be secured and adds a configuration headache, it gives the possibility of added functionality. Through this bridge you could be alerted if your lights are going on and off while you are out of town on vacation.

View all 7 project logs

Enjoy this project?

Share

Discussions

Similar Projects

Does this project spark your interest?

Become a member to follow this project and never miss any updates