I use Microchip 8-bit MCUs in many of my projects and have always found accommodating ICSP (In Circuit Serial Programming - Microchip's method of loading firmware once the MCU is installed) a hassle. The standard .100" pitch header takes up a ton of room (or even the RJ11 Microchip recommends) but, if you don't install some sort of connector then your stuck clipping probes to the pins. That gets old quick and may not be practical with some SMD packages.
Then there's the need to debug and perhaps manually step thru parts of the operation to figure out what's going on. Sure, the debugger is sometimes necessary but most often the more difficult problems are how the MCU is interacting with the circuit. If only there was a console to issue simple commands and display data & peripheral status.
This is what BTCON enables and is silly-simple and solves two problems. It uses Microchip's RN4677 Bluetooth module to provide an RS232 connection that can be accessed from any terminal emulator on Linux/MAC/Windows that can communicate via Bluetooth SPP. It connects to the MCU in your project using a USB Micro-A/B jack which is in turn wired to Vdd & GND and the MCU's ICSPDAT, CLK, and Vpp pins. So you not only get a console that plugs into your project, you also get a compact method for connecting your PICKIT without taking up much room. The connector is pinned to the USB standard for power & ground so chances are that no damage would be inflicted if some other USB device were plugged in.
This approach only requires the dedication of three pins on the MCU and the associated space on the PCB to accommodate the traces & USB jack. I've found it indispensable, particularly on complex projects. I am even incorporating it as a 'service port' on some of my finished projects.
The pictures show BTCON assembled in it's case & open as well as a separate cable that adapts the PICKIT 6-pin .100" pitch header to USB. Also included is a picture showing the USB connector mounted near the MCU in a working design.
Only a handful of parts are necessary to build the dongle. BTCON expects to get +5V from the USB connection and includes an onboard 3.3V LDO. The RN4677 does include a 3.3V LDO but only accepts a maximum input voltage of 4.3V. You'll also notice a voltage divider (R1, R2) on the BT module's Rx pin to keep voltages <3.3V; this assumes the MCU is using 5V.
The RN4677 can be used as-is from the factory but there are a few settings which should be changed to make connection management easier (service & broadcast names) - those are covered in the instructions. I leave the baud rate at the factory default of 115.2Kbps which means this is the baud rate that must be used with MCUs as well.
You may have difficultly obtaining the RN4677 since Microchip recently marked it for end of life and I think they're recommending the RN4678 for new designs. I haven't looked that closely at it for pin compatibility but I believe the major change is support for BLE 4.2.
End of life for the RN4677 may not be a bad thing since it has some quirks and the documentation needs improvement.
- The documentation for the RN4677 says HW flow control can be enabled / disabled; it cannot and is always on. That's why BTCON has the RTS & CTS lines connected.
- It will not allow a connection if it doesn't see valid electrical states on the RX & TX pins when it boots. This shouldn't be a problem for BTCON since it derives its power from the unit it's plugged in to. But, be aware that if you power-up an RN4677 and the RX/TX lines are open you won't see BT advertisements or be able to connect to it (even if you have its address). I've found this to be true even when subsequently connecting the pins.
- The RN4677 will lock up if left running for >2 days without a connection. This happens even if there are periodic...

 hesam.moshiri
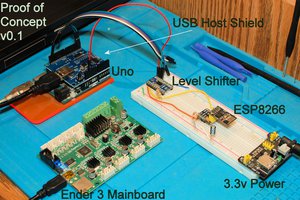
 Robert
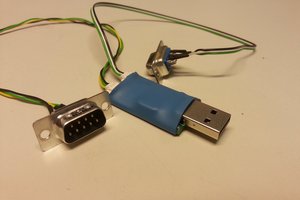
 Łukasz Przeniosło
 Anton Khrustalev