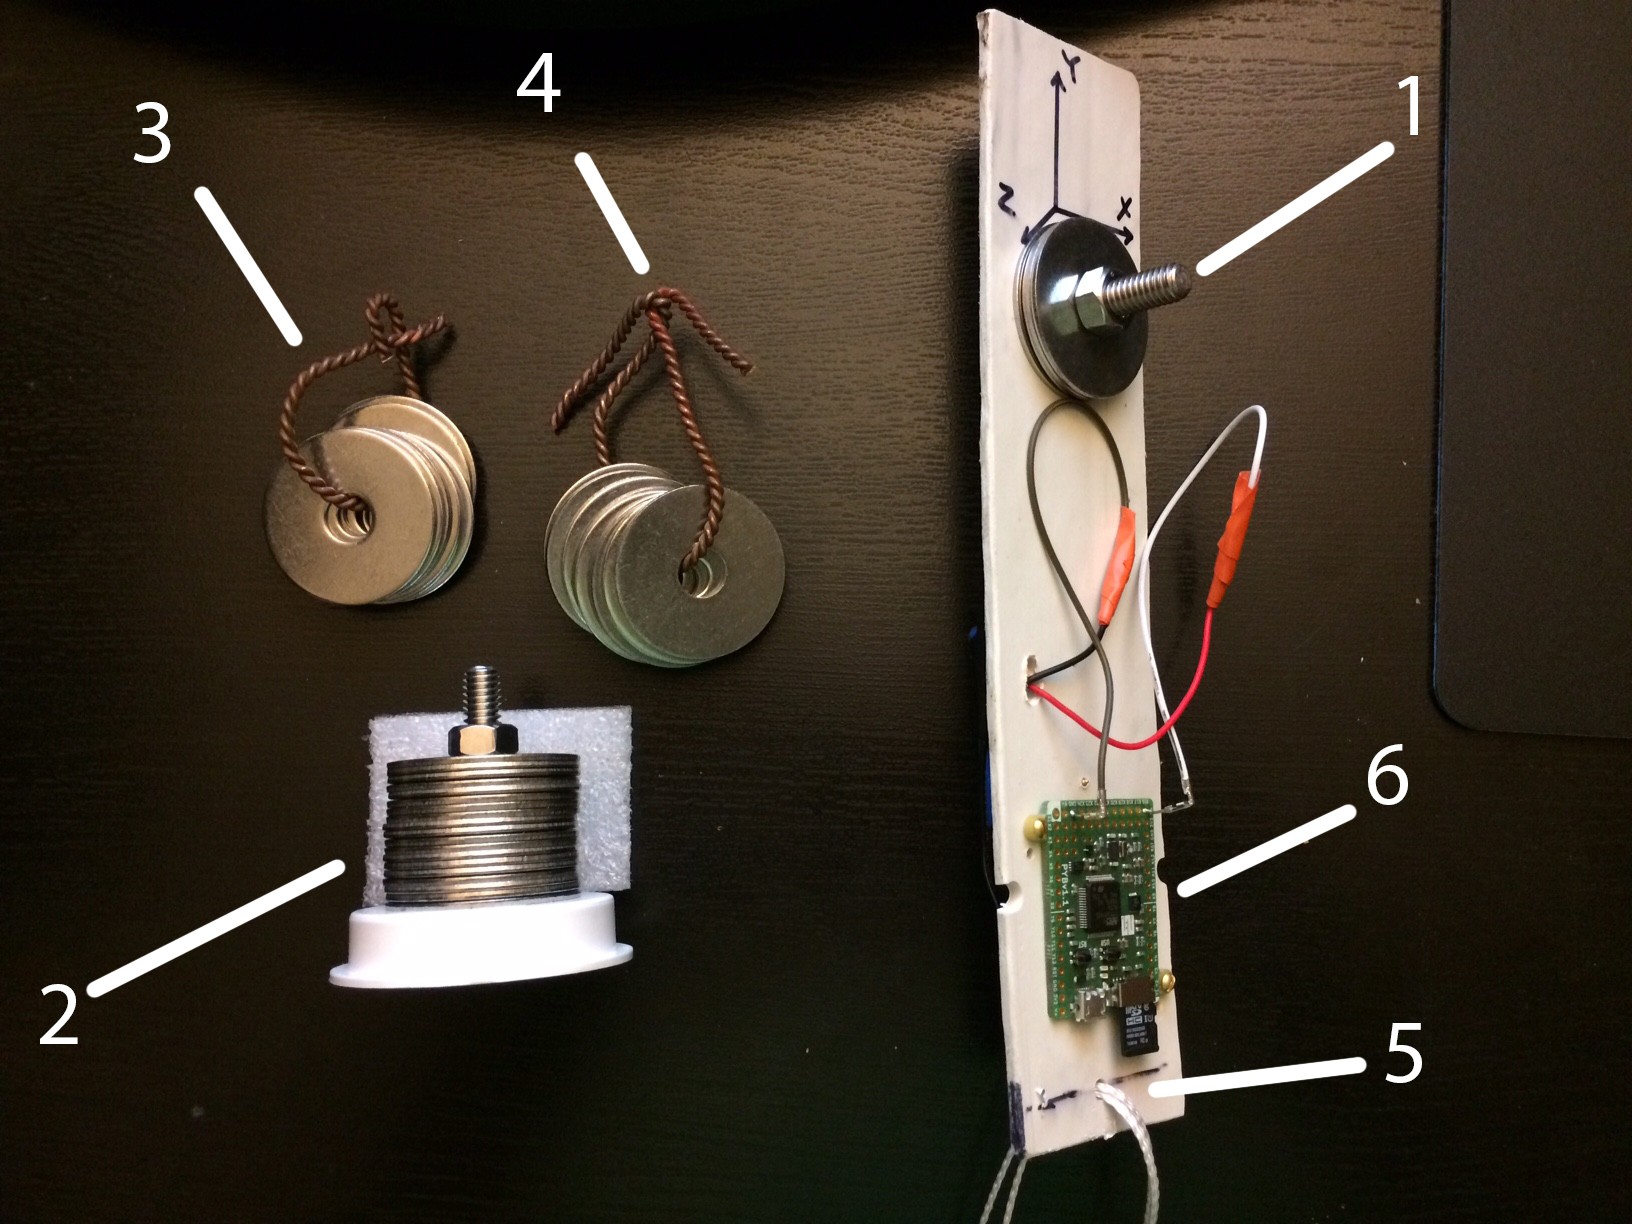
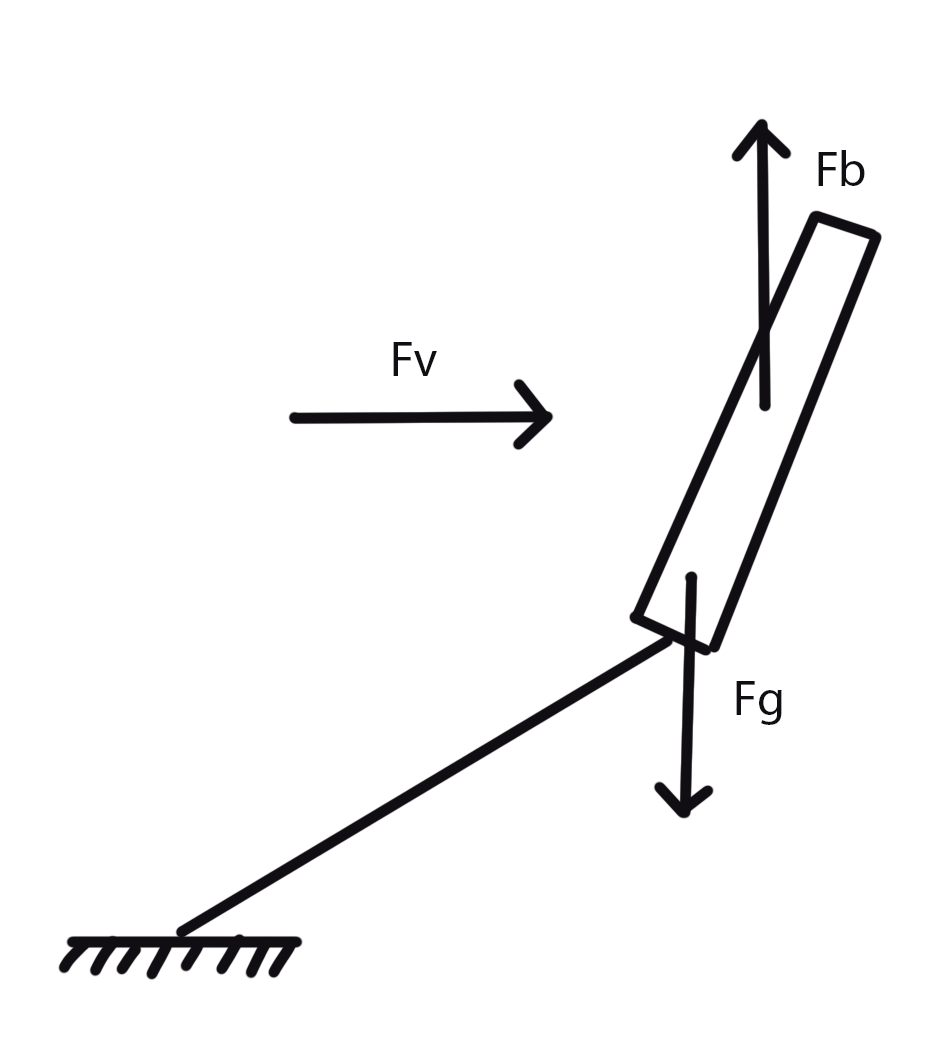
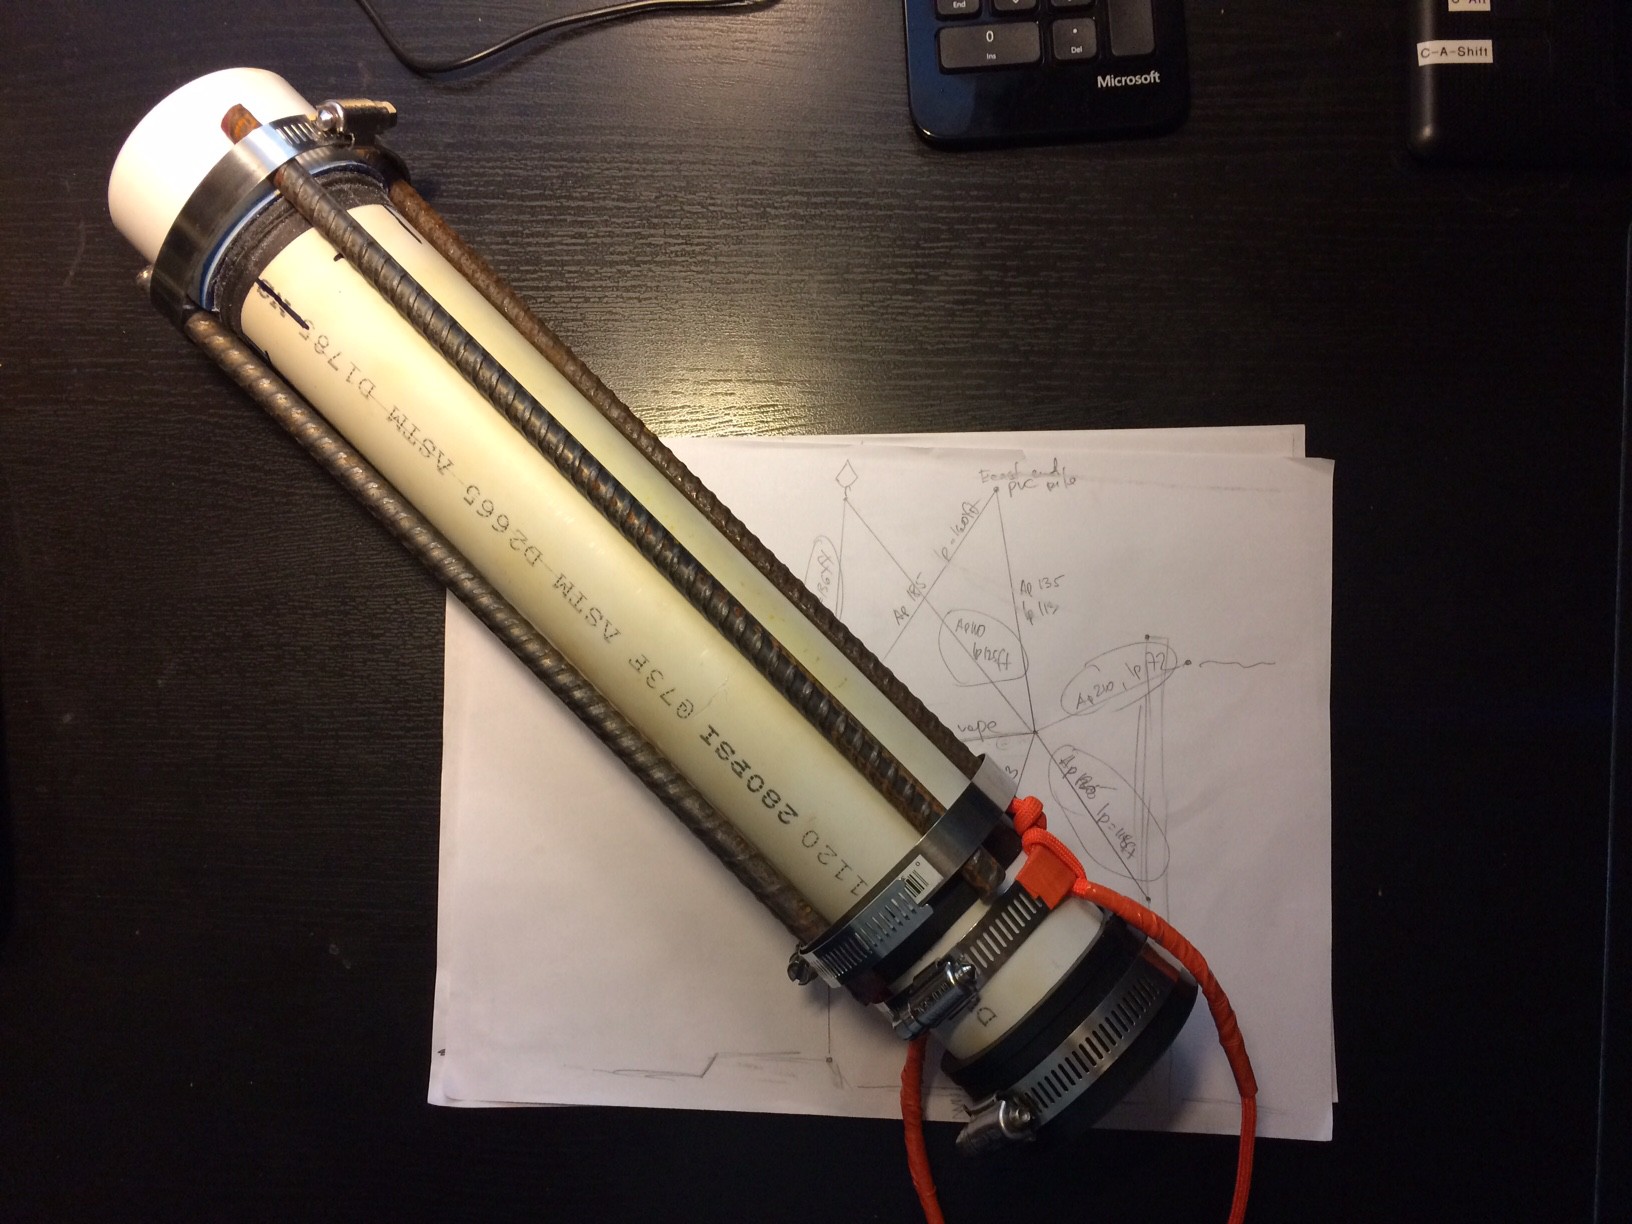
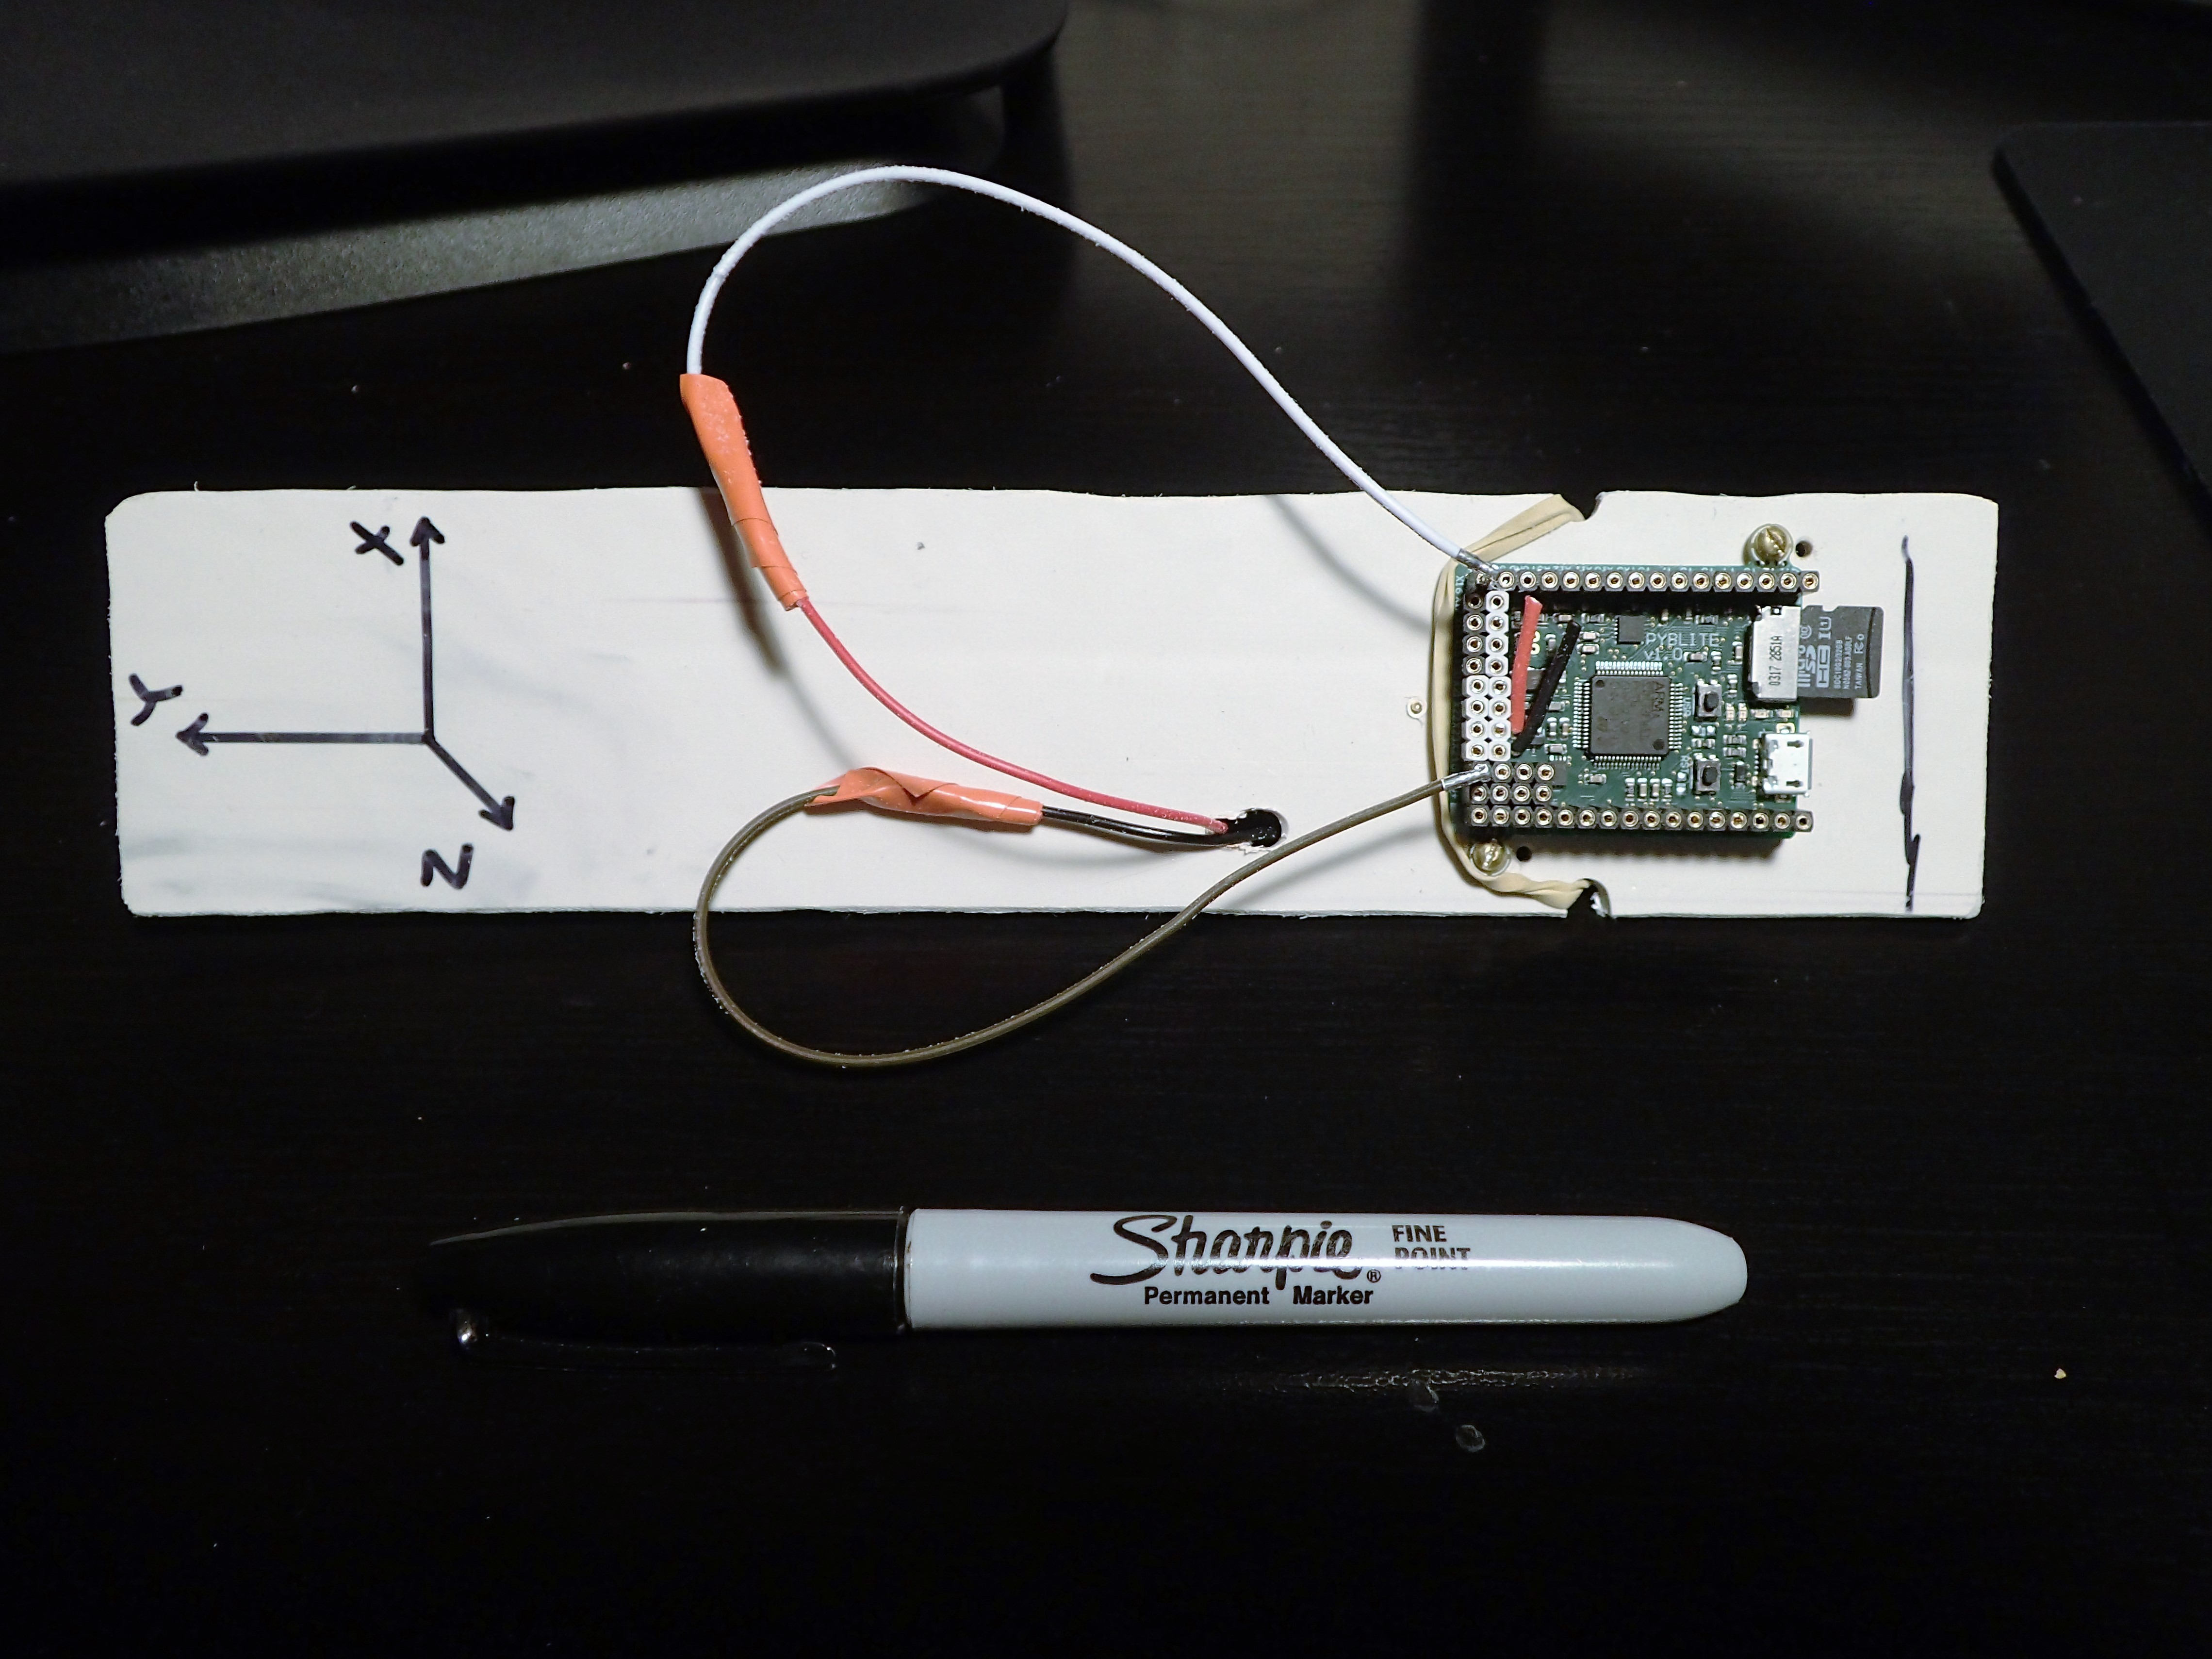
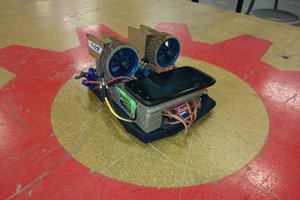
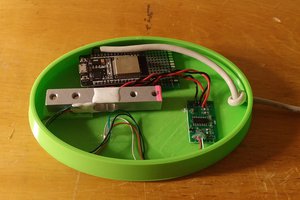
• More data!

    Max Kviatkouski12/24/2018 at 02:40 0 comments

    It's been a while since my last update here. A few reasons. First I wasn't diving that much in September (got sick) and then later I got busy setting up twin tanks for myself and my fiancee so we can dive longer. Here's what happened since my last update:

    • I've tried to reach out to NOAA (National Oceanic and Atmospheric Administration in US) in Seattle asking to help me scale my meter in knots. No luck. Some people replied saying that they are not the right people :) I'll try again later.
    • I've made an underwater sleigh with some weight on it. The idea was to tie my meter to that sleigh, and drag the sleigh using my 300ft measurement tape at different pace. Instead of making water moving around the meter I would make the meter move through the water. I could easily measure distance and travel time. In theory it would work well. In practice it didn't. Here's what went wrong:
      • It's hard to find a patch of ideally flat unobstructed bottom. Incline made my sleigh go sideways. Kelp and other obstacles wouldn't let me to pull sleigh smoothly and at a very consistent pace.
      • Even though sleigh with buoy would weigh only 1-2lb underwater it wasn't very easy to stay put underwater while pulling tape.
      • I think in ideal conditions this idea is ok but in my circumstances I need to find a way to improve implementation significantly to make it work
    • I've had the buoy deployed for two weeks but bug in my logging firmware wouldn't put circuit board to sleep so battery lasted only a day and a half.
    • After fixing firmware I had my meter underwater for a week with following settings: every 30sec capture 2sec at 10Hz. With proper standby mode it seems that I can have a month of logging on my 2500mAh 18650 battery.

    Below is one of observed days data:

    Full week of observations can be found at http://mukilteo.pnwdiving.org/ (Dec-15 - Dec-22 2018)

    My plan and next steps:

    • Check if reducing interval between captures from 30sec to 1 or 2 minutes will change picture or not.
    • Update log processing scripts to make them more robust, testable and structured. So far it's just a bunch of scripts that read one set of files and write result into some other files. 
    • Continue capturing data.
    • Try again to scale meter in knots.
    • After a few months worth of data try to run some regression to possibly figure out good enough prediction model.

  • Failed attempt to weight buoy properly. Trying differently this time.

    Max Kviatkouski08/15/2018 at 06:03 0 comments

    First weight system to make buoy less buoyant was captured in https://hackaday.io/project/158083-cheap-underwater-tilt-current-sensor/log/150221-my-concerns-regarding-weighting-the-buoy-properly.

    That system had following advantages in my opinion:

    • Cheap
    • Robust

    Disadvantages:

    • It didn't work :) (more about it below)
    • Cannot fine-tune weight
    • A bit difficult to mount
    • Lack of radial balance far from central axis of the buoy can create rotational moment
    • Poking rods might catch kelp which will increase buoy drag (in summertime it is quite common that moderately sized pieces of kelp and see weeds are carried by current).

    Four rebars were too heavy. So I decided to upgrade system a little bit and leave two rebars and add two stainless steel bolts in the upper part of the buoy to allow addition of washers. I cannot mount anything co-axial to the buoy since bottom is rubber cap and top is - PVC cap and my attempts to glue some PVC nut to it with PVC cement or superglue failed. If I drill it, I'll have to deal with sealing it nicely (which I'm trying to avoid as much as possible).

    Long story short - that didn't work either. Too much weight on top of the buoy and my buoy was going upside down. But during my attempt to weight the buoy for the second time I got following valuable observations:

    • Approximate weight I need to make my buoy neutral is around 487g (±11g - weight of one washer)
    • Vinyl tape I used to protect tethering rope from wear and tear is rigid enough to affect buoy position. If buoy was more massive and more buoyant it wouldn't matter probably. Had to remove it.

    Also I've attempted to pull my buoy attached to 5lb dumbbell disk (acting as an anchor) and it turned out it is really hard to do it. My plastic measurement tape frame doesn't seem to take that kind of load really well. On top of that I had to hold onto something with my legs to stay in place. So next time I'll do following:

    • Make simple sleigh out of PVC (because bottom inclined and I'd like my buoy stay at the same depth and follow direction of the pull instead of sliding down the hill)
    • Put around 2lb on that sleigh
    • Add fixed mount points for the buoy and for measurement tape.

    Now, back to weighting. After some thinking I've decided to try this system:

    1. Top weight (5/16-18 1.5' stainless steel bolt + 4 washers on each side)
    2. Bottom weight (5/16-18 2' stainless steel bolt + 20 washers. One of the washers is on the other side of the cap (cannot be seen here) to prevent bolt being pushed through the whole when rubber cap intrudes into the housing at depth)
    3. My guess of how much is missing till buoy is neutrally buoyant (I'll just hook that wire onto the buoy tether rope) (that's how much buoyancy I plan for the buoy to have - around 92g. That's approximately 1/5th of what it was)
    4. Extra washers if I need them underwater.
    5. Loop to pull this core platform out of housing. It fits very tight now and I like to keep it this way (nothing is swinging inside of the housing and I don't have to have any other means of attaching things to the housing). Since I've added bolt #2 I need to push this platform deeper into the housing. This loop has been made so I don't have a problem pulling it out later.
    6. PyBoard v1.1 with accelerometer. (Replaced PyBoard Lite with accelerometer).

    Advantages of this weight system:

    • Simple. Takes just a few holes and screws.
    • Easy to mount.
    • Don't have to use stainless steel parts since it's all inside of the housing (stainless steel bolts and washers are expensive!)
    • Allows top/bottom trim
    • Quite centered around main buoy axis
    • Nothing is hanging outside of the buoy waiting to catch that seaweed leaf
    • Can be pretty precise if using different size washers

    Disadvantages:

    • Cannot weight a buoy and then leave it for logging in one session. (Because weight needs to be put inside of the housing).
    • Figuring out resulting buoyancy might be a bit tricky since you place weights in the water during weighting procedure (washers loose a part of weight equivalent to the...
    Read more »

  • Attempting to calibrate the meter in knots

    Max Kviatkouski07/31/2018 at 06:21 0 comments

    I've made an attempt to reach out to NOAA seeking their assistance in calibrating the meter but I'm yet to get some answer. Meanwhile, tomorrow I'm going to try to calibrate it manually. Here is the method I'll try to use:

    - Tie up my meter to some smooth, sufficiently but not too heavy anchor (In my case it's going to be 5lb dumbbell disk - it's flat and has rounded edges so it will become also sort of a sleigh)

    - Tie up front of the disk to my 300ft measurement tape coil

    - Lay out, say, 50ft of measuring tape and starting pulling it (trying to make it as consistent and smooth as it is possible doing it manually)

    - Check time it took me to retract all 50ft of tape

    - Write down timing and time of experiment

    - Repeat with slightly different pulling speed

    I'll try to make as many experiments as possible air permitting. Hopefully there will be no sensible current tomorrow. Otherwise I'll fall back to mapping the dive site :)

    Also I've just received a bluetooth module HC-05. This is for a side project - I'll try to see if it would be possible to download data from the logger over bluetooth right underwater. That would help me to get frequent data updates meanwhile without breaks needed to take the buoy out of water. For my ultimate goal (building a regression model that would let me predict currents at the dive site) frequent data updates are not that important. It's just my impatient bug + desire to share some new insights with local divers frequently.

  • My concerns regarding weighting the buoy properly

    Max Kviatkouski07/31/2018 at 04:30 2 comments

    I didn't have time yet to lay it out properly with static diagram of forces but that's the problem I have. @Edward Mallon advised to use washers as a convenient way to add proper amount of weight to the buoy. That solution looks very elegant to me. At the same time my buoy is quite elongated and I think I cannot just add enough weight to the bottom of the buoy. If center of buoyancy and center of gravity are far enough there may appear rotational force that will try to keep the buoy upright.

    Somehow I feel it's best to keep buoy axis aligned with tilt line.

    Going forward I'll try to make the buoy more compact and that should allow me to use less weight and have the buoy weighted better.

    For now, that's my very crude solution which, I hope, distributes weight good enough so my center of buoyancy and center of gravity are close enough.

    I don't have any solid proof to my considerations (as to if my concerns above are valid at all) so if you have any thoughts, please kindly share with me.

  • Results of the first deployment

    Max Kviatkouski07/29/2018 at 08:20 5 comments

    So the buoy was deployed for about three days and already gave some meaningful insight into specifics of underwater current there. Main results are:

    - Looks like current is going only one direction only during ebb.

    - Meter needs to be more sensitive. At ~0.2kt current it was tilting for only about 10 degrees. My measuring range should be up to 1kt (currents stronger than that probably never occur at that dive site and also they would make the site not divable for most of divers).

    - Vortex shedding made the buoy oscillate at somewhere between 0.5-3Hz.

    - Mooring rope and clip were doing alright

    - I've significantly improved log processing and log visualization. Data is available at the mukilteo.pnwdiving.org

    Next steps would be:

    - Increase buoy sensitivity. I can either increase drag area or decrease buoyancy. I chose latter. After thinking about how to add weight in the cheapest and easiest way without making buoy "bottom heavy" too much I chose steel rebar scraps. Experimenting with the buoy in a bucket of fresh water I figured how many of them will make the buoy slightly buoyant. It will be even more buoyant in saltwater but that's ok. I'm not trying to figure out perfect weighting. Just trying to make it better than it was and keep it simple at the same time.

    - Update logging schedule to this: every 60s record 3s of data with 10Hz frequency. Here's why: 15s appears to be too frequent, current doesn't change that frequently. Vortex shedding was going at not more than 3Hz, so 10Hz sampling should be sufficient for proper averaging of the data.

    - Calibrate buoy. I've emailed some Instrument Lab in Seattle that NOAA is working with. Hopefully they can help for a small fee. Another way to do it: tie up my buoy with small anchor to rolled out measurement tape that I have (300ft roll) and pull it back with different speed measuring time it takes, say, to fold 50ft of tape. That could be good enough simulation of current.

    - Deploy updated buoy for a week or so.

  • Meter website is up and running

    Max Kviatkouski07/26/2018 at 20:57 0 comments

    Finally I've managed to put together very simple static website hosted on S3 in AWS to introduce project to the local diving community and visualize latest data from the meter:

    http://mukilteo.pnwdiving.org

    (Please kindly let me know if you notice any issues with the website)

  • First deployment!

    Max Kviatkouski07/22/2018 at 07:47 0 comments

    Two days ago I've charged my battery, picked up a clip, finished harnessing the meter and finally deployed it. Fortunately, the dive site is very convenient in sense that there are a lot of structures. I tied up the buoy to a pile of PVC pipes much loved by rockfish, greenlings and sculpins. It is still underwater and I plan to take it out tomorrow or sometime next week.

    Also bought a domain and deployed a very simple website. That website is written on the meter. So hopefully it's easy enough to memorize and if some divers come across that meter they will be able to remember site name:

    http://mukilteo.pnwdiving.org/

  • Housing passed waterproof test 2. Mounting electroincs.

    Max Kviatkouski07/09/2018 at 16:08 0 comments

    A little bit more than a week ago I've deployed empty housing at 60-70ft depth (depending on the tide) and left it there for a week. After taking it back to the surface and inspecting it I discovered it was completely dry inside. I suspect that continuous pressure change may stress out and eventually damage rubber 2'' cap but hopefully it will last for several month before flooding.

    After some break I was able to finish mounting PyBoard and battery on a PVC insert that will fit inside the housing.

    [It's a piece of PVC I cut from a square PVC post that I had before. I roughly ground it with my dremel tool so it fits snug into 2'' PVC pipe. One thing I should've done differently - mount PyBoard more to the left if you look at the picture - it would give more space to grab when pulling out this insert from the housing. Axes drawn for convenience.]

    Reverse side of the insert. Battery 18650 is used. I chose this kind of battery for a few reasons:

    • Good enough capacity without the need to assemble several batteries together
    • Perfect voltage for PyBoard (3.7v when PyBoard needs 3.3v
    • Good fit for the size of the housing
    • Available battery holders. (It was quite hard to find holders for AA batteries that would have desired geometry. "Three in a row" would not fit)

    Insert half-way in the housing. Had to make cutouts so rubber band that holds battery holder from spinning doesn't get in a way.

    The other side of the insert with battery. Battery holder I got has only one hole for a screw and thickness of this PVC insert and type of screws I got didn't let me to fix it well enough so use this band to keep battery holder from spinning around.

    Mount loop. It is some nylon rope I found during one of the dives (some crabbers probably lost it). I used stainless steel band clamp to attach the rope to the housing (with a few loops). I've wrapped areas where I expect abrasion with vinyl tape (clamp and part of rope that will be rubbing against rubber cap). Axes showing board orientations were drawn for convenience.

  • Angle calibration is done

    Max Kviatkouski05/25/2018 at 05:20 0 comments

    Today I've performed very simple experiment to see if my code and assumptions about accelerometer are correct so far. I have written a script to show "live" value of tilt angle of PyBoard (angle between Z-axis and vertical): calibration_util.py

    Today I've borrowed my fiancee's protractor and assuming that:

    a) my desk is leveled enough

    b) my hands are steady enough

    I just aligned the board with marks on protractor every 10 degrees. Everything seems to be correct.


    Of course angle is just a beginning. I'm yet to calibrate the meter to translate degrees to flow speed and so far I don't have a good idea how to do it reliably and with reasonable effort.

  • Looking for advice from math stats/measurement experts

    Max Kviatkouski05/23/2018 at 04:17 0 comments

    So here is a problem:

    My PyBoard real time clock is running slower that ideal clock. Since I'm doing datalogging my idea is this:

    - Sync PyBoard and my computer before logging period

    - After logging is done (in a month) compare PyBoard time and PC time

    - Knowing the difference and duration of logging calculate "lag" coefficient.

    That would work nicely if PyBoard clock was "lagging" consistently at the same rate. However, it's not the case. I've measured "lag" coefficient over the period of 1.5 hour since clock sync between PyBoard and PC and here's what I got:

    So it's not constant. At first sight it appears to be converging to some average value. However duration of my measurement is also increasing. So more important question would be: is absolute error (difference between correct clock value and value predicated based on lagging PyBoard multiplied by average lag coefficient) converging? In the end of the day I would love to get my measurements have resolution of not less than 5 min. 1 min would be great.

    Let's take a look:

    (Here x-axis is number of measurements taken. If you multiply by 15 - interval in seconds between measurements - you'll get time since clock synchronization as in previous plot).

    Below is distribution of residuals (errors between PC time and time predicted based on average lag coefficient and PyBoard time):

    This distribution appears to be normal. Though one thing I'm missing is that average is -0.3. Shouldn't average of all errors be zero?

    Please kindly let me know if you can help me with following:

    - How much of this test measurement is good enough to conclude that my absolute error is not increasing (average stays around 0). If I do run this test measurement for whole month that should be good enough but it's a bit too long.

    - What is the right way to calculate my time resolution precision based on the information above.