Close
0%
0%

3D Scan to Custom Soft Prosthetic Hand

Model and 3D print a mold to create a silicone rubber "skin" lattice for an easy to make custom prosthetic hand that matches your 3D scan

Similar projects worth following
I use a high-resolution 3D scan of a woman's hand to produce a simple 3D printed mold for casting a silicone rubber "skin". This skin acts as a lattice for holding hard 3D printed parts in place while also providing retracting 'spring' force returning the hand to an open position. I use Steve Wood's popular "Flexy Hand 2" model as a foundation for designing joint articulation. The volume of silicone rubber used for the hand costs $7 so cost increase is negligible compared to standard e-NABLE 3D printed prosthesis.

3D printed prosthetic hands are a classic project. I wanted to do something creative, but I wanted there to be an honest possibility that my work would contribute to actual real life prosthesis development. The only 3D printed prosthesis costing less than $7000 that have succeeded in being more than one-offs are the ones made by e-NABLE - so that is where I started. 

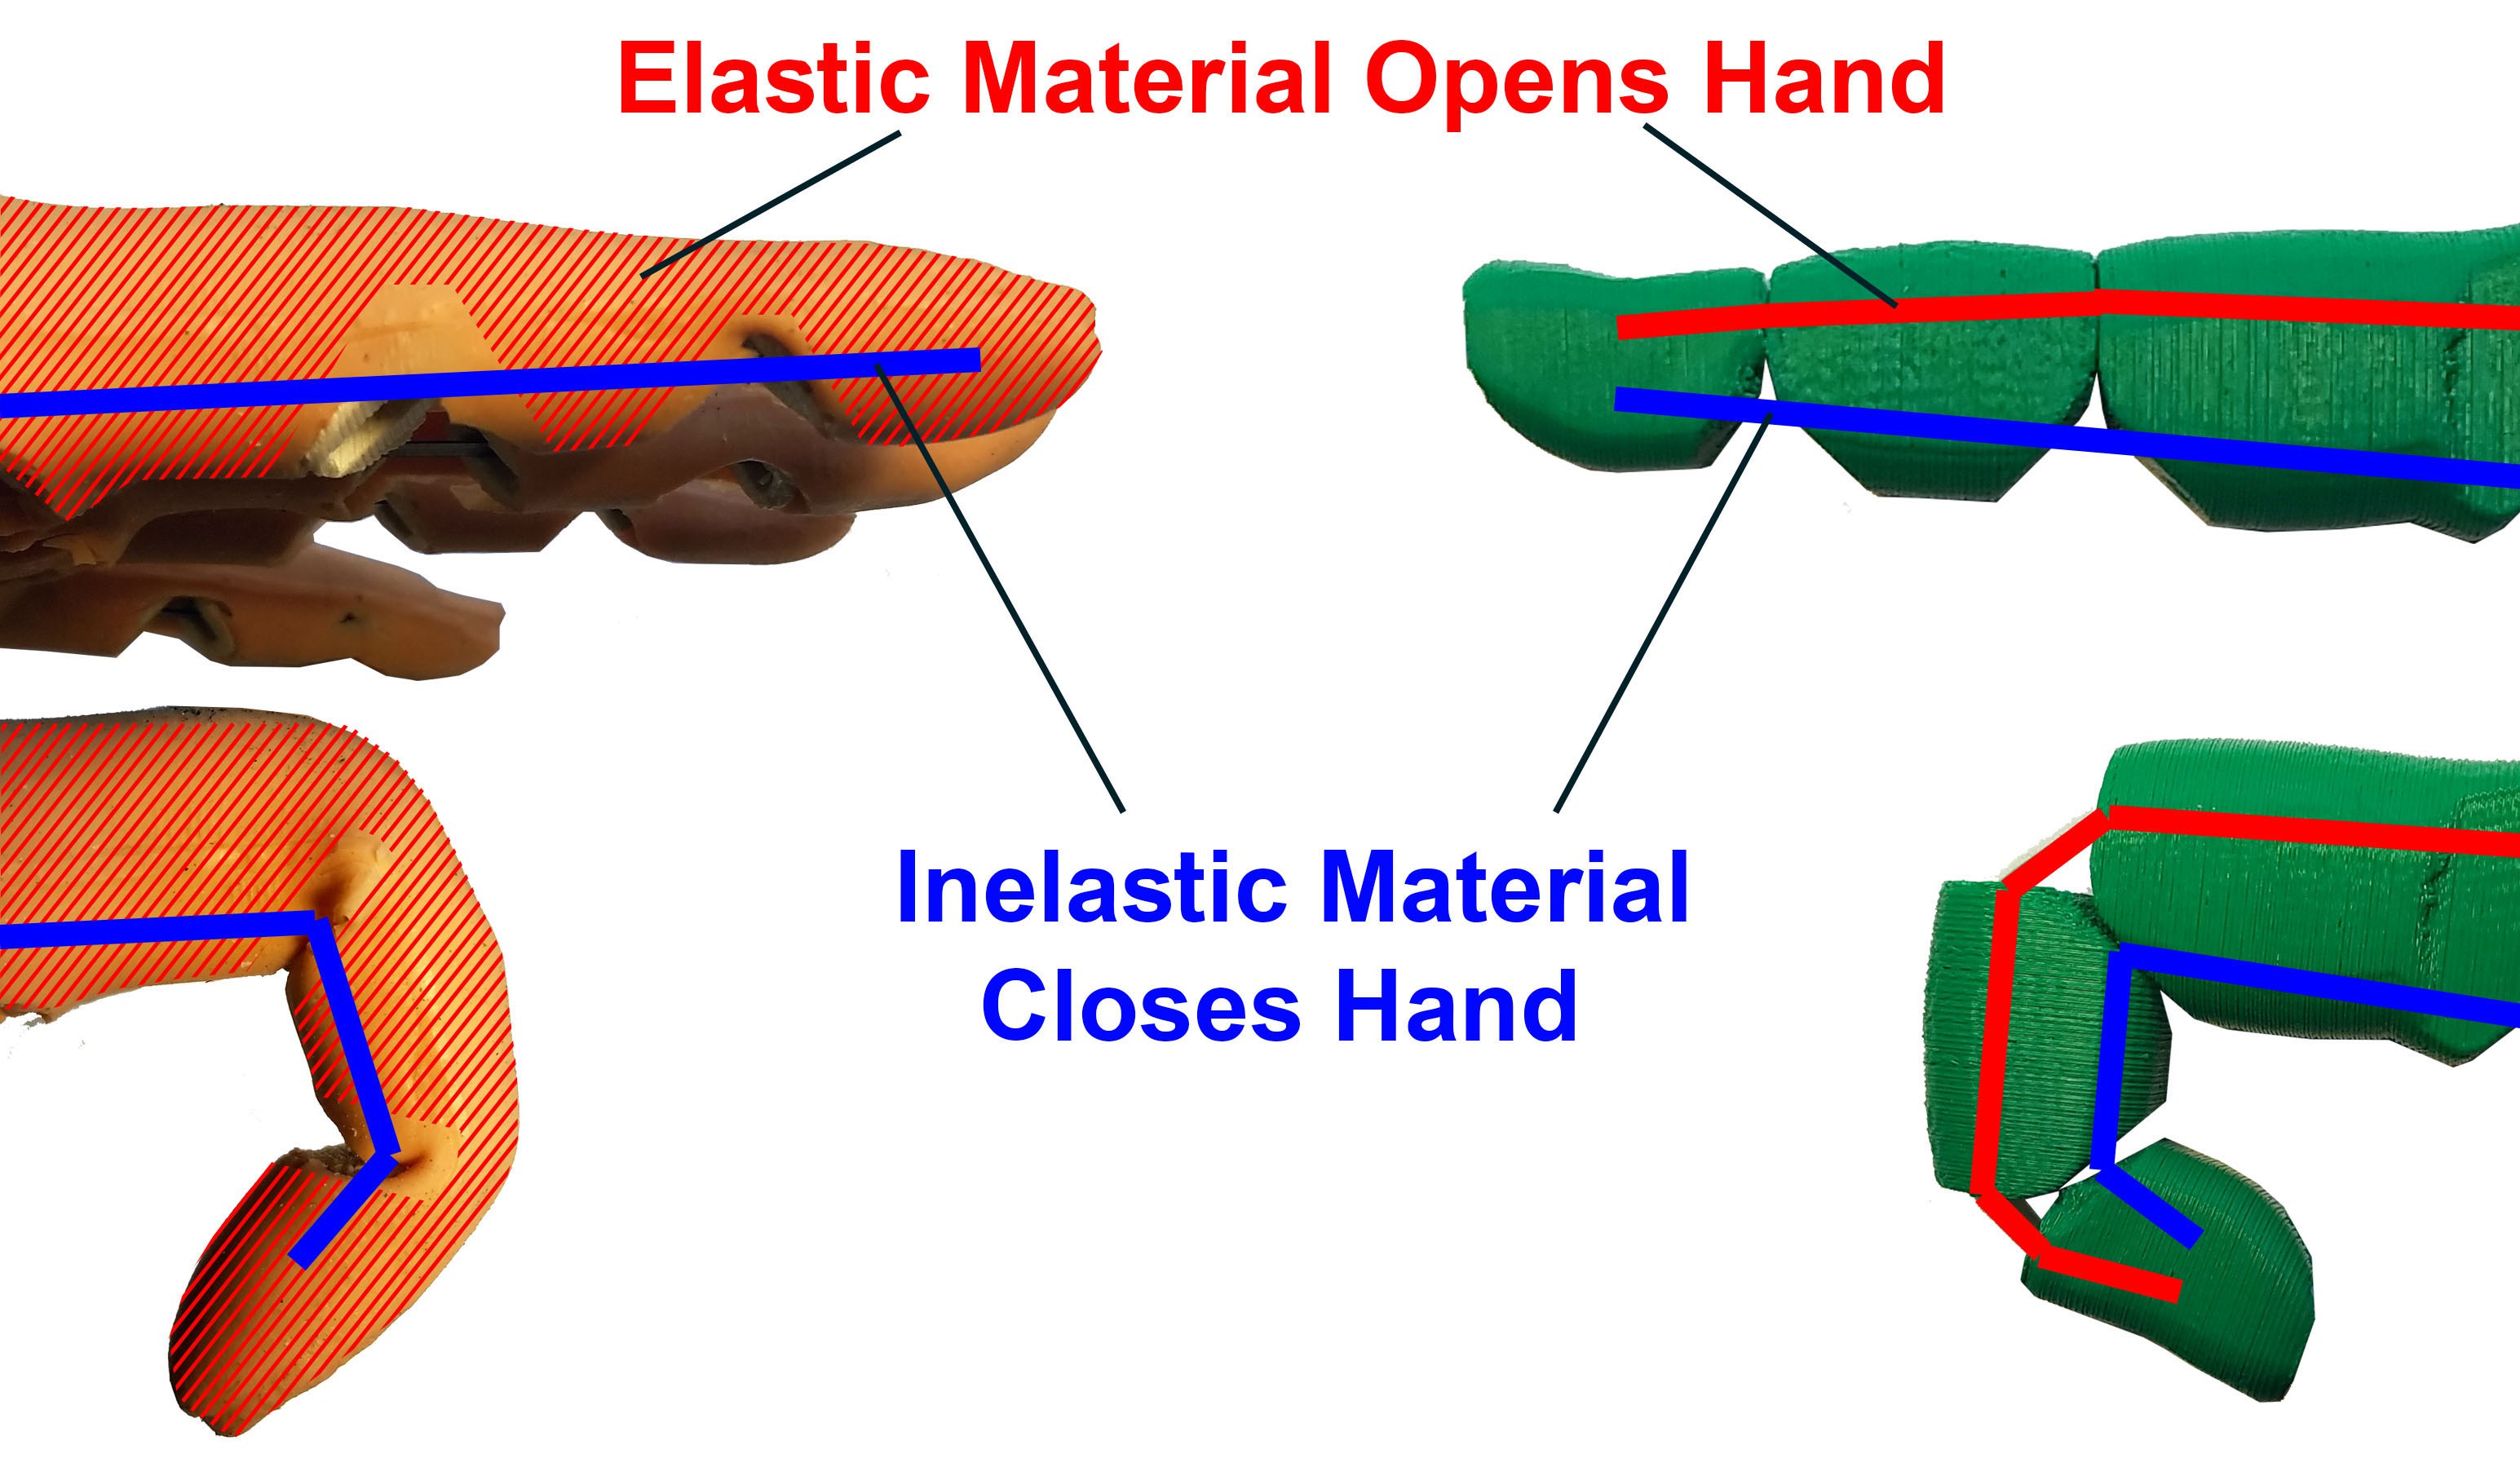
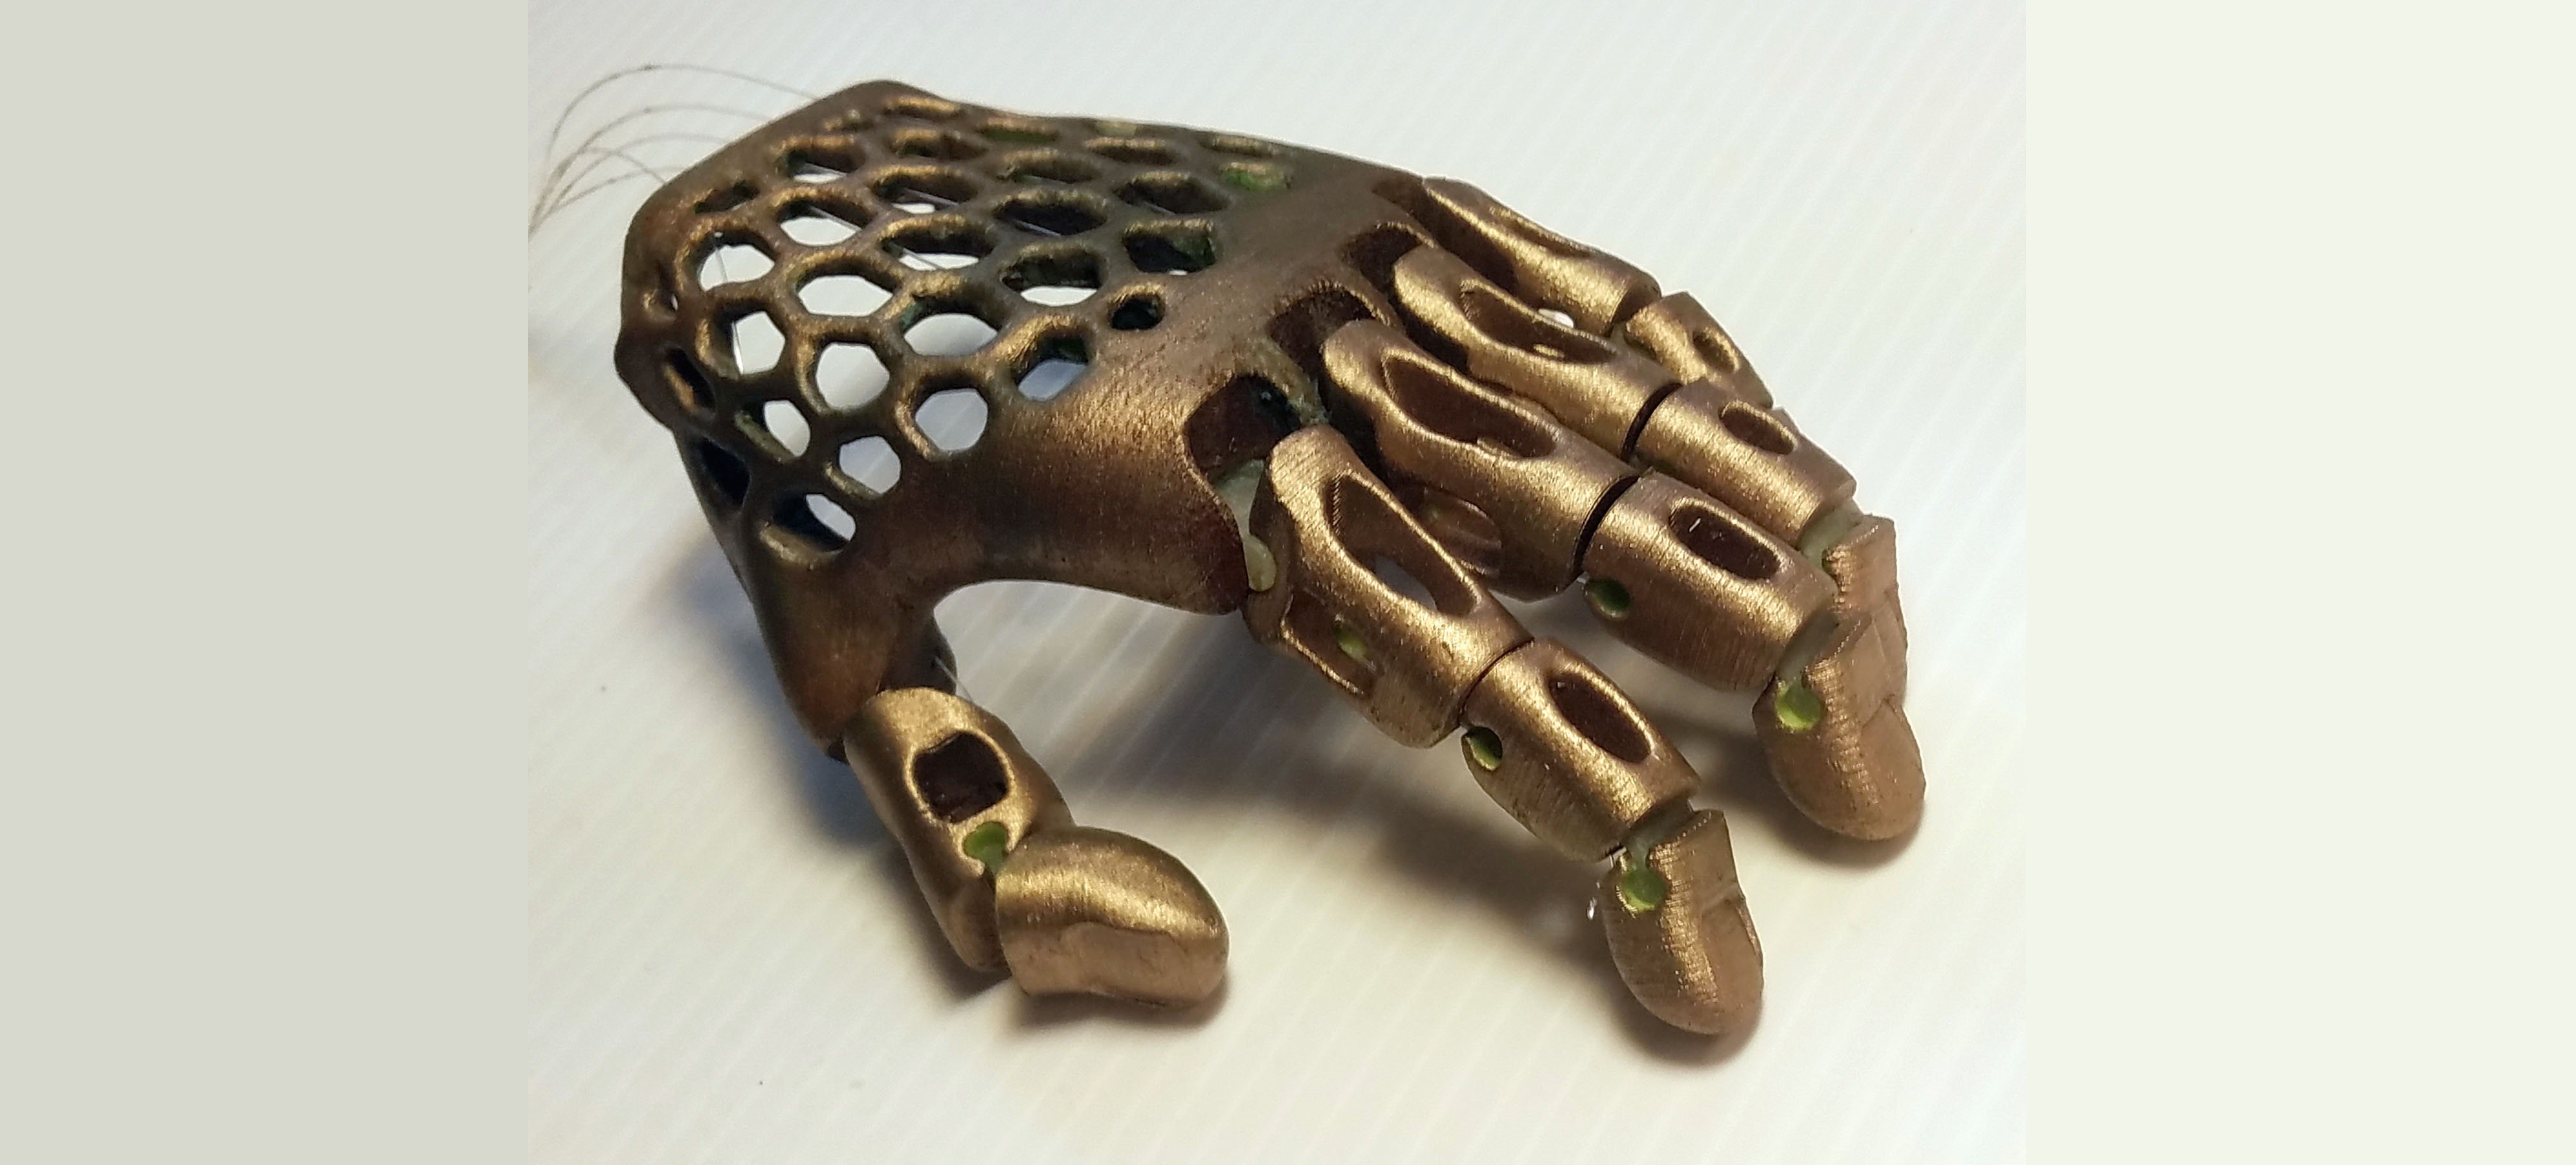
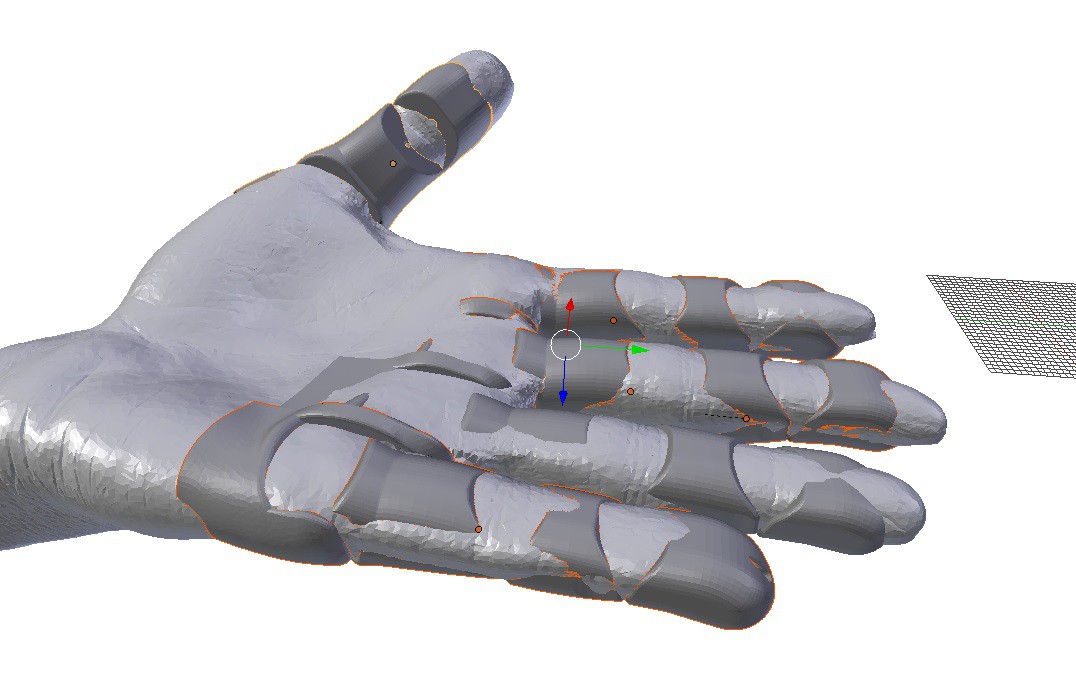
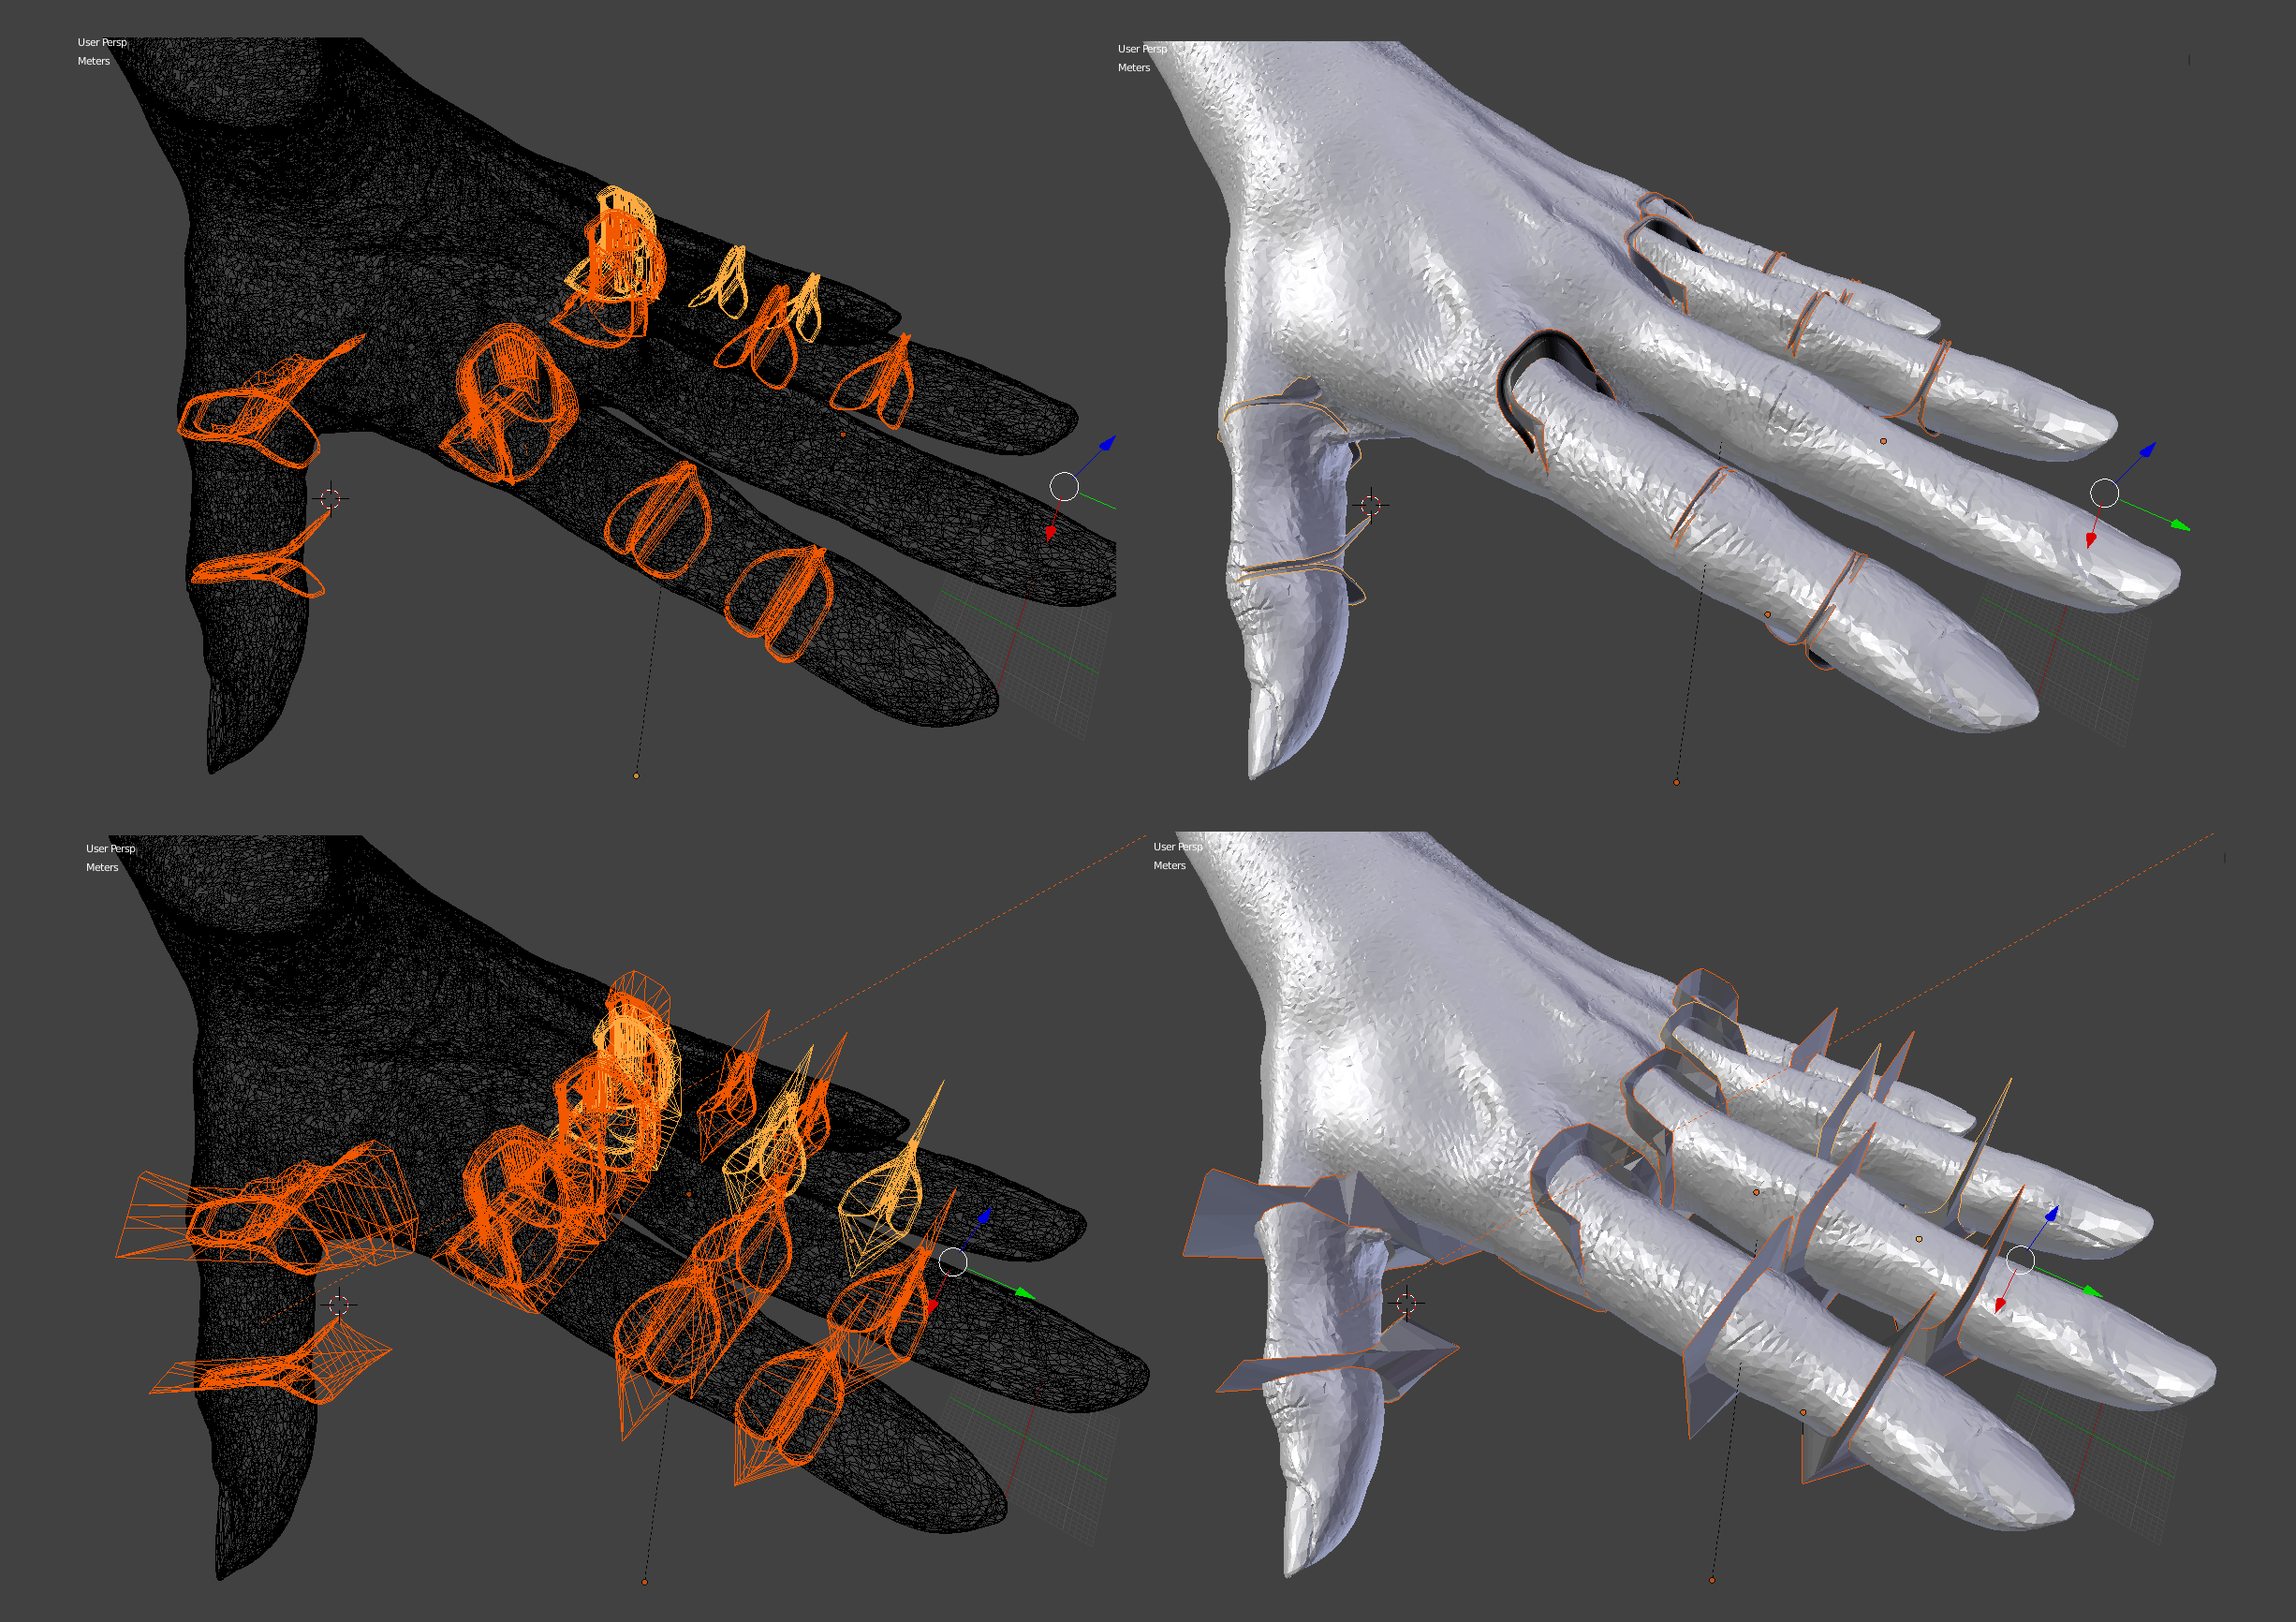
e-NABLE style prosthetic hands (right side in above illustration) use an elastic material in the top region of 3D printed joints for retraction i.e. a 'spring' force that moves the hand to an open position when no additional force is applied. An inelastic material like cord or monofilament in the bottom portion of the joints is used to pull the hand closed. The inspiration for this project came from the elastic material embedded in the hard 3D printed plastic digits of e-NABLE style hands. I wanted the hand to have a flexible, elastic life-like surface but the only flexible elastic component was buried inside hard plastic. What if I put the elastic band inside e-NABLE style hands on the outside instead? After a lot of experimentation I realized that it wouldn't be much additional work to base the hand off an actual 3D scan of a hand. Using a 3D scan with hard plastic doesn't add much, but when you are dealing with soft silicone rubber the use of a 3D scan becomes impressive. 

*I have loaded all the important models (mold and hand parts) into an online 3D model viewer for your convenience HERE ( https://curtpw.github.io/silicone-skin-prosthetic-hand).

*All models and a whole lot of high resolution images are available in the GitHub repository for this project (https://github.com/curtpw/silicone-skin-prosthetic-hand).

HOW TO USE THIS PROJECT AS A TUTORIAL: 

  1. Read through the instructions at the bottom, particularly the ones about modeling in Blender. A basic '3D printing level' knowledge of Blender software is assumed.
  2. Download my master Blender project HERE. I'm hosting the file on Google Drive because its too big (850MB) for Hackaday or GitHub.
  3. Go through the entire Blender project and look at the meshes one by one. This will take a while but it will familiarize you with the linear process I went through including dead ends and walls. 
  4. Mentally connect the instructions in this Hackday project with the meshes in the Blender file. All the modeling instruction illustrations were taken from the Blender project.
  5. Load your own 3D scanned hand model into the Blender project and replace my raw hand model with your own.
  6. Work through the instruction steps in Blender with your own model. 

Making it Robotic

This prosthetic hand is extremely easy to make robotic - in the controlled conditions of my workshop. All I have to do is hookup a linear actuator to the constriction/hand-closing cables. I'm in the process of getting this prototype up and running with an 50mm range Actuonix/Firgelli miniature linear actuator powered by two 18650 3.7v Lithium batteries. Right now I'm still working on finger/thumb cable tension but I have been running tests on the actuator using a 3D printed copy of the "Flexy Hand". The real question is whether or not this is useful. There are SO many powered hand projects on the internet, but the only one that has seemed to get any traction is Open Bionics (https://openbionics.com). Their device costs $7000, though they promise they'll get the price down to $3000. Although I'm continuing development of powered versions, I think attempting to contribute to extremely inexpensive e-NABLE style manual actuation prosthetic arms/hands is considerably more practical considering my lack of resources. There is also the possibility of combining this 3D Scan to 3D printed mold and silicone skin technique with high end robotic prostheses currently on the market. 

... Read more »

PROSTHETIC_HAND_HARD_PARTS.stl

These are the hard 3D printed parts for the actual hand prototype

Standard Tesselated Geometry - 6.86 MB - 05/08/2018 at 22:29

Download

INTERNAL_MOLD.stl

This is one of a three piece mold for casting the prosthetic hand silicone skin.

Standard Tesselated Geometry - 4.36 MB - 05/08/2018 at 22:29

Download

3DSCAN_HAND.stl

This is a slightly modified version of the original hand 3D Scan the mold is based on. I'm posting the raw scan in the GitHub repository for this project.

Standard Tesselated Geometry - 4.82 MB - 05/08/2018 at 22:29

Download

BOTTOM_MOLD.stl

This is one of a three piece mold for casting the prosthetic hand silicone skin.

Standard Tesselated Geometry - 2.43 MB - 05/08/2018 at 22:29

Download

SILICONE_SKIN_HAND_BATTERY_AND_ACTUATOR_ENCLOSURE.stl

This enclosure fits a Firgelli linear actuator and two 18650 size 3.7v rechargeable batteries

Standard Tesselated Geometry - 39.44 kB - 05/08/2018 at 22:29

Download

  • 1 × ABS 3D Printing filament I used an entry level 3D printer and cheap filament, so nothing special unless you want to try and improve.
  • 1 × Smooth-On Ecoflex™ 00-30 Platinum Cure Silicone Rubber https://www.smooth-on.com/category/platinum-silicone/
  • 1 × Smooth-On Silc Pig Silicone Rubber Pigment https://www.smooth-on.com/category/color-and-fillers/
  • 1 × mold release agent (must be non-silicone based) many mold release agents are silicone based, but since we are casting silicone these will make the silicone stick to the mold
  • 1 × super thin spring steel from cheap/small retractable USB cords I don't like using cord with 3D printed prosthetics. I've had good luck with super thin spring steel from things that automatically retract (tiny tape measures, retractable cords etc.)

View all 6 components

View all 2 project logs

  • 1
    Get the Hand 3D Scanned

    These days there are lots of places you can get your hand and other medium sized objects professionally 3D scanned - a brief internet search will help you find a convenient location. In the case of a prosthetic hand, you will need to scan the remaining hand and mirror it using 3D modeling software like Blender. If no hand is available for scanning, a professional 3D modeling artist can use photos to closely approximate a specific hand. You can also purchase 3D scans of hands - which is what I did for my current prototype.

  • 2
    Skeleton Modeling: Superimpose e-NABLE/Flexy Hand Style 3D Printed Hand Model Over Your 3D Scan Hand Model

    We need to create articulating joints for our 3D scanned hand. I use the joint geometry of Steve Wood's "Flexy Hand" and integrate it into my 3D scanned hand model in Blender. You can also use e-NABLE's standard prosthetic hand models - in fact this might be better since they are in active use as prostheses. You will need to shift around your 3D scan model to get a good fit - for example I had to shift the pinky finger of my model by about 20 degrees. In the end the 3D Printed prosthetic hand model should be cleanly superimposed over your hand 3D scan.

  • 3
    Skeleton Modeling: Joint Cutting

    In combining the Flexy Hand model with our own hand model, the primary thing we wish to retain from Flexy Hand is the geometry of joint separation/articulation, the size of inter-joint surfaces and the spatial relationship of all the inter-joint surfaces. So we delete everything else from the Flexy Hand model mesh. Then we create models of the negative space between the Flexy Hand joints so we can use them to carve joints out of our 3D scanned hand model.

View all 13 instructions

Enjoy this project?

Share

Discussions

Similar Projects

Does this project spark your interest?

Become a member to follow this project and never miss any updates