 amr.mostaafaa
If I asked you: could you please turn off the lights when it comes to 10:30?
Actually, the common answer would be check your smartphone and make a reminder on your phone to turn the lights off by 10:30.
Well, that's ok for any normal person, but not for a maker, who would certainly think of automating this process by making some cool stuff which can get time automatically and take certain actions when 10:30 comes!
So, this your 10-minute tutorial to learn how to get time automatically, monitoring it and can make any decisions based on it as far as we want.
Let’s talk about the idea behind the Arduino Digital Clock project ...
Idea:
We are going to get time from the smartphone automatically and wirelessly by using 1Sheeld with it's Android/iOS App with Arduino board.
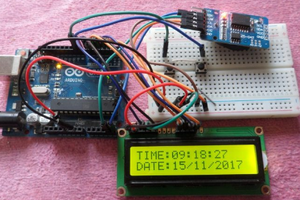
The idea behind the Arduino Digital Clock is to use the clock shield from the App and connect the App to the 1Sheeld via Bluetooth so the App on our smartphone will automatically send the current date+time to the 1Sheeld board which is connected to the Arduino.
So we can print the current time (hours + minutes + seconds) on an LCD 16*2 and once time changed whether a second passed, a minute passed or an hour passed the time on the LCD will be changed automatically ... with this simple :)
Getting started:
If this is your first time to deal with 1Sheeld or you want to learn more about it, I recommend checking this quick and easy getting started tutorial.
And if you haven't tried LCD 16*2 before, I recommend checking this quick video.
Now, after you've become a little bit familiar with 1Sheeld, let's start!
Step 1: Hardware components:
- Arduino Uno.
- 1Sheeld board.
- LCD 16*2.
- 10K potentiometer.
- Breadboard.
- 22 * Male to male wires.
- Arduino USB cable or 9-12v battery.
- Android/iOS phone with 1Sheeld App installed on it.
Step 2: Software components:
Step 3: Connection and Schematic:
- Plug the 1Sheeld board into your Arduino as this:

- Connect the LCD 16*2 as illustrated below:

- Switch the 1Sheeld power to operate on 5v (Not the 3.3v):

- 1Sheeld have 2 modes: Uploading mode and Operating mode. You can switch between them using the switch close to the Digital pins and is called “UART SWITCH” on 1Sheeld and “SERIAL SWITCH” on 1Sheeld+.
Firstly, you slide the switch towards the “SWITCH” notation which turns the 1Sheeld board into the Uploading mode to let you upload the Arduino code.

Secondly, after you finish uploading the code, slide the switch towards the “UART” notation (or “SERIAL” at 1Sheeld+ board) which turns the 1Sheeld board into the Operating mode to communicate with your smartphone 1Sheeld App.

- Connect the Arduino via your PC using Arduino USB cable.
Step 4: Code:
I would recommend checking the Arduino Clock Shield documentation to know more about the Arduino Clock Shield functionality and how to use them.
Now, switch the 1Sheeld board to the Uploading mode, upload this code for the Arduino Digital Clock:
/*
  Arduino Digital Clock Project

  This project shows an application on 1Sheeld's clock shield.

  By using this project, you can monitor the current real time
  by using clock shield from 1Sheeld.
  You can then take certain actions based on the time you get.

  OPTIONAL:
 To reduce the library compiled size...
Read more »
 kamalkedin123
 Giulio Pons
 ElectroBoy
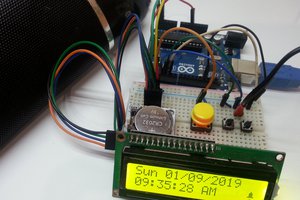
 talofer99