Alan
AlanThe Infinity Mirror
initial sketch of the wormhole core
The first step in building the Wormhole Actualization Machine was designing the infinity mirror assembly and sourcing the materials. After reading lots of Instructables and watching lots of YouTube videos of previous attempts at building an infinity mirror, I knew optic and reflective quality were the most important factors in getting a convincing tunneling effect. TappPlastics.com sells custom-cut sizes of both two-way mirrors (the front one you can partially see through) and regular mirrors (the back one). They were rather expensive (30 and 15 dollars), but worth the better quality achieved than by applying reflective window film to plexiglass, the most common DIY method. Since I'll be drilling holes in them, I bought them both in 1/8” acrylic. I wanted the ability to control the direction which the wormhole “fell” away – if the 2 mirrors are exactly parallel, the vanishing point will be in the center of the wormhole. Offset the angle slightly, and you'll get a nice 3d tunnel with the lights slowly bending into infinity. After doing some sketching, I came up with a design that incorporated 8 threaded rods and bolts that would allow the planes of the front and back mirrors to be precisely adjusted to the desired effect.
Both mirrors needed support to keep them true to flat (another important factor since every imperfection gets multiplied), so I needed to find something rigid to enclose the assembly. McMaster-Carr sells flanged angle rings made of 1/8” steel in different diameters that have a clean, simple industrial look. Since these would determine the size of my wormhole portal, I decided to go with two 12-inch rings.
front and side technical rendering of the core
Now that I knew the size of the wormhole opening, I could design the tube that will hold the LEDs. I'm using strings of common WS2801-controlled RGB LEDs that I bought on AliExpress. I calculated the optimal grid pattern with the LEDs equally spaced to create the most seamless reflection and a more convincing tube of light. I settled on an 8-inch deep cylinder with 4 rows of 24 LEDs and another ring of 24 LEDs popping through the back mirror for a total of 120 lights. My string is 150 LEDs, so I’ll snip 30 off – another great feature of the WS2801.
2 of the 3 rings installed
My initial thoughts involved using a concrete tube form or an acrylic drum shell for the 8-inch cylinder, but both were too thick for the flange on the LEDs. I did lots of wandering around in many different types of stores (and surely looked suspicious checking out at so many random things), but I couldn't find a suitable pre-formed round cylinder (the little plastic trashcan at Toys R Us was promising), so I bought an acrylic 12 inch x 6 foot wire shelf liner that was the perfect thickness and easily bent to form a circle. The acrylic needed to be an exact size, so I constructed a fairly elaborate clamping system to cut it. I used a long level to guide my jigsaw shoe along a straight line and then clamped the acrylic on either side, as close to the blade as possible to prevent it from shattering due to the rapid oscillation of the jigsaw.
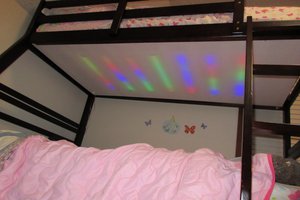
the assembled wormhole core
Once cut with a fine-tooth metal-cutting blade, I built 3 sets of wooden ring clamps to form it in a round shape. All of the components would be held together with threaded rods, so I started by cutting my “master” guide holes in one of the steel rings. Making sure I kept everything in proper orientation, I clamped the three wood rings to the steel ring and drilled their holes. I then drilled each of my 2 pieces of acrylic mirror with a special drill bit for plastic, which I found out about after destroying a few pieces of acrylic. These bits have a less aggressive cutting edge and don't get jammed up in plastic.
Before drilling the holes for the LEDs, I printed out a template with my exact placements and...
Read more »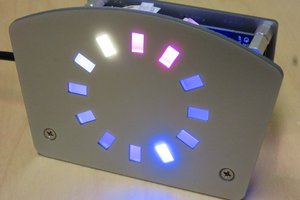
 Tom Dowad
 Bob Baddeley
 Enrico