 amr.mostaafaa
FNowadays, security systems made using open source hardware is widely used where you can develop your own security application according to your needs and thanks to Arduino platform and its based open source shields, you can now easily make your security systems which involve some security monitoring tools like alarm, laser, motion, distance, and camera.
Of course, the last one is the most important and popular tool used almost in every security system as it's the only way to recognize not only the penetration of the security from a stranger but also know exactly who did that by capturing a photo of him.
In this tutorial, we are going to use Arduino Bluetooth Camera with the help of an ultrasonic to detect whether a stranger has entered our house and capture a photo of him automatically once he gets into the area of the ultrasonic wave.
Let’s talk about the idea behind the Security System using Arduino Bluetooth Camera ...
Idea:
The idea behind the Arduino Bluetooth Camera is to use 1Sheeld board with the Arduino and using the camera shield from the 1Sheeld App and connect the App to the 1Sheeld board via Bluetooth and hence we have an Arduino Bluetooth Camera that's ready to capture photos and store them into phones storage by one line of Arduino code!
We will use the ultrasonic sensor with an obstacle in front of it on a certain distance (say 100 cm) and once anything cut the distance and come in front of the ultrasonic sensor within the range of 10 cm or less, this is considered as a penetration to the security system.
Once a stranger has entered the house, we turn on an alarm which is another shield called: Buzzer Shield and then capture a photo instantly to this stranger and save it in the phone.
Getting started:
If this is your first time to deal with 1Sheeld or you want to learn more about it, I recommend checking this quick and easy getting started tutorial.
And if you haven't tried ultrasonic before, I recommend checking this quick video.
Now, after you've become a little bit familiar with 1Sheeld, let's start!
Step 1: Hardware components:
- Arduino Uno.
- 1Sheeld+ board.
- ultrasonic sensor HC-SR04.
- 4 * Male to female wires.
- Arduino USB cable or 9-12v battery.
- Android/iOS phone with 1Sheeld App installed on it.
Step 2: Software components:
Step 3: Connection and Schematic:
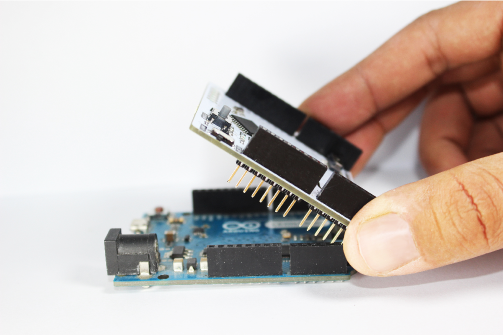
- Plug the 1Sheeld board into your Arduino as this:
- Connect the ultrasonic as illustrated below:

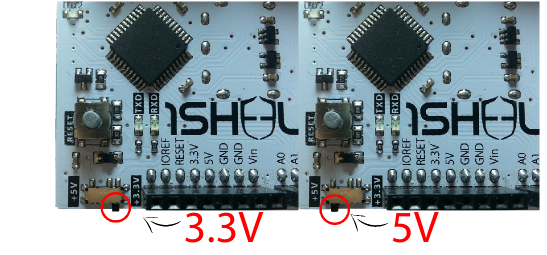
- Switch the 1Sheeld power to operate on 5v (Not the 3.3v):
- 1Sheeld have 2 modes: Uploading mode and Operating mode. You can switch between them using the switch close to the Digital pins and is called “UART SWITCH” on 1Sheeld and “SERIAL SWITCH” on 1Sheeld+.
Firstly, you slide the switch towards the “SWITCH” notation which turns the 1Sheeld board into the Uploading mode to let you upload the Arduino code.
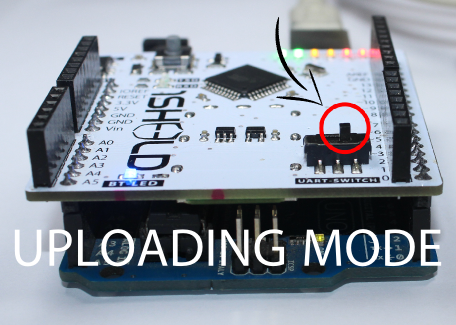
Secondly, after you finish uploading the code, slide the switch towards the “UART” notation (or “SERIAL” at 1Sheeld+ board) which turns the 1Sheeld board into the Operating mode to communicate with your smartphone 1Sheeld App.

- Connect the Arduino via your PC using Arduino USB cable.
Step 4: Code:
I would recommend checking the Arduino Camera Shield documentation to know more about the Arduino Camera Shield functionalities and how to use them.
Now, switch the 1Sheeld board to the Uploading mode, upload this code:
/*
  Security System using Arduino Bluetooth Camera Project

  This project shows an application on 1Sheeld's camera shield.

  By using this project, you can track whether anything stranger
  has entered your house and capture his photo  by using camera
  shield from 1Sheeld.

  OPTIONAL:
  To reduce the library compiled size and limit its memory usage, you
  can specify which shields you want to include in your sketch by
  defining CUSTOM_SETTINGS and the shields respective INCLUDE_ define.
*/

/* Include required shields */
#define CUSTOM_SETTINGS
#define INCLUDE_CAMERA_SHIELD
#define INCLUDE_BUZZER_SHIELD
#define INCLUDE_TERMINAL_SHIELD
#define INCLUDE_TEXT_TO_SPEECH_SHIELD

/* A command which will be converted to speech */
const char command[] = "warning a stranger has entered your house";

/* Include 1Sheeld library. */
#include <OneSheeld.h>

/* Define pins for the ultrasonic sensor */
const int trigPin = 9;
const int echoPin = 10;

/* Variable to save the measured distance from ultrasonic */
int distance;

void setup()
{
  pinMode(trigPin, OUTPUT);     // Sets the trigPin as an Output
  pinMode(echoPin, INPUT);      // Sets the echoPin as an Input

  /* Start 1Sheeld communication. */
  OneSheeld.begin();
}
void loop()
{
  /* Get the current distance from the ultrasonic */
  distance = getUltrasonicDistance();

  /* Print the distance on the Terminal shield */
  Terminal.println(distance);

  /* Check if distance is less than 10cm which means that a stranger has entered the house */
  if (distance < 10)
  {
    /* Turn on the camera's flash while capturing */
    Camera.setFlash(ON);

    /* Take a photo for that stranger using the phone's rear camera */
    Camera.rearCapture();

    /* Also turn the alarm in form of a buzzer */
    Buzzer.buzzOn();

    /* Delay for 2 seconds */
    OneSheeld.delay(2000);

    /* Turn the alarm off */
    Buzzer.buzzOff();

    /* Use text-to-speech shield to announce a break into security orally */
    TextToSpeech.say(command);

    /* Delay for 5 seconds to give the camera shield enough time for taking and saving the photo */
    OneSheeld.delay(5000);
  }
}

/* A function that makes the whole operation of the ultrasonic and returning the detected distance */
long getUltrasonicDistance(void)
{
  /* Variable to save the sound wave travel time in microseconds */
  long duration;

  /* Variable to save the detected distance in cm */
  long distanceReturned;

  /* Clears the trigPin */
  digitalWrite(trigPin, LOW);

  /* delay 2 micro seconds */
  delayMicroseconds(2);

  /* Sets the trigPin on HIGH state for 10 micro seconds */
  digitalWrite(trigPin, HIGH);

  /* delay 10 micro seconds */
  delayMicroseconds(10);

  /* Sets the trigPin on LOW state */
  digitalWrite(trigPin, LOW);

  /* Reads the echoPin, returns the sound wave travel time in microseconds */
  duration = pulseIn(echoPin, HIGH);


  /* Calculating the distance */
  distanceReturned = duration * 0.034 / 2;

  /* Returning the detected distance in cm */
  return distanceReturned;
}
Then, Switch the 1Sheeld board to the Operating mode then open the 1Sheeld app and connect it to the 1Sheeld board via Bluetooth.
Step 5: Run it:
Finally, select the Camera, Buzzer, Terminal and Text-to-speech shields from the shields list.
As you see in the video, I have used a ship as a stranger and once the ship cuts the area of the ultrasonic sensor within range of 10 cm, the phone made a buzzer sound and took a picture to the ship with a warning saying that tells me a stranger has entered my house .. pretty cool, isn’t it :)
The ship photo taken and stored:

Now we are done with this security system using the Arduino Bluetooth Camera and you can add your own extra code lines to add more security warning features like what I mentioned at the beginning of this tutorial.
Hope you enjoyed this Arduino Bluetooth Camera tutorial!
If you have any question, please don’t hesitate to leave it in the comments down below and stay tuned for more Tutorials like that ;)