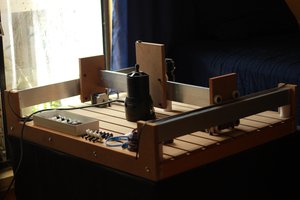
Close
0%
0%

DiscoverE Magnetic Levitator

Yet another levitator. Made to show at U of A DiscoverE camp "FUNday".

kskksk
Similar projects worth following
Based on the Arduino Project Hub project by jsirgado and using Arduino mount by Kelly Egan. Created to support the U of Alberta DiscoverE summer camps 2018

Building the hardware was pretty straightforward. The only "innovation" is the custom housing build around a 33 mm ( 1 5/16" ) diameter wooden dowel I salvaged as part of a home renovation.

ElectroMagSupport.scad

Support for electromagnet.

scad - 2.68 kB - 07/08/2018 at 05:58

Download

ElectroMagBase.scad

Base to hold the dowel and house the Arduino + shield

scad - 1.15 kB - 07/08/2018 at 05:58

Download

PIDLevitator.ino

Arduino UNO program for magnetic levitator

ino - 4.70 kB - 07/08/2018 at 05:38

Download

  • 1 × Arduino UNO
  • 1 × Mini Breadboard Prototyping Shield From Amazon.ca
  • 1 × Neodymium magnet 6 mm dia, 6mm height. If you use a different magnet, Kp, Ki, and Kd may need adjusting
  • 2 × 3/8" bolt Used to clamp the upper support to the dowel
  • 2 × 3/8" nut Embedded in upper support

View all 13 components

  • 1
    Wiring

    Using the Arduino Shield listed, connect the circuit shown in the https://bit.ly/2MXQdYd">Arduino Project Hub project, noting the following differences.

    1) Arduino pins 10 and 11 are connected to the prototype shield LEDs

    2) The switches are connected to Arduino pins 12 and 13

    3) Arduino pin 9 is connected to the base of the TIP120

    Also, I don't have an external DC jack for the 12VDC supply, but just plug 12VDC into the Arduino's jack and use Vin.

    The screw terminal is just for convenience; you can solder the electromagnet wires to the shield (but then you can't easily use the magnet for other projects :-)

  • 2
    Housing

    Use the openSCAD files to generate the upper magnet support and the base.

    I printed the parts on a MendelMax 2, but most any printer should work. No special settings, printed in PLA.

    You may need to change the diameter for the dowel if you haven't got a 33 mm dowel available.

    The 3/8" nuts should fit in the hexagonal recesses in the upper support.

    I printed knurled knobs for the 3/8" bolts, but they are not absolutely necessary.

  • 3
    Program tweaking

    The Arduino program may need tweaking for the Kp, Ki, and Kd parameters depending on the weight and neodymium magnet used.

View all 3 instructions

Enjoy this project?

Share

Discussions

Similar Projects

Does this project spark your interest?

Become a member to follow this project and never miss any updates