 Just4Fun
A cheap and easy way to burn the Arduino bootloader is to use an USBasp programmer that is commonly available:
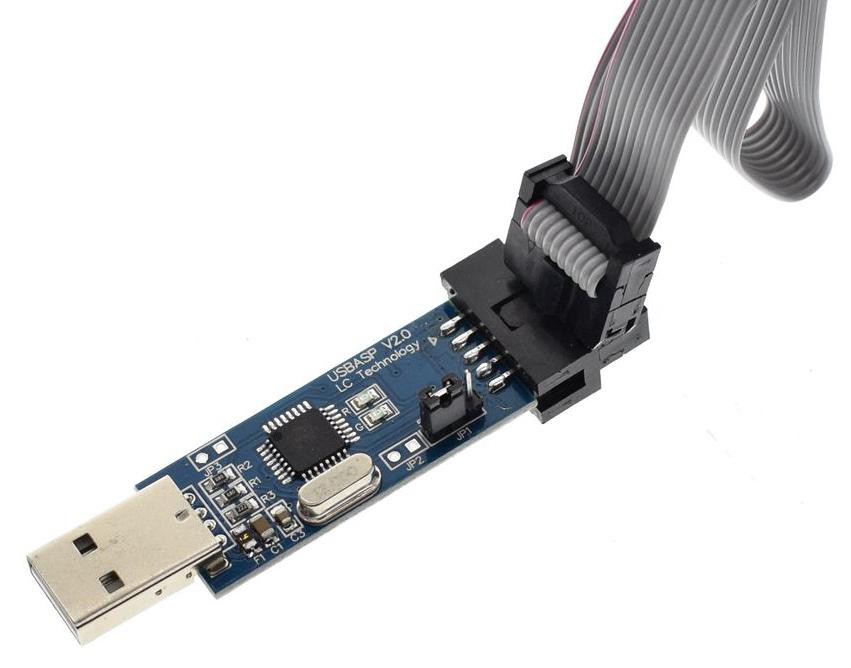
The USBasp is also capable to give the power to the "target" using the VCC pin, but remember to check that the JP1 jumper is set to provide 5V to the target (as shown in the photo).
Please note that the pinout of the USBasp is a little different from the "standard" ICSP (os ISP) pinout:
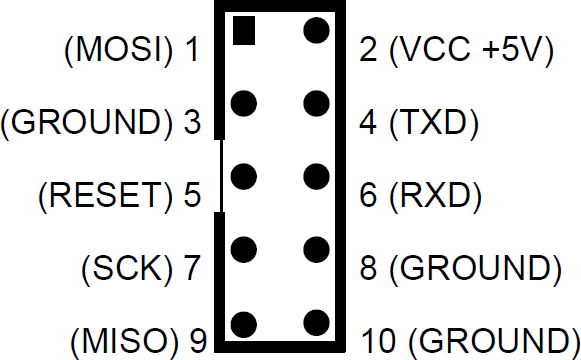
In the previous picture it is possible see that pins 4 (TXD) and 6 (RXD) are not at GND as expected by the standard ICSP port, and pin 3 is not NC.
See the following picture showing the standard 10 pin ICSP pinout:
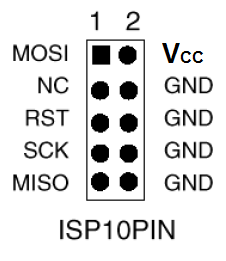
So you must consider this when connecting the USBasp to the 6 pins ICSP port (J3) on the Z80-MBC2 (see the schematic):
 To avoid problems I suggest to use as GND pin 10 of the USBasp connector, and connect the other pins (VCC, MISO, MOSI,SCK, RST) accordingly.
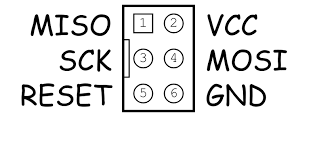
An handy way to connect the USBasp to the 6 pin ICSP port (J3) of the Z80-MBC2 could be to use a commonly available "10pin to 6pin" adapter like this:

but I suggest not to use it "as is" because its internal connections are done for a "standard" ICSP port, and we have seen that the USBasp connector differs from the standard one.
The schematic of the adapter shows that isn't compatible "as is" with the UABasp connector:

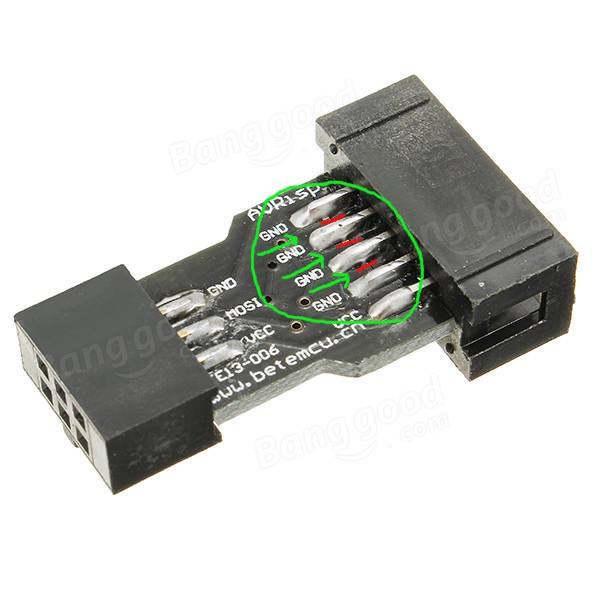
To use it is a good idea isolate the pins 4, 5 and 6 cutting the trace on the PCB of the adapter that connects those pins together, and then check with a tester.
In the following photo are shown the three cuts (thin red lines inside the green "circle") to do:
BURNING THE BOOTLOADER FROM ARDUINO IDE:
To easily burn the bootloader follow these "quick and dirty" steps (tested on a linux Mint OS with Arduino IDE 1.8.5):
STEP 1: Connect the 10 pins connector of the USBasp programmer to the 6 pins ICSP port (J3) of the Z80-MBC2 (using wires or a modified adapter as discussed before);
STEP 2: Verify carefully that any other connector of the Z80-MBC2 is not used, and verify that both the SD and RTC modules (if present) are removed from the board;.
STEP 3: Only at this point connect the USB side of the USBasp programmer to an USB port of your workstation;
STEP 4: Open a "terminal" window on your workstation and go to the directory where there are the Arduino IDE executables, and get the root privileges with the command:
sudo su
then run the Arduino IDE with the command:
./arduino
STEP 5: Because Arduino IDE is running as the root user it is necessary re-install the "core" for the Atmega32. Open the Board Manager as you already did (anyway the guide is here). Note that you must do this step only the first time you execute the Arduino IDE as root;
STEP 6: Now from the Tools menu of Arduino IDE select "Atmega32" as "Board", "16 MHz external" as "Clock", and "USBasp" as "Programmer". Then you can burn the right bootloader (without playing with the FUSE setting) selecting "Burn Bootloader" from the same "Tools" menu.
All done!
Discussions
Become a Hackaday.io Member
Create an account to leave a comment. Already have an account? Log In.