Close
0%
0%

ESP8266 Arduino Tutorials

Use the power and simplicity of the Arduino platform to bring your IoT projects up to speed quickly, with the ESP8266!

Similar projects worth following
Using the ESP8266 with Arduino couldn't be simpler. Adding support for the different modules takes only a few mouse clicks, and we've got many tips, tricks and examples to get you started!
Please do not request to join the team!

Links to the other tutorials in this series:

ESP8266 SDK Tutorial Learn how to use the ESP8266 SDK. This is what the pros use!
ESP8266 Lua/NodeMCU Tutorial A look at the NodeMCU Lua interpreter for the ESP8266.  Learn how to get to Blinky!
ESP8266 Arduino Tutorial
(You are here!)
Use the Arduino IDE to simplify development and get up to speed very quickly!

And here's the links to the other tutorials in Part 2:

ESP8266 SDK TutorialLooking at using the linker to get PWM, and the included I2C libraries
ESP8266 Lua/NodeMCU TutorialUsing PWM and I2C with Lua!
ESP8266 Arduino TutorialUsing the Wire library for I2C, and AnalogWrite for fading!

Links to Part 3

ESP8266 SDK TutorialUsing MQTT to develop an IoT device
ESP8266 Lua/NodeMCU TutorialUsing the NodeMCU MQTT module to communicate with a cloud data service
ESP8266 Arduino TutorialWe use the simpler, more widely available HTTP protocol to log data to the cloud

Getting Help

If you run into trouble while following these tutorials, you have a few different options:

  • Ask in the discussion area below the article
  • Join the ##esp8266 channel on Freenode IRC and ping me (MrAureliusR) or ask anyone who is in there
  • Post on the ESP8266 Community Forums (note it can take a while to get a response!)
  • Send me a private message here on Hackaday

The ESP8266 has been popular for quite a while now. The low cost of getting a module coupled with its power and reliability has made sales of the chip shoot through the roof. There's a lot of resources out there, but I wanted to combine all that information together into one place. So let's get started!

The ESP8266 was designed by a Chinese fabless semiconductor company called Espressif. Fabless means they just create the chip design, and they get another company to actually manufacture the silicon (Atmel was also a fabless semiconductor company). While having Wi-fi on-chip with a microcontroller was not a new idea, the concept having a simple serial link to control it out of the box was. Hobbyists all over the world started playing with the chip to see what it could do. Without having to program the ESP, complex IoT applications could be developed, using the ESP simply as an external Wi-fi chip. This is the easiest method for those who don't have interest in diving into the ESP itself. You can use AT commands over a serial link to control the chip. This is the only way to control the ESP modules which only have 8 pins. A full list of the AT command set can be found here. This is a perfectly acceptable solution for many hackers, and if that's all you need then great! I built a data-logging module which used the Sparkfun phant server as the backend using only AT commands. Getting it connected to my Wi-fi network and sending data was very easy.  

However, many of you are here because you want to dive deep down into the power at the heart of the ESP8266. You want to program the module using Arduino or the SDK. You are interested in playing with Lua and discovering how it can be used in an embedded system like this. I generally recommend that people new to the ESP8266 buy a pre-fabricated module from a company like SparkFun or Adafruit

The Adafruit Feather HUZZAH with ESP8266

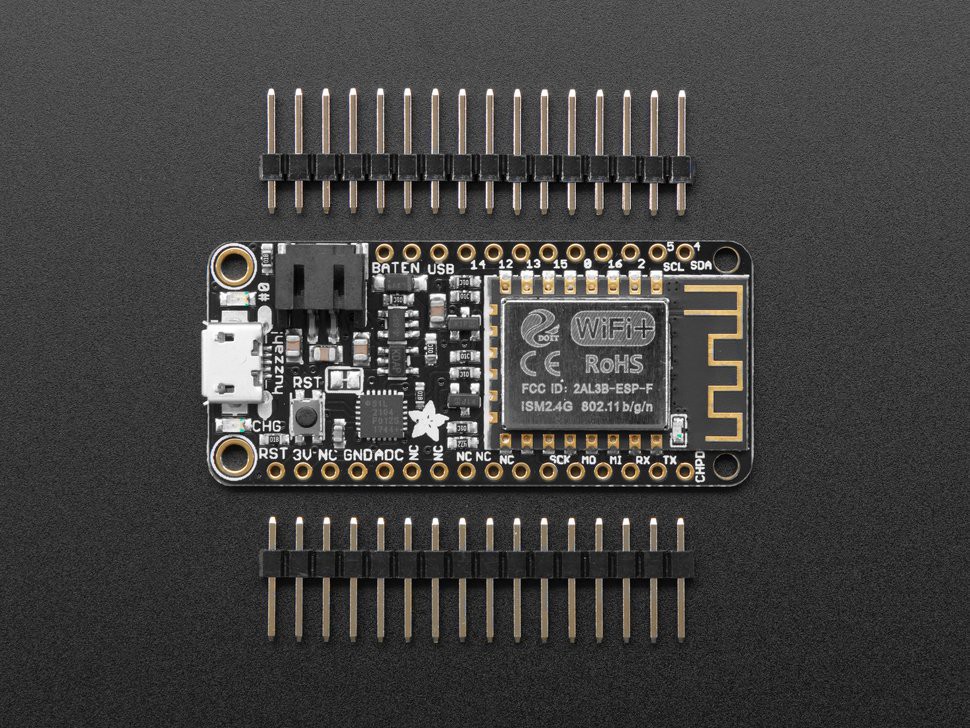
This takes a lot of the difficulty out of spinning your own board. But if you want to spin your own board using, say, an ESP-12F module, here are a few tips (skip to the tutorial section if you bought a HUZZAH Feather or a SparkFun Thing, or similar):

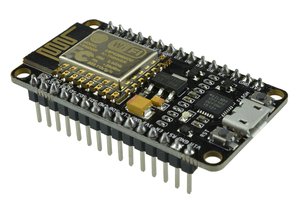
  • Decide which module you want to use. The modules were originally designed by a company called AI Thinker, but now have been widely cloned. Some of these have on-board 3.3V regulators, others don't. Take some time to find a reliable source, and take a close look at the requirements for the board. The cheaper boards tend to require more external components, while the more...
Read more »

lubuntu_esp8266.ova.torrent

Lubuntu VM image for ESP8266 development. Has Arduino, the SDK and Lua tools pre-installed and ready to go.

x-bittorrent - 38.24 kB - 08/03/2018 at 18:52

Download

  • 1
    Getting Started with Arduino & ESP8266

    For newbies to programming, I would highly recommend this approach over development with the SDK. Developing with Arduino adds a lot of convenience at the price of some control. However almost anything you want to develop can be done with Arduino, it just may not be as pretty, as fast or as small as doing it "by hand" with the SDK.

    Getting set up with Arduino is super easy. If you don't already have it, download the latest version of the Arduino IDE from the Arduino website. On Debian/Ubuntu, it can be installed from repository with:

    $ sudo apt install arduino

     And, alternatively, you can build it from source if that's your thing (it's actually quite straightforward if you've built anything from source before). On Windows and Mac, just follow the installer. Open the application after it's installed, and you'll be greeted with a blank project screen. Click File->Preferences and then in the box "Additional Boards Manager URL:" add the following link: 

    http://arduino.esp8266.com/stable/package_esp8266com_index.json
    

    After you add this link, you can then click OK to close the preferences box. Now, click on the Tools menu, hover over the Board entry, and at the top of the list you will see Boards Manager... Open this dialog box, and in the search box, type ESP8266. You will see an entry called "esp8266 by ESP8266 Community". Click install, and this will add the latest version.

    Once it is finished installing, restart the Arduino IDE. Now when you go to Tools->Boards you will see a bunch of ESP8266 boards and modules! Pick whichever board you are using. After choosing the board, you will see that the File->Examples menu has been populated with a whole bunch of examples for your module. We'll take a look at a few different examples. The Blinky example is a great way to test your module/board to make sure the USB connection is working.

  • 2
    Getting to Blinky

    Arduino is the fastest way to get up and running with the ESP8266. All we've had to do is install the Arduino environment, add ESP8266 to the Boards Manager, and then select our board after we plug it in. The ESP8266 community has written all the code which abstracts away the nitty gritty of the SDK into much easier to use functions. Let's take a look at our Blinky code:

    void setup() {
      pinMode(LED_BUILTIN, OUTPUT);     // Initialize the LED_BUILTIN pin as an output
    }
    
    // the loop function runs over and over again forever
    void loop() {
      digitalWrite(LED_BUILTIN, LOW);   // Turn the LED on (Note that LOW is the voltage level
                                        // but actually the LED is on; this is because 
                                        // it is active low on the ESP-01)
      delay(1000);                      // Wait for a second
      digitalWrite(LED_BUILTIN, HIGH);  // Turn the LED off by making the voltage HIGH
      delay(2000);                      // Wait for two seconds (to demonstrate the active low LED)
    }

    If you have done any work with Arduino in the past, the code is indistinguishable from code for any other Arduino board. This is the power of abstraction. Arduino doesn't care what the hardware is, as long as it has an Arduino bootloader. There are hundreds upon hundreds of tutorials for Arduino out there that will get you up to speed. However, let's take a look at what the code is doing, and then why Arduino makes developing on the ESP8266 so easy.

    For those of you completely new to using Arduino, the language used is C++. C++ is technically a different language than C, but you can write pure C in a C++ program and it will work and compile just fine. In this way, C++ is more a superset of C; it's basically C with a bunch of new stuff added on. In Arduino, the C++ we use is very much more like C than traditional C++. This is because almost all of the complexity has been abstracted away by using the power of object-oriented programming in the included libraries. This makes the code the user has to write much less dense and easier to use.

    Let's go through the code quickly. I don't want to give a full tutorial on how to use the Arduino environment--there are literally thousands of them out there, many much better than what I could squeeze into this tutorial. However, in the name of expediency, I will explain enough to get you off and running. 

    Arduino uses two non-standard functions to divide all your code into two sections: things you want to happen once when the program starts, and things you want to happen over and over again while the program is running. These are the setup() and loop() functions. The very first thing the ESP8266 does when running this code is look inside setup(). The only statement we have there is a call to a function called pinMode(). We set a pin to be an output so we can turn the LED on and off. Notice that instead of giving a number, it uses the pre-defined name LED_BUILTIN. This is a special definition that will change depending on the board you are programming to always point to an LED that the user can use. In this case, it's pin 0, which is the built-in red LED on the Feather HUZZAH.

    After it's done with pinMode(), it gets to the end of the setup() function and then jumps into the loop() function. The loop() function will run forever and ever and ever until something stops it -- usually power being disconnected. Our loop function only does a few basic things. It uses another Arduino function call, digitalWrite(), to change the state of the pin we prepared in setup(). It sets it LOW, which turns the LED on. This might be counterintuitive, but take a look at the schematic for the LED below.

    Notice which way the LED is pointing? Current has to flow from the 3.3V power rail, through the LED, through the resistor, and then to ground in order for the LED to light up. When we set the pin to LOW, a transistor inside the pin turns on, connecting that pin to the chip's ground pin. This type of inverse signalling is often referred to as active low; the circuit is active when given a 0, or ground.

    After this, we use the delay() function to wait for 1000ms. If we didn't do this, the LED would flash on and off so quickly that we wouldn't be able to see it. Using delay() is fine in this context, but once you get into more advanced programs it's advisable to avoid using it unless absolutely necessary. This is because during this type of delay, the processor sits in a loop, running at full speed and unable to do anything else. In low-power applications this can be a huge waste of battery, and in any other scenario it blocks the processor from being able to do anything else during that time. The solution to this is to use timers and interrupts, but if this is your first rodeo you're still a ways off from learning all that!

    The next line just does the opposite of the previous digitalWrite -- it sets the pin HIGH, which stops current flowing and extinguishes the LED. We wait for another second, and then reach the end of the function -- which simply returns us back to the beginning of the function. This will loop infinitely unless we reset the chip or cut power. Pretty simple code, right? If you followed all this so far, then you'll have no problem learning how to program the ESP8266 with Arduino! Let's take a look at why using Arduino with the ESP8266 is so popular.

    The function we call in setup(), pinMode(), takes the number of a pin and the type of output to set it to, as we established. If we were programming in C using the ESP8266 SDK, we would have to do quite a bit more work to get this basic thing to happen: we'd have to include a new header file, read the SDK documentation and figure out how the function call works, and add a library to the list that gets passed to the linker in the Makefile. The people who wrote the ESP8266 libraries for Arduino have done all this hard work for you. Under the hood, Arduino is doing exactly what I described, but all you need to know is that one function call.

    The other powerful thing about Arduino is that function names have become standardised. This means that pinMode() -- or any standard function in the Arduino environment -- will work the same on an Arduino Uno, an ESP8266, or a FLORA. Any board that has support in the Arduino IDE will be able to use the same code. This is a big reason for Arduino's popularity. Sharing code and libraries is very easy and essentially guaranteed to work on boards that are officially supported. 

    Even more advanced features, like using Wi-fi, has been written in such a way that in most cases you can use code written for a different device and it will just work. This makes development much faster, and can be a very useful tool; however, I personally think that hiding the true mechanisms of a microcontroller take all the real fun and learning out of it. This is why after you get used to using the Arduino system, I highly recommend leaning the basics of C and give a try at using the SDK. You can check out the sister tutorial to this one!

View all instructions

Enjoy this project?

Share

Discussions

Similar Projects

Does this project spark your interest?

Become a member to follow this project and never miss any updates