 Hulk
HulkStep 1: Things We Are Going to Learn Today

In this video we will be talking about:
- What is an OLED display?
- Then we will have a closer look at the 0.91 (128x32) and 0.96 (128x64) I2C OLED displays
- Next we will talk about installing the Adafruit Library to your Arduino IDE
- Then we will connect NodeMCU and Arduino to an OLED display
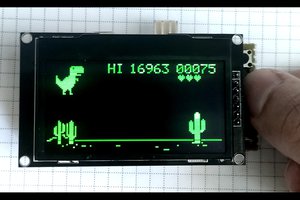
- Next we will have a look at the code and display some graphics and text on it
- We will also talk about applying Custom Fonts and displaying Images
- Then we will connect Multiple OLEDs to a micro-controller using I2C Multiplexer
- Finally, we will talk about few common errors people make while using the OLED displays
Step 2: Hardware Requirement

For this tutorial we need:
- A Breadboard
- A 0.91" (128x32) and 0.96" (128x64) I2C OLED displays
- Arduino UNO/NANO (whatever is handy)
- NodeMCU
- TCA9548A I2C multiplexer
- Few Connecting Cables
- and a USB cable to upload the code
Step 3: What Is an OLED Display?


OLED or organic light-emitting diode is a light-emitting
diode (LED) in which the emissive electroluminescent layer is a film of organic compound (millions of small LED lights) that emits light in response to an electric current.
OLEDs are used to create digital displays in devices such as television screens, computer monitors, portable systems such as mobile phones, hand-held game consoles and PDAs. An OLED display works without a backlight because it emits visible light.
There are many types of OLED displays available in the
market based on their
- Sizes
- Color
- Brands
- Protocol
- SPI (Serial Peripheral Interface) or I2C
- Passive-matrix (PMOLED) or active-matrix (AMOLED) control scheme
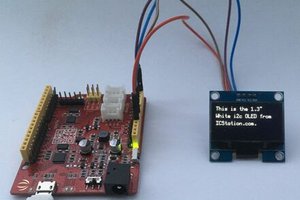
In this tutorial, I am going to talk about connecting the
blue color 0.91 (128x32 OLED) and 0.96 (128x64 OLED) I2C OLDE displays to an Arduino NANO and NodeMCU. I2C bus technology uses only 2 pins of the MCU so we have heaps available for other sensors.
Step 4: Closer Look


Lets have a closer at these two displays.
At the back of these displays there are heaps of SMD capacitors and resistors soldered on-board; but, since its an I2C device we only care about these 2 pins (SCL and SDA)
The display connects to Arduino using only four wires – two for power (VCC and GND) and two for data (serial clock SCL and
serial data SDA), making the wiring very simple. The data connection is I2C (I²C, IIC or Inter-Integrated Circuit) and this interface is also called TWI (Two Wire Interface).
- The on-board pins can be in different order, so always triple check before hooking it up to your project.
- Operation voltage is between 3v to 5v but, it is best to use the guidance from the manufacturer's datasheet.
- Sometimes we need to use 2 displays in our projects. So, how can we achieve this?
The trick is to have a configurable address on your display. This unit has a configurable address between 0x78 and 0x7A. Just by unsoldering the 0Ohm resistor from one side and hoking it up to the other side or just by putting a global solder we can change the address. We will talk about it in depth when we hook up multiple displays to an Arduino in the later section of this tutorial.
In picture these displays look very big. But, practically speaking they are tiny. They are made of 128 x 32/64 individual OLED pixels and do not require any back-light. Just have a look at this and see how small it is. Even though they are small they can be very useful in any electronic projects.
Step 5: Library


There are several libraries available to control these
displays. In past I have used the "u8glib library" but I find the AdaFruit library very easy to understand and use in our projects. So, I am going to use the AdaFruit library in this tutorial.
To control the OLED display you’ll need the "adafruit_GFX.h" library and the "adafruit_SSD1306.h" library.
There are two ways you can download and install the library to your Arduino IDE.
Method 1
Go to the "Library manager" and search "adafruit_SSD1306" and "adafruit_gfx"
Select the latest...
 electronicsworkshops
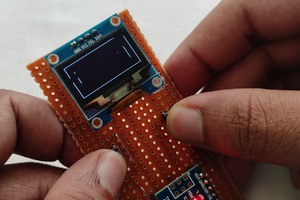
 Alexander