 Rodmg
RodmgRequired parts:
Two or more of the following:
- 3.3V version of Arduino nano or compatible
- RFM69W or RFM69CW 915Mhz transceiver (433 and 868 Mhz versions can be used with some modifications to the code)
- OR -
You could use a board that integrates the Atmega328 MCU and the RFM69 transceiver, like Moteino, however I currently don’t have one and haven’t tested it.
Required skills:
- Some experience with an UNIX-like command line (like Bash)
- Some experience with Arduino programming
- Some experience with computer networks
- Git, JavaScript and node.js is a plus
This tutorial will be divided in two parts:
- Embedded stuff: Setting up the hardware and the firmware, including the software tools needed for programming it.
- Software stuff: Setting up the software that runs on the PC/Server
Embedded stuff:
Preparing the hardware:
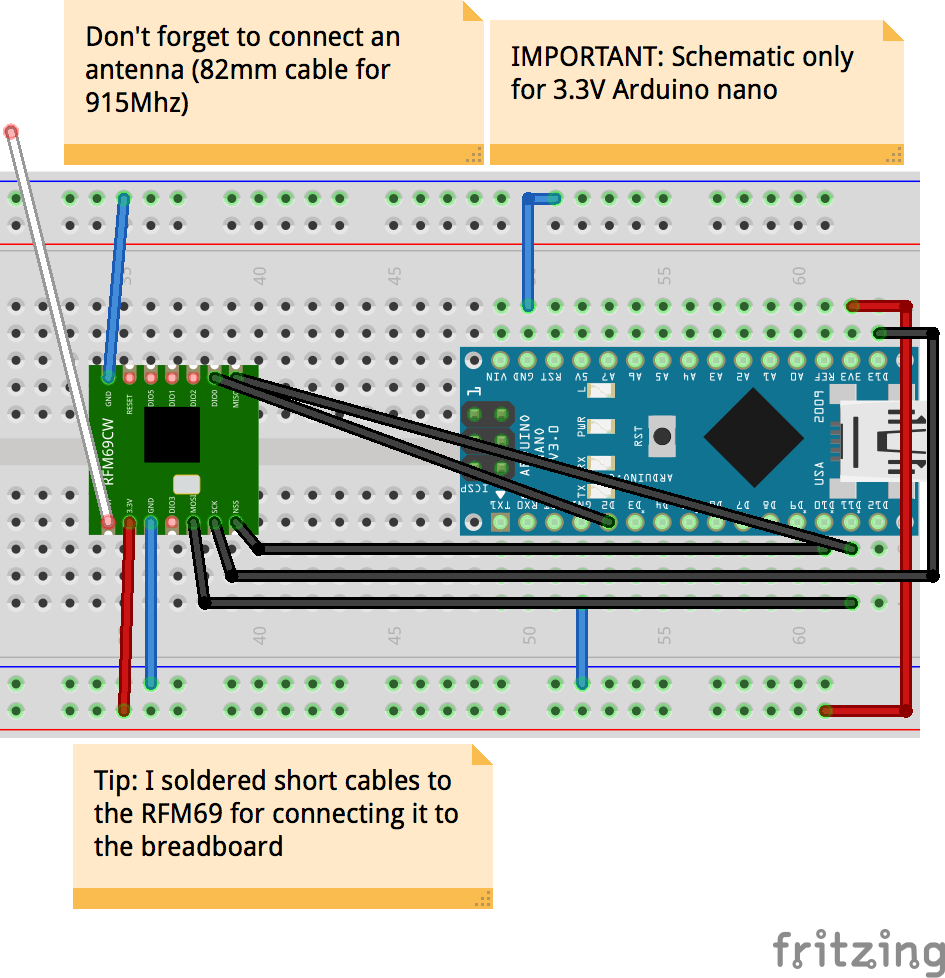
If you are using a 3.3V Arduino nano and the RFM69 separately, connect them this way:
 If you have a standard 5v Arduino nano, you will need to use a level shifter and a 3.3V regulator for powering the RFM69, here are some good guides for doing that: https://learn.sparkfun.com/tutorials/rfm69hcw-hookup-guide#hardware-connections
Example of connecting a 5V Arduino nano using a CD4050B Buffer as level shifter.
Also please note that this diagram is for the RFM69CW, variants like the RFM69HCW have different pinouts, please adapt your connections according to the specific module you are using.
Connect every Arduino/RFM69 pair you have like that. One of those will be the “Bridge” for interfacing with the PC, the others will be the clients.
Now we should prepare and upload the Bridge firmware, for that do the following:
- Install PlatformIO IDE
- Download the Bridge firmware from: https://github.com/Rodmg/rfm-mqtt-sn-bridge (Clone or download > Download Zip)
- Uncompress the downloaded file and open the resulting folder with Atom (Installed with the PlatformIO IDE)
- Connect the Arduino that will be the bridge to the PC and upload the firmware from the PlatformIO IDE.
Thats it, our bridge is ready. Disconnect it from the PC, we will set it aside for now.
Now, let’s program one of the clients with an example code:
- Download the example client firmware from a terminal with git:
git clone --recursive https://github.com/Rodmg/rfm-mqtt-sn-client-example.git
- Open the resulting folder with Atom (Installed with the PlatformIO IDE)
- Connect the Arduino that will be the client to the PC and upload the firmware from the PlatformIO IDE.
Now our client is ready. The example firmware includes all the required libraries for driving the RFM69 transceiver, along with the MQTT-SN library. The example code is in src/main.ino, we will explain what it does in detail in a future post, but for now all we need to know is what it does:
When the Arduino is powered on, it first tries to establish an MQTT-SN session with the Bridge, assigning itself a fixed address (ADDR, 23 in the example), when it succeeds, it subscribes itself to the topic “client/subscribe” and registers the topic "client/publish” (the topic where it will publish). It also registers a last-will topic, “lastwill”.
After that, it starts a loop that publishes a “Hello world” message every 5 second to the “client/publish” topic.
Also, when a publication to the topic “client/subscribe” is done, the received publication is printed via the serial port.
Now let’s prepare the software that will let us try this functionality.
Software stuff:
We need to install a MQTT broker (mosca), the aquila-gateway for connecting the MQTT-SN network to the broker via the hardware Bridge, and a tool for easily developing and debugging the communication (node-red and node-red-dashboard).
Before doing anything you need to have the following installed:
- node.js v6.X.X (https://nodejs.org/en/) (if you are on macOS or Linux, I recommend using nvm for installing and managing node versions (https://github.com/creationix/nvm))
- a UNIX-like console (If you are on macOS or Linux, you are all set, if you are on Windows, I recommend git-bash, included with the GIT package for Windows)
Now, open a terminal an enter the following commands (pressing enter after each line):
Please note: on macOS and Linux, depending on how you installed node, you may need to prepend ’sudo’ to the ‘npm install -g’ commands. (if you installed it with nvm, you don’t need to worry)
npm install -g aquila-gateway node-red
npm install -g mosca bunyan
mkdir ~/.node-red
cd ~/.node-red
npm install node-red-dashboard
Note 2: If you have problems installing aquila-gateway, try with: sudo npm install -g aquila-gateway --unsafe-permAfter everything is installed, we can proceed to starting all the processes needed for the server to run:
- Make sure the Bridge is connected to the PC
- in a terminal, execute:
mosca -v | bunyan - in another terminal, execute:
aquila-gateway -p <bridge serial port> | bunyan - in another terminal, execute:
node-red
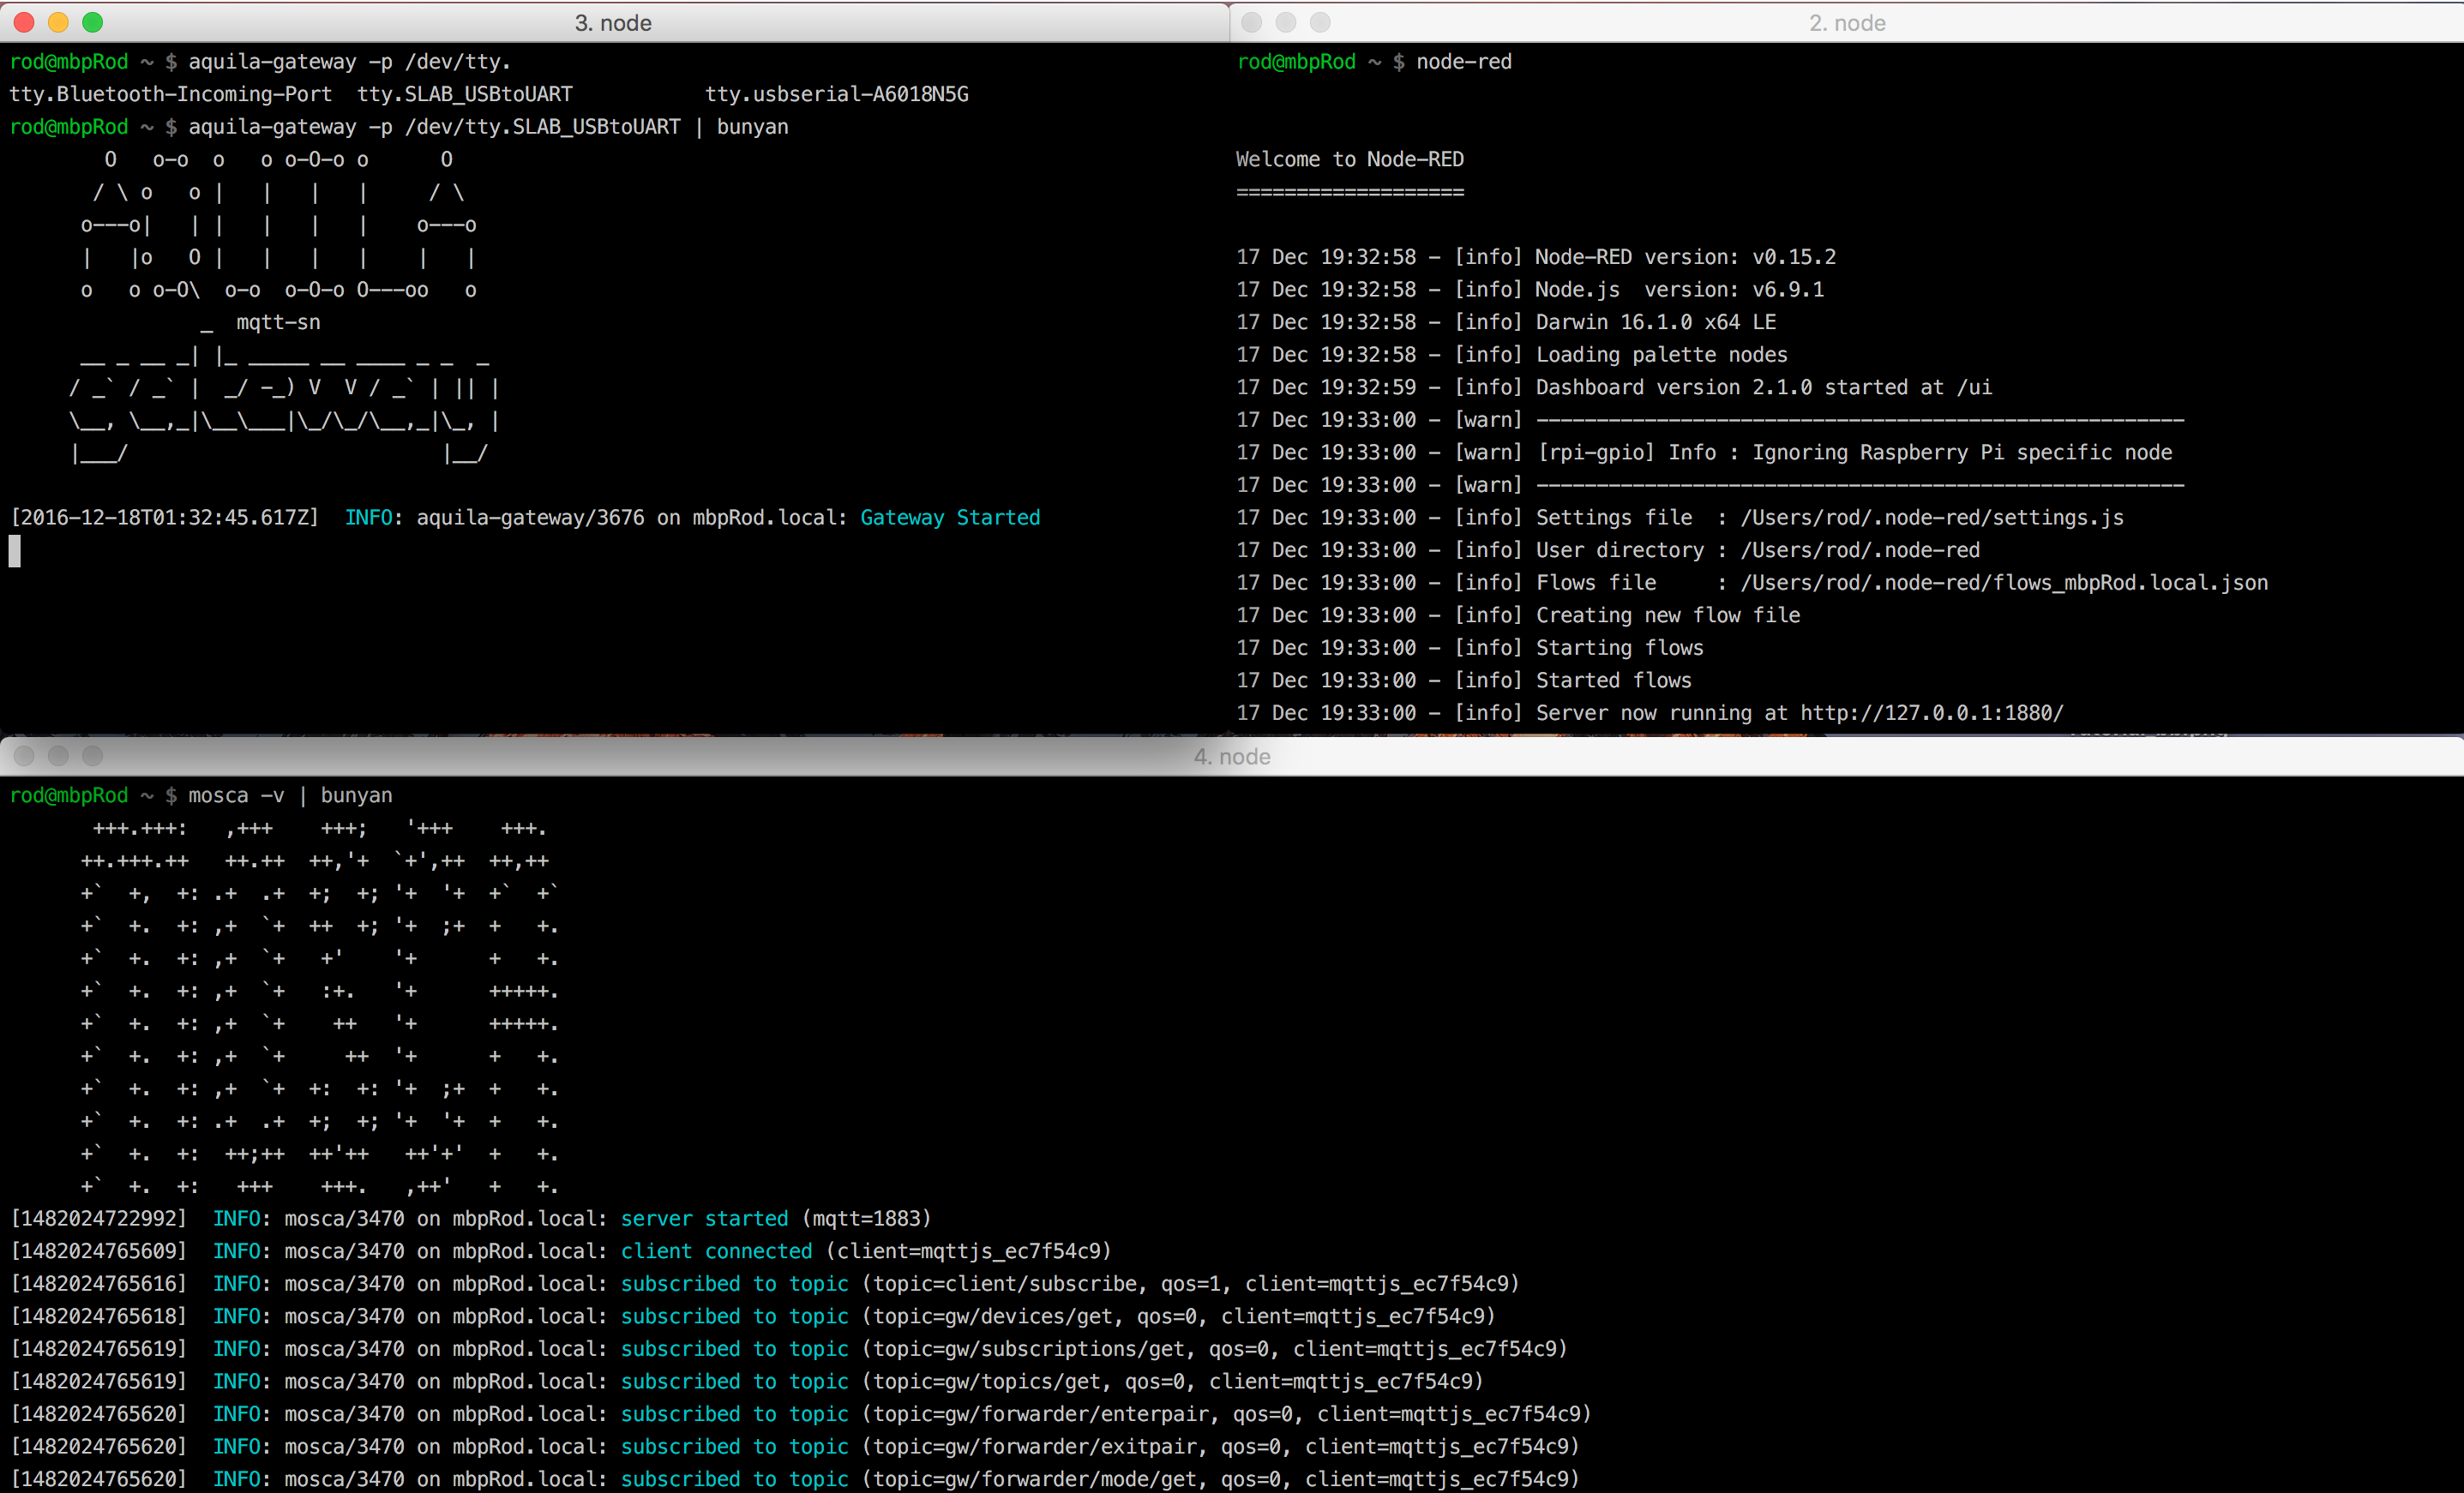
Three terminal windows running the necessary processes.
Now that everything is set, let’s start the fun:
First, we will setup a node-red flow that will give us a UI for monitoring our MQTT-SN network, useful for debugging and maintaining sensor networks.
- From a web browser, go to http://localhost:1880
- You should see the node-red interface
- Press the menu button at the top right of the page and select "Import > Clipboard"
- Paste the following code and select "Import":
[{"id":"f9059690.7dac18","type":"mqtt out","z":"cba35010.5428a","name":"","topic":"gw/devices/get","qos":"1","retain":"false","broker":"28f0b2cb.53e90e","x":345,"y":51,"wires":[]},{"id":"170a5acf.8e5dc5","type":"mqtt out","z":"cba35010.5428a","name":"","topic":"gw/subscriptions/get","qos":"1","retain":"false","broker":"28f0b2cb.53e90e","x":368,"y":118,"wires":[]},{"id":"ae873b1d.687958","type":"mqtt out","z":"cba35010.5428a","name":"","topic":"gw/topics/get","qos":"1","retain":"false","broker":"28f0b2cb.53e90e","x":351,"y":177,"wires":[]},{"id":"3c84b33e.40dd3c","type":"mqtt in","z":"cba35010.5428a","name":"","topic":"gw/topics/res","broker":"28f0b2cb.53e90e","x":135,"y":345,"wires":[["cbf0ddd3.6f633"]]},{"id":"9afdf812.949598","type":"mqtt in","z":"cba35010.5428a","name":"","topic":"gw/devices/res","broker":"28f0b2cb.53e90e","x":147,"y":246,"wires":[["ef2010df.c19a6"]]},{"id":"46548252.3e793c","type":"mqtt in","z":"cba35010.5428a","name":"","topic":"gw/subscriptions/res","broker":"28f0b2cb.53e90e","x":164,"y":294,"wires":[["909b4123.5da46"]]},{"id":"c4eeddeb.5451c","type":"inject","z":"cba35010.5428a","name":"","topic":"","payload":"","payloadType":"num","repeat":"10","crontab":"","once":true,"x":159,"y":94,"wires":[["f9059690.7dac18","170a5acf.8e5dc5","ae873b1d.687958"]]},{"id":"c9e2a488.a403a8","type":"mqtt in","z":"cba35010.5428a","name":"","topic":"gw/devices/disconnected","broker":"28f0b2cb.53e90e","x":715,"y":295,"wires":[["8856b77a.157458"]]},{"id":"e3485f36.42228","type":"mqtt in","z":"cba35010.5428a","name":"","topic":"gw/devices/connected","broker":"28f0b2cb.53e90e","x":718,"y":247,"wires":[["41cef69c.d2acc8"]]},{"id":"ea7a8f5e.b04b4","type":"ui_text","z":"cba35010.5428a","group":"bd123138.cbcb2","order":"4","width":"9","height":"2","name":"Connected","label":"","format":"{{msg.payload}}","layout":"col-center","x":1028,"y":247,"wires":[]},{"id":"7828b4e5.89b89c","type":"ui_text","z":"cba35010.5428a","group":"bd123138.cbcb2","order":"5","width":"9","height":"2","name":"Disconnected","label":"","format":"{{msg.payload}}","layout":"col-center","x":1041,"y":299,"wires":[]},{"id":"41cef69c.d2acc8","type":"function","z":"cba35010.5428a","name":"","func":"var pl = JSON.parse(msg.payload);\nmsg.payload = JSON.stringify(pl, null, 2);\nreturn msg;","outputs":1,"noerr":0,"x":888,"y":245,"wires":[["ea7a8f5e.b04b4"]]},{"id":"8856b77a.157458","type":"function","z":"cba35010.5428a","name":"","func":"var pl = JSON.parse(msg.payload);\nmsg.payload = JSON.stringify(pl, null, 2);\nreturn msg;","outputs":1,"noerr":0,"x":894,"y":302,"wires":[["7828b4e5.89b89c"]]},{"id":"1d79be34.93fe92","type":"mqtt in","z":"cba35010.5428a","name":"","topic":"gw/forwarder/mode/res","broker":"28f0b2cb.53e90e","x":118,"y":454,"wires":[["214c620d.76957e"]]},{"id":"974dca04.9dd0a8","type":"ui_text","z":"cba35010.5428a","group":"bd123138.cbcb2","order":"1","width":"","height":"","name":"Mode","label":"Mode:","format":"{{msg.payload}}","layout":"row-center","x":321,"y":488,"wires":[]},{"id":"41483d91.2a1044","type":"mqtt out","z":"cba35010.5428a","name":"","topic":"gw/forwarder/mode/get","qos":"1","retain":"false","broker":"28f0b2cb.53e90e","x":359,"y":541,"wires":[]},{"id":"db278ea1.aa20a","type":"inject","z":"cba35010.5428a","name":"","topic":"","payload":"","payloadType":"num","repeat":"10","crontab":"","once":true,"x":163,"y":541,"wires":[["41483d91.2a1044"]]},{"id":"46311d5a.6c9d94","type":"ui_button","z":"cba35010.5428a","name":"Set Pair","group":"bd123138.cbcb2","order":"2","width":"","height":"","label":"Set Pair","color":"","icon":"","payload":"","payloadType":"str","topic":"","x":163.5,"y":589,"wires":[["449b7d69.93a954"]]},{"id":"449b7d69.93a954","type":"mqtt out","z":"cba35010.5428a","name":"","topic":"gw/forwarder/enterpair","qos":"1","retain":"false","broker":"28f0b2cb.53e90e","x":348,"y":589,"wires":[]},{"id":"4fa2305d.0effc","type":"mqtt out","z":"cba35010.5428a","name":"","topic":"gw/forwarder/exitpair","qos":"1","retain":"false","broker":"28f0b2cb.53e90e","x":351,"y":637,"wires":[]},{"id":"f0d8452f.e1a3f8","type":"ui_button","z":"cba35010.5428a","name":"Set Normal","group":"bd123138.cbcb2","order":"2","width":"","height":"","label":"Set Normal","color":"","icon":"","payload":"","payloadType":"str","topic":"","x":175,"y":637,"wires":[["4fa2305d.0effc"]]},{"id":"d1c06e5b.521c2","type":"ui_template","z":"cba35010.5428a","group":"5010d576.b0a54c","name":"Devices","order":0,"width":"9","height":"4","format":"<div ng-init=\"rodShowDetails = false; rodDevice = {};\">\n <h1>Devices</h1>\n \n <div ng-if=\"!rodShowDetails\">\n <table>\n <tr>\n <th>Address</th>\n <th>Connected</th>\n <th>State</th>\n <th>Duration</th>\n <th>Will Topic</th>\n <th>LQI</th>\n <th>RSSI</th>\n </tr>\n <tr ng-repeat=\"device in msg.payload\">\n <td>\n {{device.address}}\n </td>\n <td>\n {{device.connected}}\n </td>\n <td>\n {{device.state}}\n </td>\n <td>\n {{device.duration}}\n </td>\n <td>\n {{device.willTopic}}\n </td>\n <td>\n {{device.lqi}}\n </td>\n <td>\n {{device.rssi}}\n </td>\n </tr>\n </table>\n </div>\n \n <div ng-if=\"rodShowDetails\">\n <button class=\"md-button md-raised\" type=\"button\" ng-click=\"rodShowDetails = false;\">Back</button>\n </div>\n</div>\n\n\n","storeOutMessages":true,"fwdInMessages":true,"x":510,"y":248,"wires":[[]]},{"id":"94416a6.9ba9a98","type":"ui_template","z":"cba35010.5428a","group":"5010d576.b0a54c","name":"Subscriptions","order":0,"width":"9","height":"4","format":"<h1>Subscriptions</h1>\n<!--\n<pre>\n <code>{{msg.payload}}</code>\n</pre>\n-->\n\n<table>\n <tr>\n <th>Device</th>\n <th>Topic</th>\n <th>QOS</th>\n </tr>\n <tr ng-repeat=\"sub in msg.payload\">\n <td>\n {{sub.device}}\n </td>\n <td>\n {{sub.topic}}\n </td>\n <td>\n {{sub.qos}}\n </td>\n </tr>\n</table>","storeOutMessages":true,"fwdInMessages":true,"x":500,"y":296,"wires":[[]]},{"id":"f39c0c6c.86ac","type":"ui_template","z":"cba35010.5428a","group":"5010d576.b0a54c","name":"Topics","order":0,"width":"9","height":"4","format":"<h1>Topics</h1>\n<!--<pre>\n <code>{{msg.payload}}</code>\n</pre>\n-->\n\n<table>\n <tr>\n <th>ID</th>\n <th>Device</th>\n <th>Name</th>\n <th>Type</th>\n </tr>\n <tr ng-repeat=\"topic in msg.payload\">\n <td>\n {{topic.id}}\n </td>\n <td>\n {{topic.device}}\n </td>\n <td>\n {{topic.name}}\n </td>\n <td>\n {{topic.type}}\n </td>\n </tr>\n</table>","storeOutMessages":true,"fwdInMessages":true,"x":486,"y":353,"wires":[[]]},{"id":"909b4123.5da46","type":"json","z":"cba35010.5428a","name":"","x":335,"y":296,"wires":[["94416a6.9ba9a98"]]},{"id":"cbf0ddd3.6f633","type":"json","z":"cba35010.5428a","name":"","x":329,"y":348,"wires":[["f39c0c6c.86ac"]]},{"id":"ef2010df.c19a6","type":"json","z":"cba35010.5428a","name":"","x":341,"y":250,"wires":[["d1c06e5b.521c2"]]},{"id":"214c620d.76957e","type":"json","z":"cba35010.5428a","name":"","x":279.5,"y":414,"wires":[["5bee0c1f.cb9f64"]]},{"id":"5bee0c1f.cb9f64","type":"change","z":"cba35010.5428a","name":"","rules":[{"t":"set","p":"payload","pt":"msg","to":"payload.mode","tot":"msg"}],"action":"","property":"","from":"","to":"","reg":false,"x":339.5,"y":451,"wires":[["974dca04.9dd0a8"]]},{"id":"28f0b2cb.53e90e","type":"mqtt-broker","z":"cba35010.5428a","broker":"localhost","port":"1883","clientid":"","usetls":false,"verifyservercert":true,"compatmode":true,"keepalive":"60","cleansession":true,"willTopic":"","willQos":"0","willRetain":null,"willPayload":"","birthTopic":"","birthQos":"0","birthRetain":null,"birthPayload":""},{"id":"bd123138.cbcb2","type":"ui_group","z":"cba35010.5428a","name":"Pairing","tab":"8c8f57f9.f65c38","disp":true,"width":"9"},{"id":"5010d576.b0a54c","type":"ui_group","z":"cba35010.5428a","name":"Gateway Database","tab":"8c8f57f9.f65c38","disp":true,"width":"9"},{"id":"8c8f57f9.f65c38","type":"ui_tab","z":"cba35010.5428a","name":"Gateway Aquila","icon":"dashboard","order":2}]
- Press “Deploy”
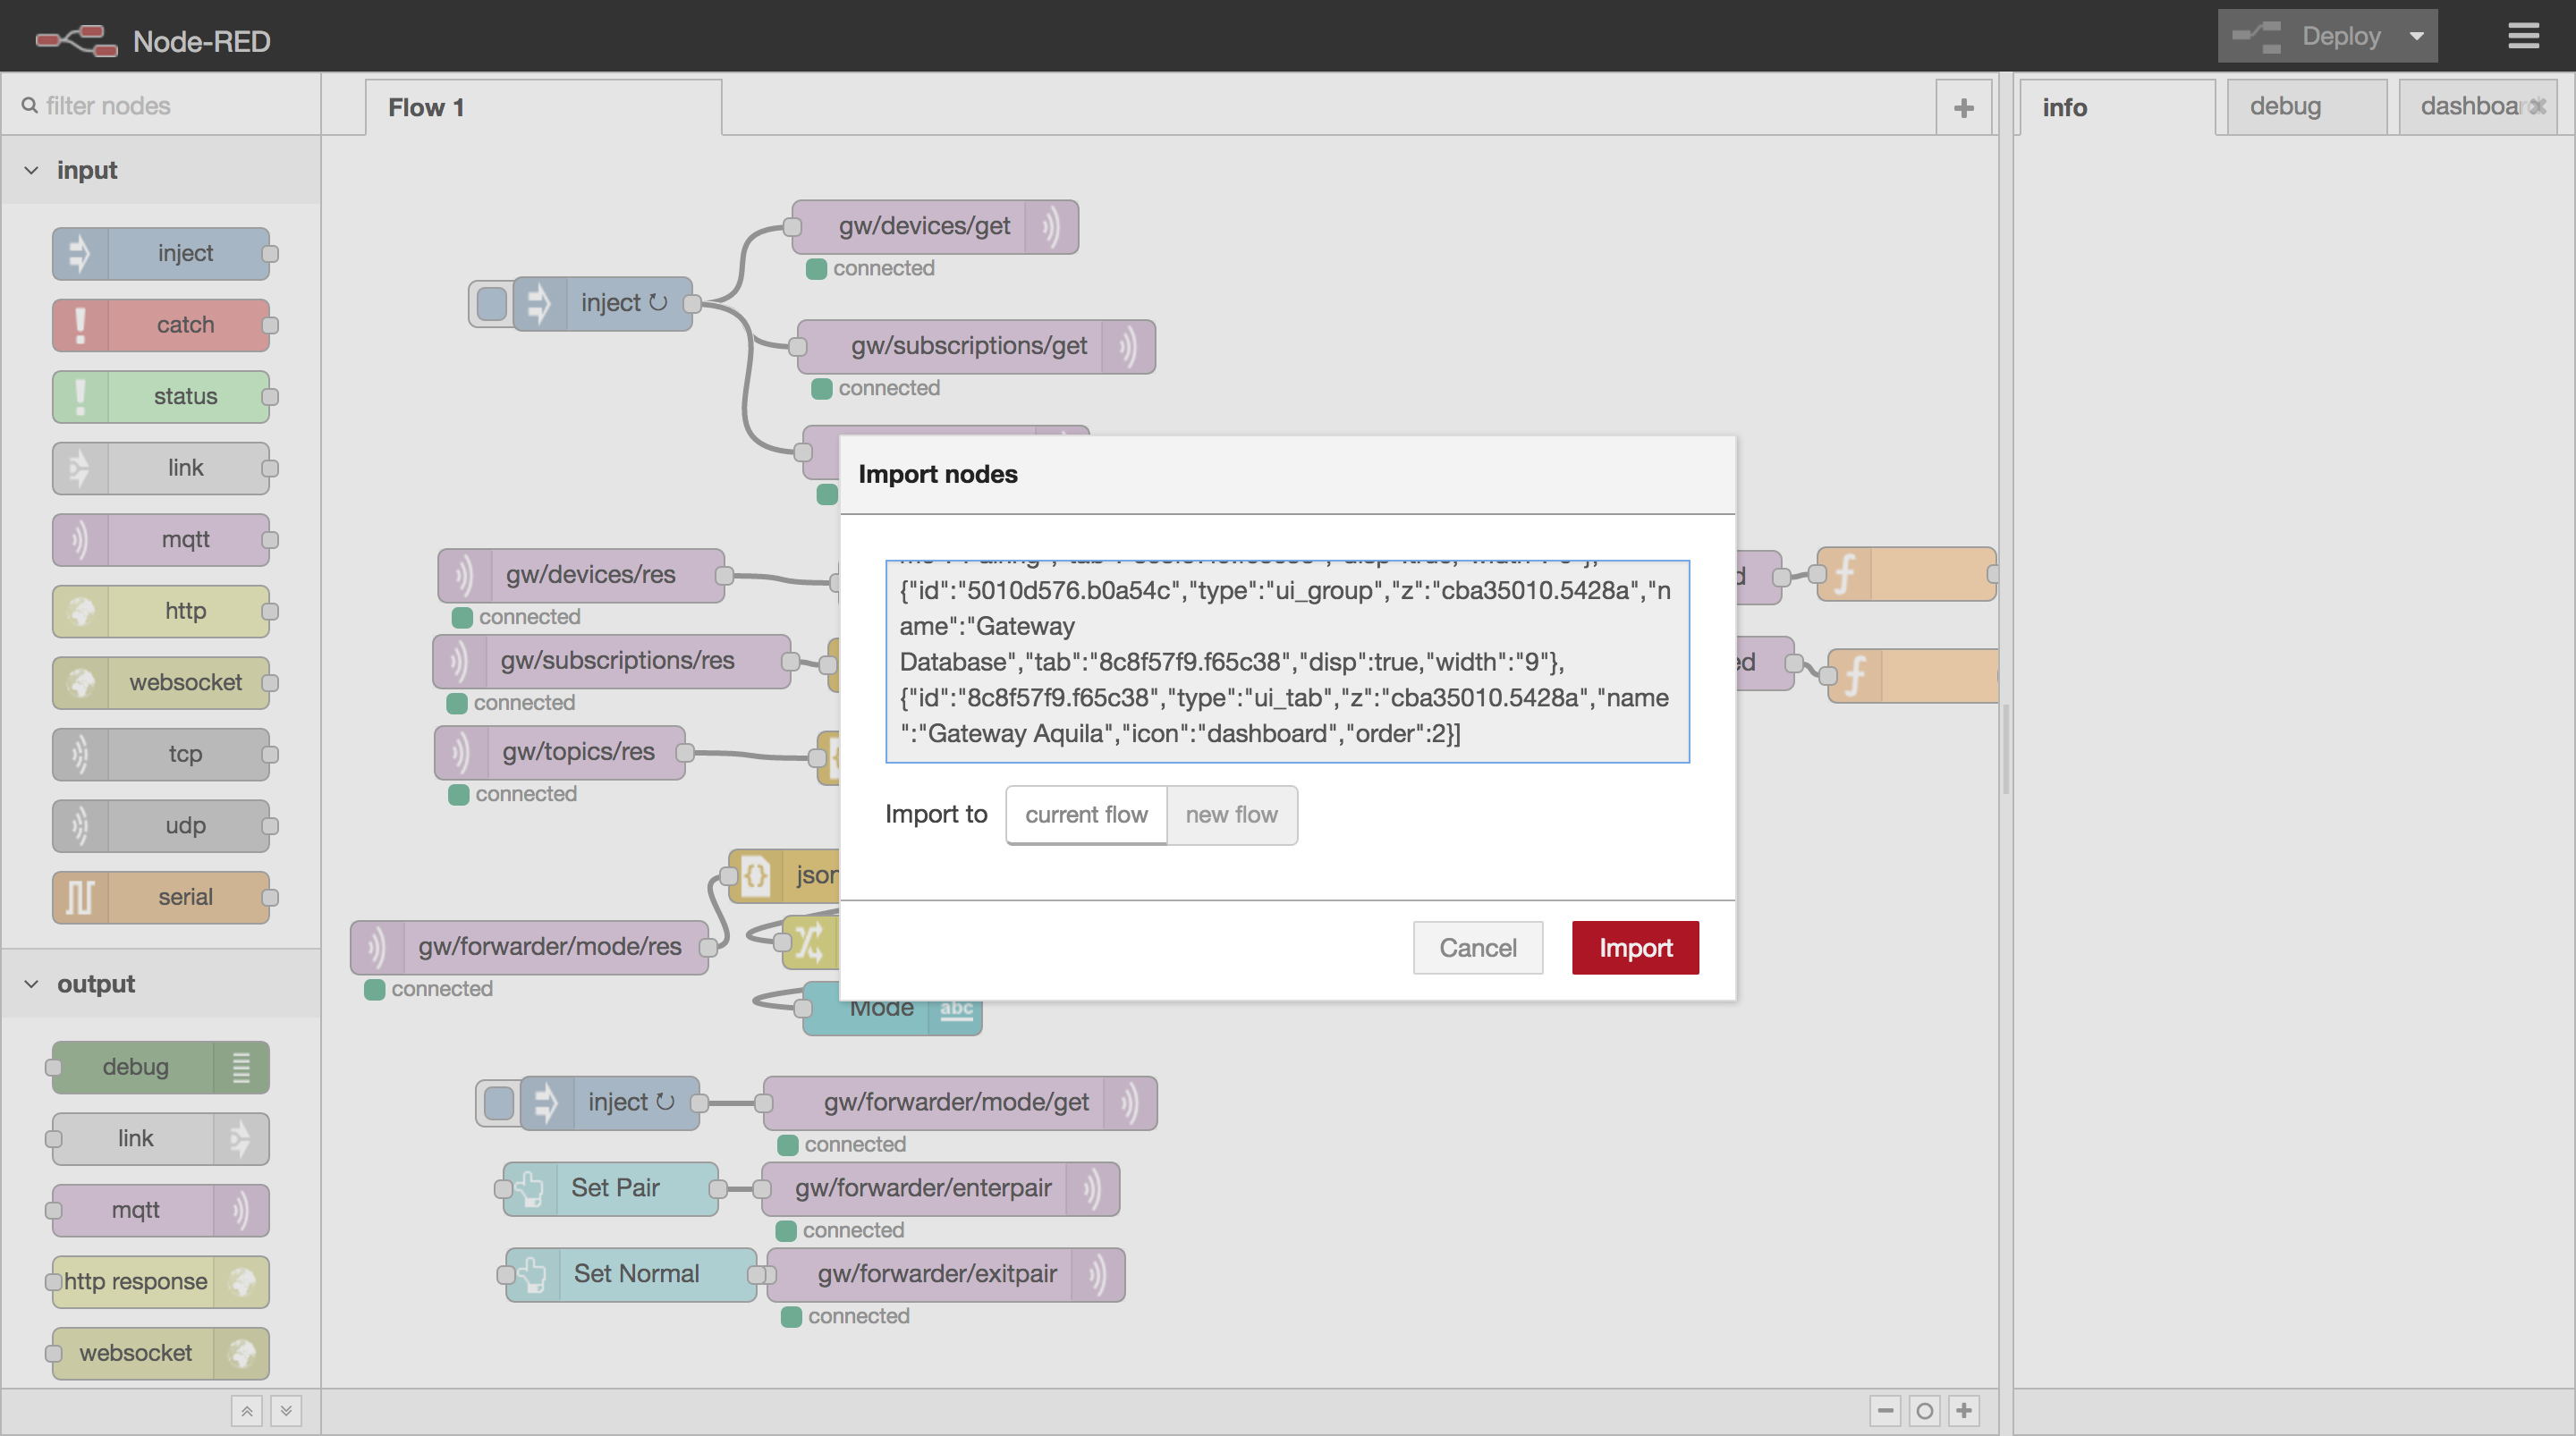
The node-red interface and the import dialog.
- Go to http://localhost:1880/ui
- Now you should see a little UI with information about our Gateway and the devices currently connected. This will be useful for debugging our sensor network.
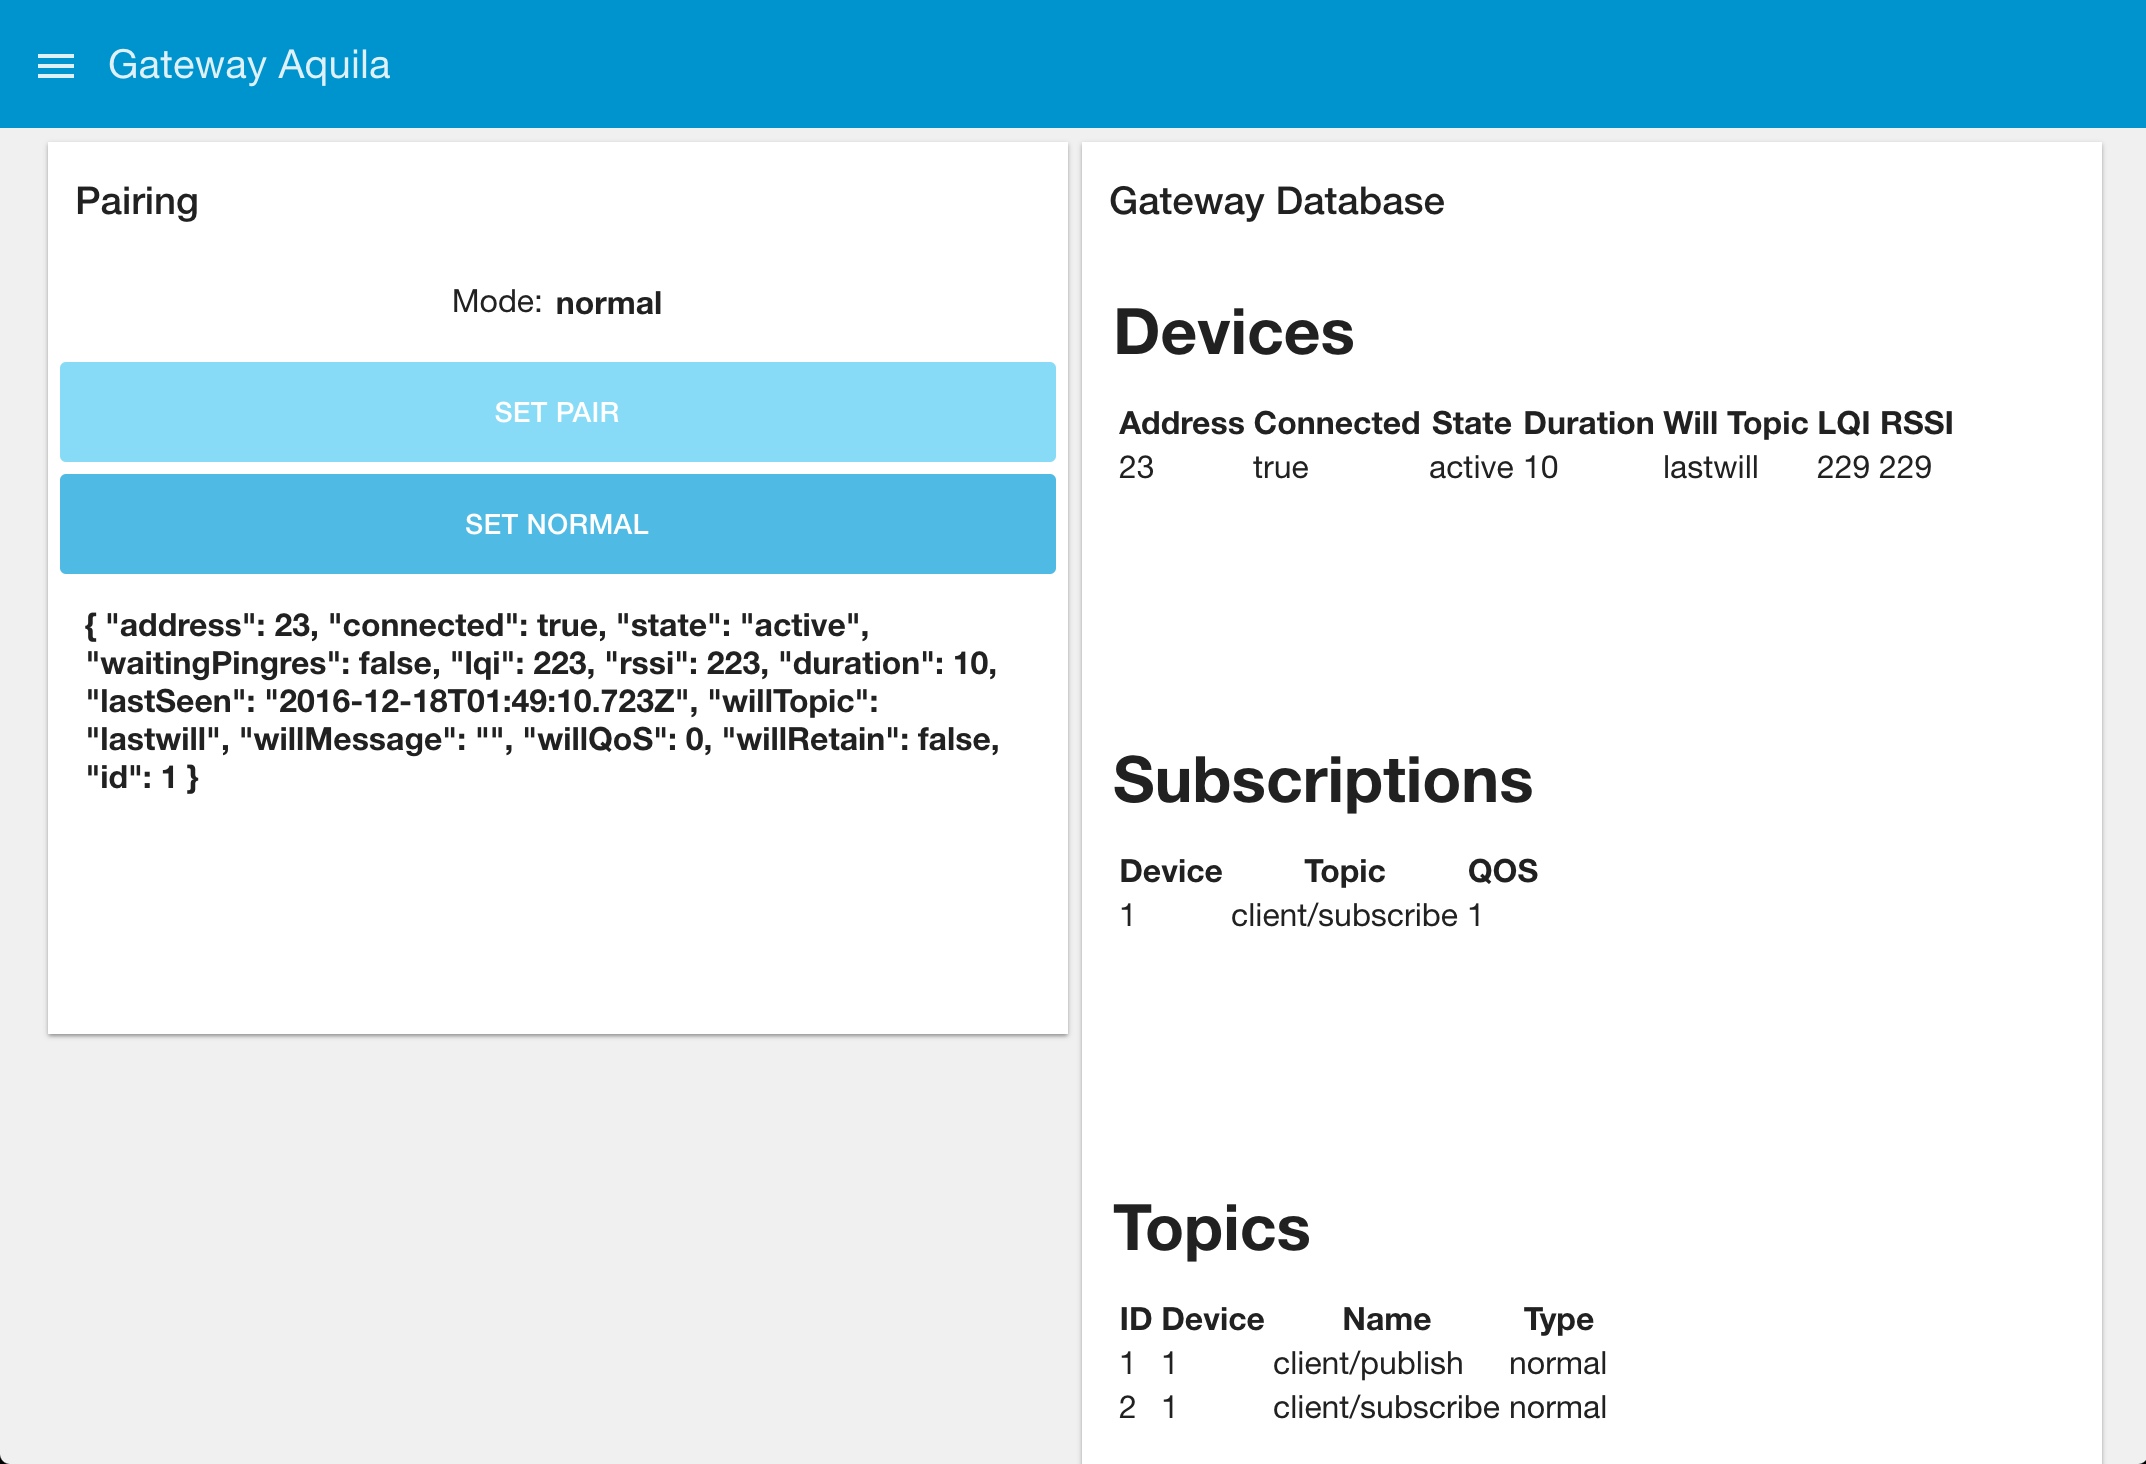
MQTT-SN Gateway monitoring interface based on node-red-dashboard
Now you can power your client device and it should appear in the monitoring interface, along with its subscriptions and topics.
Also, you may have noted that we have buttons for entering and exiting "Pair" mode, this is a feature that allows us to more easily create sensor networks by automatically assigning addresses to the devices with a simple pairing step. We will discuss more about it and how to implement it on firmware in a future tutorial.
Now lets us proceed to a more real-life example on how to use the MQTT-SN network from a MQTT client.
Communicating with devices from a MQTT client
The whole point of the Aquila 2.0 platform is making easier the communication of embedded devices with other technologies. This is accomplished via a standard MQTT client, like MQTT-Lens, MQTT-FX or your favorite MQTT library on Android, iOS, python, node, etc.
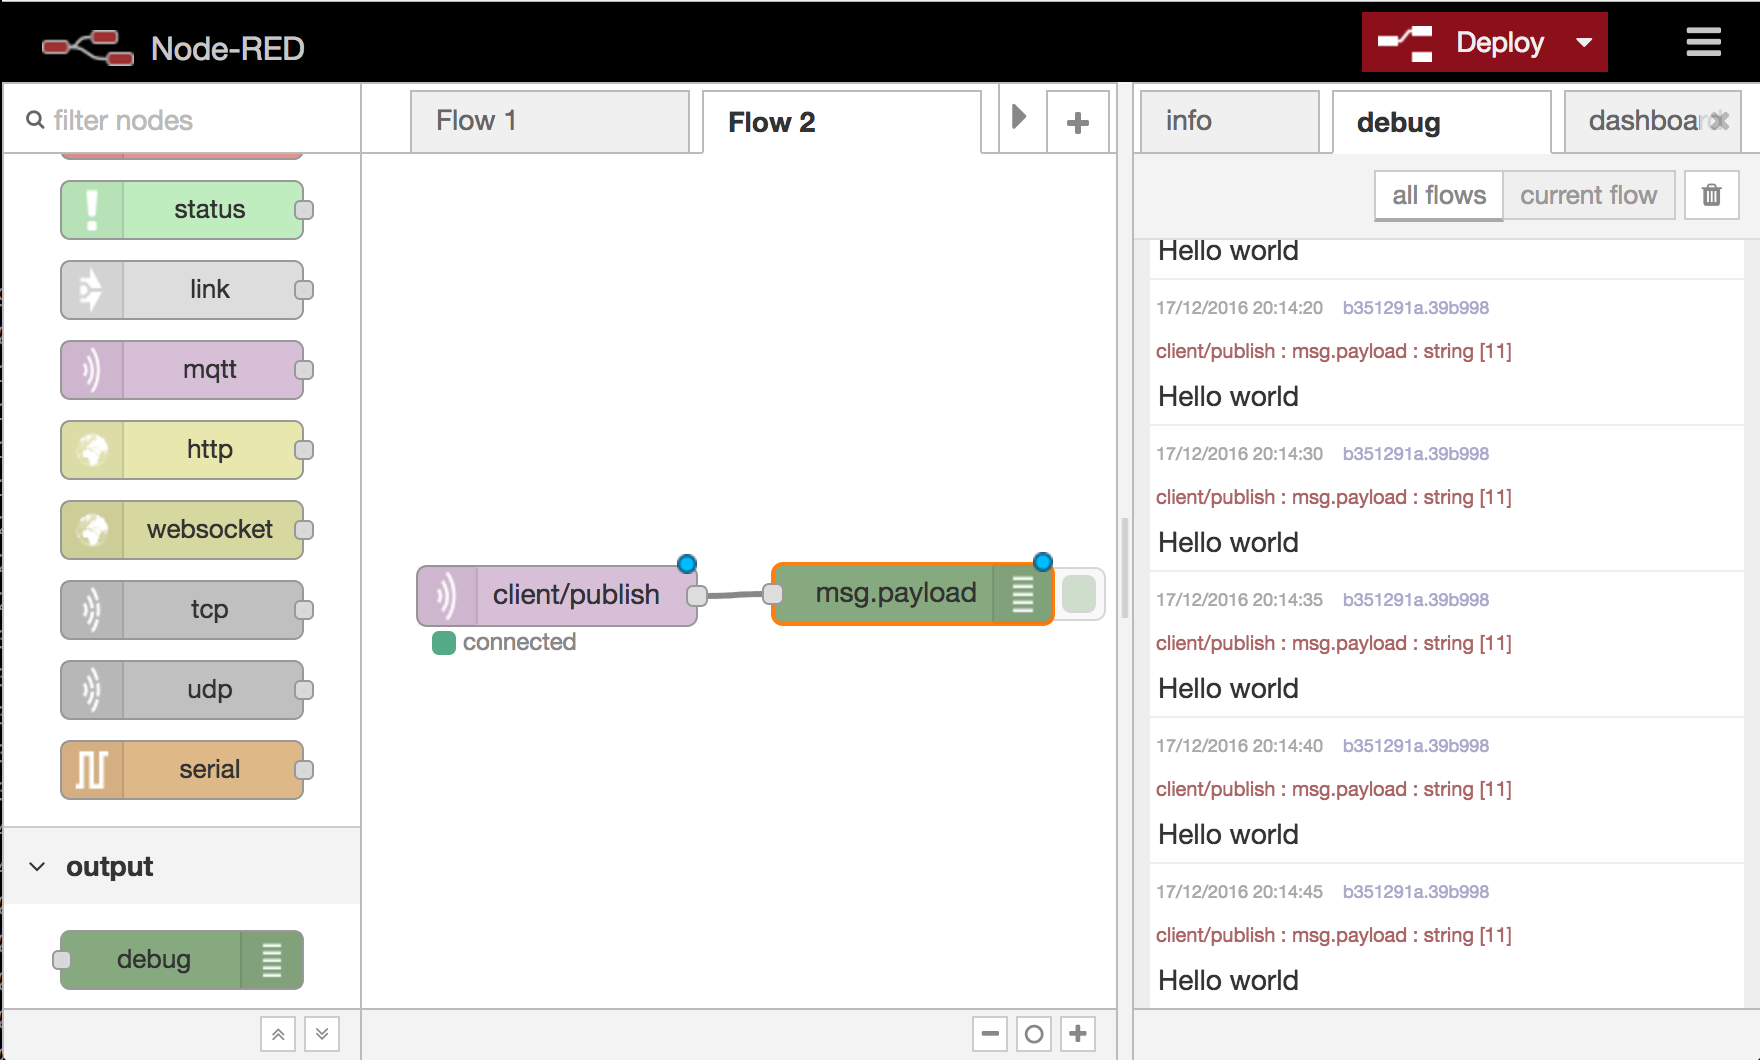
In this tutorial we have been using node-red, one of the reasons why is because node-red is modeled around MQTT, so let's take advantage of it using the built-in MQTT nodes:
1. Create a new flow by clicking the "+" icon next to the "Flow 1" tab.
2. From the nodes list, drag a mqtt input node and a debug output node.
3. Double click the mqtt node and configure it like the following image:

4. Connect the mqtt node and the debug node.
5. Press the "Deploy" Button.
6. Open the "Debug" Tab in the panel at the right of the window.
Now you should see a "Hello world" message published by the device every 5 seconds.
Conversely you could connect an "Inject" input node to a mqtt output publishing to the "client/subscribe" topic and send any text. You would then see that text coming from the Arduino serial port.
Discussions
Become a Hackaday.io Member
Create an account to leave a comment. Already have an account? Log In.