Close
0%
0%

Alternative Communication Vest

The CoCoA Project is a wearable vest connected to the internet that assists people with speech or non-verbal disabilities.

Public Chat
Similar projects worth following
144 views
0 followers

The Alternative Communication Vest (CoCoA) is a wearable vest  connected to the internet that allows the coupling of tactile symbols of alternative communication to assist people with speech or non-verbal disabilities.

Speech impairments affect people with autism, aphasia, cerebral palsy, partial or total deafness, among other disorders. A person with  with autism, for example, the  of non-verbalization or speech delay is common condition. Additionally, speech absence  may also be a temporary disability due to some illness.

Speech impairment, either permanent or temporary, requires attention and treatment since this ability is important for socialization and for the person who has another condition or disability to be better understood in their needs.

Alternative Assistive Communication (AC) resources are used to help people with speech disabilities communicate with family members, therapists, and others. Pictograms are one of the most frequent forms of AC where the person can point to the symbols set in strategic points of the house or use applications that vocalize these symbols, such as AssistiveWare Proloquo2Go.

However, physical pictograms can only be used to communicate with other people in the same environment, which makes it difficult to communicate with caregivers if they are in other rooms or separated places.

The Alternative Communication Vest (CoCoA, an acronym from the portuguese name  "Colete de Comunicação Alternativa") is a wearable vest that is connected to the internet allowing the coupling of tactile symbols of alternative communication to assist people with speech or non-verbal disabilities express their needs to caregivers, therapists, other health professionals, without them always being present in the same environment as the person with the disability, thus facilitating the monitoring.

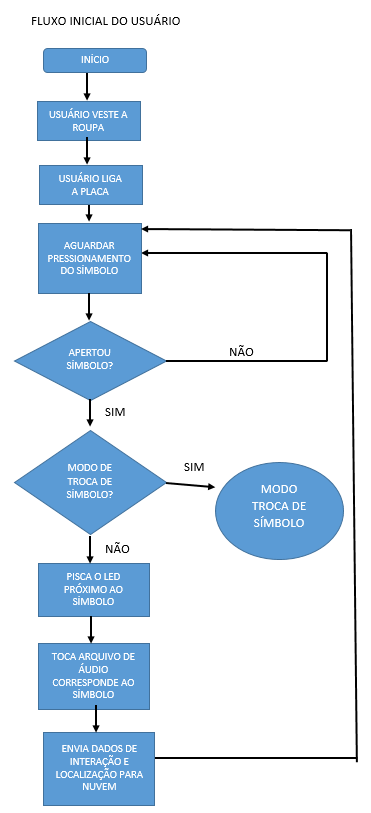
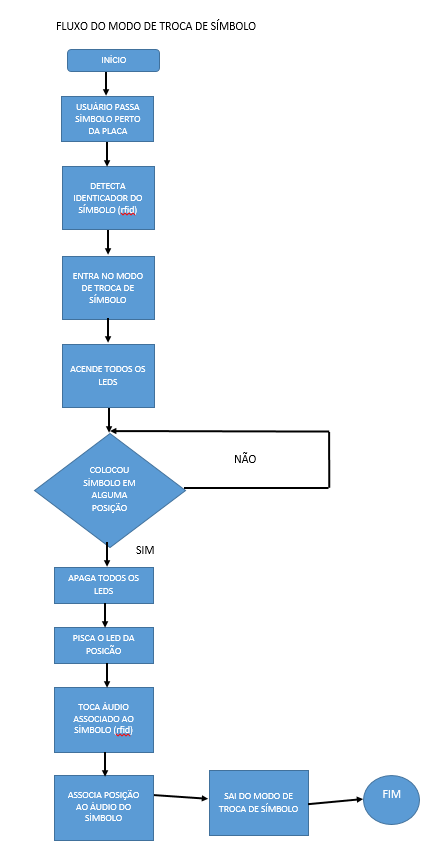
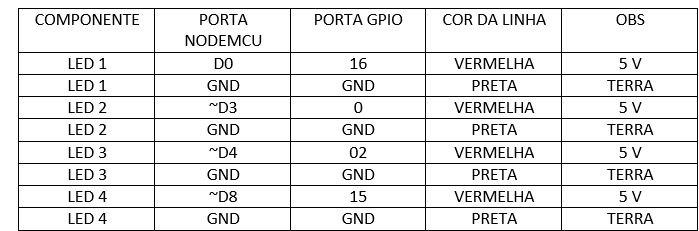
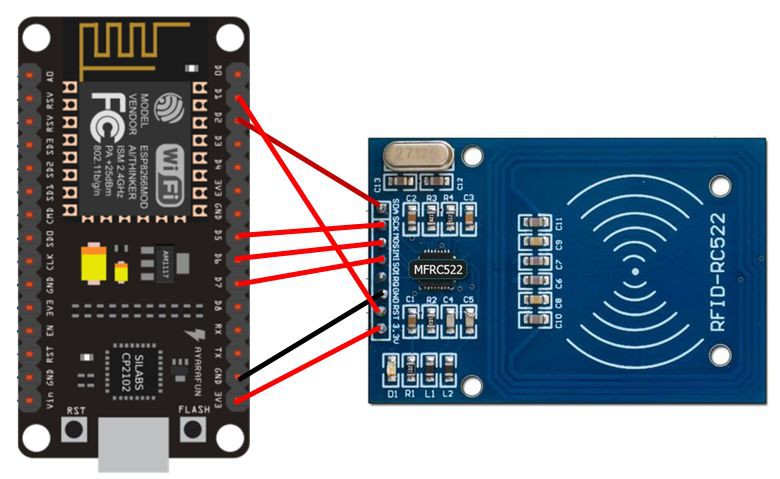
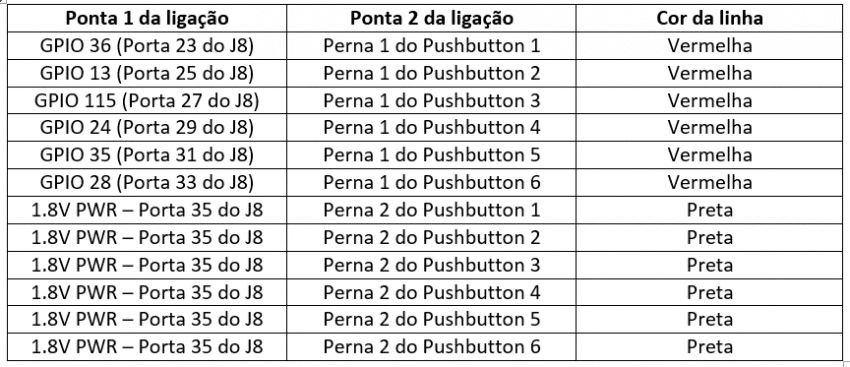
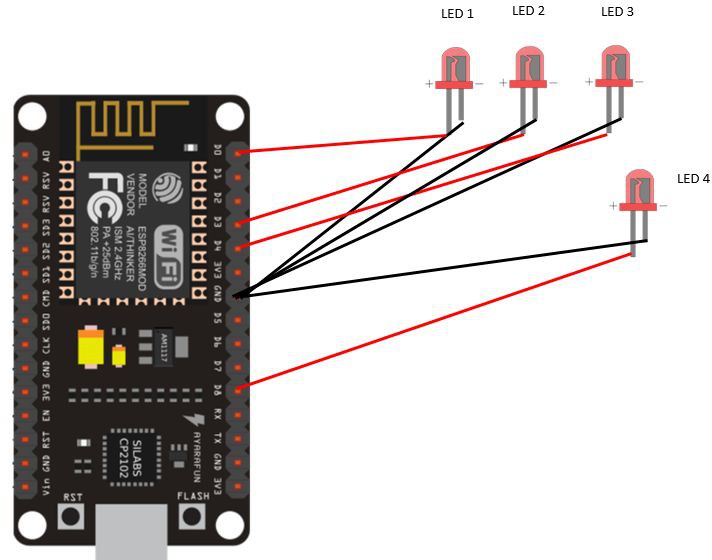
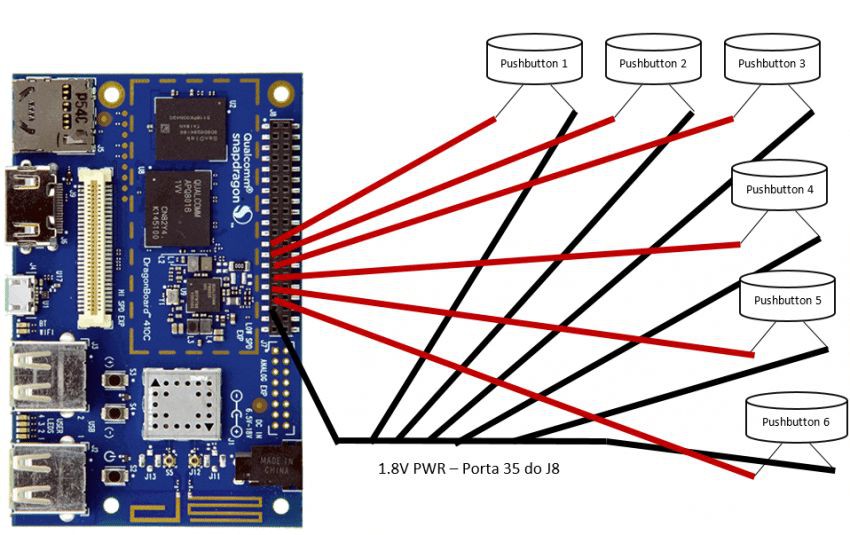
The vest allows the user to include up to six AC symbols in different combinations. When the physical buttons are pressed they perform two actions:

1)  Play a sound of the chosen actions through a loudspeaker coupled to the vest followed by a message of the performed  actions in textual format to some communication application of the care, therapists or teachers, enabling them to be communicated of the need of the person if they are not in the same enclosure.

2) Provide a feedback to the disabled person through  blinking LEDs to indicate the chosen actions.

To summarize, CoCoa is a non-intrusive,connected, portable and easy-to-use wearable interface proposed to assist people with speech disabilities communicate their needs in loco or remotely. The vest  can be used in different locations and facilitates  the disabled person to meet their needs, potentially preventing them from becoming uncomfortable or stressed.

Waveform Audio File Format (WAV) - 254.04 kB - 08/27/2018 at 01:30

Download

Waveform Audio File Format (WAV) - 268.04 kB - 08/27/2018 at 01:30

Download

Waveform Audio File Format (WAV) - 334.04 kB - 08/27/2018 at 01:30

Download

Waveform Audio File Format (WAV) - 274.04 kB - 08/27/2018 at 01:30

Download

Waveform Audio File Format (WAV) - 262.04 kB - 08/27/2018 at 01:30

Download

View all 17 files

  • 1 × DragonBoard 410C The main SoC board
  • 1 × Arduino NodeMCU The arduino with the ESP 8266 module or any other WiFI enable arduino with at least 13 GPIO ports
  • 1 × SD Memory card 32 GB will do. To be inserted in the DragonBoard
  • 1 × Pack of bateries (2000 mAPH and 12V) Required to power up the DragonBoard
  • 20 × Parallel crystal wires

View all 13 components

  • 1
    Diagrams

    To help understand the operation of the vest we will explain its use by means of three diagrams:In this first step we define three diagrams with the interation flux. The first one is when the users wear and touch a symbol in the vest

    The second diagram shows when the caretaker replaces the button in the vest with a new one

    The third diagram shows the steps to register a new image and sound to represent a new symbol in an existing physical button.

    To help understand the operation of the vest we will explain its use by  three diagrams:

    Diagram 1: This flow represents the initial use of the clothing describing the steps necessary to dress it and access the audio already registered.

    Diagram 2: This diagram shows the steps to change one of the existing pads so that another symbol / sound is placed on the vest.

    Diagram 3: This diagram shows the steps to change the audio associated with an existing cushion. This flow was not implemented in version 1.0 of the vest.

  • 2
    Software

    We used the following softwares to program the Vest:

    Arduino IDE

    Python 3.5

    The external dependencies of the project are the Arduino library to handle the RFID reader module, the Python library twx.botapi to interact with the Telegram and the PySerial library to read / write data through the serial port with Python. The Python libraries can be installed using the pip package manager.

    All the source code files are available in the project's git hub page: https://github.com/pichiliani/CoCoA

  • 3
    Physical connections

    The following images describe the physical connections of the boards, sensors, push buttons and other hardware. We also provide tables with the correct port numbers, names and wire colors.

    The architecture of the CoCoA project is based on the DragonBoard 410C card, an Arduino NodeMCU 8622, the RFID reader sensor, LEDs, push buttons and a sound box. An integration with a Telegram bot called ProjectCoCoABot is also done, which sends a message with the generated audio each time one of the buttons is pressed.

    We chosed to  connect the RFID reader and the LEDs on theAarduino and then upload the code that is in the /CocoaNodeMCUServer folder on GitHub. Connection diagrams of both the LEDs and the RFID reader are shown in the figures that illustrate this step.

     We also need to connect the push buttons with the DragonBoard board. This diagram and table are also shown in pictures that accompany this step.

View all 6 instructions

Enjoy this project?

Share

Discussions

Similar Projects

Does this project spark your interest?

Become a member to follow this project and never miss any updates