 Moritz Simon Geist
I started with building everything on breadboard PCBs and did this for many years. After a short journey to PCB etching, China PCBs got so cheap that I don't bother anymore to handle the chemicals myself. I order everything from JLCPCB (EsayEDA). I use eagle and KiCAD for PCB creation.
The electronics are used to create an electric pulse out of a MIDI Signal, so that the actuator (motor or solenoid) starts moving. The electronics normally consist of an ATMEGA328, an MIDI-IN, an logic level MOSFET (e.g. IRLZ34N or VN820P) and something to drive the lights (an TLC5940 or just some small Mosfets). The general setup is like this:
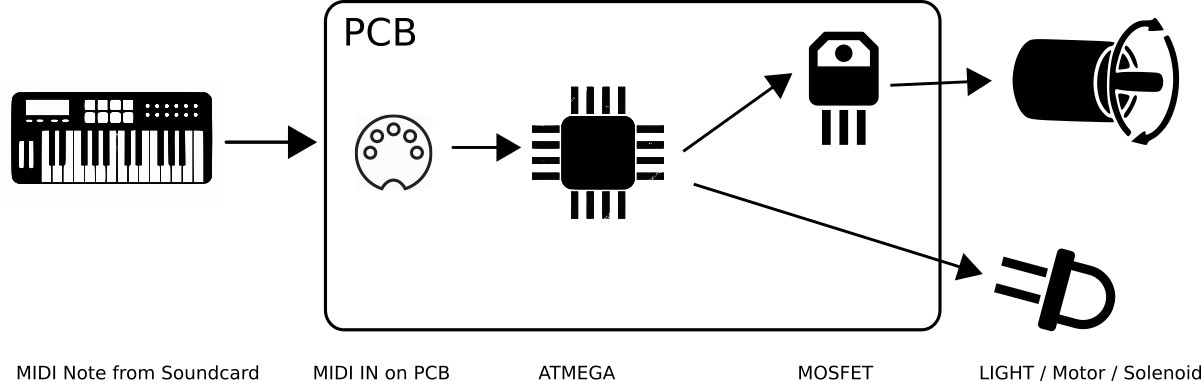
I use only MIDI notes with velocity to control robots. Throughout the years and performing solo on big stages, on rainy festivals, with broken cables and in a hurry, and working with a lot of other artists like Mouse On Mars I learned that the simpler, the better. No CC Commands, no OSC, no complication. To control the volume of my robots I use Velocity Through Impulse Length Control (VILC – I made up that term, haha!). This means that with mapping the MIDI velocity to the length of an electric impulse for a motor or solenoid you can actually control the acoustic volume. Pretty nifty! Other music robot builders like (Dada Machines) or Polyend use this technique, too.
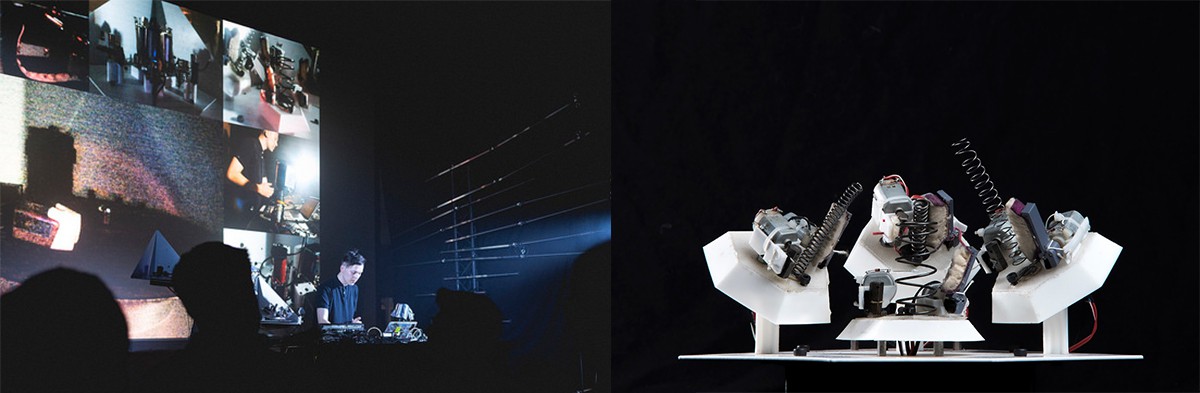
In music robotics it is very important to work with visual key elements, so it is visible what is actually happening. Either one works with very big movements – this is nice, everyone can see whats happening. But it has the disadvantage of very high latency and normally theses robots are hard to transport. The other option is to add light to a very small movement. I chose this option, which after my knowledge Uk based Robot artist Felix Thorn introduced in the mid-2000s. Like this, my robots have a latency of 5-20ms (from MIDI note to acoustic signal) so you can actually play them live! But the movement is only a few millimeters, so I added a pulsed Light (fade out) to make it more visible. When I perform on bigger staged I also use a dedicated multicam system so everyone can see what's going on.
I started in 2003 with a PIC based MIDI system. Then Arduino came along. Over the years I developed a lot of different systems, involving ATMEGAs and RasPis. Now everything is written in C++ by my Programmer Lennart on a Arduino basis.
You can find most of the code here in the github repo.


Discussions
Become a Hackaday.io Member
Create an account to leave a comment. Already have an account? Log In.