Close
0%
0%

Alertron

Alertrnon is a simple visual alert system based on RPi Zero W and Unicorn pHAT

Similar projects worth following
390 views
0 followers
Alertron is a simple system that can take any type of input data (e.g. sensor data, web sources, REST API sources) and turn them into color coded visualisation. For example, data from outside temperature sensor can be used to represent different temperatures as colors and give visual representation rather than displaying values. This way, it can be usefull even for little children who can't read or for people with disabilities. Also, this way of data representation is 'readable' from greater distance, withot the need for bigger displays or any extra hardware. It's build using just three hardware components: Raspberry Pi Zero W, Unicorn pHAT and power supply.

Inspired by recent extreme weather events around the globe, project includes demo application which reads weather alerts from http://www.meteoalarm.eu/ and shows color coded warning levels (green, yellow, orange, red) for selected country and region for today and tommorow. With some basic knowledge of Python this script can be easily reworked to show any kind of color coded data from any source. Code is commented and it should be fairly easy to understand.

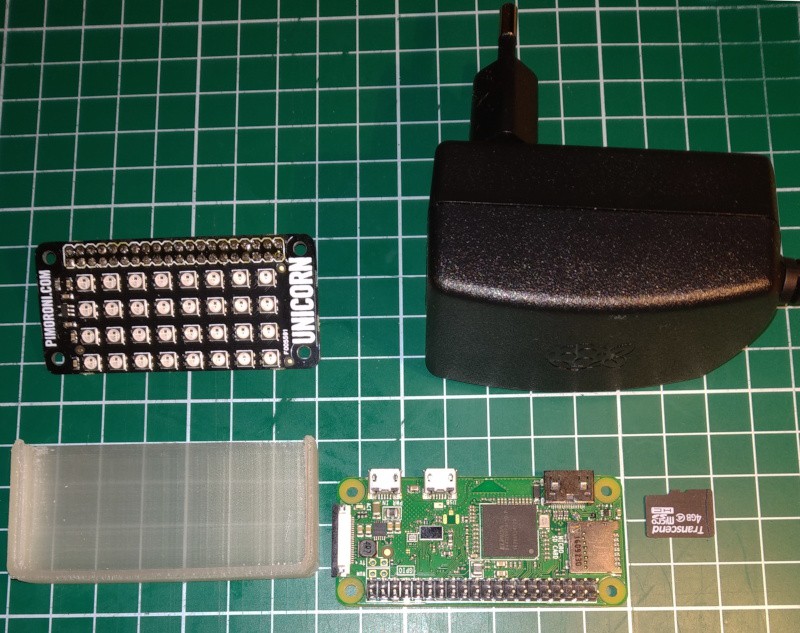
Project includes 3D printable model for a simple Unicorn pHAT diffuser. It should be printed in 'natural' or 'transparent' color, using PLA, PET-G or ABS filament. If the .stl file doesn't fit, change values in original OpenSCAD file and re-export to STL format.

  • 1 × Raspberry Pi Zero W(H) The beast!
  • 1 × Pimoroni Unicorn pHAT The beauty!
  • 1 × Raspberry Pi power supply 5.1 V / 2.4 A Official RPi supply, don't use phone chargers!
  • 1 × microSD card (4 GB or more) You'll probably need microSD to SD card adapter, they often come in the package together, try to buy that one ;-)

  • 1
    Hardware

    Well, there's nothing much to build on the hardware side. All you need is Raspberry Pi Zero W or WH - you need to solder 2x20 male headers if you get W, WH has them already soldered. Pimoroni's Unicorn pHAT comes with unsoldered 2x20 female headers, so there's some soldering to be done. Once you're done with soldering, just put these together, add microSD card (4 GB or more, with Raspbian image - it'll be explained how to do that in next step) and power supply (use the original Raspberry power supply) and you're done.

    Of course, adding a diffuser will help, as those RGB LEDs can be really bright. There's a 3D printable diffuser model included in the project, if you have 3D printer (or your friend does), it's a good idea to print one.

    Anyway, you should end up with something like this:

  • 2
    Raspbian installation

    Never installed Linux before? No biggie, we're here to lend you a helping hand :-)

    First thing you have to do is to download one: go to Raspbian download page and choose the Lite version. This one is not easier, it's just lighter as it comes without the GUI. Your basic installation comes to writing the image file to micro SD card (this is where microSD to SD card adapter might come handy), and  the instructions for this step are here.

    Once you've done that there is something else to do, so don't pull that microSD card out of your PC just yet. As this is so called 'headless' instalation, you'll want to avoid connecting monitor and keyboard to Pi altogether. So, let's do that! If you open your file explorer, you'll notice there is a new drive called 'boot'. We need to add two files to this drive to make remote acces to RPi Zero possible. First, the easy one: just right click anywhere on folder and choose New -> Text Document. Name is simply ssh (that's it, no extension, no content) - that's an empty file telling your Zero to allow ssh access.

    Now, add one more file the same way - name it wpa_supplicant.conf and once you've created it, open it in Notepad or any other text editor. Add this to file (insert your WiFi's SSID and password instead of "SSID" and "password"):

    ctrl_interface=DIR=/var/run/wpa_supplicant GROUP=netdev
    update_config=1
    country=GB
    
    network={
        ssid="SSID"
        psk="password"
        key_mgmt=WPA-PSK
    }

     You can change country code too, but 'GB' will work for most of Europe. Save this file and you should get something like this:

    Now you safely remove microSD card from your PC and put it in Zero's microSD card slot.

  • 3
    Seek and find

    It's time to boot your Zero for the first time - you can add Unicorn pHAT on top of it before this step, so you'll have everything you need to get it up and running right after this step. Now just plug power supply to micro USB (the one labeled pwr, it's the one closer to the edge) and green LED should start blinking. Since this is first boot, wait for a minute or two, your Zero has to set itself up :-) Now it's time to take a seat at your PC and talk to this little devil.

    To do that, you'll need two applications. The first one is Advanced IP Scanner, it'll help you find your Zero in a local network - just install it and run with default options, you should get the list of devices in your LAN. The one you're searching for is:

    Now that you know your Zero's IP, it's time to go hardcore - command line type :-) For that you'll need another application - PuTTY. Download, install and run it. Enter Zero's IP address, choose SSH connection type and click open.

    When connecting for the first time you'll get the warning - click Yes to continue.

    If everything's OK, the terminal will open, and you'll be asked for pi's password - guess what, it's raspberry :-) (don't worry if you don't see anything happen while typing password, that's not a bug, it's a feature!). So, you'll end up with something like this:

    Well done, now you can be your Zero's master and make it do whatever you want!

View all 4 instructions

Enjoy this project?

Share

Discussions

Similar Projects

Does this project spark your interest?

Become a member to follow this project and never miss any updates