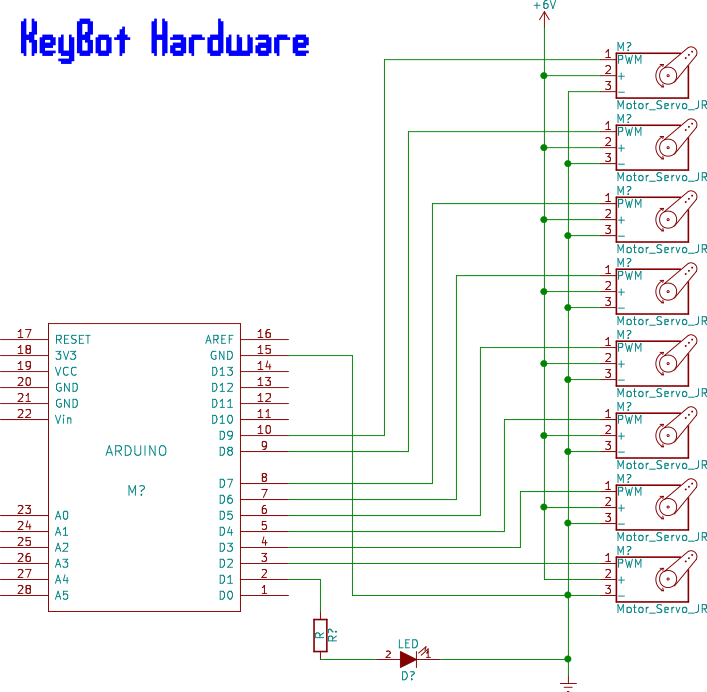
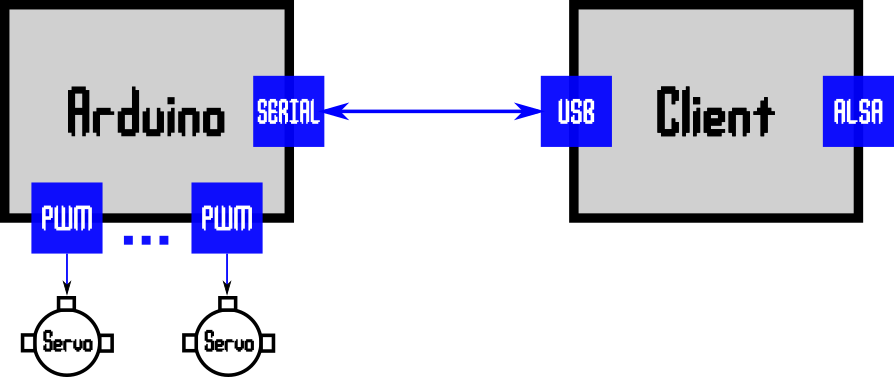
Close
0%
0%

CasioKeyBot

This funky Arduino-powered robot adds MIDI capability to an old Casio SA-21 keyboard.

Similar projects worth following
I really like the crappy sound of those 80s toy keyboards. Unfortunately, I am a lousy live keyboarder and I only have so many hands. So I thought about adding MIDI capability to my good old Casio SA-21. The simplest way to do this is obviously building a robotized hand with 8 servo motors controlled by an Arduino microcontroller, which in turn receives its commands through the serial-over-USB interface sent by a tiny C application that connects to the ALSA sequencer world of my Linux live music setup.

casing.svg

Template for keybot casing. Laser cut from 3mm plywood.

svg+xml - 84.99 kB - 10/05/2018 at 20:35

Download

stand.svg

Template for keybot tentacles. Laser cut from 3mm plywood.

svg+xml - 53.91 kB - 10/05/2018 at 20:35

Download

arms.svg

Template for keybot fingers. Laser cut from 3mm plywood or acrylic.

svg+xml - 17.39 kB - 10/05/2018 at 20:35

Download

  • 1 × Arduino Uno Arduino µController
  • 1 × 5V/1A power supply with barrel connector
  • 1 × Casio SA-21 keyboard or similar
  • 8 × Micro servo motors Such as SG90 9g
  • 1 × Power switch

View all 11 components

  • Hardware

    Igor Angst10/06/2018 at 20:44 0 comments

    The hardware part (without the laser cut parts) is really dead stupid: It's an Arduino Uno plus a status LED, a power switch for the external motor supply and eight micro servos. That's about it.

  • Software considerations

    Igor Angst10/06/2018 at 19:26 0 comments

    This project is more or less finished, at least I have a stable version that I am satisfied with and that I already used in a live setup on stage. The one thing I regret not having implemented during my performance was MIDI panic (cc #123 set to zero should be interpreted as "all notes off"), since I ended the first song with one finger stuck in the downward position...

    In my Linux musical setup, I am using both JACK (mostly for audio) and ALSA (only for MIDI). Jack also does MIDI, but the API is even uglier than the ALSA one. So I opted for ease of use. Using the QJackctrl patchbay, JACK and ALSA coexist peacefully.

    This is how I drive the robot in my live setup: On the Linux host side, there is a C program running, which accepts incoming ALSA MIDI sequencer connections. It reads incoming note events (and optionally cc events for the finger setup) and sends corresponding messages (in a dedicated message format) over the USB-to-serial connection to the robot. The heart of the robot is an Arduino Uno. The firmware listens to the serial interface, interprets incoming messages and drives 8 soft PWM outputs to move the individual fingers.  

    Meanwhile I discovered that having an extra client program on the host and a dedicated protocol was probably not the best design choice. In other projects I am using the Arduino Micro or Leonardo. These boards have the ATmega32u4, which has builtin USB support. This allows it to act as USB human interface controller (keyboard, mouse or MIDI) natively. This means that if you have your Arduino setup acting as a MIDI interface, the ALSA sequencer will automatically attribute a sequencer port to the device once the USB cable is connected, without starting the client software manually. While this would be definitely a better and more portable solution, I do not plan to do this change in the near future. This is also due to the fact that my client software now integrates some brothers and sisters of the keybot: a xylophone bot, a snare drum bot, and a bass drum but which all speak the same protocol and identify themselves with the client software, so I can setup ALSA sequencer ports with appropriate names.

  • Thoughts on the laser cut structure design

    Igor Angst10/06/2018 at 19:16 0 comments

    This is actually the first assembled object that I have realized using laser cut parts. I had to go through a number of prototypes and bad designs before ending up with the 1.0 arms and support structure. My first version was a robot standing in front of the keyboard, but it would tip over once it pressed down a key. So I came up with the idea to extend the robots base so that I could put the keyboard on top. This turned out to be very effective and it gave the whole thing a very interesting look - form follows function.

    I also had some trouble getting the fingers lined up at the exact distance of the small keys - the SA-21 is a toy keyboard with miniature keys. The servos are much bigger (in z direction) than the key-to-key distance. I thought about putting the servos upright behind the manual and having some transmission mechanism, much too complex... Finally I figured out that I could superpose two servos, such that every the motor of every odd key turns in the opposite direction. This way, 8 servos would fit next to each other to cover one octave.

    The last thing to construct was the actual key pressing mechanism. The problem is that even micro servos have quite a torque and pressing down a key beyond the playing angle would simply break the whole mechanism, I had some fingers flying around my ears. I first thought about integrating torsion springs into the fingers but couldn't find springs with a goof form factor for my purposes. The final solution to this is a combination of hardware and configuration: I tested different laser cut wooden S-shaped fingers that act like a spring in order to amortize the last few millimeters when pressing down a key. I went through multiple designs with varying material thickness and shapes until finding a good compromise between robustness and flexibility.

    Secondly, I integrated a configuration mode in the client software, such that the upper and lower angles of each servo can be configured separately for each finger using a MIDI controller nob. This allows fine-tuning each finger such that it just gently presses down the key without destroying itself during the performance.

    Finally, I had some fun giving the whole thing - the arms, fingers and the support structure - a kind of organic or maybe steampunk-like look.

View all 3 project logs

Enjoy this project?

Share

Discussions

zakqwy wrote 10/06/2018 at 18:22 point

i love the laser cut supports and hammers!

  Are you sure? yes | no

Similar Projects

Does this project spark your interest?

Become a member to follow this project and never miss any updates