 Silícios Lab
Presentation of the Project
Following, I'll introduce you to the full explanation of how to develop your menu options using Flowcode 7 with Arduino. Subscribe on my channel for more projects.
Introduction
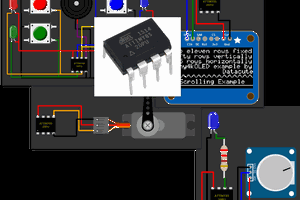
In this project you will learn how to creating and modeling your machine human interface with MENU using a Arduino Uno and the LCD 16 x 2.
There are several projects using MENU for configure parameters and receive other informations of the world by the machine users.
In this article, you will see how to modeling easily your Menu using Arduino and two buttons.
For this project, we'll use the following components:
Bill of Materials
- PCBWay Custom PCB
- Resistor 1K 1/4W - UTSOURCE
- Resistor 330R 1/4W - UTSOURCE
- LCD 16 x 2 - Green Backlight - UTSOURCE
- Arduino UNO R3 - UTSOURCE
- Pushbutton Switch 6 x 6 x 5 - UTSOURCE
Now, we'll explain the project.
The Project
For modeling easily your menu with Arduino, I use the Flowcode 7. With the Flowcode 7, you can create a flowchart and modeling your programming logic, because it allows you see how your code will execute in real time through the flowchart constructed. accordingto it presented in Figure below. The Figure can be downloaded on the link of topic: Files for Download.

Figure 1 - Flowchart constructed using Flowcode 7.
In the project was used two button. The first button is used to move down the options of MENU and the second button is used to move up in the options of the MENU.
Each time of the first or second button is pressed, the variable count is incremented or decremented according with the pressed button.
According with the value of count variable, will be presented the names in the Menu of LCD 16 x 2.
Files for Download
In this link are all files of project and image of Figure 1.
http://bit.ly/FilesDownloadFlowcode
Acknowledgments
The Silícios Lab thanks PCBWay for its support and work together.
In addition to them, the Silícios Lab thanks UTSOURCE for its support, for offering us the low cost electronic components of great quality and good service.
 Open Technology
 Lutetium
 Alex Leitch