 Cloud4RPi
Temperature Monitoring
How to connect a DS18B20 temperature sensor? Just google how to do this, and you’ll see a lot of pictures like this one:
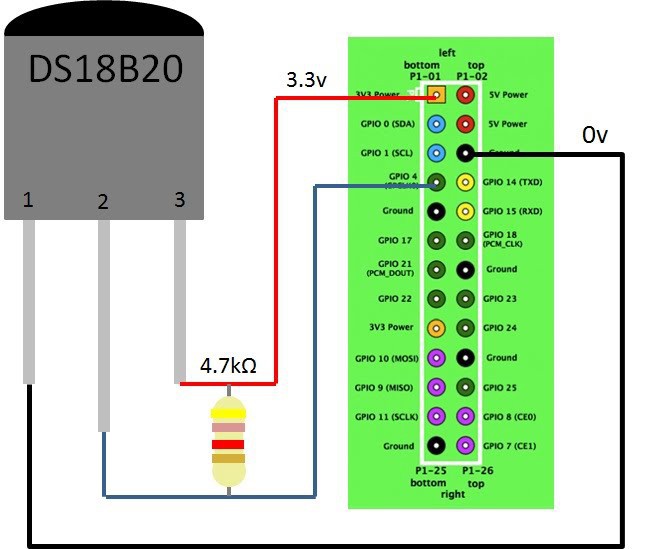
In my case I had Black, Yellow and Red wires. The black is ground, goes to Ground pin, the red is power — goes to 3.3v pin, and the yellow is data — should go to GPIO4 pin, with 4.7 kOm resistor connected between data and power.
Note, you can connect several sensors in parallel (they are digital, and has different addresses), you need only one resistor.
After connecting your sensor, you should enable 1Wire in the raspi-config:
sudo raspi-config
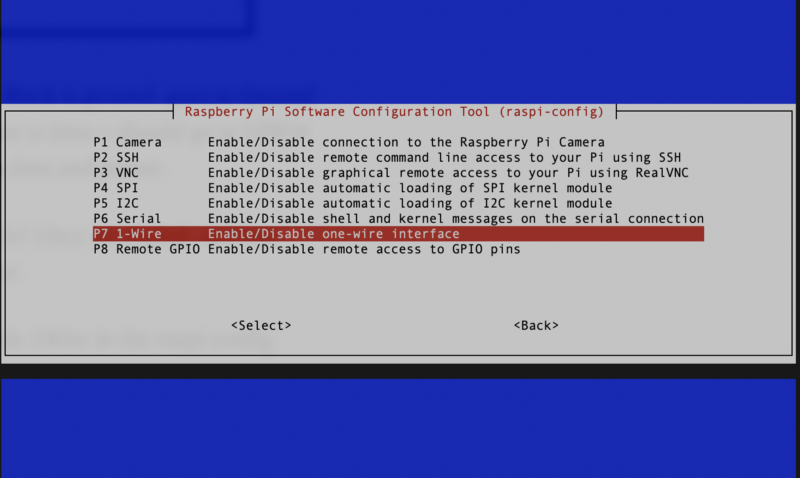
Go to 5 Interfacing options, enable P7 1-Wire and reboot.
Then you can test if you can see the sensor:
sudo modprobe w1-gpio
sudo modprobe w1-therm
ls /sys/bus/w1/devices/
You should see something like this:
pi@vcontrol:~ $ ls /sys/bus/w1/devices/
28–00044eae2dff w1_bus_master1
28–00044eae2dff is our temperature sensor.
Hardware is ready. Now I need to set up the monitoring part. I need something that would show me the data and notify me if the device is disconnected for a while or there is no power, or the temperature is low. Obviously this cannot be raspberry pi itself, there should be some server or service in the internet that monitors my device.
I can create a simple server, get a hosting and set everything up, but honestly, I don’t want to. Luckily, somebody has thought about this already and created cloud4rpi.io — a cloud control panel for your device.
Setting Up Cloud4RPi.io
Cloud4RPi provides a service that let your device send and receive data using MQTT or HTTP protocols. They have a client library for Python, so I’ll use Python.
Python examples that comes with Cloud4RPi service already contains code for DS18B20 temp sensor.
So I went to https://cloud4rpi.io, created an account and added a new device there. The device page has a token — a string that identifies the device, and which should be specified in the program that sends data.
To begin with, it is always a good idea to update a package manager and upgrade packages (note: it can take hours if you haven’t upgraded for a while)
sudo apt-get update && sudo apt-get upgrade
Then, install git, Python and its package manager Pip:
sudo apt-get install git python python-pip
Then, install cloud4rpi Python library:
sudo pip install cloud4rpi
Finally, i’m ready to write my control program. I start from example available at https://github.com/cloud4rpi/cloud4rpi-raspberrypi-python
git clone https://github.com/cloud4rpi/cloud4rpi-raspberrypi-python.git cloud4rpi && cd cloud4rpi
The main program file is control.py — I need to modify it for my needs. First, edit the program and paste a token:
sudo nano control.py
Find a line DEVICE_TOKEN='...' and specify a device token there. After that I can simply run the program:
sudo python control.py
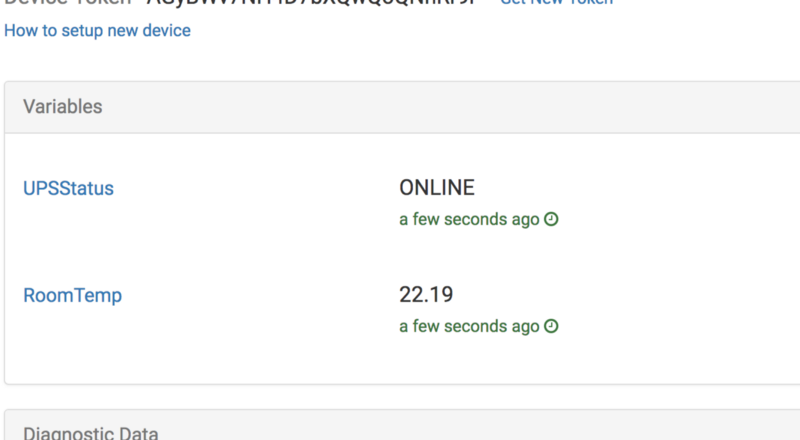
It works and reports a temperature in RoomTemp variable:

Note that it discovers all onewire ds18b20 sensors
ds_sensors = ds18b20.DS18B20.find_all()
and uses the first found sensor:
'RoomTemp': {
    'type': 'numeric',
    'bind': ds_sensors[0] if ds_sensors else None
}
Ok, that was easy, because the sample program has everything that is required to work with ds18b20 sensor on Raspberry Pi. Now I need to find the way to report the power status.
UPS Monitoring
Next thing I want to monitor is UPS status, so if there is power outage, I will know about it before everything disconnects.
I have an APC UPS with USB control, so I quickly googled and found that I need apcupsd. http://www.anites.com/2013/09/monitoring-ups.html. I tried several times to install it via apt-get, and it was not working for me for various reasons. I’ll show how to install it from the sources.
wget https://sourceforge.net/projects/apcupsd/files/apcupsd%20-%20Stable/3.14.14/apcupsd-3.14.14.tar.gz
tar xvf apcupsd-3.14.14.tar.gz
cd apcupsd-3.14.14
./configure --enable-usb
sudo make
sudo make install
Then I edit apcupsd.conf to connect to my UPS via usb.
sudo nano /etc/apcupsd/apcupsd.conf
#
#UPSCABLE smart
UPSCABLE usb
#
#UPSTYPE apcsmart
#DEVICE /dev/ttyS0
UPSTYPE usb
DEVICE
Now I can plug USB cable from UPS to RaspberryPi and test if UPS would be found.
sudo apctest
It should give you no error messages.
Now sevice apcupsd should be started:
sudo systemctl start apcupsd
To query UPS status I can use a status command:
sudo /etc/init.d/apcupsd status
And it would output something like this:
APC      : 001,035,0855
DATE     : 2018-10-14 16:55:30 +0300
HOSTNAME : vcontrol
VERSION  : 3.14.14 (31 May 2016) debian
UPSNAME  : vcontrol
CABLE    : USB Cable
DRIVER   : USB UPS Driver
UPSMODE  : Stand Alone
STARTTIME: 2018-10-14 16:54:28 +0300
MODEL    : Back-UPS XS 650CI
STATUS   : ONLINE
LINEV    : 238.0 Volts
LOADPCT  : 0.0 Percent
BCHARGE  : 100.0 Percent
TIMELEFT : 293.3 Minutes
MBATTCHG : 5 Percent
MINTIMEL : 3 Minutes
MAXTIME  : 0 Seconds
SENSE    : Medium
LOTRANS  : 140.0 Volts
HITRANS  : 300.0 Volts
ALARMDEL : 30 Seconds
BATTV    : 14.2 Volts
LASTXFER : No transfers since turnon
NUMXFERS : 0
TONBATT  : 0 Seconds
CUMONBATT: 0 Seconds
XOFFBATT : N/A
STATFLAG : 0x05000008
SERIALNO : 3B1424X02945
BATTDATE : 2014-06-10
NOMINV   : 230 Volts
NOMBATTV : 12.0 Volts
NOMPOWER : 390 Watts
FIRMWARE : 892.R3 .I USB FW:R3
END APC  : 2018-10-14 16:55:38 +0300
I need a status — which is the “STATUS:” line.
Cloud4RPi library contains a module rpi.py that returns Raspberry Pi system parameters such as hostname or cpu temperature. Since all those params are results of running some commands and parsing output, it also contains a handy ‘parse_output’ function that does exactly what I need. This is how to get my UPS status:
def ups_status():
    result = rpi.parse_output(r'STATUS\s+:\s+(\S+)',
['/etc/init.d/apcupsd', 'status'])
    if result:
        return result
    else:
        return 'UNKNOWN'
To send this status to cloud4rpi, I need to declare a variable UPSStatus and bind it to my ups_status function:
variables = {
    'RoomTemp': {
        'type': 'numeric',
        'bind': ds_sensors[0]
    },
    'UPSStatus': {
        'type': 'string',
        'bind': ups_status
    }
}
Now I can run my program:
sudo python control.py
And I can immediately see my variable at the cloud4rpi device page:
Preparing for "Production"
Everything is working, and now I need to prepare my device to unattended mode.
To begin with, i’m going to adjust time intervals. Poll interval defines how often the program checks for temperature and UPS status — i set it to one second.
Results are sent to the cloud every 5 minutes, and diagnostic information — every hour.
# ConstantsDATA_SENDING_INTERVAL = 300
# sec DIAG_SENDING_INTERVAL = 3600
# sec POLL_INTERVAL = 1  #  sec
When UPS status changes — i don’t want my device to wait for 5 minutes, and I send data immediately. So I have slightly modified the main loop and it looks like this:
data_timer = 0
diag_timer = 0
prevUPS = 'ONLINE'
while True:
   newUPS = ups_status()
   if (data_timer <= 0) or (newUPS != prevUPS):
       device.publish_data()
       data_timer = DATA_SENDING_INTERVAL
       prevUPS = newUPS
   if diag_timer <= 0:
       device.publish_diag()
       diag_timer = DIAG_SENDING_INTERVAL
   sleep(POLL_INTERVAL)
   diag_timer -= POLL_INTERVAL
           data_timer -= POLL_INTERVAL
Testing: run script:
sudo python control.py
And I can watch UPS status on my device page:
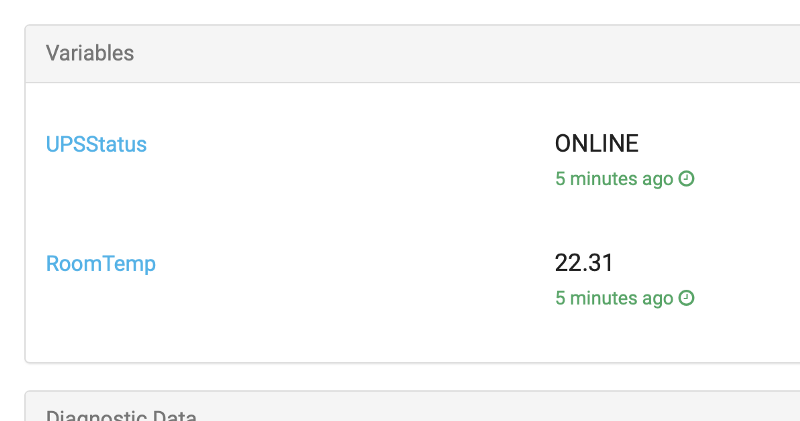
If I turn off UPS power, status changes in a couple of seconds, so everything is working.
Now I need to start apcupsd and my control.py on the system startup.
Apcupsd service is old and to start it on modern raspbian, I should modify /etc/init.d/apcupsd file, by adding these lines the somewhere at the top:
### BEGIN INIT INFO
# Provides: apcupsd
# Required-Start: $all
# Required-Stop:
# Default-Start: 2 3 4 5
# Default-Stop:
# Short-Description: APC UPS daemon…
### END INIT INFO#
Then enable the service:
sudo systemctl enable apcupsd
Then start the service:
sudo systemctl start apcupsd
Now apcupsd will be started on the system startup.
To install control.py as a service, I used the supplied service_install.sh script:
sudo bash service_install.sh ~/cloud4rpi/control.py
an now I can run control.py as a service:
sudo systemctl start cloud4rpi.service
Now service is started and it shouls survive a reboot.
Setting up a control panel
Cloud4RPi lets me set up a control panel for my device. You can add “widgets” and bind them to device variables.
My device provides two read-only variables — RoomTemp and UPSStatus:
variables = {
    'RoomTemp': {
        'type': 'numeric',
        'bind': ds_sensors[0]
    },
    'UPSStatus': {
        'type': 'string',
        'bind': ups_status
    }
}
I added 3 widgets — Number for RoomTemp, Text for UPSStatus and a Chart for RoomTemp:
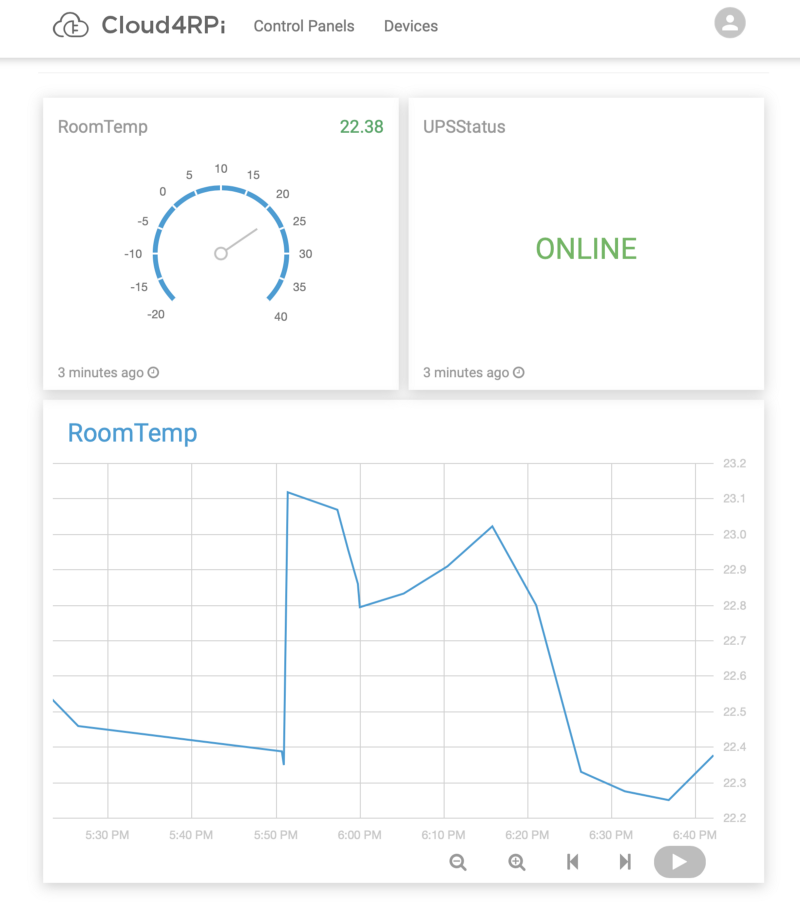
I can set up alerts, so I receive an email when the temperature is out of specified range, UPS went offline or device itself does not send data when it should.
Now I can be sure my country house is ok, and I can be notified when something is wrong, so I can phone neighbours and ask them to check what is going on.