 Ted Yapo
Around 1988, I added a simple lighting model to this algorithm (and later added shadows, described in the next log). My roommate at the time had a Mac II, which was the first machine I ever used with 24-bit color. I have photographs somewhere of the images I was able to make - some of them took hours to draw a single frame.
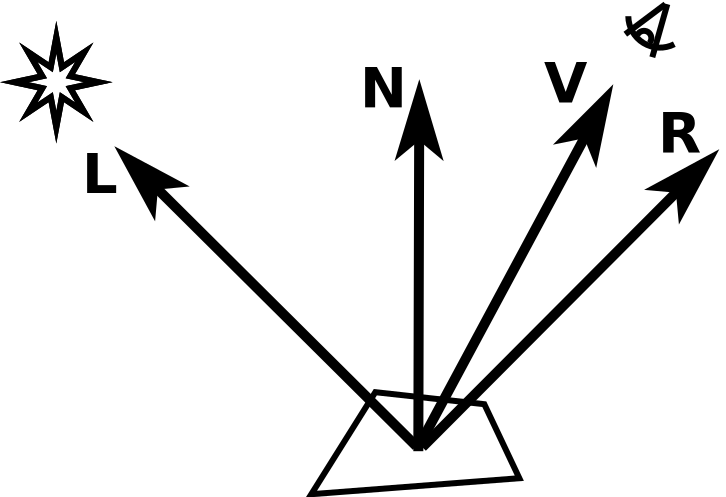
The main idea is to cheat as much as possible. The above diagram shows the vectors involved in the classic Phong illumination model. At each patch on the surface, there is the normal vector (N), which is perpendicular to the surface at that point. A light vector (L) points toward the light source, while a view vector (V) points toward the viewpoint. Finally, if you want to add specular highlights, you need to calculate the reflected light vector (R).
In this model, you have three illumination terms:
- Ambient - this represents light from the surrounding environment which illuminates all surfaces equally.
- Diffuse - this represents the Lambertian reflection from rough surfaces. Think of a tennis ball.
- Specular - this represents the highlights (direct reflections of the light source). Think of the white glint on an apple.
For reasons detailed below, I use only the ambient and diffuse terms.
Ambient Term
This term is easy. Each pixel calculated gets a base level of intensity multiplied by its color - if the ambient illumination level is 0.25, for example, a green object with RGB color (0, 1, 0) would end up with an ambient contribution of (0, 0.25, 0) to its final color value.
Diffuse Term
This term is calculated using the dot product of L and N, the light vector and the surface normal. Mathematically, this looks like:
where N and L are both normalized to unit length. Vector normalization is relatively expensive on the badge, requiring a square root and a division. To avoid this, I use a directional light source parallel to the x-axis. This is essentially a source infinitely far to the left of the image, so the light vectors are always the same, with Lx = 1, Ly = 0 and Lz = 0. Now, two of the terms in the diffuse expression drop out, and we're left with:
this saves two multiplications, but more importantly, it means that the diffuse illumination is simply proportional to the x-component of the normal. Now, we can skip vector normalization entirely, avoiding the expensive square root and division.
An added bonus is that we only need a value proportional to the x-component of the surface normal. This can be easily estimated by a finite difference approximation using the z-value of the current point and previous point on the line:
So, to calculate this, we only need to save the z-values of the points drawn in the previous column of the image. Instead of nine multiplications, two square roots, and two divisions for a point light source, we can use just a subtraction if we choose the directional light source correctly. In practice, this light source placement gives adequate visual cues to convince the brain that there's light shining on the surface.
Once you have the diffuse term, you just multiply it by the object color as was done for the ambient.
Specular Term
To calculate the specular term, you first need to reflect the light vector from the surface. This requires knowledge of all three components of the normal vector. Additionally, you have to normalize the view vector, the surface normal, and the relfected vector, then compute the dot product, and finally raise the result to an exponent related to the shininess of the surface. Overall, it's a pretty expensive operation for a very small additional realism. I just bailed here - it's not worth the performance hit. Having a faster animation is much more impressive.
Next Up
Shadows - the last visual cue used in the demo is shadows cast from the surface onto itself. You can probably guess how the choice of light source above helps with shadow calculation. Details to come.
Source code - I've been very lazy, and have been writing these logs without getting the demo source code off my laptop. I'll comment it a little then post it here and on GitHub so you can check it out and burn it into your badge if you want. It only replaces the "user program" menu item, so the rest of the badge functionality remains intact.
Discussions
Become a Hackaday.io Member
Create an account to leave a comment. Already have an account? Log In.