 Alexander
Take a look at Part 1 of this tutorial series:
| ESP8266 SDK Tutorial | Learn how to use the ESP8266 SDK. This is what the pros use! |
| ESP8266 Lua/NodeMCU Tutorial | A look at the NodeMCU Lua interpreter for the ESP8266. Learn how to get to Blinky! |
| ESP8266 Arduino Tutorial | Use the Arduino IDE to simplify development and get up to speed very quickly! |
And here's the links to Part 2:
| ESP8266 SDK Tutorial | Looking at using the linker to get PWM, and the included I2C libraries |
| ESP8266 Lua/NodeMCU Tutorial | Using PWM and I2C with Lua! |
| ESP8266 Arduino Tutorial | Using the Wire library for I2C, and AnalogWrite for fading! |
Links to the other tutorials in Part 3:
| ESP8266 SDK Tutorial (You are here) | Using MQTT to develop an IoT device |
| ESP8266 Lua/NodeMCU Tutorial | Using the NodeMCU MQTT module to communicate with a cloud data service |
| ESP8266 Arduino Tutorial | We use the simpler, more widely available HTTP protocol to log data to the cloud |
Getting Help
If you run into trouble while following these tutorials, you have a few different options:
- Ask in the discussion area below the article
- Join the ##esp8266 channel on Freenode IRC and ping me (MrAureliusR) or ask anyone who is in there
- Post on the ESP8266 Community Forums (note it can take a while to get a response!)
- Send me a private message here on Hackaday
What is MQTT?
MQTT, pronounced "em-cute" and short for Message Queuing Telemetry Protocol, is a lightweight communication protocol that was specifically designed to be easy to implement in environments with limited resources, like a microcontroller. It has found widespread use in the IoT arena. It is easy to understand, and it is perfectly suited for applications where data logging or remote control are required. In this tutorial, we will be implementing a basic MQTT library for the ESP8266. In order to do this, we will need to take a look at the MQTT standard document, which is freely available. A huge kudos to OASIS and MQTT.org for making the specification freely available. This is one of the factors that has led to its widespread use.
MQTT is based on a subscribe/publish model. Think of it like a newspaper or magazine subscription. There are many different newspapers and magazines available, each containing different information that you may or may not be interested in. Your local magazine supplier, or broker, has a listing of all the publications that are available. You can choose to subscribe to those you are interested in, and from that point forward, you will receive all the subsequent releases as long as you maintain your subscription.
MQTT works in the same way, with a server running the MQTT broker software. This broker can be queried by clients looking to subscribe to the data feeds (known as topics in MQTT lingo) it has available. One of these topics might be the temperature in Toronto, Ontario, at the Pearson International Airport. You send a message to the server that you would like to subscribe to that topic. When a new reading is taken from the thermometer, the server sends you a message with the new data. This continues until you cancel your subscription, stop responding, or the broker goes offline.
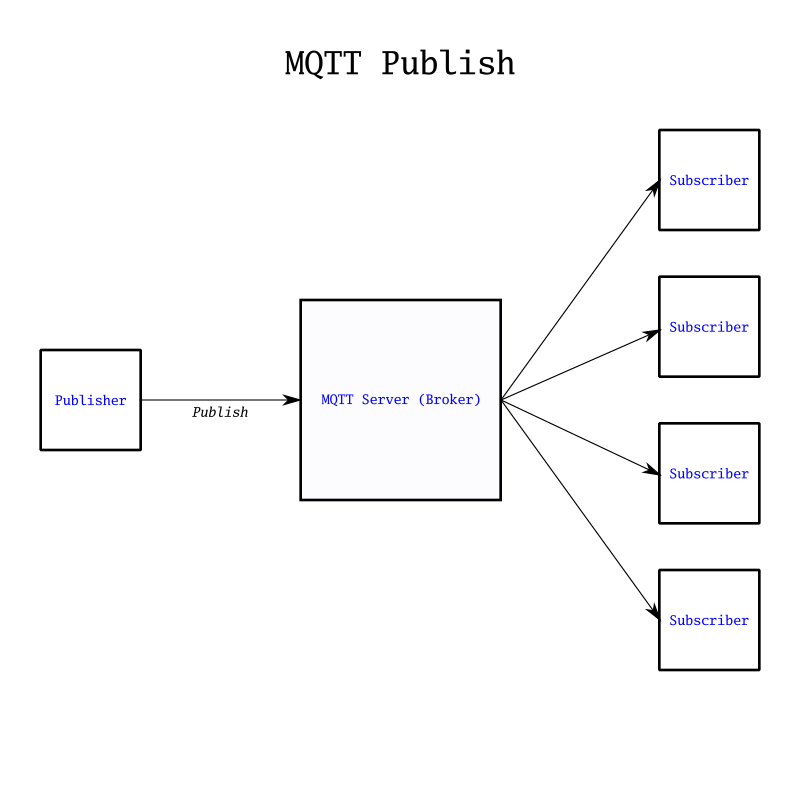
On the other side of the broker is the publisher. This is the computer at Pearson Airport which is actually taking the readings from the thermometer. Whenever it has a new piece of data, it publishes this data to the MQTT broker software, running on the publicly accessible server. The publisher doesn't know who is subscribed, and it doesn't care. Its only job is publishing new data to the feeds it is responsible for. This separation between the publisher and subscriber allows for easy scaling and security. It is also highly reliable, with features in the protocol that can ensure delivery of messages with some additional overhead. However, most MQTT brokers work in a "fire-and-forget" mode.
MQTT runs over TCP, the transport control protocol which runs most of the internet. In this way, it is similar to HTTP or FTP, in that it is a layer above TCP in the OSI Stack Model. We won't delve into what that means; suffice it to say that we will (for the most part) let the ESP8266 SDK take care of the TCP details. We will take care of the MQTT packet formatting.
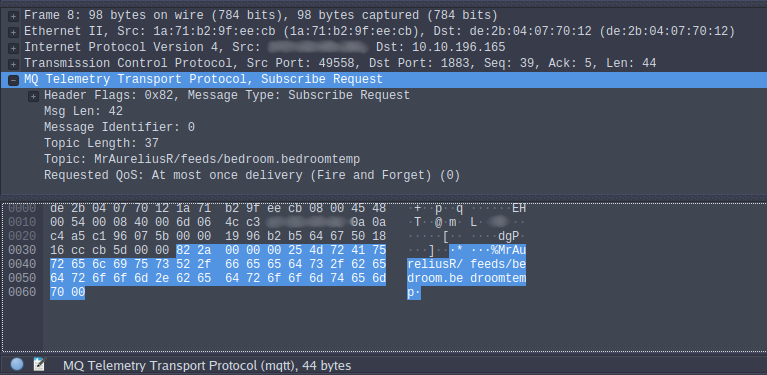
In this screenshot from Wireshark, you can see the separation of MQTT from TCP. The highlighted portion is the MQTT portion of the packet. Everything else is generated by the ESP8266, making our task much simpler. This packet is a subscription request to the Adafruit IO server for a test feed of the temperature sensor in my bedroom. For this tutorial, we will be focusing on using MQTT with Adafruit IO; however, there is no reason why you couldn't use this knowledge with any other MQTT broker. This excellent article on Hackaday takes a look at the various datalogging services that support MQTT.