 KeeZhongPing
Introduction
iAttendance serves as a platform which allows professors and students to access the attendance question efficiently. It consists of two main pages, the professor page and the student page. The professor’s page would allow the professor to set an attendance question either by voice recognition or text. It would also allow for the professor to view all the students answer and retrieve the students list who are absent from the class.
Why did you make it?
It started off with the unique introduction of attendance question during the start of the module. It was unlike any other module I took before, and I found it to be an interesting concept. Instead of taking attendance on a piece of paper, like how most other modules do, we will have to wait out for the professor to write out the attendance question which instantly test your knowledge of the current lecture like a pop quiz. Students will them scramble and try to quickly get solve the attendance question.
In the following weeks, the excitement and anticipation died down as we were more used to the routine and that was when I noticed during tutorials that the TA had to write down the attendance question, create the topic in the forum and then tell us to do it. This got me thinking.
What if there’s a cooler way to do it? With shared attention being the most basic medium, an implementation that could capture the attention of the students would be most effective. Therefore, I realise that if the professor did something cool during the class it would leave an impact. After creating the voice gun, as a project in one of the assignment, I saw the potential of using voice recognition in achieving my objective and thus, embarked on this learning journey to complete my project, iAttendance.
Important Links
iAttendance link: https://keezhongping.github.io/
Prof Page Password: prof
iAttendance [Student]
This page allows the student to view and answer the attendance question.
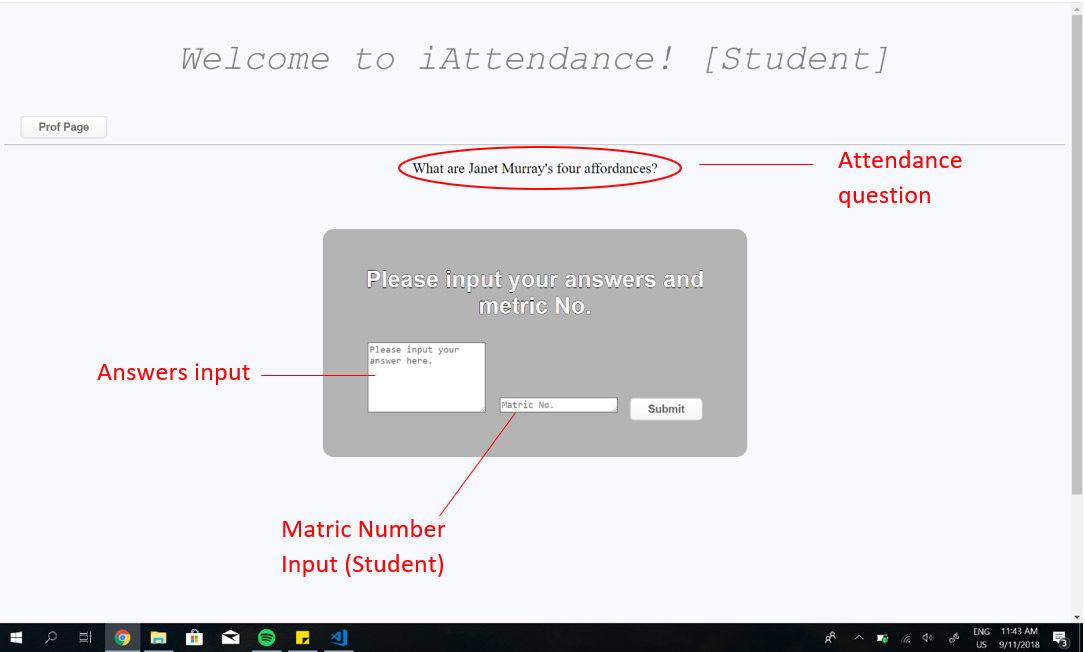
Steps of answering attendance question:
- Enter https://keezhongping.github.io
- Key in answer and Matric number
- Click submit
Time verification
Students are only allowed to enter their answer from 0800 to 1000 during the class. Any other timing would return an error notification and their response would not be recorded.
Prof Page Button
Clicking on this button would trigger a password request and if the correct password is entered, the user would be navigated to the professor page.
An incorrect password would trigger a notification and user will not be navigated.
iAttendance [Professor]
This page allows the user to:
- Set an attendance question
- View student’s answers
- View absent students
Set attendance question
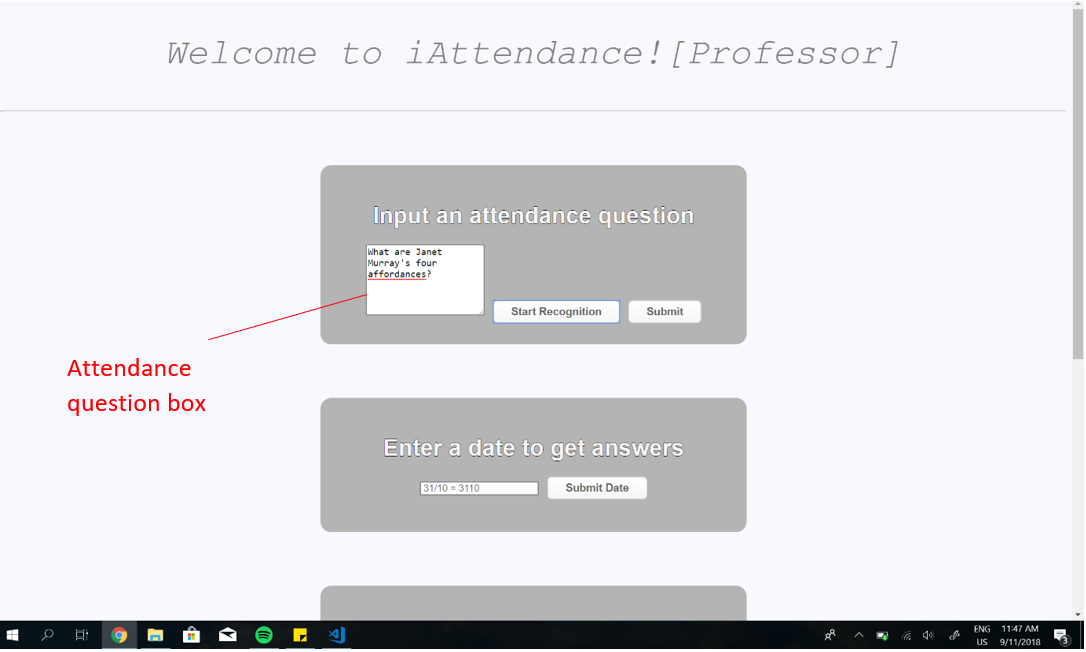
The Attendance question box can be populated by two ways:
- Voice Recognition
- Text
If the user wishes to use voice recognition, click on “Start Recognition” and a blinking red circle would appear at the tab. Refer to the figure below.

Upon the presence of the red circle, the user can now speak and end with a pause. The speech will then populate the attendance question box. The user will be able to edit the box if needed. Finally the user would click “Submit” and the attendance question will be posted.
For text, user would be able to type into the attendance question box and click “Submit” after.
View Students Answer
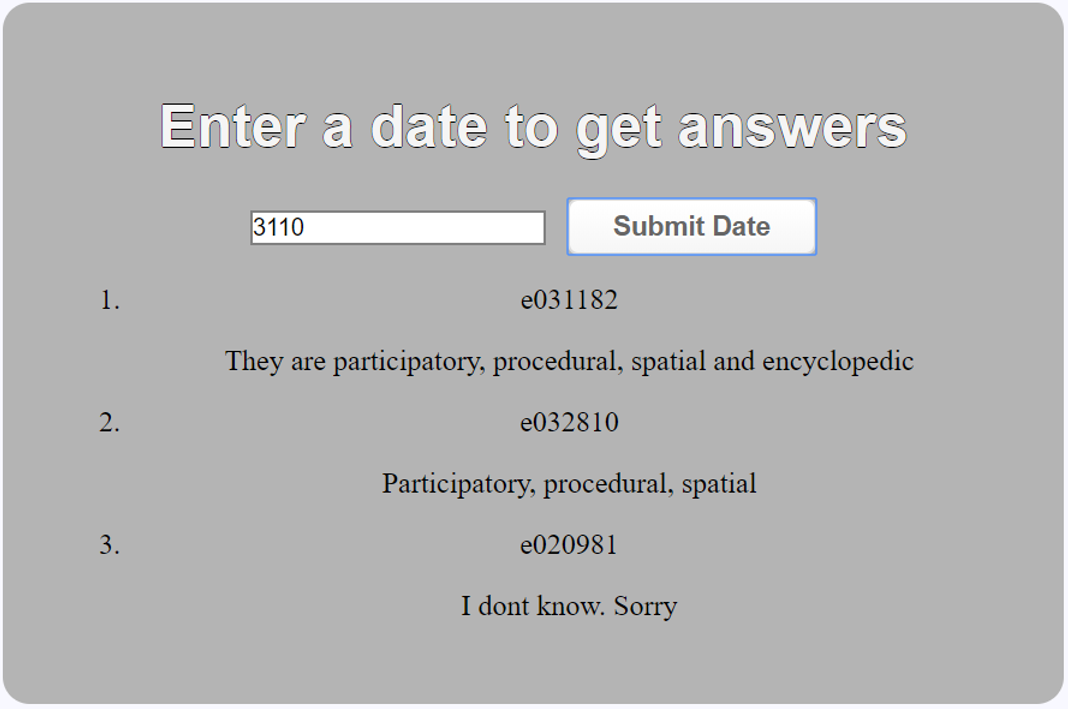
This would be a simple view of all the student’s answer in the following order:
- [Matric Number]
[Student’s input]
The date entered follows the following format: “ddmm”.
Example:
31/10/2018 would be inputted as “3110”.
25/01/2018 would be inputted as “”2501”.
View Absent Students
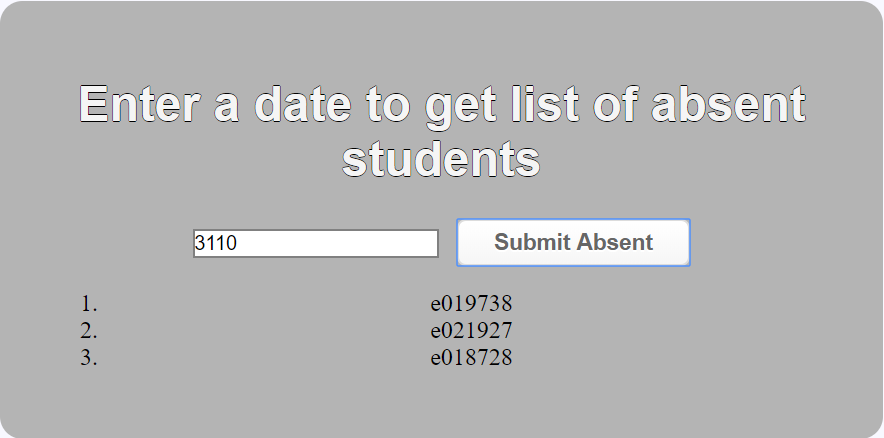
This would be a simple view of all the student’s answer in the following order:
- [Matric Number]
The date entered follows the following format: “ddmm”.
Example:
31/10/2018 would be inputted as “3110”.
25/01/2018 would be inputted as “”2501”.
The search algorithm is as follows:
- Loop through class list in database (Refer to database section)
- For each student, check with the answer pool, if student has an answer, skip. Else send to absent list.
Database Structure
Link to database
https://get1033-ce07e.firebaseio.com/
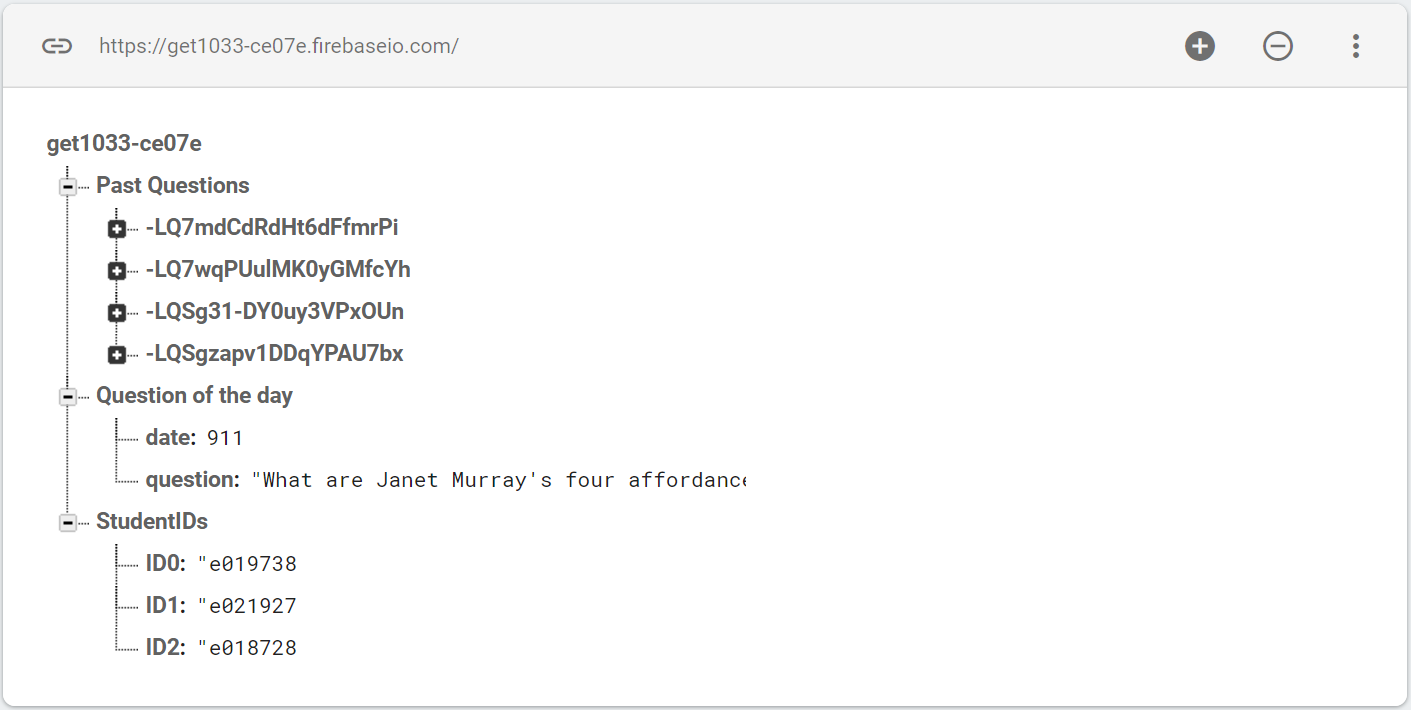
The database consist of 4 main sections:
- Past Questions
- Question of the day
- StudentIDs
Past Questions
Every student input will be logged here. Each input will be represented by a random key and the internal structure is as follows:
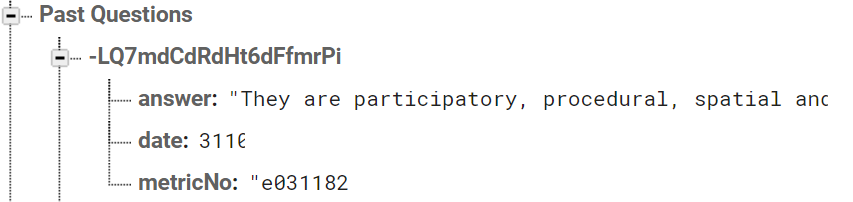
“answer” would capture the answer keyed by the student.
“date” would be automatically recorded when the student submits his/her answer in the form [ddmm].
“metricNo” would be inputted by the student and used for checking of attendance.
Question of the day
This field would be captured when the professor enters a new attendance question. It would instantly replace the previous question and appear on the student’s page simultaneously.
StudentIDs
Student IDs are a collection of the class metric numbers. This field has to be populated only once by the user before the start of a new semester.
Reflections
Starting off – Research and HTML basics
With little basics on HTML and CSS, I started off by getting as much information about the HTML, CSS and JavaScript format and syntax. That was when I learnt about how a HTML is formed by Tags. Initially I thought that all would be complied in one HTML file but apparently it uses links to link HTML, CSS and JavaScript together. Then I started modifying CSS codes and figured out how to move things using margin and how to even colour my items. I then looked through many websites to decide on the general style and design of mine. I realise that most of them uses complicated styling such as bootstrapping and jQuery but I wanted mine to be kept simple yet elegant and clean. Therefore, I decided to go with a grey background and have simple darker grey for the fonts. This was my initial design (Refer to fig 1) and then I moved on to start creating my first HTML page and CSS where I input text boxes, which are known as text areas or input, into the website and styling it by changing font size, alignment. Then I moved on to JavaScript, which was comparably more familiar to me as I had made the ping pong game during tutorial. I started with grasping the fundamentals of JavaScript which was how to get variable, declare variable, and changing text. Then with the knowledge of java which I am learning in CS 1010J, I tried to input information using variables instead of hard coding them. This worked out to be quite similar and I was able to get how the basic function work after a while. For example, getting text from a textbox into another text box.
However, I found out later that the sequence of HTML was important. I initially placed the Javascript link at the beginning and that affected how some of the variable turned out. I was only able to solve it by moving the link to the end which I believed that it is because the codes ran in order and it was not loaded when the Javascript was linked.
Voice recognition – The Research
Voice recognition was my main plot for getting ‘attention’ from students as shared attention is crucial as a medium. The action of the professor going “Hey iAttendance, what are the four affordances?” would spark the proactive contest of the students to complete the attendance question as the website would automatically detect the question and post an attendance question. Following which, we learned about security such as phishing which is to imitate and hacking in our lecture and I even thought of recognising the professor’s voice signature and creating a verification check based on it. With that in mind, I started off looking through countless online reference towards voice recognition. It started off with many demo sites which allows you to try out their sample code/program. To my surprise, most of these codes does not work and at that point I was not sure whether I was the cause to it. I soon found one that finally worked, and I was amused when I saw for the first time, what I said could be turned into text. It felt really rewarding as I could see that I am on the right track.
With that boost of confidence, I continued searching on. However, that was when I encountered another problem. Most of the documentations and instructions were complicated and I had issues understanding them. There was no simplified version of JavaScript code and it was unlike the JavaScript that we learnt during our tutorial, which was meticulously explained to us. Therefore, it took me awhile to try and understand their code while relying on a countless trip to Google to get the definition of each of the terms.
Finally, I managed to find one collate the simplest way to come out with the voice to text function which I then implemented into my code. Once I am done with the user interface and linked it to the JavaScript that allows for voice recognition, I turned on the microphone and muttered a sentence into it. Then I stared into the textbox and waited. Nothing appeared. With a hinge of disappointment, I went back to stare at my codes, hoping to fix the problem. It later occurred to me that I was able to “console.log” my text speech but it was not shown in the text field. That was when I realise I did not send the recorded speech text into the text field for display. After fixing the bug, it finally worked. I was able to get my speech into text!
But why go through all that trouble?
Applying a procedural rhethoric
Not only can it capture attention, the action of using voice recognition could act as a procedural rhetoric where students would learn that “Words are important” as they would have to pay attention to the question in order to complete their attendance question.
Not only so, voice recognition is a relatively new technology (1962 IBM Shoebox) and therefore, I would like to make use of it to add an element of fun to the application.
Making use of the 4 affordances
I wanted to access my project at this point with the 4 affordances and figure out what I was lacking. I looked at the encyclopedic affordance and I realise I had to figure out a way to store my data. I then realised I needed a database to provide encyclopedic reference and information to the users.
Designing database and algorithm to retrieve and compare.
But the question is “How?”. I began my online research journey to find out how online database works and how to implement it. It was initially quite startling as I was bombarded with the endless choices of many services which I did not know where to start. I then learnt about the different between SQL and NoSQL (Not only SQL) database. I had a hunch that I did not want to download and work with SQL as it was too much confusing, so I dived into the various types of NoSQL database. All I wanted was to store the question and that was it. I tried looking at really simple and basic options that allows me to do so but sadly there is not much. Most of them boast about much about their capability of running and processing thousands of data, which unfortunately was not for my case. Then I went to search for “Realtime easy database nosql” and I chanced upon firebase. Which I heard some of my friends mentioning before. I then went in to learn more about it.
I realise that firebase is basically an online Realtime database which uses NoSQL structure and its was bought over by google in 2011. It was not the website that attracted me but when I continued to research on firebase, I came across a third-party website[1] about firebase which had a video which really caught my attention. It was very detailed and easy to follow. I then went on to read how I could input my data from clicking a button into the database. It was not as easy as I thought. The very first thing I learnt was to link to the database. Which was also called referencing. I had to initialise the firebase object in my codes before I could even link to it. Basically, inputting the URL like and other basic information into my HTML codes. After that I had to edit various permission on the firebase console end to ensure that my website could gain access to it. I then learnt the difference between a write, read, update and delete. At that point, I needed a write to work first.
To write data, user can either push, set data and could even use hard coded functions to send specific information into their database. I needed to push my questions up onto the database, but I did not know how to. I left that website in search for many others. But my first issue was if I should set or push. I then figured that I should just start by setting some data using hard coded information and try to send it to the database and see if it works. I was soon able to send information into my online database in real time. With that, I continued on with retrieving data and I was able to as well. Retrieving data was slightly more complicated as some of my data were pushed into the database and that would generate a random unique key. I went online to figure out how I should navigate down to the “child” of the dataset and use it to retrieve the specific data that I require.
I moved on to consider my database design. I wanted a section for “Questions”, “Past Question”, “Students”. My data flow would be as follows. The question would be updated by the professor and would update the “Question” field in the database. The students will then log on and give their input. If they missed their time slot (0800-1000), they will then receive an error message to not allow them to enter. Upon successfully submitting their answer, they will receive a notification and their response will be recorded automatically including their current date. The professor would then have 2 functions. First, to view all the answers on a specific date. Second, to instantly find out who is absent on specific date.
Making use of the 4 affordances
Now that I can store my data. I then realise that I did not have much of a spatial affordance where I could manipulate these data to provide me with critical information. Therefore, I knew I had to figure out functions which could do so.
Figuring out the functions [Get Students Answers]
My first function was to get the students answers. I knew that these functions required deliberate carefully planning of the database and there was where I started. I thought about how the students answers will be stored and I decided to tag all answer with a date as I learnt that getDay() would return the day and I could manipulate that to use it as my searching algorithm. It had to be different for every week and therefore, I decided it should be “3110” for 31/10 as it would be unique to the day. With that, I was able to identify the specific day the question was asked. I then decided that the other information would just be the answer and their metric number.
Once I knew what information I needed, all I needed to do was retrieve. Or that’s what I thought. I realise that as there would be many students answering at once, it would require a push instead of a set. A push of data would create a unique key to all my answer sets and that would mean trouble for me to retrieve the date as I was not able to access the variable that easily. All I wanted to do was retrieve each data and compare it with the inputted date and return the answer if the dates match. However, with the random key present, I was unable to do so, and it took me a whole week just to figure out how to access the “child” value of the dataset. When I got it, the rest of the function just relies on comparing the dates and displaying the data onto a list in the website which was relatively manageable.
Figuring out the functions [Get Absent Students]
The next question comes, “How would the professor know who is absent?”. After all the whole point of the attendance question is to get the attendance of the class and it would be most important to do so automatically. I wanted to make a function that the professor would just need 1 click to get the absents student’s names. With the experience of making the first function, I dived straight into the database console and stared right into it hoping to figure this out. This time, I figured that I would use the same date picking algorithm to search out the students but how can I determine who was absent? I knew I needed a list of every student in the class which will allow me to compare the students who answered to the list and that would give me the absent list. I went on to create the said list and next, I had to find a way to compare the list to the answer.
With little searching algorithm technique that I learnt from my CS1010J module, I decided to loop through the class list, compare and check if that student has answered the attendance question, and if not, send his/her metric number to the absent student list. That way, after looping through the whole class list, a list of students who did not answer the attendance question could be collated.
Implementing this function went smoothly until I had to loop through the class list. I used a nested foreach loop to do so and it returned a very weird result. The loop ran one after another despite being nested together. Meaning the outer loop completed before the Inner loop and I had no clue why so. After much research, I found out that it was just because of a bracket, the foreach became outside the “snapshot”, which was an issue as I used it to compare my data. After finally solving all the issues, I finished up the comparison algorithm and the controls for the function.
Beautifying the webpage
With all the functions completed, the website looked ugly. The form controls were boring and the whole webpage looked like it came out of the 1990s. First, I went to search for bootstrapping my data. It was covered in the tutorial but when I tried to find the codes to bootstrap on the net, it was very different from what we learned. There was application of really complicated tables and that would mean I had to redo to fit everything inside. Therefore, I learned that there is also a form of bootstrapping known as “element bootstrap” where instead of declaring absolute values for the elements, it uses percentage and therefore were able to manipulate the elements when the size of the window is changed. Therefore, I changed all my values from pixel to ‘%’ and it worked. I was able to scale the items accordingly. Following that was colours. My elements and objects in the webpage looked really flat and I wanted some complex colour and texture to it. I used a button creator[2] to create my desired button, as there were too many complicated gradient codes. However, I learnt how they used other statements like “border-radius” and applied it to design every other element myself. Finally, I was able to come out with an aesthetically pleasing webpage and was happy with it.
Conclusion
“WOW, what have I made?” was the first thought that struck me when I sat back and look at my webpage. I felt a sense of accomplishment when I was able to produce a full working product from just an idea. This inspired me to plan for the many various other projects that I am going to work on. My next idea would be a “Nature Machine Learning” product! The journey of creating this website taught me many lessons, such as sometimes the solution to a very complicated issue might be from the simplest of things. There were many times that hours or even days of “googling” might result in a very obvious solution but through constant research and googling is where I learn the most.
[1] Firebase related website : https://howtofirebase.com/save-and-query-firebase-data-ed73fb8c6e3a
[2] Credits to https://www.bestcssbuttongenerator.com/#/23*/