 andriy.malyshenko
-
1Step #0 - buy raspberry pi zero
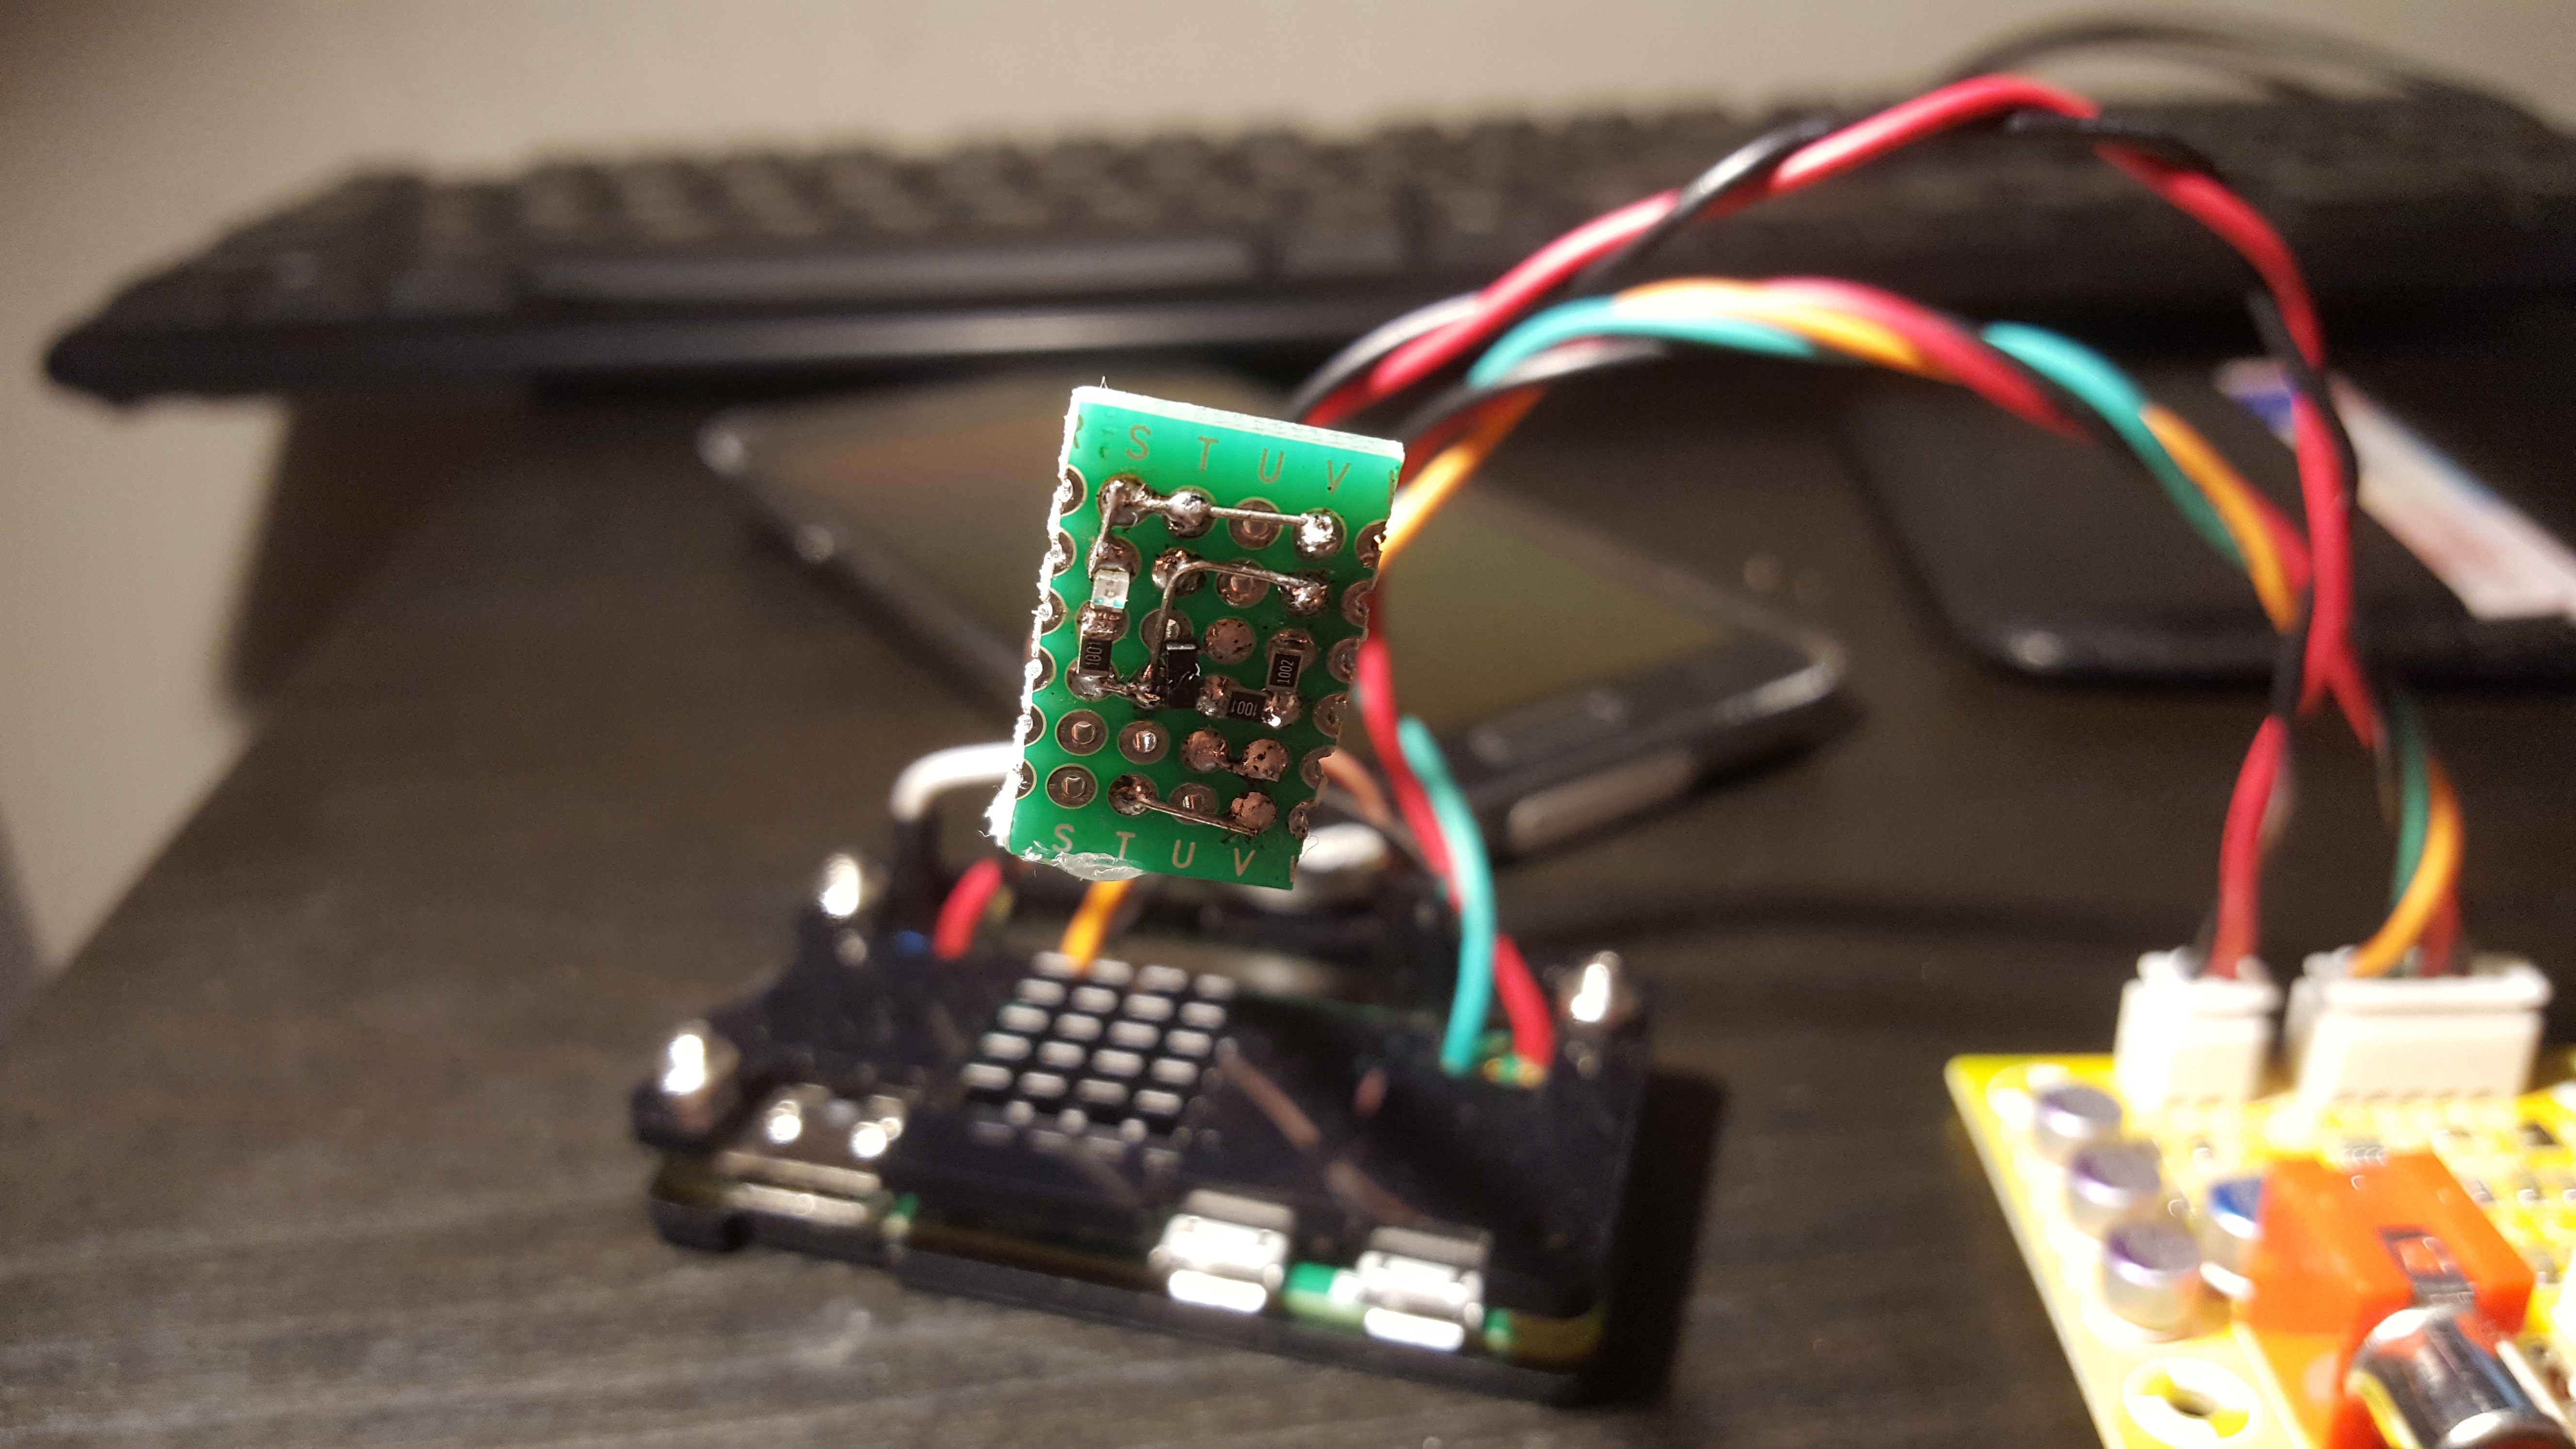
Kidding, but for comparison i really did started with that and configured everything i would like to have from this project on '5$' raspberry zero. So here it is
![]()
![]()
![]()
What is missing on that images is external usb ethernet card and amp that was used in previous project. In fact i will reuse amp setup in every following configuration since amp part is equally compatible with onion, raspberrypi or orangepi configuration. Green relay module will be described later, but is essentially same relay module that i've used in prev project. But back to topic.
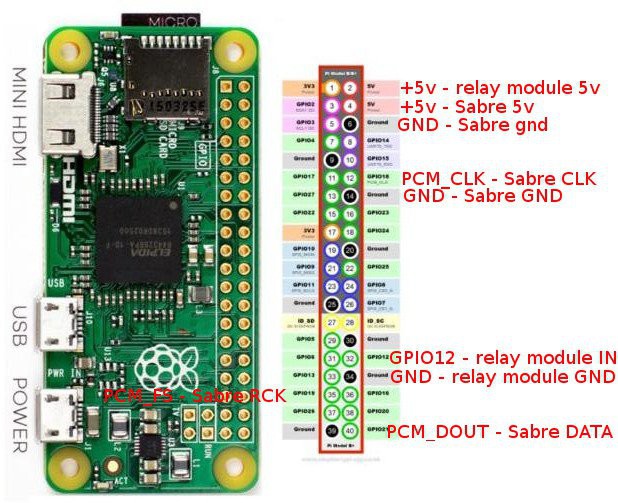
Connection goes this way
![]()
And this ends HW part. Than SW part
1) Install pulse server
sudo apt-get update && sudo apt-get upgrade -y
sudo apt-get install -y pulseaudio
we need to configure system service, that is when pulseaudio is run with --system switch. Then it will load config from system.pa. Therefore we will edit this one
sudo nano /etc/pulse/system.pachange this line to allow local usage for every user
load-module module-native-protocol-unix auth-anonymous=1and enable network server
### enable network server

load-module module-native-protocol-tcp auth-ip-acl=127.0.0.1;192.168.1.0/24 auth-anonymous=1
then we will create system service
sudo nano /etc/systemd/system/pulseaudio.serviceand add this content
[Unit]
Description=PulseAudio system server

[Service]
Type=notify
ExecStart=/usr/bin/pulseaudio -v --daemonize=no --system --realtime --log-target=journal

[Install]
WantedBy=multi-user.target
enable and start
sudo systemctl daemon-reload && sudo systemctl start pulseaudio.service && sudo systemctl enable pulseaudio.serviceat this point you should see pulse running in processes
and from external device (laptop in my case) you should add this server as target
nano ~/.config/pulse/default.paadd this line (change ip appropriately)
load-module module-tunnel-sink-new server=192.168.1.85 sink_name=rpithen run kill command to sertart pulse.
pulseaudio -knew sink will appear
at this point pulse part is done
2) Sound card and I2S configuration
we will need to enable I2S and configure card but lucky enough our card is compatible with hifiberry-dac hat, so we only need to enable appropriate DT layer.
sudo nano /boot/config.txtEdit those lines (last one is commented - not necessary but i prefer to have only one card for simplicity)
dtparam=i2s=on
dtoverlay=hifiberry-dac

#dtparam=audio=on
then you need to reboor your pi and find new sound card available
aplay -l

card 1: sndrpihifiberry [snd_rpi_hifiberry_dac], device 0: HifiBerry DAC HiFi pcm5102a-hifi-0
 Subdevices: 1/1
 Subdevice #0: subdevice #0
to test sound i use this command
speaker-test -t sine -f 2500 -c 2
you should see beeping sound in both channels
3) last step is to configure relay module. and i will describe it in next instruction since it is exactly the same as for OrangePI. And this project is actualy for latter one, so let's leave something for it.
Next step is actually start adopting this basic setup to OrangePI Zero.
-
2Step #1 - Connect I2S Sabre sound card
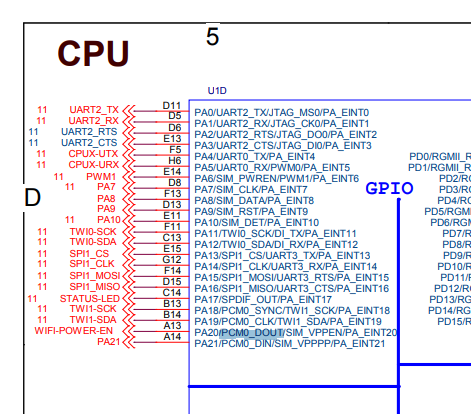
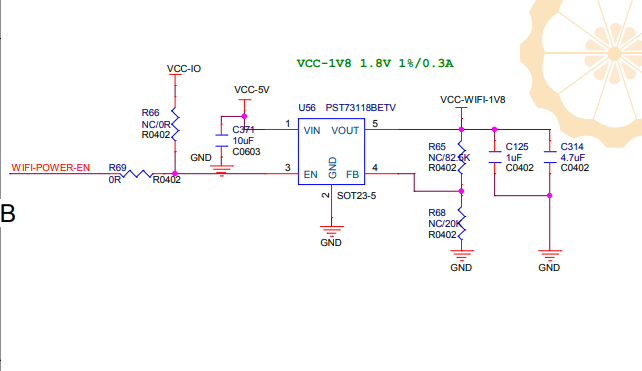
I started working with OrangePI Zero for the sake of price and simplicity. And immediately were struck by the fact that vendor forgot to solder I2S on the board header. In early versions this was solvable by soldering couple of resistors on the board (more details here) but in my revision this possibility was removed. Technicaly speaking the probem is that PA20/PCM0_DOUT pin is used by vendor to enable and disable WIFI module and not available for my use anymore.
This is from early version schematics, but since newer is not published i will work with this one
So what i will do - i will solder out wifi power switch completely (and lose it forever, since i don't need it, but there is also an option also to enable it permanently) and add wire to unit's solder pad.
We are looking for tsot-5 element
![DiodesZetex AP22802BW5-7 Load Switch IC, Power Distribution, 2A, 2.7 → 5.5V 5-Pin, SOT-25]()
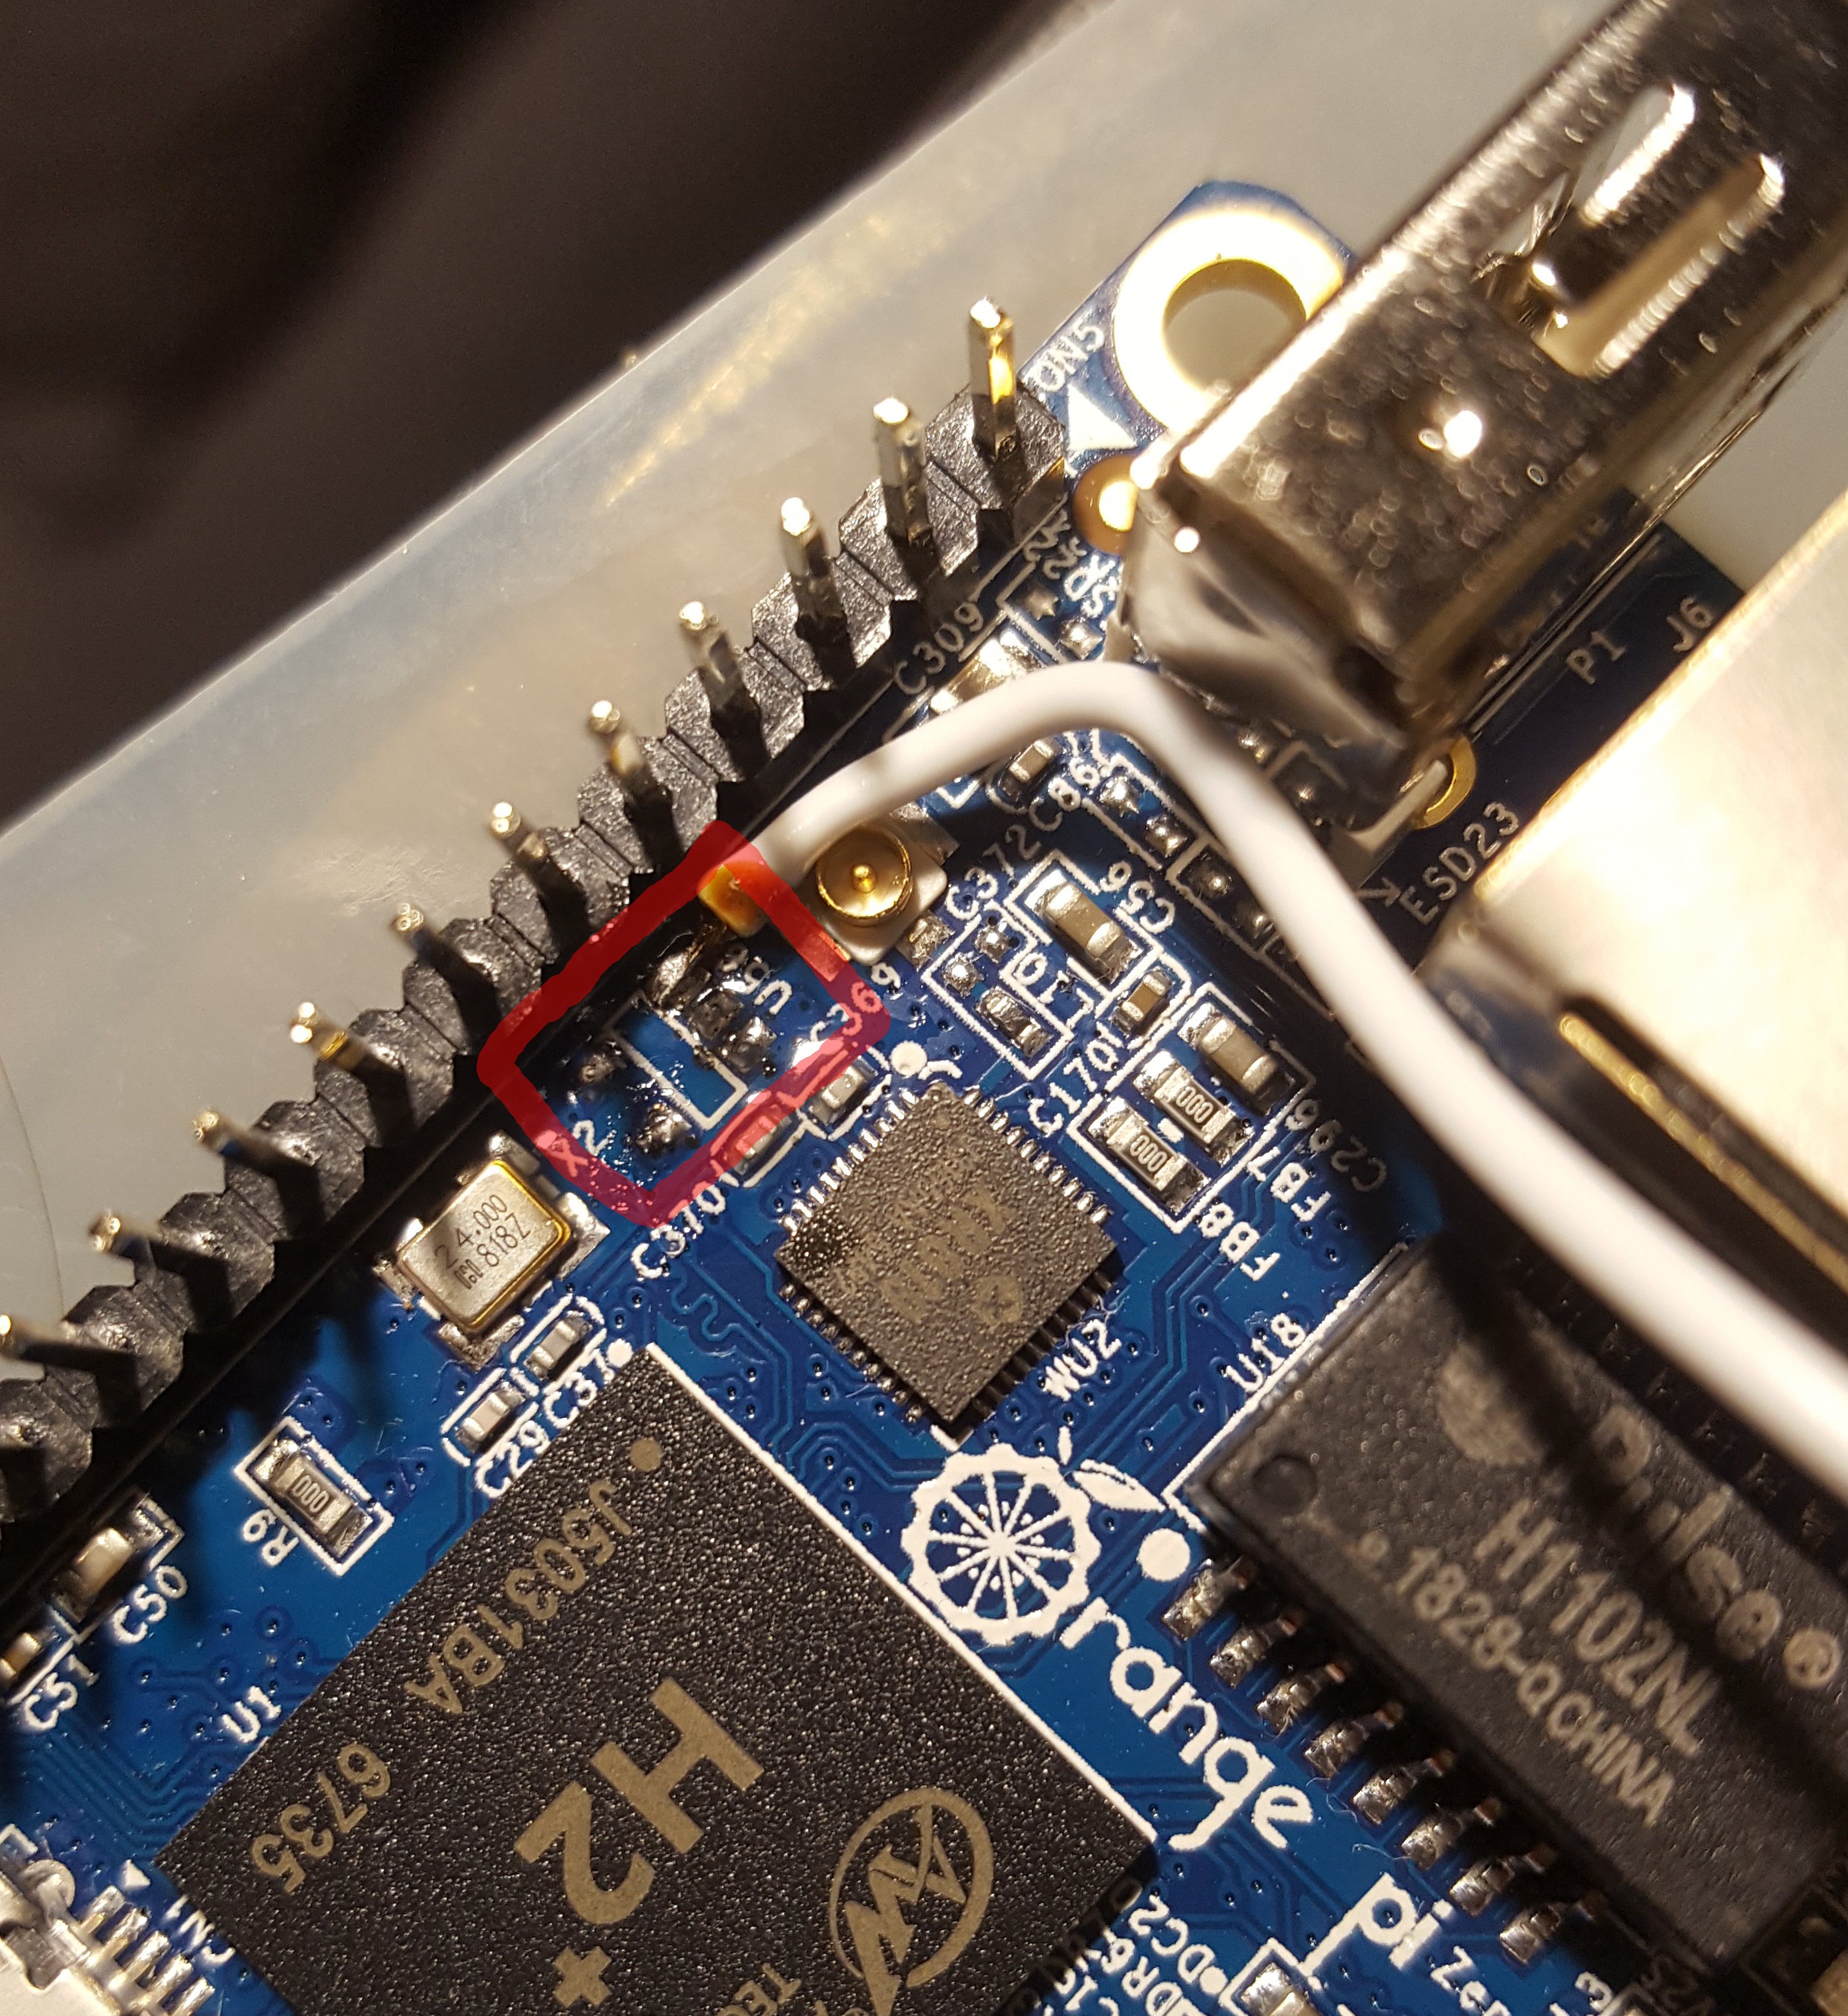
And we will find it near wifi chip
![]()
(sorry, forgot to make 'before' photo, so this is soldered out state). Pad #3 is where we should solder PA20 header and pad #5 we should solder to +5V to enable wifi permanenty. In my case i skip last part.
Then other connections will look like this:
![]()
So far that's it, relay module will be covered later.
Next step is configure Sound Card in Armbian.
-
3Step #3 - Configure I2S sound card
Since Armbian 5.30 it switched to device tree to setup device perepherials. Along with this change somehow a lot of features lost their support, therefore it is not as straightforward to enable I2S.
I prepeared github repo to do it quickly
So first get it from github
git clone https://github.com/anabolyc/pcm5102a-for-armbian-orangepi-zero
cd pcm5102a-for-armbian-orangepi-zero
We need to add user overlays to enable I2S (disabled by default) and enable sound card on that port
sudo armbian-add-overlay i2s-sound.dtsthis will compile overlay script, put compiled file under /boot/overlay-user and add to /boot/armbianEnv.txt line
user_overlays=i2s-sound
You need to reboot to changes to take effect, but this will not work just yet. Problem is we are referencing to pcm5102a kernel module there, and this one is not included to armbian for some reason. Therefore we will build it on the same board using current kernel sources. So please check if you have build symlink
$ ls -al /lib/modules/$(uname -r)/build
lrwxrwxrwx 1 root root 36 Nov 17 13:42 /lib/modules/4.14.78-sunxi/build -> /usr/src/linux-headers-4.14.81-sunxi
Iif it is missing - just create it manually be running
sudo ln -s /usr/src/linux-headers-$(uname -r) /lib/modules/$(uname -r)/build
Now you ready to build. First command produce pcm5102a.ko file among others. Second will copy it to appropriate kernel modules folder.
make all
sudo make install
Now we ready to reboot and check if we have sound card listed
$ aplay -l
**** List of PLAYBACK Hardware Devices ****
card 0: I2Smaster [I2S-master], device 0: 1c22000.i2s-pcm5102a-hifi pcm5102a-hifi-0 []
  Subdevices: 1/1
  Subdevice #0: subdevice #0
Check if new module correctly loaded
$ lsmod | grep snd_soc_pcm5102a

snd_soc_pcm5102a       16384 1

snd_soc_core          118784 5 sun4i_i2s,sun8i_codec_analog,snd_soc_simple_card_utils,snd_soc_pcm5102a,snd_soc_simple_card
Note: this will work even if card is not connected, board will output to appropriate pins and it doesn't really care if someone listens or not. So now lets check if audio will produce
speaker-test -t sine -f 2500 -c 2
And finally i can hear beeping sound in both speakers. Hooray!
-
4Step #4 - Configure pulse server
This is no different from raspberry lucky enough.
Install pulse
$ sudo apt-get install -y pulseaudio
Edit system config
$ sudo nano /etc/pulse/system.pa
edit this line
load-module module-native-protocol-unix auth-anonymous=1
add those lines at the end of file
### enable network server
load-module module-native-protocol-tcp auth-ip-acl=127.0.0.1;192.168.1.0/24 auth-anonymous=1
now lets create ssyted service file
sudo nano /etc/systemd/system/pulseaudio.servicepaste there following content
[Unit]
Description=PulseAudio system server

[Service]
Type=notify
ExecStart=/usr/bin/pulseaudio -v --daemonize=no --system --realtime --log-target=journal

[Install]
WantedBy=multi-user.target
now lets enabe and start it
sudo systemctl daemon-reload && sudo systemctl start pulseaudio.service && sudo systemctl enable pulseaudio.servicecheck if it is running
$ ps -ax | grep pulse
 3444 ?        S<sl   0:00 /usr/bin/pulseaudio -v --daemonize=no --system --realtime --log-target=journal
Good, lets check from outside device (laptop in my case), edit user's pulse config
nano ~/.config/pulse/default.paAdd line at the bottom (change IP to yours)
load-module module-tunnel-sink-new server=192.168.1.84 sink_name=opilets restart pulse and see if connection is established
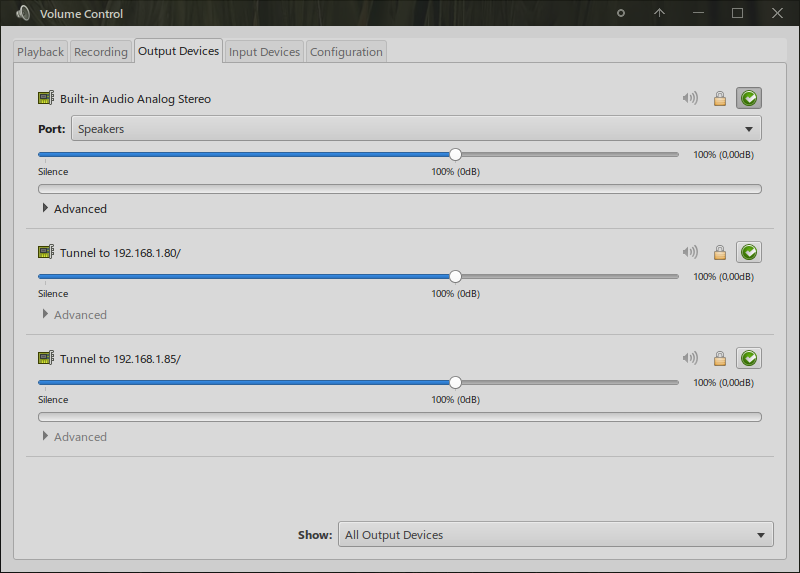
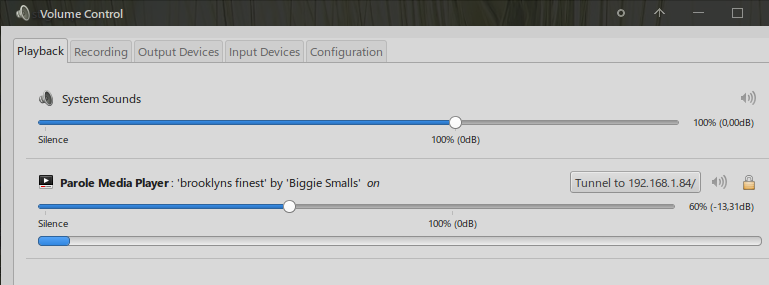
$ pulseaudio -k
$ pacmd list sinks
...
index: 2
    name: <opi>
    driver: <module-tunnel-sink-new.c>
    flags: NETWORK DECIBEL_VOLUME LATENCY DYNAMIC_LATENCY
    state: IDLE
    suspend cause:
    priority: 9000
    volume: front-left: 65536 / 100% / 0,00 dB,   front-right: 65536 / 100% / 0,00 dB
            balance 0,00
    base volume: 65536 / 100% / 0,00 dB
    volume steps: 65537
    muted: no
    current latency: 45,62 ms
    max request: 6 KiB
    max rewind: 0 KiB
    monitor source: 3
    sample spec: s16le 2ch 44100Hz
    channel map: front-left,front-right
                 Stereo
    used by: 0
    linked by: 1
    configured latency: 40,00 ms; range is 0,50 .. 200,00 ms
    module: 18
    properties:
        device.class = "sound"
        device.description = "Tunnel to 192.168.1.84/"
        device.icon_name = "audio-card"
no we may play some stuff on remote pulse and check sound
This concludes pulse configuration
-
5Step #5 - Configure GPIO to shut off amp automatically when there is no sound
I will use PA12 to control relay to switch amplifier physically off from mains when there is no sound.
Lets put script first
sudo nano /sbin/pa-monitorput there following contents
#!/bin/bash

GPIO=12
gpio_value=/sys/class/gpio/gpio$GPIO/value
gpio_direc=/sys/class/gpio/gpio$GPIO/direction

function main {

        init;

        while (true); do
        get_state;

                if [ $state = "SUSPENDED" ]; then
                        off;
            sleep 1;
                else
                        on;
            sleep 5;
                fi
        done

}

function init {
        echo $GPIO > /sys/class/gpio/export
        echo out > $gpio_direc
}

function on {
    if [ $(cat $gpio_value) != 1 ]; then
            echo "on: setting gpio to ON"
            echo 1 > $gpio_value
    else
        echo "on: already ON"
    fi
}

function off {
    if [ $(cat $gpio_value) != 0 ]; then
            echo "off: setting gpio to OFF"
            echo 0 > $gpio_value
    else
        echo "off: already OFF"
    fi
}

function get_state {
    state=$(pactl list sources short | grep output | awk '{print $7}')
    echo "state is $state"
}

main
enable it
sudo chmod a+x /sbin/pa-monitoradd it to autostart
sudo nano /etc/rc.localput it there
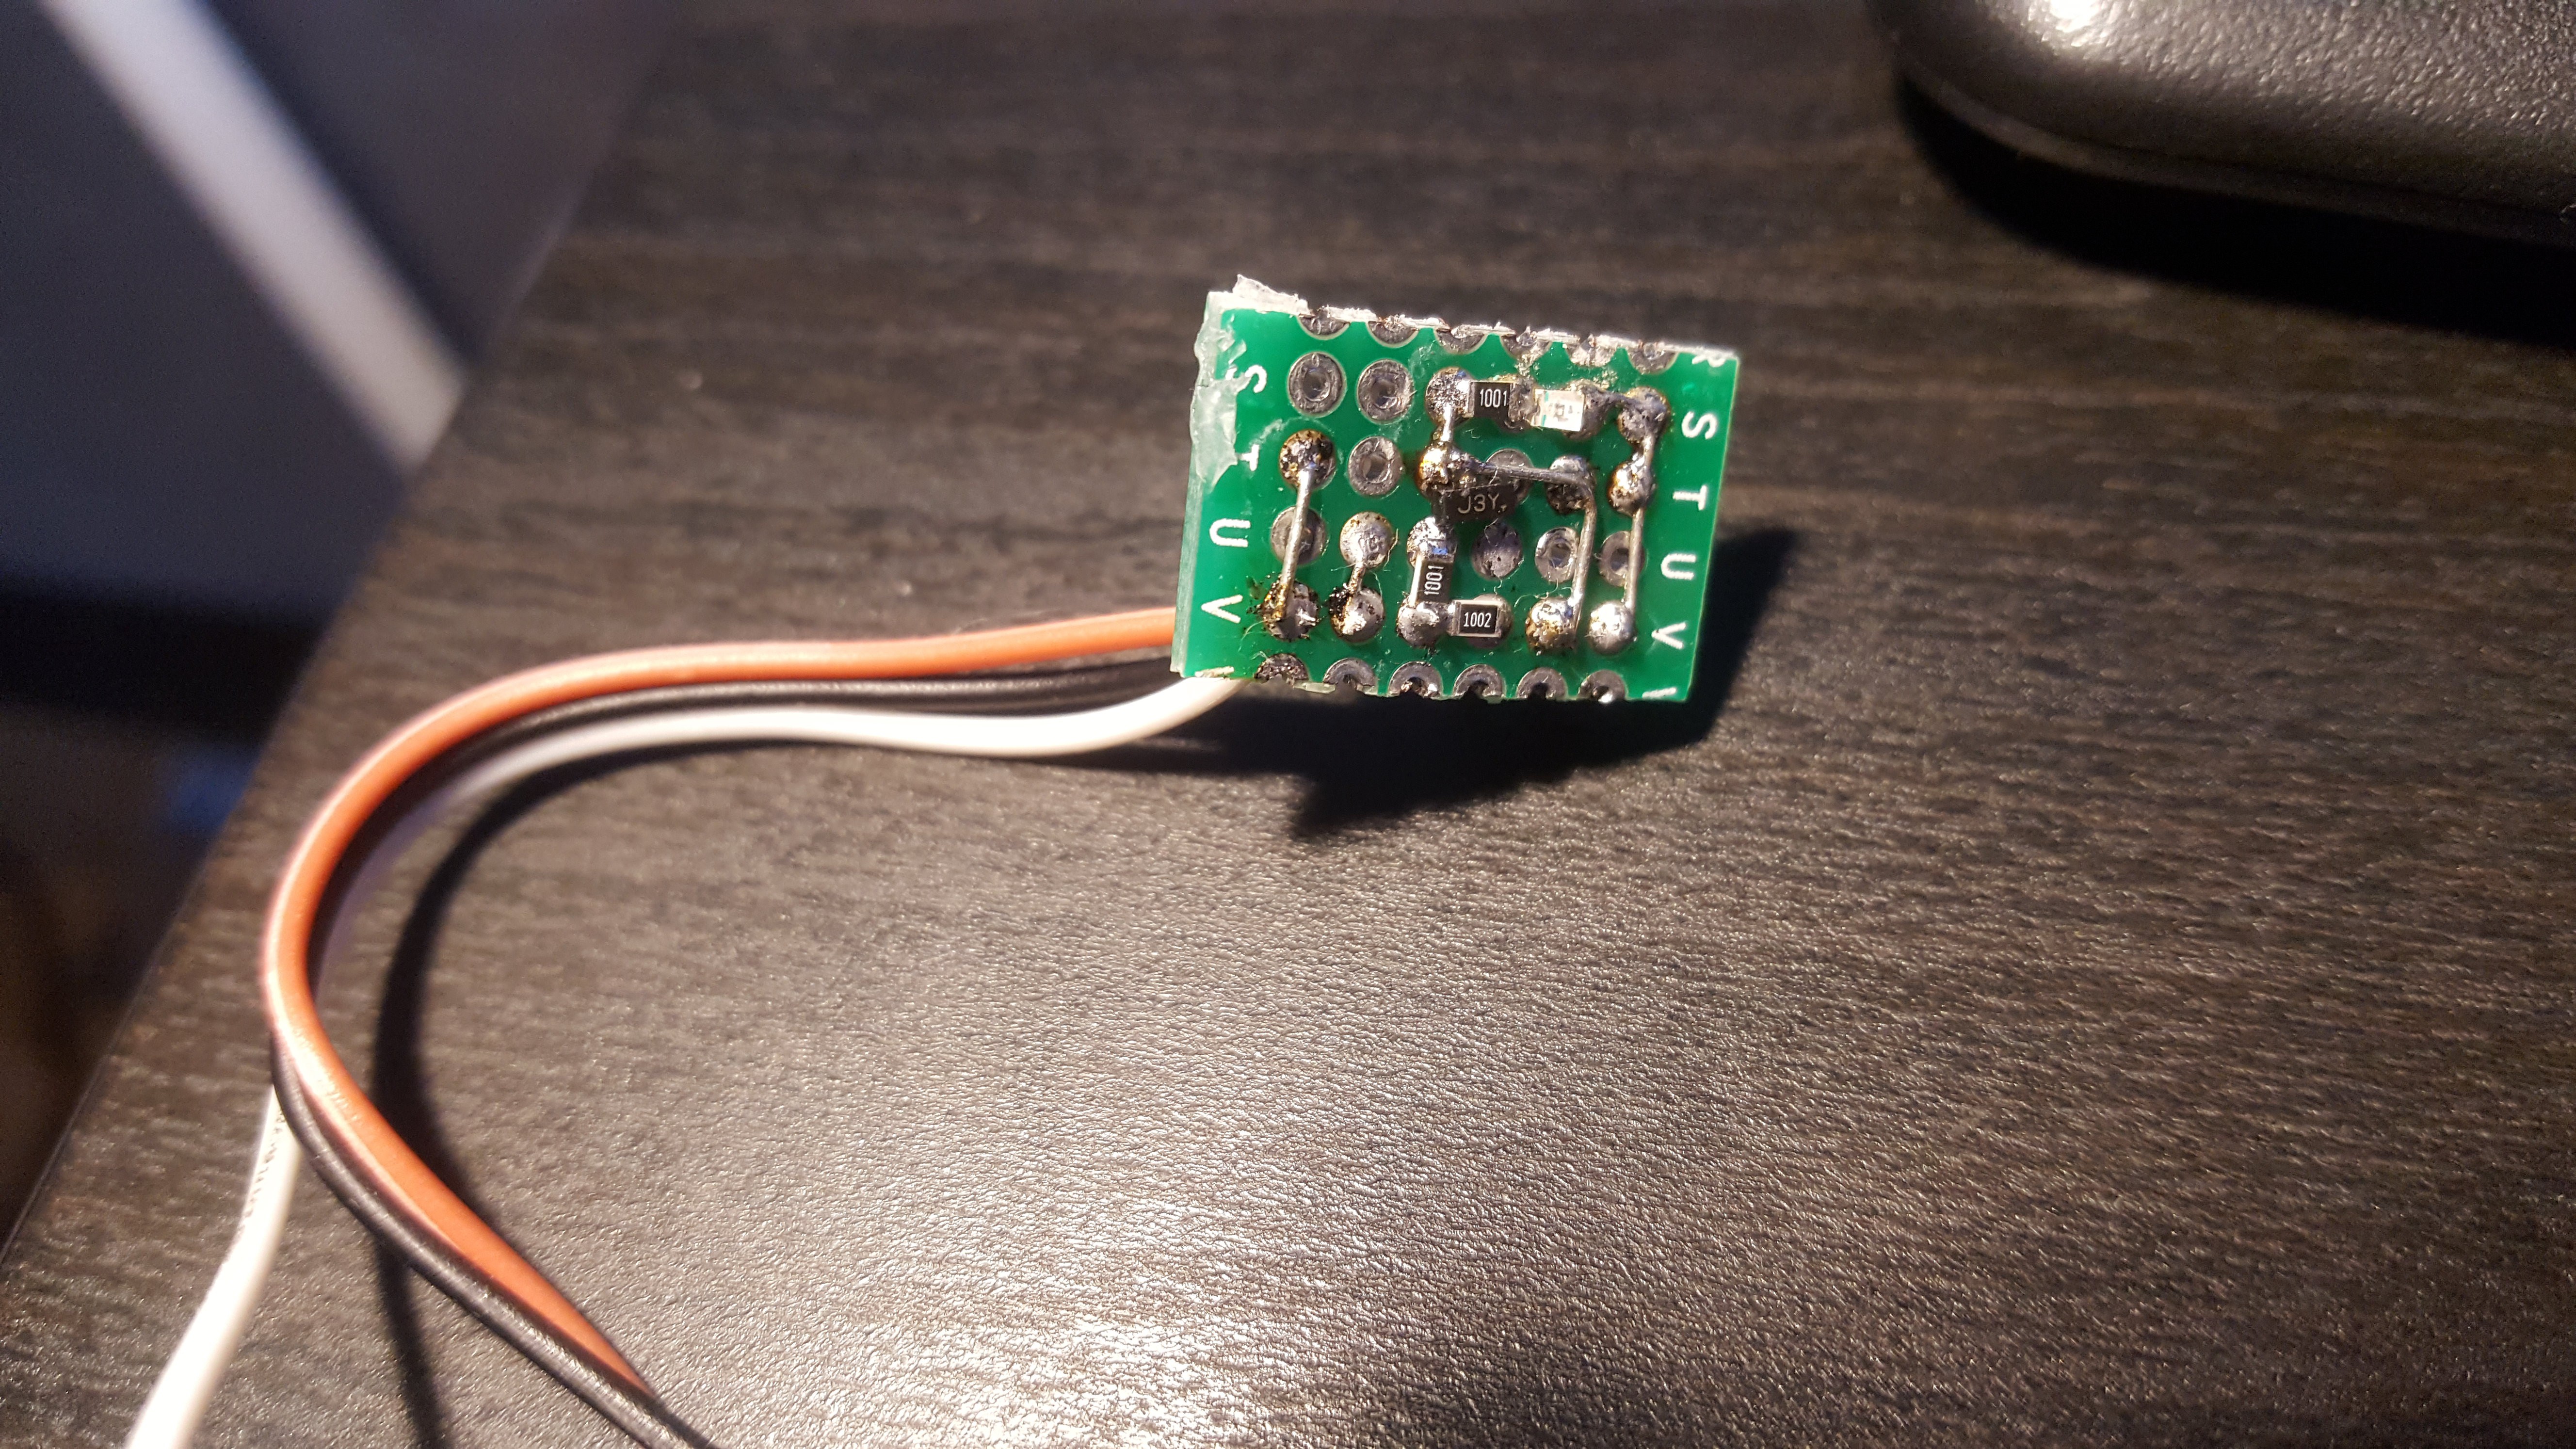
sleep 5 && /sbin/pa-monitor > /dev/null &now it is time to reboot and connect relay to GPIO12
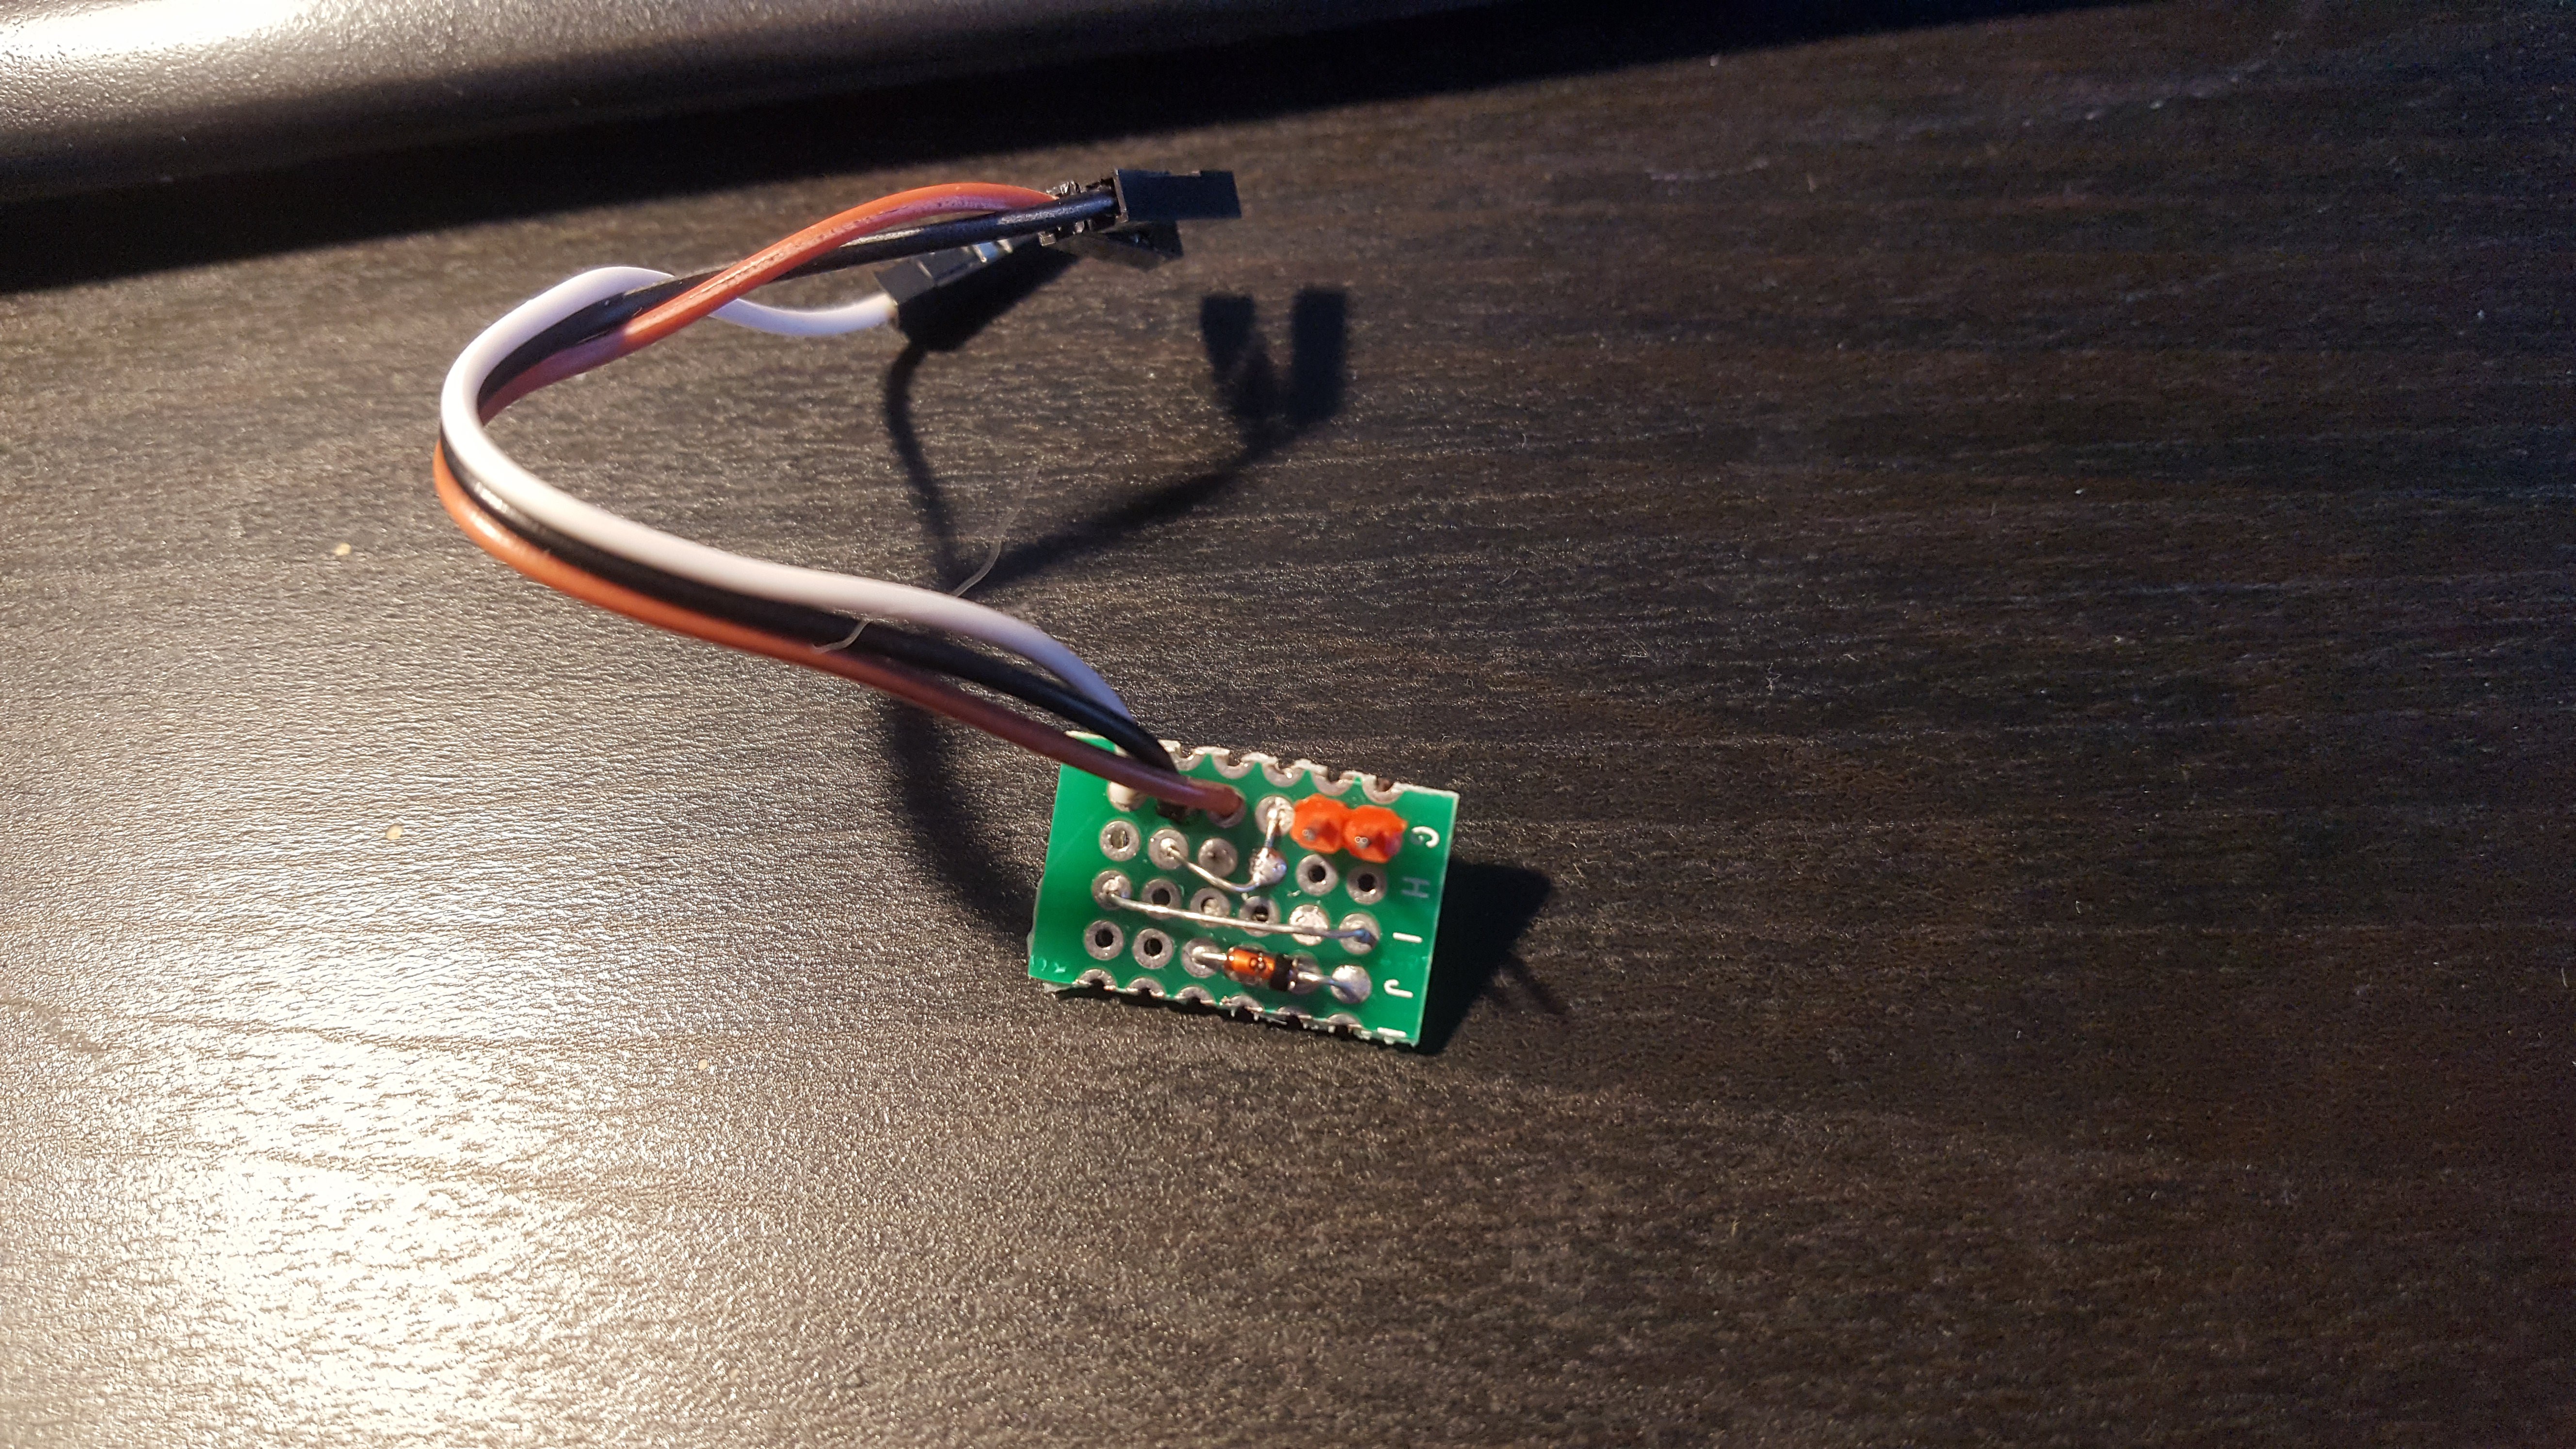
I soldered this small module (temporarily of caurse:), until i will prepare more accurate version)
![]()
![]()
Relay itself sits inside amp
![]()
And there you go - amp is switched on when audio is playing, and after it is done - after few seconds it is switched off
-
6Step #6 - configure mopidy server instance
This can be done on any other board in network, but i will use same OrangePi - since now i have lots of resources compared to paspberry zero - at least all this effort will make some sense when i wil utilize added power.
So lets install docker, shall we
$ curl -fsSL https://download.docker.com/linux/debian/gpg | sudo apt-key add -
$ echo "deb [arch=armhf] https://download.docker.com/linux/debian $(lsb_release -cs) stable" | sudo tee /etc/apt/sources.list.d/docker.list
$ sudo apt-get update
$ sudo apt-get install docker-ce
i mount my music from external NAS, so i will create cifs mount for that
$ sudo apt-get install cifs-utils -ycreate credentials file for cifs mount
$ sudo nano /etc/.smb_shareaccesspaste there
username=your-share-user-name
password=your-share-password
change file mode
$ sudo chmod 600 /etc/.smb_shareaccesscreate mount systemd service file
$ sudo nano /etc/systemd/system/data-muzlo.mountpaste there
[Unit]
Description=Mount Remote Muzlo Storage
Requires=network-online.target
After=network-online.target

[Mount]
What=//ubuntu-op-z1.lan/muzlo
Where=/data/muzlo
Type=cifs
Options=credentials=/etc/.smb_shareaccess,iocharset=utf8,uid=1000,gid=1000

[Install]
WantedBy=multi-user.target
start mount service
$ sudo systemctl daemon-reload && sudo systemctl start data-muzlo.mount && sudo systemctl enable data-muzlo.mountnow create service file for mopidy
$ sudo nano /etc/systemd/system/mopidy-docker.servicepaste this
[Unit]
Description=dockerized mopidy
Requires=docker.service data-muzlo.mount                                                                                         $
After=docker.service data-muzlo.mount

[Service]
ExecStartPre=-/usr/bin/docker rm -f mopidy-instance
ExecStartPre=-/usr/bin/docker pull andreymalyshenko/mopidy:armhf
ExecStart=/usr/bin/docker run  --name mopidy-instance -p 6680:6680 -p 8011:8011 -v /data/muzlo:/media:ro -v /var/lib/mopidy:/var/$
ExecStartPost=/bin/sh -c 'while ! docker ps | grep mopidy-instance ; do sleep 0.2; done'
ExecStop=/usr/bin/docker rm -f mopidy-instance
TimeoutSec=0
RemainAfterExit=no
Restart=always

[Install]
WantedBy=multi-user.target
and now usual
$ sudo systemctl daemon-reload && sudo systemctl enable mopidy-docker.service && sudo systemctl start mopidy-docker.service
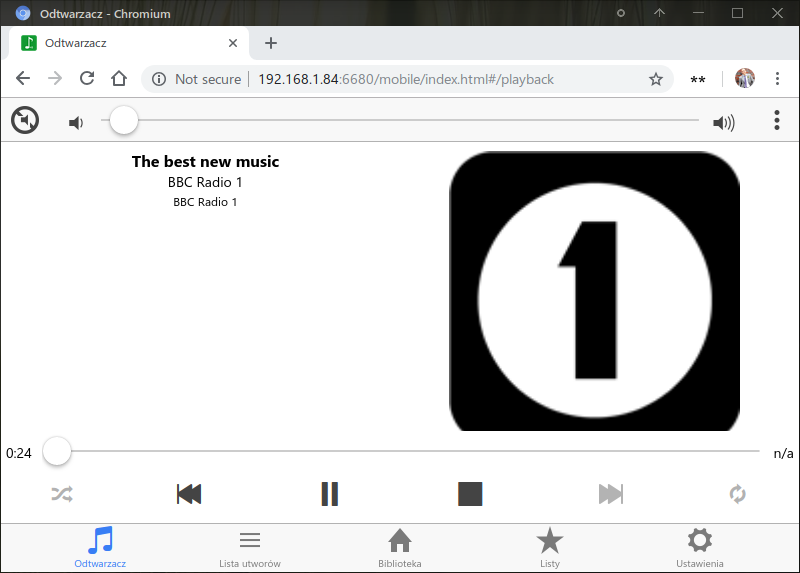
image will be loaded and after some time mopidy service will fire up
And last step is to assemble it all together. to be concluded
OrangePi Zero pulse music server using I2S DAC
Music server based on orange pi zero v.1.5 board, PCM5102 I2S DAC, and pulse server and mopidy running in docker on the software side.


Discussions
Become a Hackaday.io Member
Create an account to leave a comment. Already have an account? Log In.